第十二章 原理篇:vision transformer
参考教程:
https://arxiv.org/pdf/2010.11929.pdf
https://zhuanlan.zhihu.com/p/340149804 【大佬总结的非常好,他的好多篇文章都很值得学习】
文章目录
- 为什么会使用transformer
- VIT详解
-
- method
-
- 获得patch
- patch embedding
- position embedding
- 代码实现
-
- einops
-
- rearrange
- repeat
- reduce
- 获得patch
- cls token和pos embedding
- VIT forward
- TNT: transformer in transformer
为什么会使用transformer
transformer在NLP领域广泛使用,它解决了RNN的并行化问题,并且能适应不同的语境。
既然如此,为什么不能在图像领域也使用这样的方法呢?
我们知道计算机视觉中普遍使用的是卷积神经网络,通过卷积核在feature上滑动窗口处理,一层一层地传递信息,并得到图像的特征。
在卷积神经网络中,有一个很重要的概念——感受野。感受野就是你站在当前层的一个像素点,能看到的原始图像的像素范围有多大。对于一张图像,你使用3*3的核进行卷积处理,在得到的featuremap中,你的感受野大小就是3*3。此时再用一个3*3的核进行卷积处理,再新的featuremap中,你的感受野就是5*5。
受卷积核大小的限制,你需要堆叠很多的层才能得到比较大的感受野。为什么不直接使用大卷积核呢?一方面来说大卷积核计算也更复杂,但是效果并不如小卷积核好。另一方面3*3卷积作为最广泛使用的卷积,针对它的底层优化也比别的大小的做的要好。
做CNN的时候是只考虑感受野红框里面的资讯,而不是图片的全局信息。所以CNN可以看作是一种简化版本的self-attention。
或者可以反过来说,self-attention是一种复杂化的CNN,在做CNN的时候是只考虑感受野红框里面的资讯,而感受野的范围和大小是由人决定的。但是self-attention由attention找到相关的pixel,就好像是感受野的范围和大小是自动被学出来的
引用自:https://zhuanlan.zhihu.com/p/340149804
ps:这个大佬文章写的真的很不错,学到了很多。
你在做卷积的时候,人为设定的卷积核决定了你每步操作时元素所能观测到的范围,感受野中的一个点也只会和这个点附近的别的点存在联系,这个大小和范围取决于你的模型架构。
self-attention中,每个元素都能观测到其余的元素,并自我学习哪个元素对自己的影响更大,所以说这个范围和大小是自动学习的。
但是这种自学习也让模型更加flexible,对训练数据的要求也就越高。所以重新训练一个比较好的transformer模型也是比较困难的,好在我们可以站在前人的肩膀上,使用别人的预训练模型。
VIT详解
论文名称:《an image is worth 16x16 words: Transformers for Image Recognition at scale》

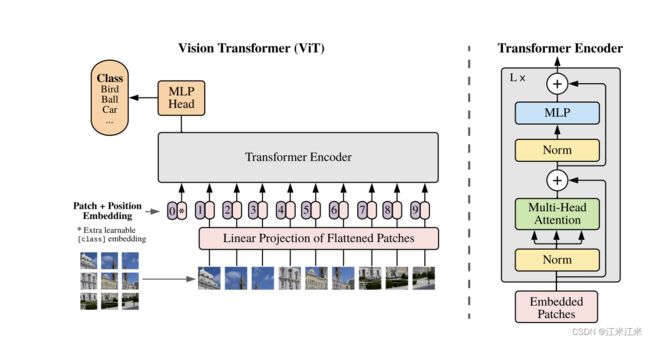
论文标题通俗易懂,再配合图片使用效果更好。一眼过去我们就能直接看到作者首先把一张图片分成了多个小块,然后处理后作为transformer encoder的输入。
也就是说它把图片分块处理后,当作一段文本中的连续单词,使用transformer的encoder来寻找一个单词与别的单词的联系,也就是寻找image patch之间的关系。
method
获得patch
论文中写到,一个标准的transformer会接受一个token embeddings的序列作为输入。现在输入变成了2D的图像,那么就把图像分割成一个p*p大小的patch,并且每个patch通过flatten展开,就变成了个长度为 p 2 p^2 p2的vector,vector的个数是 N = H W / p 2 N=HW/p^2 N=HW/p2。那么这样我们的输入也就变成了一个序列。N是序列的长度, p 2 p^2 p2是序列的维度。
通常情况下,对于一个输入大小为224*224的图像,假如要分成16*16大小的patch,那你就会得到14*14个长度为256的vector。
对于一个输入大小为224*224*224的图像,分成16*16大小的patch后,每一块都为16*16*3,那么你会得到14*14个长度为768的vector。
patch embedding
我们现在得到的是一个序列,序列的长度为N,每个元素都是一个大小为 p 2 p^2 p2*c的embedding。这和我们的目标之间还有一点点差距。假如说我们期望的给transformer encoder的输入大小为N*D,那么我们已经有N了,接下来就需要把 p 2 p^2 p2*c变成D。
z 0 = [ x c l a s s ; x p 1 E ; x p 2 E ; . . . ; x p N E ] + E p o s , E ∈ R ( P 2 ∗ C ) × D , E p o s ∈ R ( N + 1 ) × D z_0 = [x_{class}; x^1_pE; x^2_pE; ...; x^N_pE] + E_{pos}, E\in R^{(P^2* C)\times D}, E_{pos}\in R^{(N+1)\times D} z0=[xclass;xp1E;xp2E;...;xpNE]+Epos,E∈R(P2∗C)×D,Epos∈R(N+1)×D
这里的E可以看作一个全连接层,它的输入大小是 p 2 p^2 p2*c,输出大小是D,通过全连接层就可以把我们的N*( p 2 p^2 p2*c)变成N*D。
并且这里还追加了一个向量xclass。这里是学习了在BERT中的方法,追加的这个向量用于进行对全局特征的把控,并且它也是我们最终用于进行分类预测的向量。
position embedding
就像之前解释过的transformer的原理一样,通过一个元素的q和所有元素的k的内积来判断元素的关注点,它也存在一个问题,就是我们不知道元素的顺序,不知道它在整个文章中的位置。所以在输入encoder/decoder前,embedding上添加了一个额外的位置编码。
使用卷积神经网络的时候,featuremap中点的相对位置也不会随着卷积的进行而发生改变,假如你直接用编码后的image patch作为输入,你会发生你已经丢失了patch之间的相对位置信息。因此在这种情况下,我们也需要一个位置编码。
VIT论文中尝试比较了几个方法,比如:
- 直接按顺序排序。
- 加坐标形式的位置编码。
实验表明编码对学习是有帮助的,但是编码的方法影响不大。
代码实现
进行一些简单的代码实现。
其实可以和上一节原理解释放一起,分开放整体目录结构看着比较规整,所以还是分开放了。
核心的部分就是如何构建一个传入transformer encoder的输入。按照之前的解释:
- 把图像分成patch
- 图像编码成目标维度
- 增加一个额外的xclass
- 增加position embedding
然后获得的embedding就可以传入到模型中去。
那么我们现在就来一步一步完成这一部分。
einops
参考链接:https://github.com/arogozhnikov/einops
eniops是一个方便的进行张量操作的库。它支持多种数据类型,并且给出很直观的数据变换。它比较常用的函数包括:rearrange, reduce, repeat。看上去只有三个函数,但是它们的功能性很强。
在我们对输入图像分patch的操作中就会用到rearrange方法,所以先来了解一下这个库。
from einops import rearrange, reduce, repeat
# rearrange elements according to the pattern
output_tensor = rearrange(input_tensor, 't b c -> b c t')
# combine rearrangement and reduction
output_tensor = reduce(input_tensor, 'b c (h h2) (w w2) -> b h w c', 'mean', h2=2, w2=2)
# copy along a new axis
output_tensor = repeat(input_tensor, 'h w -> h w c', c=3)
rearrange
This operation includes functionality of transpose (axes permutation), reshape (view), squeeze, unsqueeze, stack, concatenate and other operations.
rearrange提供了一些维度变化上功能,比如transpose,squeeze等。我们来看个具体的使用例子。
rearrange(tensor: Union[Tensor, List[Tensor]], pattern: str, **axes_lengths) -> Tensor
它的输入是一个tensor或者tensor的序列,第二个输入是pattern,也就是你希望在这个tensor上做的变化,pattern的类型是字符串,你需要用类似文字描述的形式来定义这个pattern。axse_lengths是对一些变量值的具体定义。
>>> rearrange(images, 'b h w c -> (b h) w c').shape
    (960, 40, 3) # b和h两个维度被合并

    # concatenated images along horizontal axis, 1280 = 32 * 40
    >>> rearrange(images, 'b h w c -> h (b w) c').shape
    (30, 1280, 3) # b和w两个维度被合并

    # reordered axes to "b c h w" format for deep learning
    >>> rearrange(images, 'b h w c -> b c h w').shape
    (32, 3, 30, 40) # 维度c的和hw的位置变换
当然它也可以实现维度的拆解。或者别的组合方式。
# decomposition is the inverse process - represent an axis as a combination of new axes
# several decompositions possible, so b1=2 is to decompose 6 to b1=2 and b2=3
rearrange(ims, '(b1 b2) h w c -> b1 b2 h w c ', b1=2).shape
rearrange(ims, 'b h (w w2) c -> (h w2) (b w) c', w2=2)
repeat
einops.repeat allows reordering elements and repeating them in
arbitrary combinations.
This operation includes functionality of repeat, tile, broadcast functions.
repeat函数允许你对tensor的维度进行奇怪的重复+组合。
>>> repeat(image, 'h w -> h w c', c=3).shape
    (30, 40, 3)

    # repeat image 2 times along height (vertical axis)
    >>> repeat(image, 'h w -> (repeat h) w', repeat=2).shape
    (60, 40)

    # repeat image 2 time along height and 3 times along width
    >>> repeat(image, 'h w -> (h2 h) (w3 w)', h2=2, w3=3).shape
    (60, 120)

    # convert each pixel to a small square 2x2. Upsample image by 2x
    >>> repeat(image, 'h w -> (h h2) (w w2)', h2=2, w2=2).shape
    (60, 80)
reduce
python einops.reduce provides combination of reordering and
reduction using reader-friendly notation.
reduce函数允许你进行重排和缩减操作。
reduce(tensor: Tensor, pattern: str, reduction: Reduction, **axes_lengths: int) -> Tensor:
它的第一个输入是你的tensor,第二个输入代表你进行reduction的方式。
 # 2d max-pooling with kernel size = 2 * 2 for image processing
    >>> y1 = reduce(x, 'b c (h1 h2) (w1 w2) -> b c h1 w1', 'max', h2=2, w2=2)
    # Subtracting mean over batch for each channel
    >>> y = x - reduce(x, 'b c h w -> () c () ()', 'mean')
获得patch
把patch的获取和组合放在同一步。
- 图像取patch
- patch重组+全连接
patch的获取给出两种方法,第一种就是使用einops中的rearrange方法。
对于给定的img,使用pattern ''b c (h p1) (w p2) -> b (h w) (p1 p2 c)",将它的形状转变为 b*n* (p^2*c)的大小。也就是说我们的batchsize是b,每个输入是n* (p^2*c)。之后再用全连接把它传换成n*D。
class PatchEmbed(nn.Module):
    def __init__(self, img_size=224, patch_size=16, in_c=3, embed_dim=768, norm_layer=None):
        super().__init__()
        self.proj = Rearrange('b c (h p) (w p ) -> b (h w) (p1 p2 c)', p = patch_size)
        self.linear = nn.Linear(patch_size * patch_size * in_c, embed_dim)
        self.norm = norm_layer(embed_dim) if norm_layer else nn.Identity()

    def forward(self, x):
        x = self.proj(x)
        x = self.linear(x)
        x = self.norm(x)
        return x
第二种是使用卷积的方法。
class PatchEmbed(nn.Module):
    def __init__(self, img_size=224, patch_size=16, in_c=3, embed_dim=768, norm_layer=None):
        super().__init__()
        img_size = (img_size, img_size)
        self.proj = nn.Conv2d(in_c, embed_dim, kernel_size = patch_size, stride=patch_size)
        self.norm = norm_layer(embed_dim) if norm_layer else nn.Identity()

    def forward(self, x):
        # proj(x)把输入为 b, 3, 224, 224的img变成了b, 768, 14, 14
        # 然后flatten变成 b, 768, 196
        # 再tranpose变成b, 196, 768
        x = self.proj(x).flatten(2).transpose(1,2)
        x = self.norm(x)
        return x
cls token和pos embedding
得到原始的embedding后,比如说我们现在的embedding大小时b*196*768,我们需要给它增加一个额外的cls token,这个token会用于计算全局特征。
# 增加一个cls_token,大小为1,长度为emb_size。在我们的例子中就是1*768
cls_token = nn.Parameter(torch.randn(1,1, emb_size))
# 因为我们有batch组数据,所以使用repeat
# 这里也可以cls_token.expand(embed.shape[0],-1,-1)
cls_token = repeat(cls_token, '() n e -> b n e', b=b)
# embed是我们上一步得到的embedding,在b n e中n的维度进行concatenate
# 那我们现在得到的embedding大小为 b*197*768
embed = torch.cat([cls_token, embed], dim = 1)
position embedding直接按简单的方法生成就可以,不需要按照nlp中的整什么sincos的方法。
self.positions = nn.Parameter(torch.randn((img_size // patch_size) **2 + 1, emb_size))
这个position embedding和上一步得到的embedding的大小应该是保持一致的,都是197*768。
VIT forward
参考教程: https://github.com/google-research/vision_transformer
一步一步梳理一下我们的输入进入模型后都经过了怎样的处理。
- 输入img,获得patch,并转成embedding的形式。
- 增加cls embedding和position embedding。
- 进入transformer encoder构成的blocks。每个block由两部分组成:
- multi-head attention
- mlp
- 进入mlp分类头,输出结果。
需要注意的是,block中还是用layer_norm和残差结构。
可以简单写成
# 假设有n个block
while n:
	x = x + attention(norm(x))
	x = x + mlp(norm(x))
	n-=1
前两部我们现在已经完成了,所以接下来只要写一个block,然后重复使用这个block对数据进行处理就可以了。
class MultiHeadAttention(nn.Module):
    def __init__(self, emb_size, num_heads, dropout):
        super().__init__()
        self.emb_size = emb_size
        self.num_heads = num_heads
        head_dim = dim//num_heads
        self.scale = head_im**(-0.5) # 按照embedding大小进行缩放
        self.qkv = nn.Linear(emb_size, emb_size*3)
        self.dropout = nn.Dropout(dropout)
        self.projection = nn.Linear(emb_size, emb_size)

    def forward(self, x, mask = None):
        # 对于输入的大小为b*n*d的embedding,使用self.qkv变成b*n*(embedding*3)
        # 然后转变一个shape
        B, N, D = x.shape
        qkv = self.qkv(x).reshape(B, N, 3, self.num_heads, D//self.num_heads).permute(2,0,3,1,4)
        # qkv = rearrange(self.qkv(x), 'b n (h d qkv) -> qkv b h n d', h = self.heads, qkv=3)
        queries, keys, values = qkv[0], qkv[1], qkv[2]
        # 得到的每个大小都是 batchsize* num_heads* num_words * sub_embeding dim

        # 然后对q和k进行内积并求sortmax
        attn = (queries@keys.transpose(-2,-1)) * self.scale
        # energy = torch.einsum('bhqd, bhkd -> bhqk', queries, keys)
        attn = attn.softmax(dim=-1)
        # 这一步已经拿到softmax的接过了,下一步是和value加权求和

        out = (attn@values).transpose(1,2).reshape(B, N, D)
        # out = torch.einsum('bhnn, bhnd -> bhad ', att, values)
        # out = rearrange(out, "b h n d -> b n (h d)")
        out = self.projection(out)

        return out
我们的MLP就是比较常规简单的MLP。
class MLP(nn.Module):

    def __init__(self, in_features, hidden_features = None, out_feature=None, act_layer=nn.GELU, drop=0):
        super().__init__()

        self.fc1 = nn.Linear(in_features, hidden_features)
        self.act = act_layer()
        self.fc2 = nn.Linear(hidden_features, out_features)
        self.dropout = nn.Dropout(drop)

    def forward(self, x):
        x = self.f1(x)
        x = self.act(x)
        x = self.f2(x)
        x = self.act(x)
        return self.dropout(x)
TNT: transformer in transformer
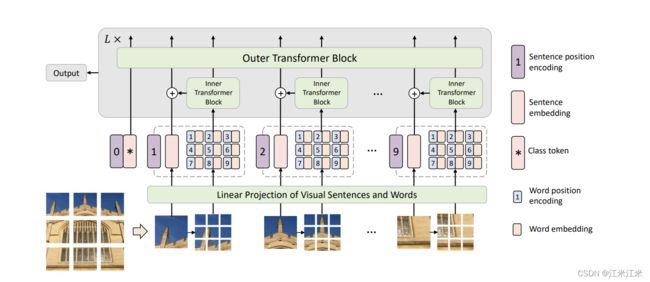
vit中把图像分成不同的patch。自然界中,图像的多样性是很高的,假如你的patch比较大,里面可能存在着很多相似度很高的subpatch。TNT的作者认为patch的划分粒度不够细,因此他将分好的patch再重新分成更多的subpatch。
比较大的patch被称为“visual sentences”, 比较小的subpatch被称为“visual words”。
图中的模型结构看起来也比较好理解。
