ViewOverlay-使用简单实践
ViewOverlay-使用简单实践
-
-
- 一、ViewOverlay能实现什么?
- 二、基础用法
-
- 2.1 一个简单案例
- 2.2 overlay.add(drawable)/groupOverlay.add(view)之后,不显示问题解决
- 2.2.1 add(Drawable)方法
- 2.2.1 add(View)方法
-
一、ViewOverlay能实现什么?
在Android中,ViewOverlay是一个特殊的视图层,可以在一个视图的上方添加和管理附加的视图层,而不会干扰原始视图的布局和交互。它提供了一种方便的方式来在运行时添加、移除或修改视图层,而无需修改原始布局。
二、基础用法
2.1 一个简单案例
比如我们想给一张图片加一张蒙层效果,蒙层颜色是#cc000000,那可以这样很简单的实现:
val imageView = ...
val colorDrawable = ColorDrawable(Color.parseColor("#cc000000"))
button.setOnClickListener {
    // 完全盖住ImageView
    // !!对于Drawable对象来说,必须调用setBounds()方法指定其宽高,否则不展示
    colorDrawable.setBounds(0, 0, imageView.measuredWidth, imageView.measuredHeight)
    imageView.overlay.add(colorDrawable)
}
imageView.overlay.remove(colorDrawable)
2.2 overlay.add(drawable)/groupOverlay.add(view)之后,不显示问题解决
2.2.1 add(Drawable)方法
如果直接将Drawable对象添加到imageView.overlay.add()没有setBounds则会因为Drawable没有宽高而无法展示,宽高可能为0,需要主动调用setBounds指定drawable的宽高。
2.2.1 add(View)方法
而对于add(View)来说(需要通过ViewGroup类型的容器对象getOverlay()),就需要给需要添加的view通过setLayoutParams的方式指定宽高才能展示。
注意View和ViewGroup的getOverlay方法实现的差异,是和ViewGroup有addView()而View没有是一样的道理。
- ViewGroup->getOverlay()返回ViewGroupOverlay类型对象,能添加view的浮层,也能添加drawable
   @Override
    public ViewGroupOverlay getOverlay() {
        if (mOverlay == null) {
            mOverlay = new ViewGroupOverlay(mContext, this);
        }
        return (ViewGroupOverlay) mOverlay;
    }
- View->getOverlay()返回ViewOverlay类型对象,无法addView(),只能添加drawable对象
    public ViewOverlay getOverlay() {
        if (mOverlay == null) {
            mOverlay = new ViewOverlay(mContext, this);
        }
        return mOverlay;
    }
特别的如果添加TextView,因为不同字体、大小都会导致宽高不同,所以预先无法知道,这时候就需要StaticLayout.getDesiredWidth()方法获取文本需要的宽高,然后设置给TextView。

测试代码:
布局文件:activity_overlay:
<layout xmlns:android="http://schemas.android.com/apk/res/android"
    xmlns:app="http://schemas.android.com/apk/res-auto"
    xmlns:tools="http://schemas.android.com/tools">

    <data class="ActivityOverlayBinding">

        <variable
            name="viewModel"
            type="com.yanggui.animatordemo.drawable.MyViewModel" />
    data>

    <FrameLayout
        android:layout_width="match_parent"
        android:layout_height="match_parent"
        android:orientation="vertical"
        tools:context=".drawable.OverlayActivity">

        <Button
            android:id="@+id/button_add"
            android:layout_width="wrap_content"
            android:layout_height="wrap_content"
            android:layout_marginTop="10dp"
            android:text="overlay测试-添加" />

        <Button
            android:id="@+id/button_remove"
            android:layout_width="wrap_content"
            android:layout_height="wrap_content"
            android:layout_marginTop="60dp"
            android:text="overlay测试-移除" />


        <include
            android:id="@+id/layout_sub"
            layout="@layout/layout_sub_module"
            android:layout_width="match_parent"
            android:layout_height="match_parent" />

    FrameLayout>
layout>
布局文件:layout_sub_module
<layout xmlns:android="http://schemas.android.com/apk/res/android">

    <data class="LayoutSubModuleBinding">

        <variable
            name="viewModel"
            type="com.yanggui.animatordemo.drawable.MyViewModel" />
    data>

    <LinearLayout
        android:id="@+id/container"
        android:layout_width="match_parent"
        android:layout_height="match_parent"
        android:gravity="bottom"
        android:orientation="vertical">

        <androidx.appcompat.widget.AppCompatImageView
            android:id="@+id/image_view"
            android:layout_width="wrap_content"
            android:layout_height="600dp"
            android:scaleType="centerCrop"
            android:src="@{viewModel.imageDrawable}" />
    LinearLayout>
layout>
- 从id为container的LinearLayout中添加文字TextView:
// 主布局
mBinding = DataBindingUtil.setContentView(this, R.layout.activity_overlay)
// include进来的布局,只为测试在databinding中使用include加载子布
// 局的调用使用方式
mSubBinding = mBinding.layoutSub
mBinding.buttonAdd.setOnClickListener {
    val tv = TextView(this)
    tv.text = "是神仙姐姐呀~"
    tv.isSingleLine = true
    tv.maxLines = 1
    // !!需要走一遍测量-》布局的过程确定View的宽高和位置,否则是无法展示的
    tv.measure(MeasureSpec.UNSPECIFIED, MeasureSpec.UNSPECIFIED)
    // 调用layout方法确定tv控件的摆放位置
    tv.layout(0, 800, 1600, 1800)
    Log.d(TAG, "buttonAdd click, tv.w = ${tv.measuredWidth}, tv.h = ${tv.measuredHeight}")
    // container是一个普通的LinearLayout布局容器
    mSubBinding.container.overlay.add(tv)
}
效果截图:
### 三、问题
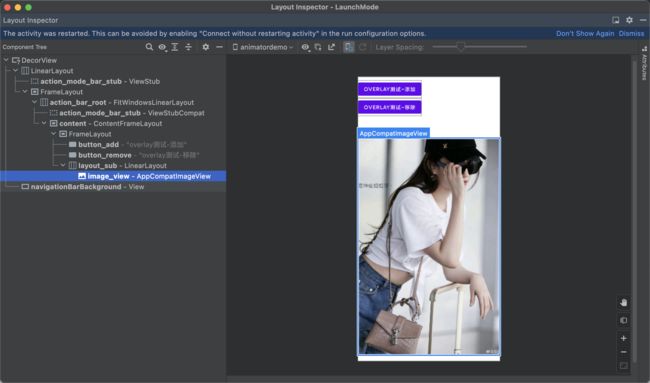
通过overlay方式添加view层级,通过AS的LayoutInspector工具抓布局居然看不到增加的View层级!!

