使用预训练的深度学习模型和 OpenCV 提取图像洞察力
如果我家的监控摄像头的照片可以告诉我后院的草变得越来越黄(受热压力),那么在炎热的夏天调整喷水灭火系统可能对我有用。
如果一个模型可以量化照片中体育场内人物的百分比,我们就可以用它来估计售出的门票数量。
人们可以通过比较整个时间的叶面积来使用照片监测植物生长。
你可以通过本文回答上述问题或愿望清单。
训练用于图像识别的深度学习神经网络模型通常很昂贵,训练像 CNN 这样的深度神经网络模型通常需要大量的训练数据和昂贵的 GPU 计算能力。
如何才能“站在巨人的肩膀上”?通过反复试验,发现使用具有计算机视觉(openCV 功能)的预训练深度学习模型可能是一种强大而有效的出路。
最终目标
到本文结束时,无需训练深度学习模型,你将能够
对图像进行分类并从图像中提取感兴趣区域。
提取图像的百分比,来自人或汽车或其他 16 个预先确定的类别
通过比较从草图像中提取的统计数据,了解花园里的草在炎热的夏天是否承受压力。
从草的照片中提取绿色直方图
预训练语义分割模型
训练了语义分割模型;模型工件和端点是按照 AWS 文档 [1] 创建的。
语义分割 (SS) 是将图像中的每个像素与来自一组已知标签的类进行分类的任务。
相比之下,图像分类只为每张图像生成一个标签,而对象检测为图像中的每个对象生成一个边界框和标签。
语义分割输出通常表示为图像中的不同像素值。
因此,输出是一个与输入图像具有相同形状的整数矩阵(或灰度图像)。此输出图像也称为分割掩码。
在本文中,我们将调用预训练的深度学习端点进行图像识别。
示例 1:从图像中提取洞察力:照片中人物的区域
下载,可视化照片,缩小照片尺寸
from matplotlib import pyplot as plt
import PIL

%matplotlib inline
#1. download photo save to local drive, visualize the photo and reduce size
filename = "./data/street.jpg"
width = 800

im = PIL.Image.open(filename)

aspect = im.size[0] / im.size[1]
im.thumbnail([width, int(width / aspect)], PIL.Image.ANTIALIAS)
im.save(filename, "JPEG")

plt.imshow(im)
plt.show()
照片尺寸调整为宽度 800,并保持原始纵横比。
使用预训练的深度学习模型
用户可以附加端点或模型工件以进行模型预测。在这里,我们使用 sagemaker 中的预训练端点。
建议使用更便宜的实例/虚拟机进行端点预测。在本教程中,我使用 ml.c5.xlarge 机器
# As with Estimators & training jobs, we can instead attach to an existing Endpoint:
ss_predictor = sagemaker.predictor.Predictor("XXX-2022-10-XX-XX-XX-XX-XX") # please fill your end point name here
设置序列化器和反序列化器
在 SageMaker SDK 中,Predictor 有一个关联的序列化器和反序列化器,它们控制数据如何转换为我们的 API 调用,并加载回 Python 结果对象。
当你需要通过网络发送数据或将数据存储在文件中时,通常会使用序列化程序。反序列化器反转将字节序列转换为对象的过程。
模型预测将返回类别概率矩阵。它将返回每个像素的所有类概率。
我们将定义一个自定义反序列化器来解压缩端点返回的 RecordIO 包装的 protobuf 内容。
让我们复制并粘贴一个预定义的图像反序列化器类,如下所示。可以在 AWS 文档 [1] 中找到有关此反序列化器的详细说明
import io
import tempfile
import mxnet as mx
from sagemaker.amazon.record_pb2 import Record

class SSProtobufDeserializer(sagemaker.deserializers.BaseDeserializer):
    """Deserialize protobuf semantic segmentation response into a numpy array"""
def __init__(self, accept="application/x-protobuf"):
        self.accept = accept

@property
    def ACCEPT(self):
        return (self.accept,)

def deserialize(self, stream, content_type):
        """Read a stream of bytes returned from an inference endpoint.
        Args:
            stream (botocore.response.StreamingBody): A stream of bytes.
            content_type (str): The MIME type of the data.
        Returns:
            mask: The numpy array of class confidences per pixel
        """
        try:
            rec = Record()

            # mxnet.recordio can only read from files, not in-memory file-like objects, so we buffer the
            # response stream to a file on disk and then read it back:

            with tempfile.NamedTemporaryFile(mode="w+b") as ftemp:
                ftemp.write(stream.read())
                ftemp.seek(0)
                recordio = mx.recordio.MXRecordIO(ftemp.name, "r")
                protobuf = rec.ParseFromString(recordio.read())
            values = list(rec.features["target"].float32_tensor.values)
            shape = list(rec.features["shape"].int32_tensor.values)

            # We 'squeeze' away extra dimensions introduced by the fact that the model can operate on batches
            # of images at a time:
            shape = np.squeeze(shape)
            mask = np.reshape(np.array(values), shape)
            return np.squeeze(mask, axis=0)
        finally:
            stream.close()

ss_predictor.deserializer = SSProtobufDeserializer()
设置序列化器
ss_predictor.serializer = sagemaker.serializers.IdentitySerializer("image/jpeg")

with open(filename, "rb") as imfi
模型预测
%%time

# create mask of image classification
cls_mask = ss_predictor.predict(imbytes)

print(type(cls_mask))
print(cls_mask.shape)
预测结果是预测类别的掩码(这里是人)
plt.imshow(cls_mask, cmap="jet")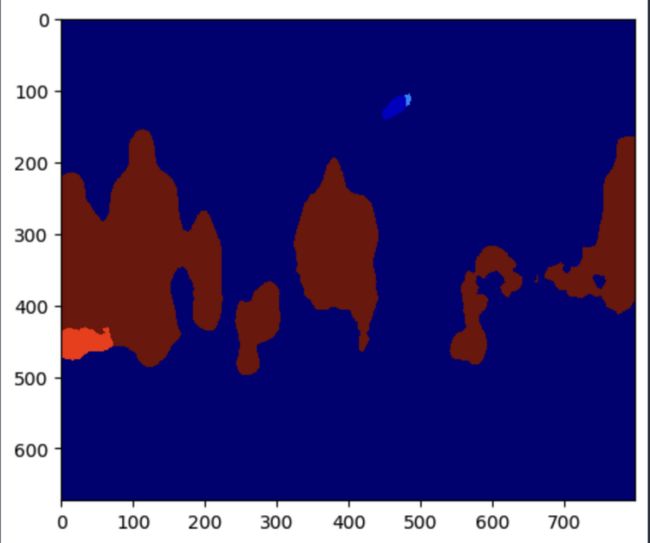
它突出了人的领域
我们可以获得特定类别的概率(这里是 people class=15)。预测类表可以在 AWS 文档 [1]中找到
target_cls_id = 15  # (people)
plt.imshow(prob_mask[target_cls_id, :, :], cmap="inferno")
plt.show()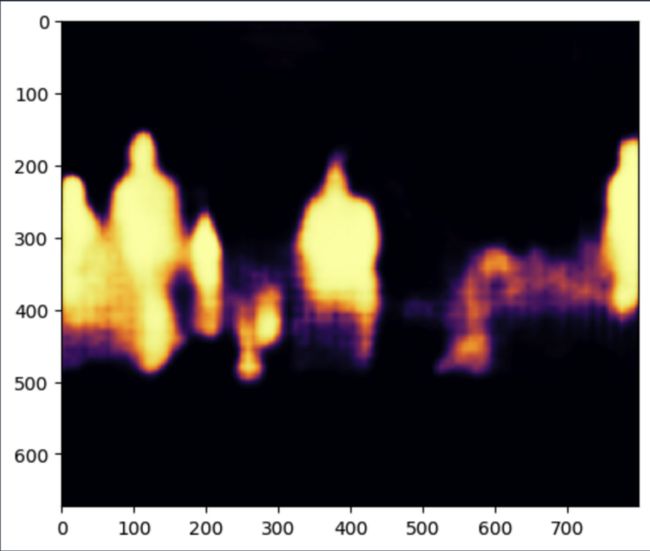
明亮的黄色意味着是一个人的可能性更高
我们可以使用 overlay 来方便人工审查:
imarray = np.array(PIL.Image.open(filename)) / 255.0  # Convert image pixels from 0-255 to 0-1
hilitecol = np.array((0.0, 1.0, 1.0, 1.0))  # Cyan, 100% opacity (RGBAlpha 0-1 range)

# Red-shift our image to make the cyan highlights more obvious:
imshifted = imarray.copy()
imshifted[:, :, 1] *= 0.6
imshifted[:, :, 2] *= 0.5

# Construct a mask with alpha channel taken from the model result:
hilitemask = np.tile(hilitecol[np.newaxis, np.newaxis, :], list(imarray.shape[:2]) + [1])
hilitemask[:, :, 3] = prob_mask[target_cls_id, :, :]

# Overlay the two images:
fig, (ax0, ax1, ax2) = plt.subplots(1, 3, figsize=(16, 6))
ax0.imshow(imarray)
ax0.axis("off")
ax0.set_title("Original Image")

ax2.imshow(hilitemask)
ax2.axis("off")
ax2.set_title("Highlight people Mask")

ax1.imshow(imshifted)
ax1.imshow(hilitemask)
ax1.axis("off")
ax1.set_title("Color-shifted Overlay")

plt.show()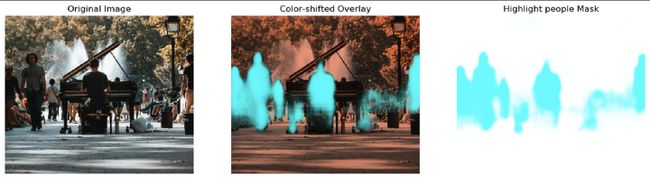
模型端点在识别人员区域方面做得很好。挑战区域:例如只有钢琴下面的部分人的腿被正确识别。
另一个视图是显示带有颜色条的蒙版
import matplotlib.gridspec as gridspec
from mpl_toolkits.axes_grid1 import make_axes_locatable

import matplotlib.gridspec as gridspec
from mpl_toolkits.axes_grid1 import make_axes_locatable

mask_tmp= np.where(cls_mask_2==15, 255, 0) # if class type is 15 or people, it will be assigned 255 or not be masked

# mask_tmp
plt.imshow(mask_tmp, cmap="jet")
divider = make_axes_locatable(plt.gca())
cax = divider.append_axes("left", "10 %", pad ="15 %")

plt.colorbar(im, cax = cax)
plt.show()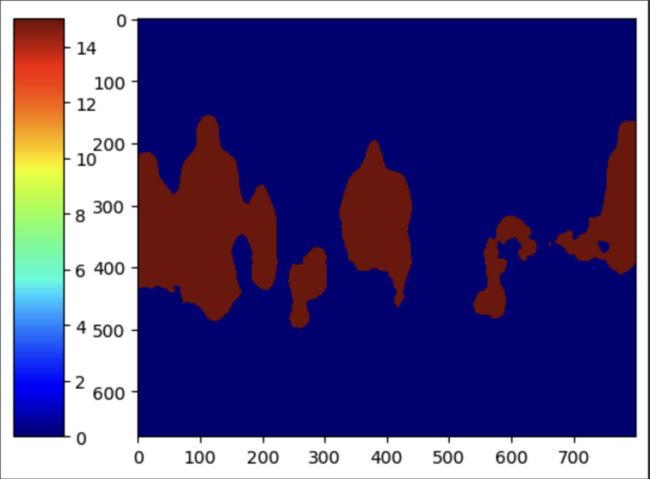
突出显示人员或类别代码 =15 的区域
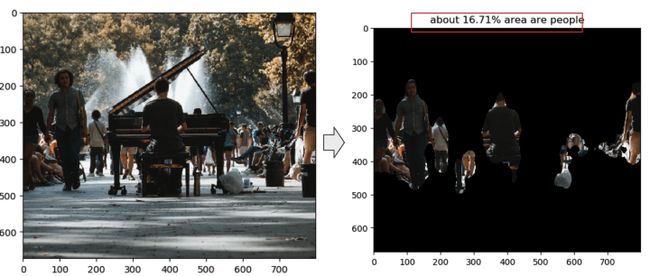
使用 mask area map mask_tmp,我们可以计算照片中人物所占区域的百分比。
size=mask_tmp.shape[0]*mask_tmp.shape[1]
people_area=round(np.sum(mask_tmp==255)/size*100,2)
然后使用 bitwise_and 函数屏蔽掉不是人的区域。
请注意,要允许 bitwise_and 函数工作,请务必确保输入 bitwise_and 函数的掩码为 uint8 格式。
mask_tmp1=mask_tmp.astype('uint8') # need to change the data format
masked_img1 = cv2.bitwise_and(img,img,mask = mask_tmp1)

plt.imshow(masked_img1)
plt.title(f'about {people_area}% area are people')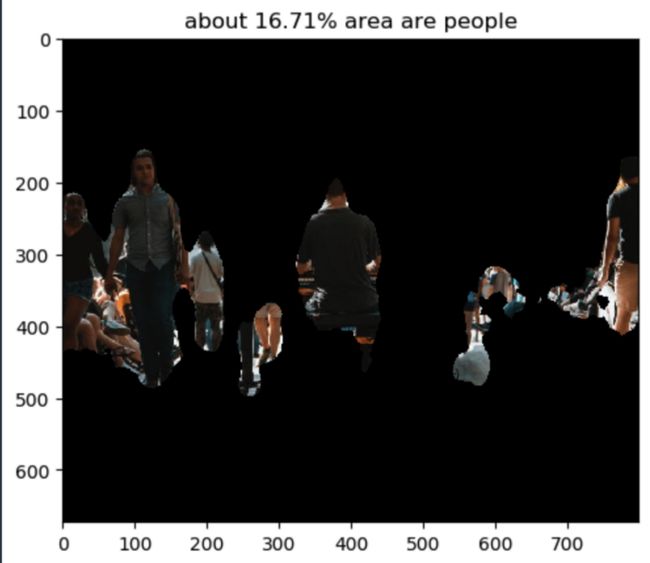
人的面积是经过计算的。总体而言,该模型在从这张非常繁杂的照片中识别人物方面做得很好
另一个有用的视图是使用 opencv 函数 cv2.bitwise_and 来显示感兴趣的区域
示例 2:使用 openCV 进行草地绿度比较。
如果监控摄像头的照片可以告诉我后院的草变黄了,那么在炎热的夏天调整喷水灭火系统可能对我有用。
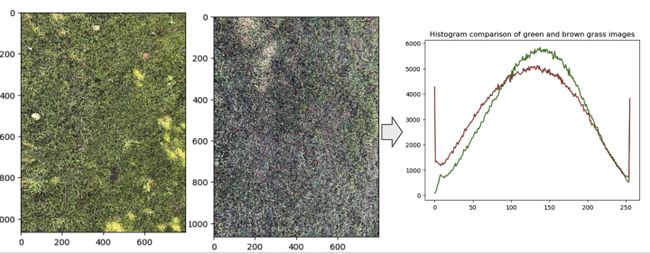
让我们加载两张我后院草地的照片。通过人眼,我们可以分辨出一个是绿色的,另一个是褐色的,需要更多的水。
def read_imgs(filename):
    objs = cv2.imread(filename)
    objs = cv2.cvtColor(objs, cv2.COLOR_BGR2RGB)
    plt.imshow(objs)
    return objs

greengrass=read_imgs("./data/green.jpg")
browngrass=read_imgs("./data/brown.jpg")
绿草如茵
棕色的草地
使用 openCV calcHist 函数计算上述草地照片绿色通道的直方图。换句话说,检查植物的绿色
objgrass, objmask=greengrass, greenmask
hist_mask1_values_obj = cv2.calcHist([objgrass],channels=[1],mask=objmask,histSize=[256],ranges=[0,256])
plt.plot(hist_mask1_values_obj, 'g')

objgrass, objmask=browngrass, brownmask
hist_mask2_values_obj = cv2.calcHist([objgrass],channels=[1],mask=objmask,histSize=[256],ranges=[0,256])

plt.plot(hist_mask2_values_obj, 'brown')
plt.title(f'Histogram comparison of green and brown grass images')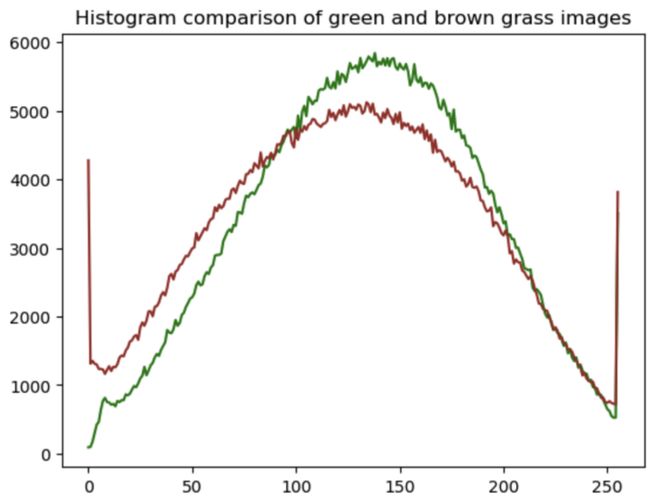
上图中绿色通道的绿色度或强度。绿色曲线来自绿草照片;棕色曲线来自棕色草地照片。棕色草照片的绿色峰值向左移动,这意味着绿色通道中的强度较低。所以,它不太绿。
虽然比较绿色度对人类来说是一项简单的任务,但在以下场景中使用模型和 openCV 将很有用:
scalable image recognition:对以上两张照片进行预测分析的时间为14ms。如果筛选几千张甚至更多的照片,会比人类快很多
从图像中提取见解:人们感兴趣的区域是一项众所周知的具有挑战性的任务。模型完成上述任务需要 20 毫秒,速度更快,更易于扩展且一致。
总之,使用预训练模型和 openCV 从图像中提取洞察力是使用深度学习模型的一种高效、低成本的方式。
参考
[1] AWS 语义分割模型: https://sagemaker-examples.readthedocs.io/en/latest/introduction_to_amazon_algorithms/semantic_segmentation_pascalvoc/semantic_segmentation_pascalvoc.html
[2] Bitwise_and和calcHist函数介绍: https://medium.com/@Stan_DS/three-tips-for-image-processing-in-python-bc4b80bd69da
☆ END ☆
如果看到这里,说明你喜欢这篇文章,请转发、点赞。微信搜索「uncle_pn」,欢迎添加小编微信「 woshicver」,每日朋友圈更新一篇高质量博文。
↓扫描二维码添加小编↓