【Vue学习】Vue高级特性
1. 自定义v-model
Vue中的自定义v-model指的是在自定义组件中使用v-model语法糖来实现双向绑定。在Vue中,通过v-model指令可以将表单元素的值与组件实例的数据进行双向绑定。但是对于自定义组件,如果要实现v-model的双向绑定,就需要自定义v-model的实现方式。
自定义v-model需要在自定义组件中提供一个value属性和一个input事件,并在组件模板中使用v-bind将value属性(text1)绑定到input元素的value属性上,并通过v-on监听input事件,当input事件触发时将输入框的值通过$emit方法发送出去。这样就可以在父组件中使用v-model语法糖来实现自定义组件的双向绑定了。
下面是一个自定义组件v-model的实例代码:
<template>
  <div>
    <input :value="text1" @input="$emit('change1', $event.target.value)">
  div>
template>

<script>
  export default {
  	model: {
		prop: 'text1',
		event: 'change1'
	},
    props: {
		text1 : String,
		default(){
			return ''
		}
	},
    // ...
  }
script>
在父组件中使用该组件,并使用v-model语法糖实现双向数据绑定:
<template>
  <div>
    <child-component v-model="message">child-component>
    <p>Message: {{ message }}p>
  div>
template>

<script>
  import ChildComponent from './ChildComponent.vue';

  export default {
    components: { ChildComponent },
    data() {
      return {
        message: ''
      }
    }
  }
script>
2. $nextTick
在Vue中,$nextTick是一个实例方法,它用于在DOM更新完成后执行一些操作,例如修改DOM、操作DOM元素等。它的作用是将回调函数延迟到下次DOM更新循环之后执行,从而确保在回调函数执行时,DOM已经被更新了。
$nextTick会将回调函数放入一个队列中,在下次DOM更新循环时执行该队列中的所有回调函数。这个过程可以确保在回调函数执行时,DOM已经被更新,因此可以进行一些操作,例如获取更新后的DOM节点、修改DOM属性等。
下面是一个使用$nextTick方法,获取组件data更新后的DOM长度的代码:
<template>
  <div id="app">
    <ul ref="ul1">
        <li v-for="(item, index) in list" :key="index">
            {{item}}
        li>
    ul>
    <button @click="addItem">添加一项button>
  div>
template>

<script>
export default {
  name: 'app',
  data() {
      return {
        list: ['a', 'b', 'c']
      }
  },
  methods: {
    addItem() {
        this.list.push(`${Date.now()}`)
        this.list.push(`${Date.now()}`)
        this.list.push(`${Date.now()}`)

        this.$nextTick(() => {
          // 获取 DOM 元素
          const ulElem = this.$refs.ul1
          // eslint-disable-next-line
          console.log( ulElem.childNodes.length )
        })
    }
  }
}
script>
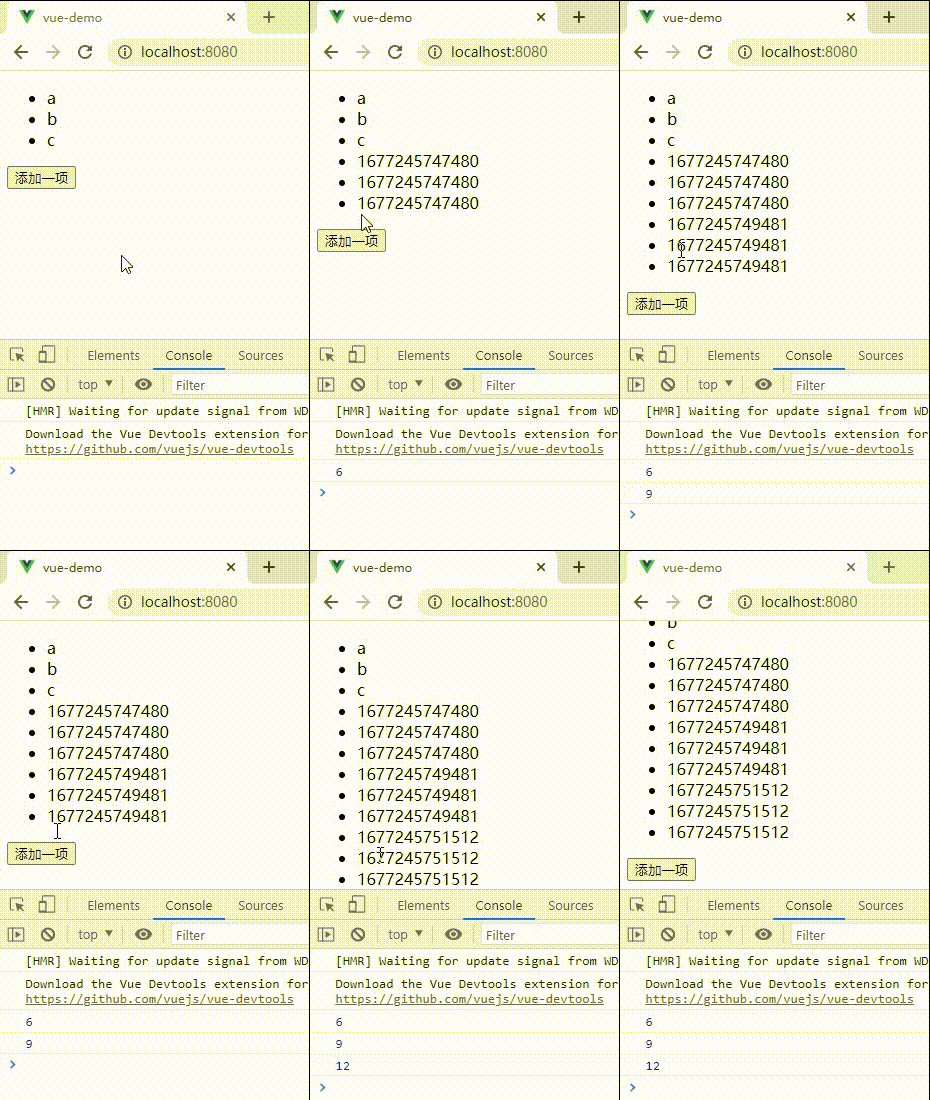
每点击’添加一项‘按钮后,会更新List数组,在数组中新添加3个元素,并打印出DOM元素的长度。如果不使用$nextTick方法,那么在第一次点击后打印的数字为3,然而DOM元素实际长度已经变为6了。下面是使用$nextTick方法的效果图,在第一次点击按钮后,打印的数字就是6。
3. slot 插槽
- 基本使用
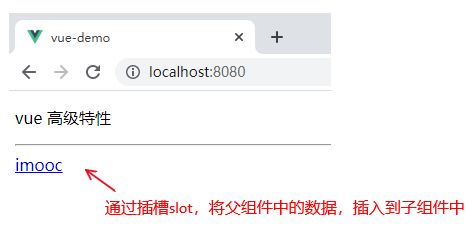
使用插槽的目的是父组件需要向子组件中插入一段内容。
<template>
    <div>
        <p>vue 高级特性p>
        <hr>

        <SlotDemo :url="website.url">
            {{website.title}}
        SlotDemo>
    div>
template>

<script>
import SlotDemo from './SlotDemo'

export default {
    components: {
        SlotDemo,
    },
    data() {
        return {
            name: '双越',
            website: {
                url: 'http://imooc.com/',
                title: 'imooc',
                subTitle: '程序员的梦工厂'
            },
        }
    }
}
script>
<template>
    <a :href="url">
        <slot>
            默认内容,即父组件没设置内容时,这里显示
        slot>
    a>
template>

<script>
export default {
    props: ['url'],
    data() {
        return {}
    }
}
script>
- 作用域插槽 ScopedSlot
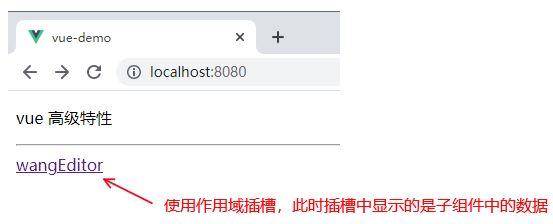
父组件希望使用子组件中的data数据作为插槽中的内容,可以使用作用域插槽。
<template>
    <div>
        <p>vue 高级特性p>
        <hr>

        <ScopedSlotDemo :url="website.url">
            <template v-slot="slotProps">
                {{slotProps.slotData.title}}
            template>
        ScopedSlotDemo>

    div>
template>

<script>
import ScopedSlotDemo from './ScopedSlotDemo'

export default {
    components: {
        ScopedSlotDemo,
    },
    data() {
        return {
            name: '双越',
            website: {
                url: 'http://imooc.com/',
                title: 'imooc',
                subTitle: '程序员的梦工厂'
            },
        }
    }
}
script>
<template>
    <a :href="url">
        <slot :slotData="website">
            {{website.subTitle}}
        slot>
    a>
template>

<script>
export default {
    props: ['url'],
    data() {
        return {
            website: {
                url: 'http://wangEditor.com/',
                title: 'wangEditor',
                subTitle: '轻量级富文本编辑器'
            }
        }
    }
}
script>
- 具名插槽
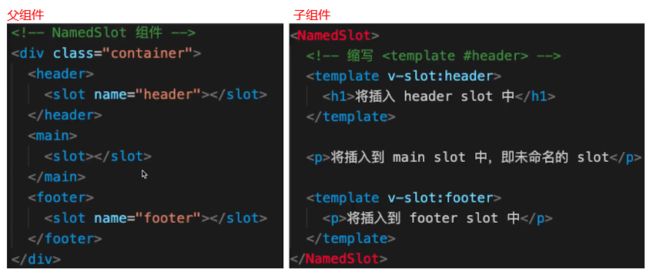
Vue中的具名插槽是指可以在一个组件中定义多个插槽,并使用不同的名称来标识它们的用途。相对于默认插槽,具名插槽可以更灵活地定制组件的样式和行为。
具名插槽可以在组件内部使用name属性来指定插槽的名称。如果在组件的使用者中,需要为具名插槽提供自定义的内容,可以使用v-slot指令来绑定具名插槽。
4. Vue 动态组件
Vue动态组件是一种在运行时动态选择要渲染的组件的技术。它可以根据不同的条件渲染不同的组件,从而使应用程序更加灵活和可扩展。在Vue中,使用特殊的组件元素is属性,它可以接受一个组件名或一个组件对象。当is属性的值发生变化时,
- 下面给出一个动态组件的使用场景:
假设我们有两个组件,一个是LoginForm,一个是SignupForm,它们分别表示登录和注册表单。我们希望根据用户点击的按钮来动态选择展示哪个表单。首先,需要在父组件中定义两个子组件,并设置一个变量currentForm来控制当前展示的组件,在这个父组件中,我们引入LoginForm和SignupForm组件,并使用currentForm变量初始值为空字符串,因此初始时不会渲染任何组件。当用户点击"登录"或“注册”按钮时,我们可以通过调用showLoginForm和showSignupForm方法来更新currentForm变量的值,从而动态渲染对应的表单组件。
<template>
  <div>
    <button @click="showLoginForm">登录button>
    <button @click="showSignupForm">注册button>
    <component :is="currentForm">component>
  div>
template>

<script>
import LoginForm from './LoginForm.vue'
import SignupForm from './SignupForm.vue'

export default {
  components: {
    LoginForm,
    SignupForm
  },
  data() {
    return {
      currentForm: ''
    }
  },
  methods: {
    showLoginForm() {
      this.currentForm = 'LoginForm'
    },
    showSignupForm() {
      this.currentForm = 'SignupForm'
    }
  }
}
script>
我们需要在子组件中定义具体的表单。假设LoginForm和SignupForm组件分别是以下形式:
<template>
  <form>
    <input type="text" placeholder="用户名">
    <input type="password" placeholder="密码">
    <button type="submit">登录button>
  form>
template>
<template>
  <form>
    <input type="text" placeholder="用户名">
    <input type="password" placeholder="密码">
    <input type="password" placeholder="确认密码">
    <button type="submit">注册button>
  form>
template>
5. Vue 异步组件
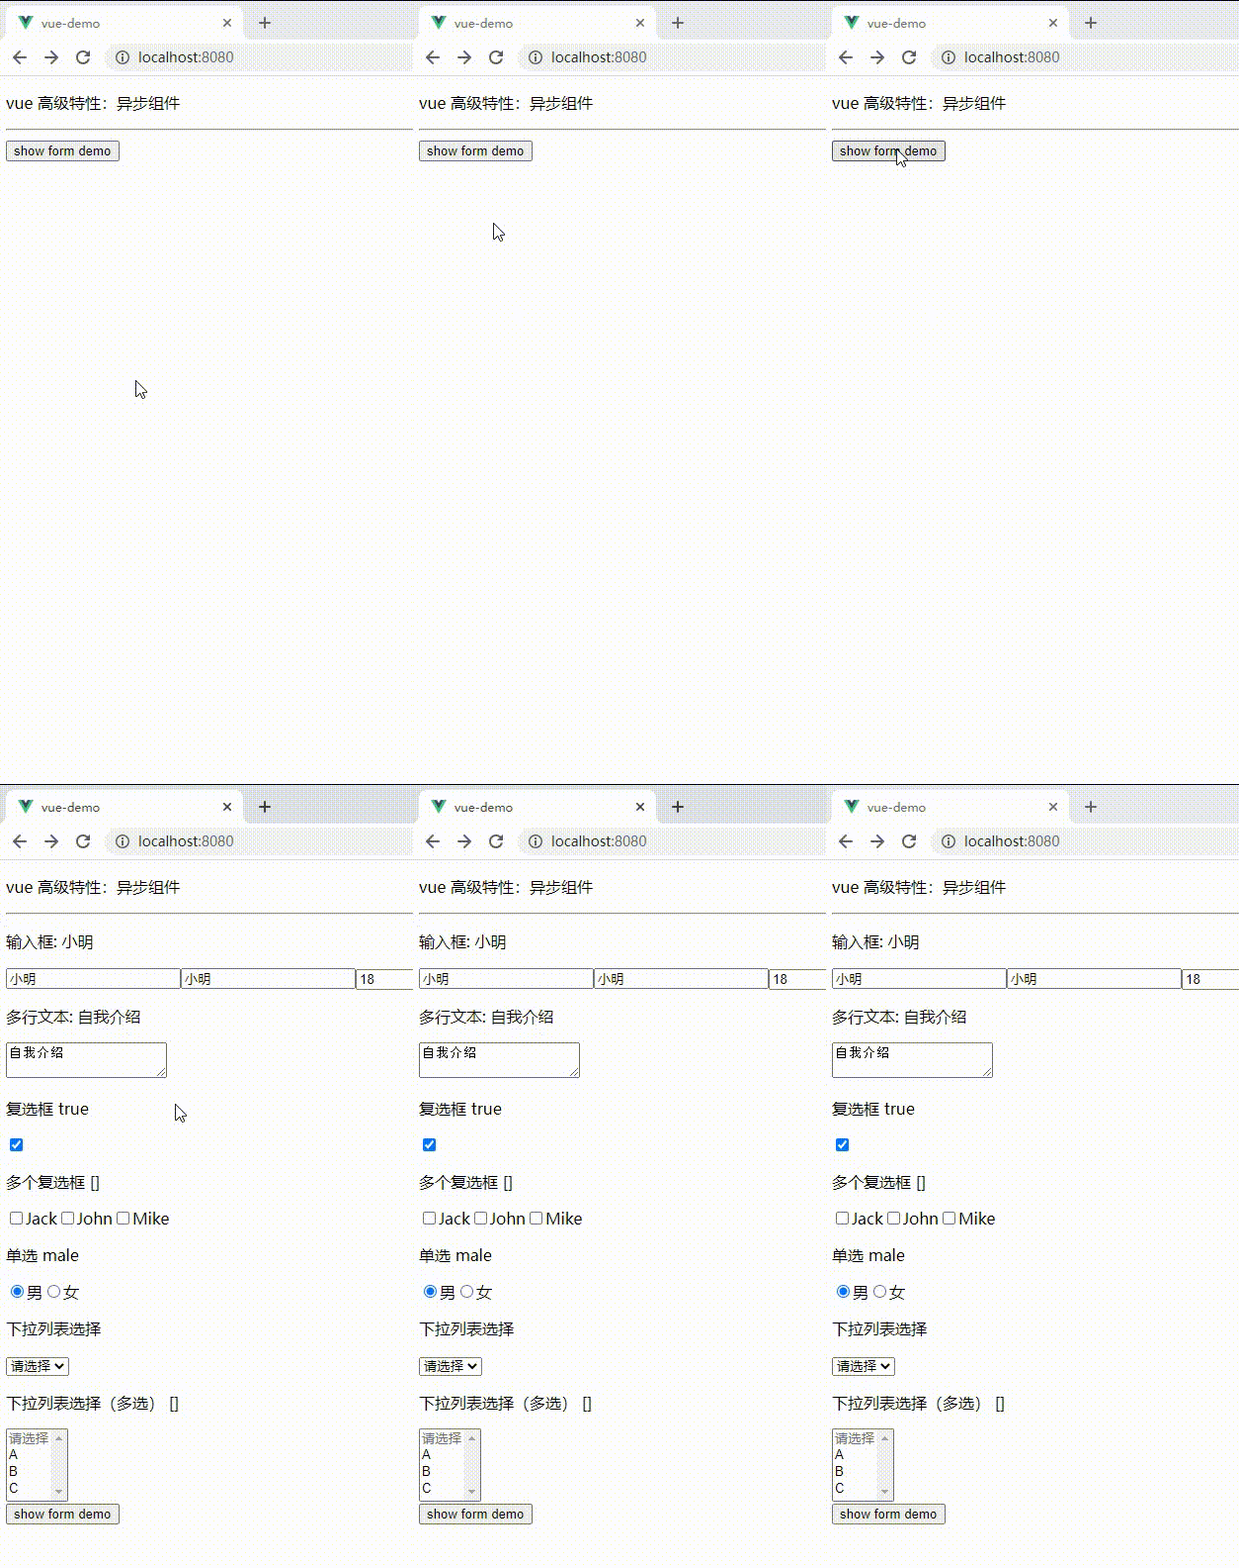
异步组件与常规组件的不同之处在于,异步组件只有在需要的时候才会被加载,而不是在应用初始化时就被全部加载。异步组件的应用场景是:当某个组件的体积比较大时,例如Echarts文件,如果应用初始化时就加载,会非常慢,严重影响性能。此时可以将该组件设置为异步组件,在需要使用该组件时,再加载该组件。异步组件通过import()函数引入。
以下代码中的FormDemo组件中包含多个表单,可以通过将其设置为异步组件,在需要的时候再将其加载。
<template>
    <div>
        <p>vue 高级特性:异步组件p>
        <hr>

        <FormDemo v-if="showFormDemo"/>
        <button @click="showFormDemo = true">show form demobutton>
    div>
template>

<script>

export default {
    components: {
        FormDemo: () => import('./FormDemo'),   // 使用import函数,引入需要异步渲染的组件
    },
    data() {
        return {},
		showFormDemo: false      // 首先将异步组件的 v-if 属性值设置为 false
    }
}
script>
6. 使用 keep-alive 缓存组件
keep-alive是Vue内置的一个组件,可以将其用于需要缓存的动态组件,避免每次重新渲染时都要执行组件的 created() 、mounted()、destoryed()等钩子函数,从而提高组件的性能。
keep-alive 组件可以包裹动态组件,使其被缓存。被缓存的组件在组件切换时并不会被销毁,而是被保留在内存中,下次需要渲染时直接从缓存中读取组件实例,避免了组件的重新创建和重新渲染。
<template>
    <div>
        <button @click="changeState('A')">Abutton>
        <button @click="changeState('B')">Bbutton>
        <button @click="changeState('C')">Cbutton>

        <keep-alive>
            <KeepAliveStageA v-if="state === 'A'"/>
            <KeepAliveStageB v-if="state === 'B'"/>
            <KeepAliveStageC v-if="state === 'C'"/>
        keep-alive>
    div>
template>

<script>
import KeepAliveStageA from './KeepAliveStateA'
import KeepAliveStageB from './KeepAliveStateB'
import KeepAliveStageC from './KeepAliveStateC'

export default {
    components: {
        KeepAliveStageA,
        KeepAliveStageB,
        KeepAliveStageC
    },
    data() {
        return {
            state: 'A'
        }
    },
    methods: {
        changeState(state) {
            this.state = state
        }
    }
}
script>
<template>
    <p>state Ap>
template>

<script>
export default {
    mounted() {
        console.log('A mounted')
    },
    destroyed() {
        console.log('A destroyed')
    }
}
script>
<template>
    <p>state Bp>
template>

<script>
export default {
    mounted() {
        console.log('B mounted')
    },
    destroyed() {
        console.log('B destroyed')
    }
}
script>
<template>
    <p>state Cp>
template>

<script>
export default {
    mounted() {
        console.log('C mounted')
    },
    destroyed() {
        console.log('C destroyed')
    }
}
script>
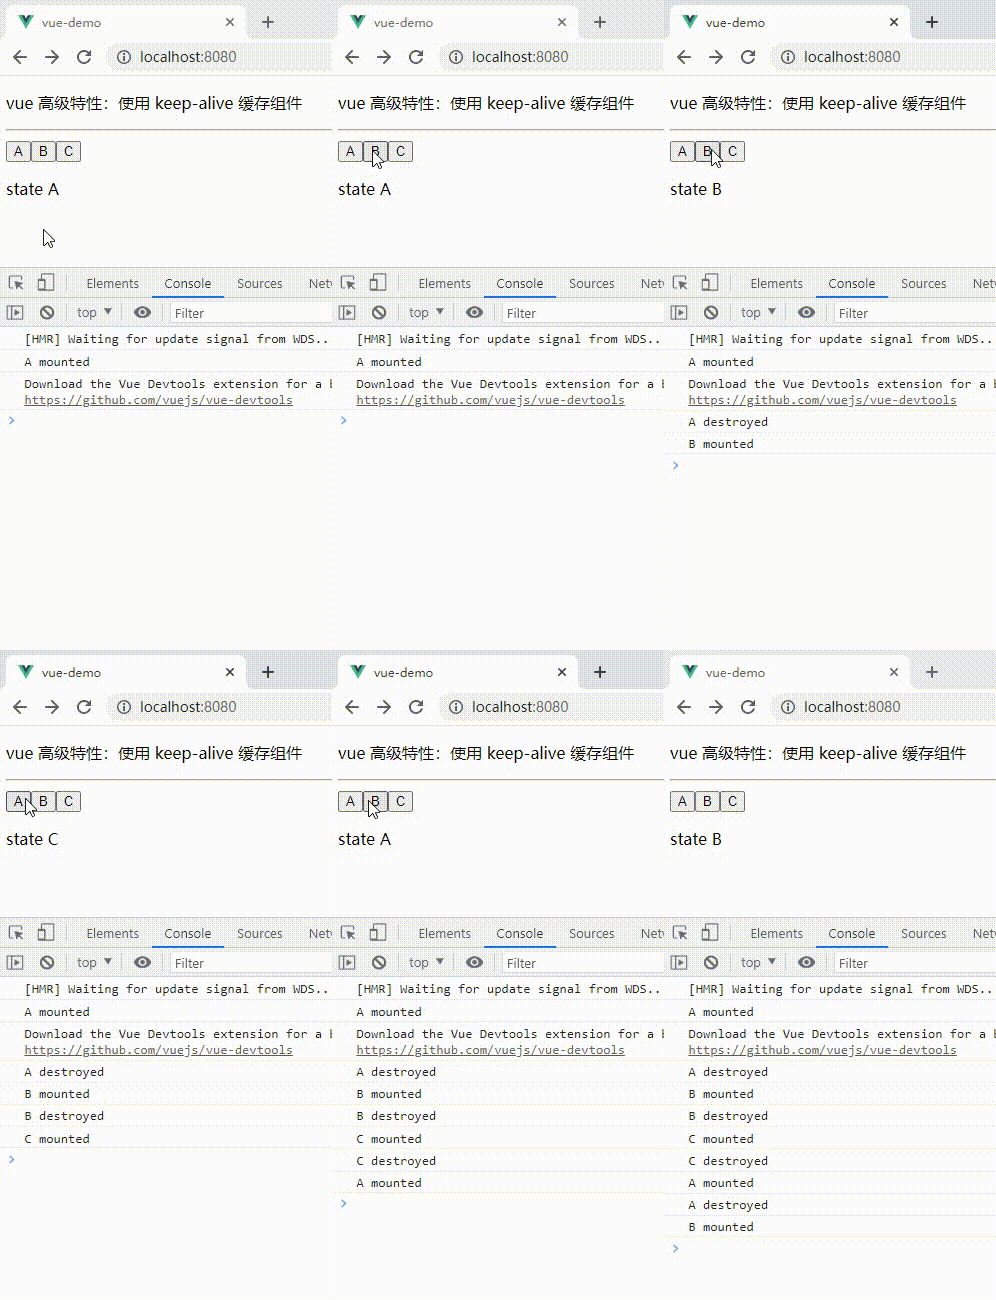
当组件没有被keep-alive组件包裹时,每次渲染新的组件就会执行当前已渲染组件的destoryed()函数,然后再执行需要渲染组件的mounted()函数,效果如下图所示:
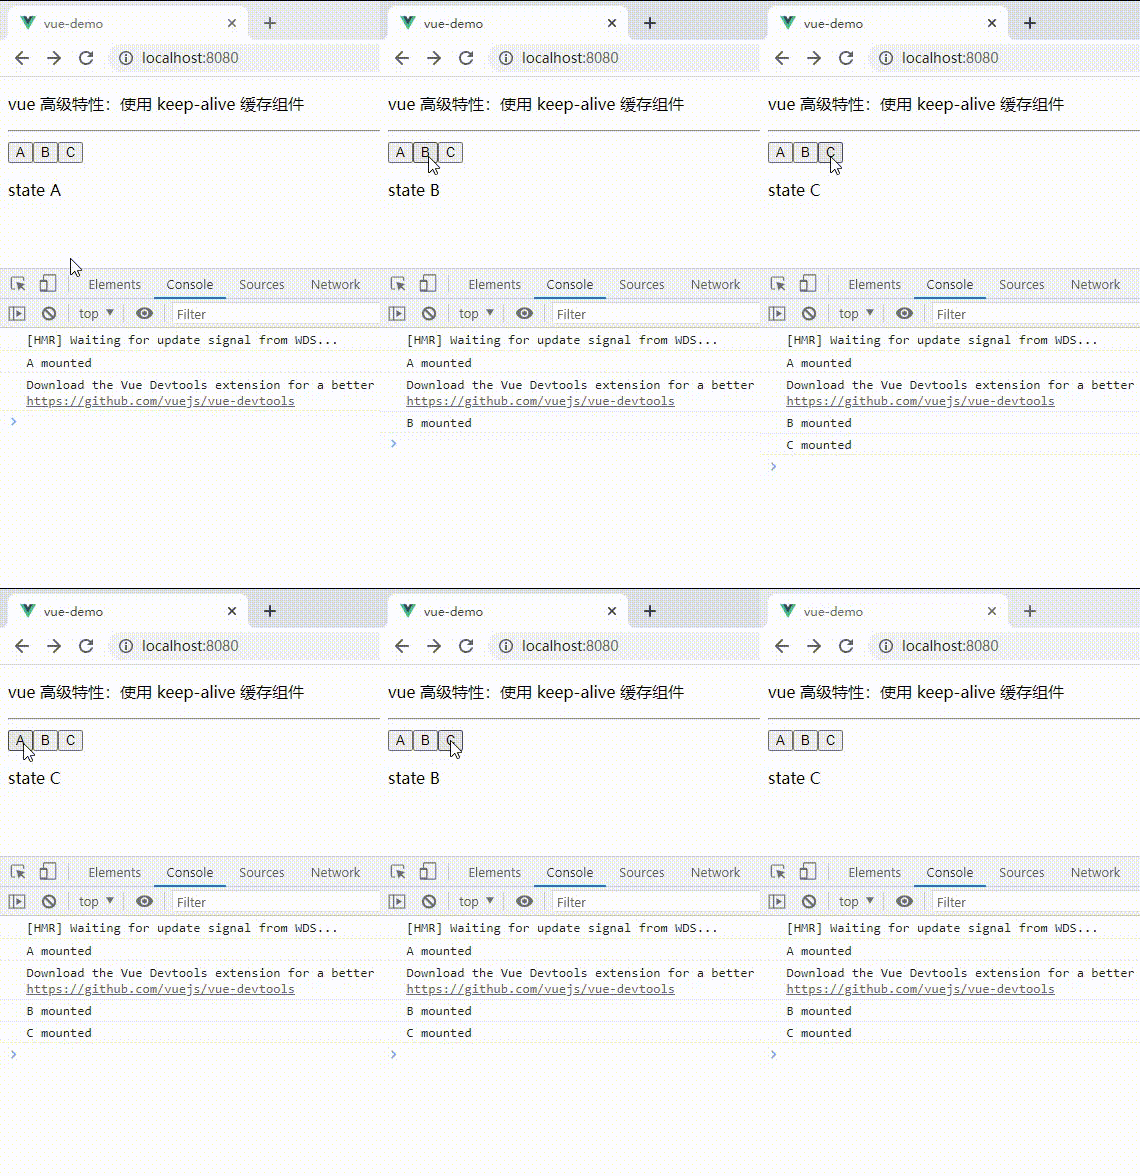
如果将需要渲染的组件通过keep-alive组件包裹起来,那么当前页面中已渲染的组件不会执行destoryed()函数,渲染过的组件也不会再次执行mounted()函数,效果如下图所示:
7. mixin 混入
在Vue中,mixin是一种可重用组件的机制,它可以将一组选项混入到多个Vue组件中。使用mixin,可以将通用的选项抽象出来,然后在需要的组件中混入这些选项,从而实现代码复用和逻辑共享。
mixin存在一些问题:
- 变量来源不明确,不利于阅读
- 多个mixin可能会造成命名冲突
- mixin和组件可能会出现多对多的关系,复杂度高
<template>
    <div>
        <p>{{name}} {{major}} {{city}}p>
        <button @click="showName">显示姓名button>
    div>
template>

<script>
import myMixin from './mixin'

export default {
    mixins: [myMixin], // 可以添加多个,会自动合并起来
    data() {
        return {
            name: '小明',
            major: 'web 前端'
        }
    },
    methods: {
    },
    mounted() {
        console.log('component mounted', this.name)
    }
}
script>
混入的文件通常是一个js文件:
// mixin.js
export default {
    data() {
        return {
            city: '北京'
        }
    },
    methods: {
        showName() {
            console.log(this.name)
        }
    },
    mounted() {
        console.log('mixin mounted', this.name)
    }
}
