Angular 基础操作之 - 懒加载(Lazy Load)
默认情况下,NgModules 是贪婪加载的,这意味着一旦应用程序加载,所有 NgModules 也会加载,无论它们是否立即需要。 对于有很多路由的大型应用程序,可以考虑延迟加载——一种根据需要加载 NgModules 的设计模式。 延迟加载有助于保持较小的初始包大小,从而有助于减少加载时间。
惰性加载入门
要惰性加载 Angular 模块,请在 AppRoutingModule routes 中使用 loadChildren 代替 component 进行配置,代码如下。
const routes: Routes = [
  {
    path: 'items',
    loadChildren: () => import('./items/items.module').then(m => m.ItemsModule)
  }
];
在惰性加载模块的路由模块中,添加一个指向该组件的路由。
const routes: Routes = [
  {
    path: '',
    component: ItemsComponent
  }
];
分步设置
建立惰性加载的特性模块有两个主要步骤:
- 使用 --route 标志,用 CLI 创建特性模块。
- 配置相关路由。
建立应用
输入下列命令,其中的
customer-app表示你的应用名称:ng new customer-app –routing这会创建一个名叫
customer-app的应用,而--routing标识生成了一个名叫app-routing.module.ts的文件,它是你建立惰性加载的特性模块时所必须的。 输入命令cd customer-app进入该项目。创建一个带路由的特性模块
接下来,你将需要一个包含路由的目标组件的特性模块。 要创建它,在终端中输入如下命令,其中
customers是特性模块的名称。加载customers特性模块的路径也是customers,因为它是通过--route选项指定的:ng generate module customers --route customers --module app.module这将创建一个
customers文件夹,在其customers.module.ts文件中定义了新的可惰性加载模块CustomersModule。该命令会自动在新特性模块中声明CustomersComponent。因为这个新模块想要惰性加载,所以该命令不会在应用的根模块
app.module.ts中添加对新特性模块的引用。 相反,它将声明的路由customers添加到以--module选项指定的模块中声明的routes数组中。const routes: Routes = [ { path: 'customers', loadChildren: () => import('./customers/customers.module').then(m => m.CustomersModule) } ];注意,惰性加载语法使用
loadChildren,其后是一个使用浏览器内置的import('...')语法进行动态导入的函数。 其导入路径是到当前模块的相对路径。
添加另一个特性模块
使用同样的命令创建第二个带路由的惰性加载特性模块及其桩组件。
ng generate module orders --route orders --module app.module这将创建一个名为
orders的新文件夹,其中包含OrdersModule和OrdersRoutingModule以及新的OrdersComponent源文件。 使用--route选项指定的orders路由,用惰性加载语法添加到了app-routing.module.ts文件内的routes数组中。const routes: Routes = [ { path: 'customers', loadChildren: () => import('./customers/customers.module').then(m => m.CustomersModule) }, { path: 'orders', loadChildren: () => import('./orders/orders.module').then(m => m.OrdersModule) } ];
创建 UI
虽然你也可以在地址栏中输入 URL,不过导航 UI 会更好用,也更常见。 把
app.component.html中的占位脚本替换成一个自定义的导航,以便你在浏览器中能在模块之间导航。{{title}}
要想在浏览器中看到你的应用,就在终端窗口中输入下列命令:
ng serve然后,跳转到
localhost:4200,这时你应该看到 "customer-app" 和三个按钮。这些按钮生效了,因为 CLI 会自动将特性模块的路由添加到
app-routing.module.ts中的routes数组中。
导入与路由配置
CLI 会将每个特性模块自动添加到应用级的路由映射表中。 通过添加默认路由来最终完成这些步骤。 在
app-routing.module.ts文件中,使用如下命令更新routes数组:const routes: Routes = [ { path: 'customers', loadChildren: () => import('./customers/customers.module').then(m => m.CustomersModule) }, { path: 'orders', loadChildren: () => import('./orders/orders.module').then(m => m.OrdersModule) }, { path: '', redirectTo: '', pathMatch: 'full' } ];前两个路径是到
CustomersModule和OrdersModule的路由。 最后一个条目则定义了默认路由。空路径匹配所有不匹配先前路径的内容。
特性模块内部
接下来,仔细看看
customers.module.ts文件。如果你使用的是 CLI,并按照此页面中的步骤进行操作,则无需在此处执行任何操作。import { NgModule } from '@angular/core'; import { CommonModule } from '@angular/common'; import { CustomersRoutingModule } from './customers-routing.module'; import { CustomersComponent } from './customers.component'; @NgModule({ imports: [ CommonModule, CustomersRoutingModule ], declarations: [CustomersComponent] }) export class CustomersModule { }customers.module.ts 文件导入了 customers-routing.module.ts 和 customers.component.ts 文件。@NgModule的 imports 数组中列出了 CustomersRoutingModule,让 CustomersModule 可以访问它自己的路由模块。CustomersComponent 位于 declarations 数组中,这意味着 CustomersComponent 属于 CustomersModule。
然后,app-routing.module.ts 会使用 JavaScript 的动态导入功能来导入特性模块 customers.module.ts。
专属于特性模块的路由定义文件 customers-routing.module.ts 将导入在 customers.component.ts 文件中定义的自有特性组件,以及其它 JavaScript 导入语句。然后将空路径映射到 CustomersComponent。
import { NgModule } from '@angular/core';
import { Routes, RouterModule } from '@angular/router';

import { CustomersComponent } from './customers.component';


const routes: Routes = [
  {
    path: '',
    component: CustomersComponent
  }
];

@NgModule({
  imports: [RouterModule.forChild(routes)],
  exports: [RouterModule]
})
export class CustomersRoutingModule { }
这里的 path 设置为空字符串,因为 AppRoutingModule 中的路径已经设置为 customers,因此,CustomersRoutingModule 中的此路由已经位于 customers 这个上下文中。此路由模块中的每个路由都是其子路由。
另一个特性模块中路由模块的配置也类似。
import { OrdersComponent } from './orders.component';

const routes: Routes = [
  {
    path: '',
    component: OrdersComponent
  }
];
确认它工作正常
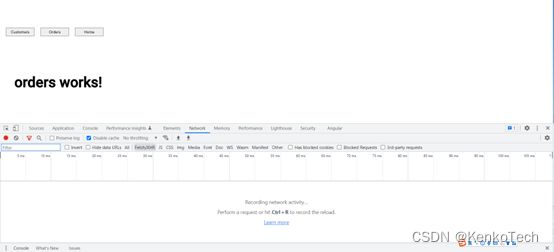
你可以使用 Chrome 开发者工具来确认一下这些模块真的是惰性加载的。 在 Chrome 中,按
Cmd+Option+i(Mac)或Ctrl+Shift+j(PC),并选中Network页标签。点击 Orders 或 Customers 按钮。如果你看到某个 chunk 文件出现了,就表示一切就绪,特性模块被惰性加载成功了。Orders 和 Customers 都应该出现一次 chunk,并且它们各自只应该出现一次。


