RabbitMQ 集群部署
RabbiMQ是用Erlang开发的,集群非常方便,因为Erlang天生就是一门分布式语言,但其本身并不支持负载均衡。
RabbitMQ的集群节点包括内存节点、磁盘节点。RabbitMQ支持消息的持久化,也就是数据写在磁盘上,最合适的方案就是既有内存节点,又有磁盘节点。
RabbitMQ模式大概分为以下三种:
- 单一模式;
- 普通模式(默认的集群模式);
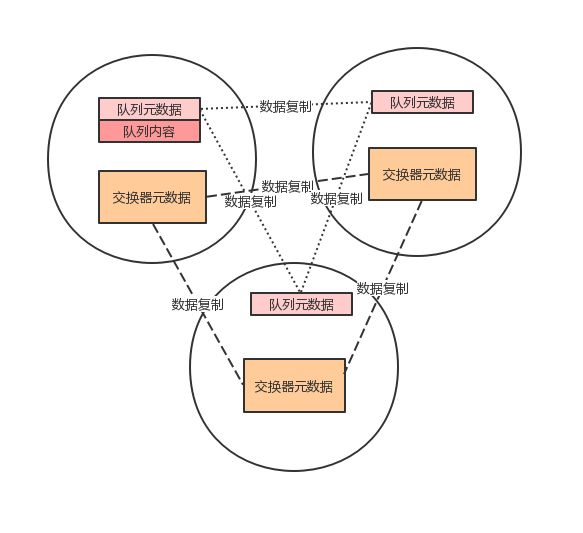
- 镜像模式(把需要的队列做成镜像队列,存在于多个节点,属于
RabbiMQ的HA方案,在对业务可靠性要求较高的场合中比较适用)。 要实现镜像模式,需要先搭建一个普通集群模式,在这个模式的基础上再配置镜像模式以实现高可用。
1. 集群架构 #
2. 集群部署规划 #
item |
node 1 |
node 2 |
node 3 |
|---|---|---|---|
listeners.tcp.default |
5000 | 5100 | 5200 |
management.tcp.port |
5020 | 5120 | 5220 |
mqtt.listeners.tcp.default |
5040 | 5140 | 5240 |
3. 安装文件 #
下载文件
请下载
unix generic版本
-
以
3.9.11版本为例: https://github.com/rabbitmq/rabbitmq-server/releases/download/v3.9.11/rabbitmq-server-generic-unix-3.9.11.tar.xz -
其他版本下载:https://github.com/rabbitmq/rabbitmq-server/releases
解压文件
xz -d rabbitmq-server-generic-unix-3.9.11.tar.xz

tar xvf rabbitmq-server-generic-unix-3.9.11.tar
复制成功!
4. 集群部署 #
4.1 创建文件目录 #
分别创建三个节点(
node)目录,多个以此类推node-N
cd /data

mkdir -p rabbitmq/dc3/node-01 rabbitmq/dc3/node-02 rabbitmq/dc3/node-03
复制成功!
将解压的
rabbitmq文件放入到每个节点中,其他节点操作一致
cp -r rabbitmq-server/* rabbitmq/dc3/node-01/

# pwd
# /data/rabbitmq/dc3/node-01

# ls
# escript  etc  plugins  sbin  share
复制成功!
为每个节点创建配置和
keys目录,其他节点操作一致
cd node-N

mkdir -p etc/rabbitmq keys
复制成功!
4.2 配置文件 #
在每个节点的
etc/rabbitmq下添加配置文件advanced.config、rabbitmq.conf、rabbitmq-env.conf、enabled_plugins
4.2.1 advanced.config #
[


 %% ----------------------------------------------------------------------------
 %% Advanced Erlang Networking/Clustering Options.
 %%
 %% See https://www.rabbitmq.com/clustering.html for details
 %% ----------------------------------------------------------------------------
 %% Sets the net_kernel tick time.
 %% Please see http://erlang.org/doc/man/kernel_app.html and
 %% https://www.rabbitmq.com/nettick.html for further details.
 %%
 %% {kernel, [{net_ticktime, 60}]},
 %% ----------------------------------------------------------------------------
 %% RabbitMQ Shovel Plugin
 %%
 %% See https://www.rabbitmq.com/shovel.html for details
 %% ----------------------------------------------------------------------------

 {rabbitmq_shovel,
  [{shovels,
    [%% A named shovel worker.
     %% {my_first_shovel,
     %%  [

     %% List the source broker(s) from which to consume.
     %%
     %%   {sources,
     %%    [%% URI(s) and pre-declarations for all source broker(s).
     %%     {brokers, ["amqp://user:[email protected]/my_vhost"]},
     %%     {declarations, []}
     %%    ]},

     %% List the destination broker(s) to publish to.
     %%   {destinations,
     %%    [%% A singular version of the 'brokers' element.
     %%     {broker, "amqp://"},
     %%     {declarations, []}
     %%    ]},

     %% Name of the queue to shovel messages from.
     %%
     %% {queue, <<"your-queue-name-goes-here">>},

     %% Optional prefetch count.
     %%
     %% {prefetch_count, 10},

     %% when to acknowledge messages:
     %% - no_ack: never (auto)
     %% - on_publish: after each message is republished
     %% - on_confirm: when the destination broker confirms receipt
     %%
     %% {ack_mode, on_confirm},

     %% Overwrite fields of the outbound basic.publish.
     %%
     %% {publish_fields, [{exchange,    <<"my_exchange">>},
     %%                   {routing_key, <<"from_shovel">>}]},

     %% Static list of basic.properties to set on re-publication.
     %%
     %% {publish_properties, [{delivery_mode, 2}]},

     %% The number of seconds to wait before attempting to
     %% reconnect in the event of a connection failure.
     %%
     %% {reconnect_delay, 2.5}

     %% ]} %% End of my_first_shovel
    ]}
   %% Rather than specifying some values per-shovel, you can specify
   %% them for all shovels here.
   %%
   %% {defaults, [{prefetch_count,     0},
   %%             {ack_mode,           on_confirm},
   %%             {publish_fields,     []},
   %%             {publish_properties, [{delivery_mode, 2}]},
   %%             {reconnect_delay,    2.5}]}
  ]},

  {rabbitmq_auth_backend_ldap, [
    %%
    %% Authorisation
    %% =============
    %%

    %% The LDAP plugin can perform a variety of queries against your
    %% LDAP server to determine questions of authorisation. See
    %% https://www.rabbitmq.com/ldap.html#authorisation for more
    %% information.

    %% Set the query to use when determining vhost access
    %%
    %% {vhost_access_query, {in_group,
    %%                       "ou=${vhost}-users,ou=vhosts,dc=example,dc=com"}},

    %% Set the query to use when determining resource (e.g., queue) access
    %%
    %% {resource_access_query, {constant, true}},

    %% Set queries to determine which tags a user has
    %%
    %% {tag_queries, []}
  ]}
].
复制成功!
4.2.2 rabbitmq.conf #
## This example configuration file demonstrates various settings
## available via rabbitmq.conf. It primarily focuses core broker settings
## but some tier 1 plugin settings are also covered.
##
## This file is AN EXAMPLE. It is NOT MEANT TO BE USED IN PRODUCTION. Instead of
## copying the entire (large!) file, create or generate a new rabbitmq.conf for the target system
## and populate it with the necessary settings.
##
## See https://rabbitmq.com/configure.html to learn about how to configure RabbitMQ,
## the ini-style format used by rabbitmq.conf, how it is different from `advanced.config`,
## how to verify effective configuration, and so on.
##
## See https://rabbitmq.com/documentation.html for the rest of RabbitMQ documentation.
##
## In case you have questions, please use RabbitMQ community Slack and the rabbitmq-users Google group
## instead of GitHub issues.

# ======================================
# Core broker section
# ======================================


## Networking
## ====================
##
## Related doc guide: https://rabbitmq.com/networking.html.
##
## By default, RabbitMQ will listen on all interfaces, using
## the standard (reserved) AMQP 0-9-1 and 1.0 port.
##
listeners.tcp.default = 5000


## To listen on a specific interface, provide an IP address with port.
## For example, to listen only on localhost for both IPv4 and IPv6:
##
# IPv4
# listeners.tcp.local    = 127.0.0.1:5672
# IPv6
# listeners.tcp.local_v6 = ::1:5672

## You can define multiple listeners using listener names
# listeners.tcp.other_port = 5673
# listeners.tcp.other_ip   = 10.10.10.10:5672


## TLS listeners are configured in the same fashion as TCP listeners,
## including the option to control the choice of interface.
##
# listeners.ssl.default = 5030

## It is possible to disable regular TCP (non-TLS) listeners. Clients
## not configured to use TLS and the correct TLS-enabled port won't be able
## to connect to this node.
# listeners.tcp = none

## Number of Erlang processes that will accept connections for the TCP
## and TLS listeners.k
##
# num_acceptors.tcp = 10
# num_acceptors.ssl = 10

## Socket writer will force GC every so many 