MATLAB和c#混合编程实现心电图显示软件

由于MATLAB自带的GUI平台设计的界面不是很美观而且设计过程并不是很方便,我们选择了用c#来做软件界面的实现。我们用MATLAB做信号处理封装成函数,把函数编译成dll格式,然后用c#调用MATLAB的函数即可。在设计过程中遇到两个主要的麻烦,一个是MATLABc#数值类型的转化问题,而且c#函数多输出、多输入问题是从来没有遇到过的,另一个问题是实现动态的绘制心电曲线,我最后通过一个定时器不断的刷新画图解决了这个问题。下面详细介绍实现过程。

1 c#调用matlab函数

matlab版本2013ac#版本vs2010.

1.1  matlab函数编译成dll文件

1)首先编写一个函数的m文件,如MatrixOpera表示两个矩阵相加和相减。

%--------------------------------------------------------

function [addRlt,minusRlt]=MatrixOpera(a,b)

矩阵相加,相减

[m1,n1]=size(a);

[m2,n2]=size(b);

if m1~=m2 || n1~=n2

    display('矩阵大小不相同')

    error('参数错误');

end

addRlt=a+b;

minusRlt=a-b;

end

%-----------------------------------------------------------

两个输入参数,两个输出参数,并且都是矩阵形式

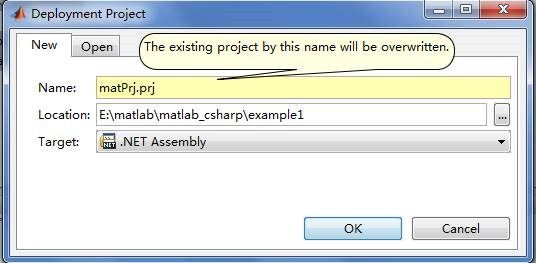
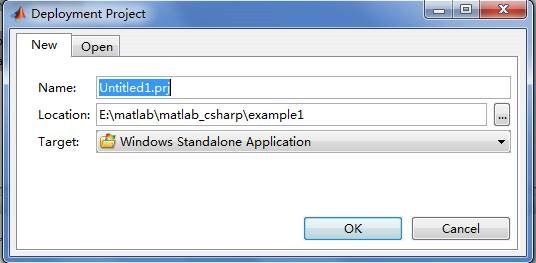
2)在matlab 命令窗口输入deploytool,弹出如下窗口

MATLAB和c#混合编程实现心电图显示软件_第1张图片

或者点击matlab的主菜单 desktopdeploy tool获得如下面图所示的窗口,然后在filenewdeployment project 中点击。获得上图窗口,修改工程名称和文件后缀名(必须是,.Net Assembly格式)

MATLAB和c#混合编程实现心电图显示软件_第2张图片


clip_image005MATLAB和c#混合编程实现心电图显示软件_第3张图片


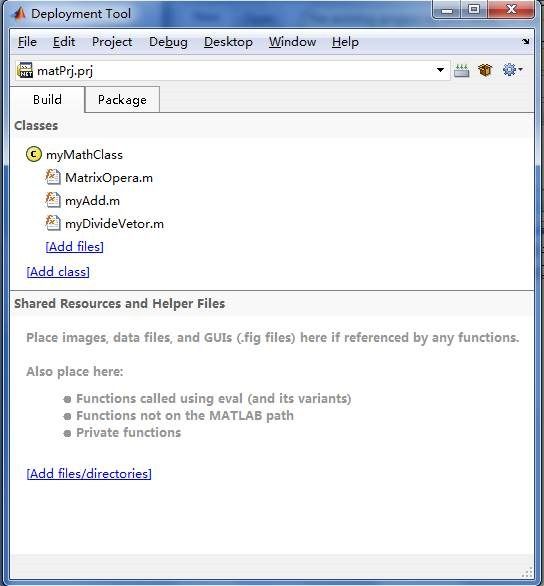
3)新建了一个叫matPrj的工程(它相当于c#中的命名空间namespace);然后给它增加class或类(它就是c#中的类),点[add class]比如myMathClass;之后再给它添加方法(它就是函数了),点[add files],如下图所示。本实例中给它添加了MatrixOpera等函数。

clip_image008clip_image009clip_image010clip_image010[1]MATLAB和c#混合编程实现心电图显示软件_第4张图片

4)完了之后就可以编译了。编译出来后需要一两分钟的时间。

clip_image013clip_image014MATLAB和c#混合编程实现心电图显示软件_第5张图片

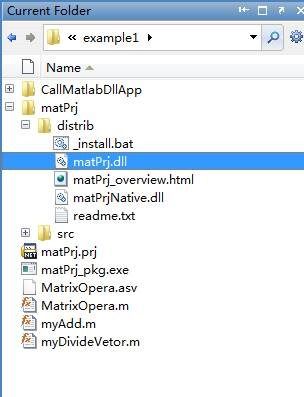
5)找到该工程存放的文件夹,从里面拷出matPrj.dll文件。同时还要从G:\Program Files\MATLAB\R2009b\toolbox\dotnetbuilder\bin\win32\v2.0拷贝出MWArray.dllManagedCPPAPI.netmodule。第二个文件必须要哦,否则可能会出错。

MATLAB和c#混合编程实现心电图显示软件_第6张图片

1.2  c#添加matlabdll引用

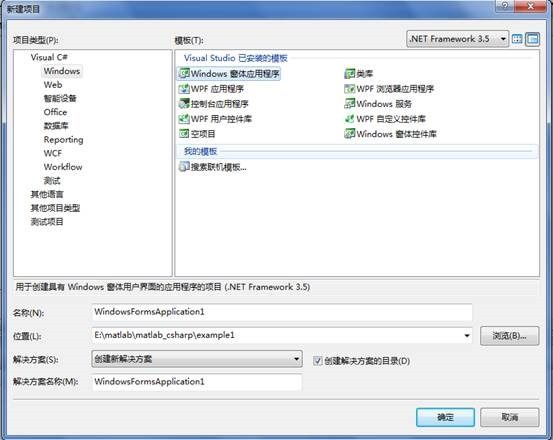
1)打开vs2008,新建一个窗体应用程序。

MATLAB和c#混合编程实现心电图显示软件_第7张图片

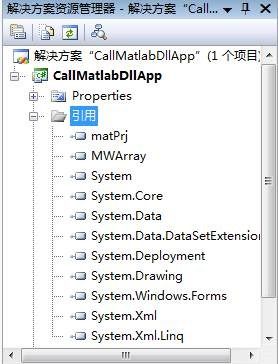
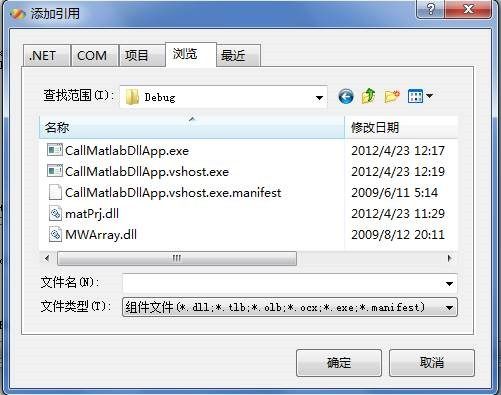
2)将刚才拷贝到的那3个文件一起放在vs工程(CallMatlabDllApp)的debug文件夹下面。然后右键下图中的引用,选择添加引用,弹出一个窗口,选择其中的浏览页面,分别添加matPrj.dll文件和MWArray.dll文件。

clip_image021clip_image022MATLAB和c#混合编程实现心电图显示软件_第8张图片

MATLAB和c#混合编程实现心电图显示软件_第9张图片


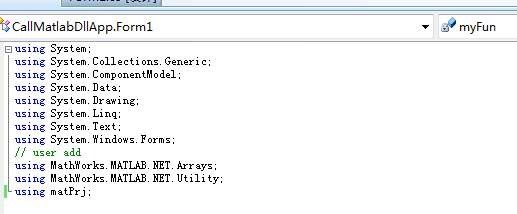
3)最后在前面,代码的前面添加下面的命名空间即可。

using MathWorks.MATLAB.NET.Arrays;//在MWArray.dll,最常用的

using MathWorks.MATLAB.net.Utility;// 在MWArray.dll,最常用的

using matPrj;//这个就是我们自己定义的,里面有matlab函数

如果matlab函数复杂,还需要用到其他的空间,则视情况而定,自己凭经验添加。

clip_image027MATLAB和c#混合编程实现心电图显示软件_第10张图片

至此,已经可以利用c#调用我们用matlab编写的函数了。

1.3  函数调用

函数调用前必须注意:

1)将c#的参数输入到matlab函数时,要将参数转化为matlab的参数形式,通常是MWArray类型。

2matlab返回的参数,也要转化为c#用的类型,比如数组或者数值类型。

直接将值传递给已经初始化的MWArray数组中的成员

直接将数据类型赋值给已经初始化的MWNumericArray变量。

直接将字符串类赋值给已经初始化的MWCharArray变量。

如果是数组类型:

直接赋值给MWNumericArray变量;

赋值给MWArray变量,则在前面加上类型转换如:(MWNumericArray)进行强制转换。

总之,MWArray是总类型,其它的以MW开头,以Array结尾的变量类型都可以直接对它进行赋值或取值。

M类型到C++/C#数据类型

MWArray

M类型,它是M文件的编译后内部的标准类型,一切C++/C#类型都要最终转换成此类型,方可作为参数调用M语言函数。

MWCharArray

M的字符串类型,使用它可以将M中的字符类型转换成C++/C#的字符串类型。

MWNumericArray

MWNumericArrayMWArrayC#等语言的转换中间类型。

常用的转换函数:     

① public Array ToArray(MWArrayComponent component);

M类型转换成C#Array类型,然后可以直接转换成其它类型的数组。

② public byte ToScalarByte();

M类型转换成C#的字节类型;

③ public double ToScalarDouble();

M类型转换成C#的双精度类型;

double temp = ((MWNumericArray)(mwArgout[0])).ToScalarDouble();

④ public float ToScalarFloat();

M类型转换成C#的单精度类型;

⑤ public int ToScalarInteger();

M类型转换成C#的整型类型;

⑥ public long ToScalarLong();

M类型转换成C#的长整C/C++/C#数据型类型;

⑦ public short ToScalarShort();

M类型转换成C#的短整型类型;

⑧  public override string ToString();

M类型转换成C#的字符串类型;string arror = mwArgout[2].ToString();

⑨  public Array ToVector(MWArrayComponent component);

M类型转换成C#Array类型,然后可以直接转换成其它类型的数组。

下面使用调试过的代码示例表述①⑨两个函数的区别:

double[,] Temp1 = new double[1,3];          

Temp1= (double[,])((MWNumericArray)mwArgout[1]).ToArray(MWArrayComponent.Real);

double[] s1 = new double[2];               

s1 = (double[])((MWNumericArray)mwArgout[1]).ToVector(MWArrayComponent.Real);

3)必须注意到多参数输入和多参数返回的问题。刚开始碰到这个这个问题比较头疼,后来经过不懈的努力,终于从网上找到答案。

声明这部分是我参考别人的想法自己写的额,网上百度知道也有我(lwq123_321)回答的。

//输入这里想传入的2个输入参数,为了支持矩阵好通用,所以得弄成Array

            double[] a = { 1, 2, 3, 4, 5, 6 };//输入参数1

            double[] b = { 2, 4, 6, 8, 10, 12 };//输入参数2

            double[,] c = new double[3, 2];//输出参数1

            double[,] d = new double[3, 2];//输出参数2

//这些参数都是矩阵

            MWNumericArray ma = new MWNumericArray(3, 2, a);//转换成matlab需求的格式

            MWNumericArray mb = new MWNumericArray(3, 2, b);

//输出参数是一个MWArray数组

            MWArray[] agrsOut = new MWArray[2];//两个输出参数,一定要写数量

            //输出几个输出参数可以是不同类型的,比如第一个元素是矩阵,第二个是数值

 //同理,输入参数也是一个MWArray数组

            MWArray[] agrsIn = new MWArray[] { ma,mb};

//调用函数,输出参数需要加 ref 关键字

            myFun.MatrixOpera(2, ref agrsOut, agrsIn);

                        //2表示输入参数的个数,输出结构都在argsOut中,类似于c的指针参数输入

//转换得到实际的输出参数

            MWNumericArray x1 = agrsOut[0] as MWNumericArray;

                       MWNumericArray x2 = agrsOut[1] as MWNumericArray;

                       c = (double[,])x1.ToArray();

                      d = (double[,])x2.ToArray();

//一定要注意最后cd的转化,不同类型的转换差异很大厄

//ToArray()对应n*m的数组

//ToScalarDouble()对应单个数值

//ToVetor()对应1维数组

到此,已经实现了c#调用matlab函数的整个过程。

2软件界面的设计

2.1软件设计

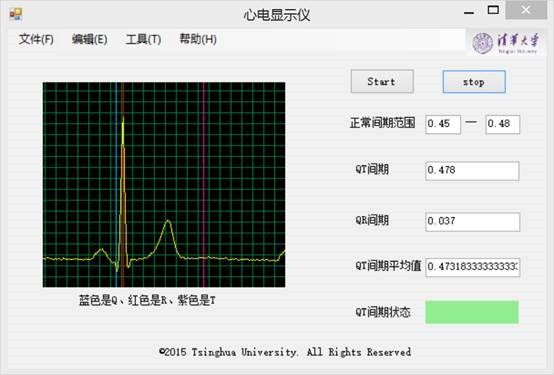
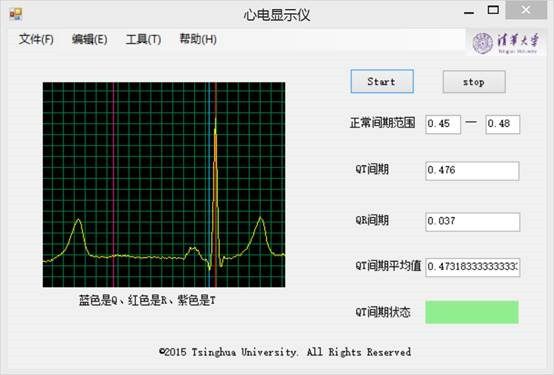
C#有很方便的界面设计平台。下图是我最后完成的效果:

MATLAB和c#混合编程实现心电图显示软件_第11张图片


我实现了心电曲线的实时绘制,正常QT间期范围设置、QT间期、QR间期的实时显示、可以显示一分钟之内的平均QT间期、QT间期状态一栏可实现间期预警,如果QT间期大于正常QT间期范围则状态颜色由绿色变成红色。用了一个100ms的定时器,每次100ms之后触发一次画图,让曲线往右移一格,由于100ms很短,所以在视觉上形成了连续移动的效果。核心代码如下:

[csharp]  view plain  copy
  1. using System;  
  2. using System.Collections.Generic;  
  3. using System.ComponentModel;  
  4. using System.Data;  
  5. using System.Drawing;  
  6. using System.Text;  
  7. using System.Windows.Forms;  
  8. using System.IO;  
  9. using MathWorks.MATLAB.NET.Arrays;//在MWArray.dll,最常用的   
  10. using MathWorks.MATLAB.NET.Utility;// 在MWArray.dll,最常用的   
  11. using third;  
  12. namespace MsPaint  
  13. {  
  14.     public partial class Form1 : Form  
  15.     {  
  16.         public Form1()  
  17.         {  
  18.             InitializeComponent();  
  19.         }  
  20.         double[,] rbegin;  
  21.         double[,] pend;  
  22.         double[,] rpk;  
  23.         double qt_mean;  
  24.         double[] ce = new double[5];  
  25.         MWArray d1;  
  26.         double[,] f1;  
  27.         MWArray[] agrsOut = new MWArray[4];//两个输出参数,一定要写数量  
  28.         public Point[] ptlist;//存放点的数组  
  29.         Point[] data = new Point[12000];  
  30.         //Random rm = new Random();//随机数产生器  
  31.         Timer mytimer = new Timer();//定时器  
  32.         third.Class1 pcl = new Class1();  
  33.         int 网格间距 = 12; //网格间距  
  34.         int 网格偏移 = 0;   //网格偏移  
  35.         Pen 网格颜色 = new Pen(Color.FromArgb(0x00, 0x80, 0x40));  
  36.         Pen 曲线颜色 = new Pen(Color.Lime);  
  37.         Pen R颜色 = new Pen(Color.Red,1);  
  38.         Pen Q颜色 = new Pen(Color.DeepSkyBlue, 1);  
  39.         Pen T颜色 = new Pen(Color.DeepPink, 1);  
  40.         int time_count = 20;  
  41.         //窗口加载时调用  
  42.         private void Form1_Load(object sender, EventArgs e)  
  43.         {  
  44.             //设置控件的样式和行为,以减少图像的闪烁  
  45.             this.SetStyle(ControlStyles.OptimizedDoubleBuffer | ControlStyles.AllPaintingInWmPaint | ControlStyles.UserPaint, true);  
  46.             this.SetStyle(ControlStyles.ResizeRedraw, true);  
  47.             this.UpdateStyles();  
  48.         }  
  49.    
  50.         draw drawtest = new draw();//创建类 draw 的实例  
  51.         private void 打开OToolStripMenuItem_Click(object sender, EventArgs e)  
  52.         {  
  53.             OpenFileDialog d = new OpenFileDialog();  
  54.             d.Filter = "(*.mat)|*.mat|所有文件(*.*)|*.*"if (d.ShowDialog() == DialogResult.OK)  
  55.             {  
  56.                 FileStream fs = File.OpenRead(d.FileName); StreamReader sr = new StreamReader(fs); string s;  
  57.                 string filename = d.FileName;  
  58.                 d1 =pcl.loaddata(filename);  
  59.                // MessageBox.Show(filename);  
  60.                 MWArray[] agrsIn = new MWArray[] {d1};  
  61.                 pcl.pces(4, ref agrsOut, agrsIn);  
  62.                 MWNumericArray x1 = agrsOut[0] as MWNumericArray;  
  63.                 MWNumericArray x2 = agrsOut[1] as MWNumericArray;  
  64.                 MWNumericArray x3 = agrsOut[2] as MWNumericArray;  
  65.                 MWNumericArray x4 = agrsOut[3] as MWNumericArray;  
  66.                 rbegin = (double[,])x1.ToArray();  
  67.                 pend = (double[,])x2.ToArray();  
  68.                 rpk = (double[,])x3.ToArray();  
  69.                 f1 = (double[,])d1.ToArray();  
  70.                 qt_mean = x4.ToScalarDouble();  
  71.                 textBox4.Text = qt_mean.ToString();  
  72.                 for (int i = 0; i < 12000; i++)  
  73.                 {  
  74.                     data[i].X = (int)i;//强制类型转换,将double转为int,可能会丢失数据  
  75.                     data[i].Y = (int)((1000-f1[0, i*5]) * 250 / 4500 + 100);  
  76.                 }  
  77.                 this.timer1.Enabled = true;//可以使用  
  78.                 this.timer1.Interval = 100;//定时时间为100毫秒  
  79.                 this.timer1.Tick += new System.EventHandler(this.timer1_Tick);  
  80.    
  81.                 this.timer1.Start();//启动定时器  
  82.             }  
  83.         }  
  84.         private void button1_Click(object sender, EventArgs e)  
  85.         {  
  86.             //动态添加一个定时器  
  87.             timer1.Start();//启动定时器  
  88.             textBox1.Enabled = false;  
  89.             textBox5.Enabled = false;  
  90.         }  
  91.         private void button2_Click(object sender, EventArgs e)  
  92.         {  
  93.             timer1.Stop();  
  94.             textBox1.Enabled = true;  
  95.             textBox5.Enabled = true;  
  96.         }  
  97.         private void timer1_Tick(object sender, EventArgs e)  
  98.         {  
  99.             if (time_count == 1100)  
  100.                 time_count = 0;  
  101.             else  
  102.                 time_count++;  
  103.             
  104.            网格偏移 = (网格偏移 + 1000) % 网格间距;  
  105.             Invalidate();  
  106.             Point[] temp = new Point[600];  
  107.             for (int i = 0; i < 600; i++)  
  108.             {  
  109.                 temp[i].X = i;  
  110.                 temp[i].Y = data[time_count * 10 + i].Y;  
  111.             }  
  112.             //调用绘图函数,这里的参数可以根据不同的测量给定不同的实参  
  113.             //drawtest.DrawLineS(Color.Blue, 1200, 600, pictureBox1, ptlist);  
  114.             int index = (int)time_count / 20;  
  115.             double QT = (pend[0, index]-rbegin[0, index])/1000;  
  116.             Graphics g2 = pictureBox2.CreateGraphics();//创建 PictureBox窗体的画布  
  117.             if ((QT < double.Parse(textBox1.Text)) || (QT > double.Parse(textBox5.Text)))  
  118.             {  
  119.                 g2.FillRectangle(Brushes.Red, g2.ClipBounds);  
  120.             }  
  121.             else  
  122.             {  
  123.                 g2.FillRectangle(Brushes.LightGreen, g2.ClipBounds);  
  124.             }  
  125.             textBox2.Text = Convert.ToString(QT);  
  126.             double QR = (rpk[0, index]-rbegin[0, index])/1000;  
  127.             textBox3.Text = Convert.ToString(QR);  
  128.            // drawtest.DrawLineS(Color.Blue, 400, 2400, pictureBox1, data);  
  129.             Graphics g1 = pictureBox1.CreateGraphics();//创建 PictureBox窗体的画布  
  130.             g1.FillRectangle(Brushes.Black, g1.ClipBounds);  
  131.             //绘制纵线 从右向左绘制  
  132.             for (int i = pictureBox1.Width - 网格偏移; i >= 0; i -= 网格间距)  
  133.                 g1.DrawLine(网格颜色, i, 0, i, pictureBox1.Height);  
  134.             //绘制横线  
  135.             for (int i = pictureBox1.Height; i >= 0; i -= 网格间距)  
  136.                 g1.DrawLine(网格颜色, 0, i, pictureBox1.Width, i);  
  137.             for (int i = 0; i < 60; i++)  
  138.             {  
  139.                     int line = (int)(rpk[0, i]/5-time_count * 10);  
  140.                     g1.DrawLine(R颜色, line, 0, line, pictureBox1.Height);  
  141.             }  
  142.             for (int i = 0; i < 60; i++)  
  143.             {  
  144.                 int line = (int)(pend[0, i] / 5 - time_count * 10);  
  145.                 g1.DrawLine(T颜色, line, 0, line, pictureBox1.Height);  
  146.             }  
  147.             for (int i = 0; i < 60; i++)  
  148.             {  
  149.                 int line = (int)(rbegin[0, i] / 5 - time_count * 10);  
  150.                 g1.DrawLine(Q颜色, line, 0, line, pictureBox1.Height);  
  151.             }  
  152.             //绘制曲线 若想曲线从右向左移动,则必须先绘制后面的        
  153.             Pen p = new Pen(Color.Yellow, 1);//画笔  
  154.                 g1.DrawLines(p, temp);//五点绘图,直线连接  
  155.         }  
  156.     }  
  157. }  


2.2软件的使用


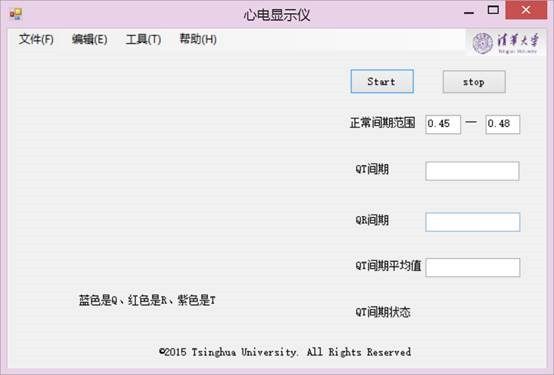
\MsPaint\bin\Debug目录下,双击:实时绘制曲线.exe运行如下图:


MATLAB和c#混合编程实现心电图显示软件_第12张图片


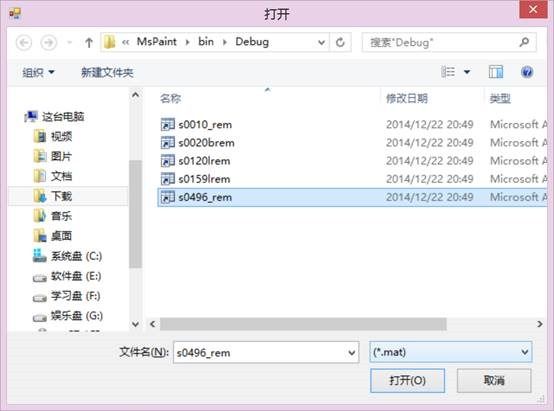
单击:文件-打开

MATLAB和c#混合编程实现心电图显示软件_第13张图片


由于我们只做了最后一个的处理,故只能选择最后一个打开,打开之后则可看到程序运行效果:
 

MATLAB和c#混合编程实现心电图显示软件_第14张图片


你可能感兴趣的:(C#窗体程序,c#)