OpenCV图像处理技巧之空间滤波
1. 引言
再次问好,图像处理爱好者们! 在前面的章节中,我们学习了图像处理的基础知识,并展现了图像增强的魅力。在这一节中,我们将更深入地研究空间滤波技术。
闲话少说,我们直接开始吧!
2. 基本概念
在图像处理方面,空间滤波器是我们所需要的基本工具。 这些滤波器具有根据局部相邻像素值修改其像素值的能力,使我们能够执行各种图像处理任务,例如降噪、边缘检测和图像平滑。
首先,按照惯例,让我们导入必要的库作为基础:
import numpy as np
import matplotlib.pyplot as plt
from fractions import Fraction
from skimage.io import imread, imshow

# For Spatial Filters
from scipy.signal import convolve2d
from skimage.color import rgb2gray, gray2rgb
3. 空间过滤器模板
接下来,我们将对图像应用各种简单的空间过滤器。这些过滤器的模板通常会用周围像素的平均值来改变当前像素值,从而达到图像增强和其他令人兴奋的功能。
接着,通过以下代码定义我们的过滤器模板:
def get_filters():
    # Define Filters
    # Horizontal Sobel Filter
    kernel_hsf = np.array([[1, 2, 1],
                           [0, 0, 0],
                           [-1, -2, -1]])

    # Vertical Sobel Filter
    kernel_vsf = np.array([[1, 0, -1],
                           [2, 0, -2],
                           [1, 0, -1]])

    # Edge Detection
    kernel_edge = np.array([[-1, -1, -1],
                            [-1, 8, -1],
                            [-1, -1, -1]])


    # Sharpen
    kernel_sharpen = np.array([[0, -1, 0],
                               [-1, 5, -1],
                               [0, -1, 0]])

    # Box Blur
    kernel_bblur = (1 / 9.0) * np.array([[1., 1., 1.],
                                         [1., 1., 1.],
                                         [1., 1., 1.]])

    # Define the kernels
    kernels = {
        'Box Blur': kernel_bblur,
        'Sharpen': kernel_sharpen,
        'Horizontal Sobel Filter': kernel_hsf,
        'Vertical Sobel Filter': kernel_vsf,
        'Edge Detection': kernel_edge,
    }
    return kernels
接着,让我们展示上述模板的可视化效果:
def display_filters(image_path):
    # Read the image
    image = imread(image_path)[:,:,:3]
    kernels = get_filters()
    # Create a figure with subplots for each kernel
    fig, ax = plt.subplots(2, 3, figsize=(20, 15))

    ax[0, 0].imshow(rgb2gray(image[:,:,:3]), cmap='gray')
    ax[0, 0].set_title('Original Image', fontsize=20)
    ax[0, 0].set_xticks([])
    ax[0, 0].set_yticks([])
    # Loop over the keys and values in the kernels dictionary
    for i, (name, kernel) in enumerate(kernels.items(), 1):
        # Determine the subplot index
        row = i // 3
        col = i % 3
        # Plot the kernel on the appropriate subplot
        ax[row, col].imshow(kernel, cmap='gray')
        ax[row, col].set_title(name, fontsize=30)
        # Loop over the cells in the kernel
        for (j, k), val in np.ndenumerate(kernel):
            if val < 1:
                ax[row, col].text(k,
                                  j,
                                  str(Fraction(val).limit_denominator()),
                                  ha='center',
                                  va='center',
                                  color='red',
                                  fontsize=30)
            else:
                ax[row, col].text(k,
                                  j,
                                  str(val),
                                  ha='center',
                                  va='center',
                                  color='red',
                                  fontsize=30)

    # Show the plot
    plt.tight_layout()
    plt.show()

# Display filters
display_filters('dorm_lobby.png')
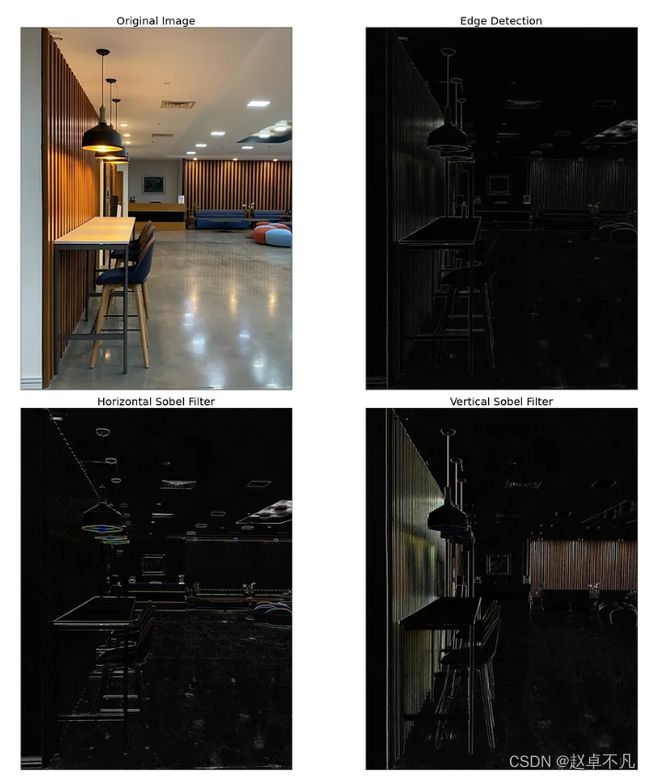
得到结果如下:

4. 展示效果
上述代码中,通过函数get_filters(),我们定义了五种常见的空间滤波器模板,分别为Horizontal Sobel Filter, Vertical Sobel Filter, Edge Detection, Sharpen以及 Box Blur 。紧着我们可以将这些滤波器应用于真实图像。此时我们可以使用 apply_selected_kernels() 函数来达到不同的可视化效果: ️✨
def apply_selected_kernels(image_path, selected_kernels, plot_cols=3):
    # Define the kernels
    all_kernels = get_filters()
    # Check if the selected kernels are defined, if not raise an exception
    for k in selected_kernels:
        if k not in all_kernels:
            raise ValueError(f"Kernel '{k}' not defined.")
    # Read the image
    image = imread(image_path)[:,:,:3]
    # Apply selected kernels to each color channel of the image
    conv_rgb_images = {}
    for kernel_name in selected_kernels:
        kernel = all_kernels[kernel_name]
        transformed_channels = []
        for i in range(3):
            conv_image = convolve2d(image[:, :, i], kernel, 'valid')
            transformed_channels.append(abs(conv_image))

        conv_rgb_image = np.dstack(transformed_channels)
        conv_rgb_image = np.clip(conv_rgb_image, 0, 255).astype(np.uint8)
        conv_rgb_images[kernel_name] = conv_rgb_image

    # Display the original image along with the combined results of all
    # the kernels in a subplot
    fig, ax = plt.subplots(2, plot_cols, figsize=(20, 20))

    ax[0, 0].imshow(image)
    ax[0, 0].set_title('Original Image', fontsize=20)
    ax[0, 0].set_xticks([])
    ax[0, 0].set_yticks([])

    for i, (kernel_name, conv_rgb_image) in enumerate(conv_rgb_images.items(), 1):
        row, col = divmod(i, plot_cols)
        ax[row, col].imshow(conv_rgb_image)
        ax[row, col].set_title(kernel_name, fontsize=20)
        ax[row, col].set_xticks([])
        ax[row, col].set_yticks([])
    plt.tight_layout()
    plt.show()
可以通过传入不同的参数selected_kernels,得到不同的效果,样例调用代码如下:
# Visualize Edge Detection and Sobel Filters
apply_selected_kernels('dorm_lobby.png',
                       ['Edge Detection',
                        'Horizontal Sobel Filter',
                        'Vertical Sobel Filter'],
                       plot_cols=2)
得到结果如下:
当然,我们可以通过以下代码查看其他几种模板的对应效果,代码如下:
# Visualize Edge Detection, Sharpen, and Box Blur
apply_selected_kernels('dog.png',
                       ['Edge Detection',
                        'Sharpen',
                        'Box Blur'],
                       plot_cols=2)
结果如下:

5. 分析
接着,让我们更加深入的分析上述五种模板的特点和作用,归纳如下:
-
Edge Detection (kernel_edge)
这是一种通用的边缘检测滤波器,有时称为拉普拉斯滤波器或高斯拉普拉斯滤波器。该术语通常是指一系列用于识别数字图像中图像亮度急剧变化或不连续的点的方法。它对所有方向的边缘做出同等响应。它与 Sobel 滤镜之间的区别在于它不区分边缘方向。 -
Sobel filter
Sobel滤波器通常也用于边缘检测,但它专门用于检测特定方向的边缘。Sobel算子使用两个3x3的卷积核通过计算导数的近似值来检测不同方向的边缘——一个用于水平方向的边缘检测,另一个用于垂直方向的边缘检测。 -
Horizontal Sobel Filter (kernel_hsf)
这旨在最大程度地响应垂直方向边缘的检测,最小地响应水平方向的边缘。这就是为什么生成的图像突出显示了水平边缘线。 -
Vertical Sobel Filter (kernel_vsf)
这是Sobel滤波器响应的另一个方向。它旨在最大程度地响应水平方向的边缘,最小地响应垂直方向的边缘。这就是为什么生成的图像突出显示了垂直边缘线。 -
Sharpen (kernel_sharpen)
此滤波器用于增强图像的“清晰度”。它通过增强彼此相邻的像素的对比度来工作,从而使边缘看起来更加清晰。 -
Box Blur (kernel_bblur)
此滤波器用于图像模糊。它的工作原理是平均每个像素周围邻域的像素值,从而降低边缘的清晰度并混合附近像素的颜色。
6. 总结
瞧!这些滤波器为我们提供了图像转换的巨大魅力,可以突出隐藏的细节并增强其视觉冲击力。通过了解每种滤波器的特性和应用,可以释放我们的创造力,探索图像处理的无限可能性。
这不是很酷吗?