无人车沿着指定线路自动驾驶与远程控制的实践应用
- Python
- 机器人操作系统(ROS)
- 自动驾驶
- PositionalPID
- GaussianBlur
- findContours
- set_motors
- widgets.Layout
- widgets.Button
有了前面颜色识别跟踪的基础之后,我们就可以设定颜色路径,让无人车沿着指定线路做自动驾驶了,视频:PID控制无人车自动驾驶
有了前几章的知识铺垫,就比较简单了,也是属于颜色识别的一种应用,主要是掌握自动驾驶中的一些基础知识,这样就可以进一步去了解在无人驾驶当中遇到的各种问题
1、导入库并初始化
from jetbotmini import Camera
from jetbotmini import bgr8_to_jpeg
from IPython.display import display
from jetbotmini import Robot
import numpy as np
import torch
import torchvision
import cv2
import traitlets
import ipywidgets.widgets as widgets
import numpy as np

#初始化摄像头
camera = Camera.instance(width=300, height=300)
#初始化机器人马达
robot = Robot()

#使用PID控制
import PID

turn_gain = 1.7
turn_gain_pid = PID.PositionalPID(0.15, 0, 0.05)
这部分很简单,依然是初始化摄像头用来颜色识别,机器人也叫马达,用来驱动轮子的运动,加一个PID控制,让无人车更加的平稳。
2、显示部件
# 红色数组
color_lower=np.array([156,43,46])
color_upper = np.array([180, 255, 255])

image_widget = widgets.Image(format='jpeg', width=300, height=300)
speed_widget = widgets.FloatSlider(value=0.4, min=0.0, max=1.0, description='speed')

display(widgets.VBox([
    widgets.HBox([image_widget]),
    speed_widget,
]))

width = int(image_widget.width)
height = int(image_widget.height)

def execute(change):
    global turn_gain
    target_value_speed = 0

    #更新图片值
    frame = camera.value
    frame = cv2.resize(frame, (300, 300))
    frame = cv2.GaussianBlur(frame,(5,5),0)
    hsv =cv2.cvtColor(frame,cv2.COLOR_BGR2HSV)
    mask=cv2.inRange(hsv,color_lower,color_upper)
    mask=cv2.erode(mask,None,iterations=2)
    mask=cv2.dilate(mask,None,iterations=2)
    mask=cv2.GaussianBlur(mask,(3,3),0)
    cnts=cv2.findContours(mask.copy(),cv2.RETR_EXTERNAL,cv2.CHAIN_APPROX_SIMPLE)[-2]

    # 检测到目标
    if len(cnts)>0:
        cnt = max (cnts,key=cv2.contourArea)
        (color_x,color_y),color_radius=cv2.minEnclosingCircle(cnt)
        if color_radius > 10:
            # 将检测到的颜色标记出来
            cv2.circle(frame,(int(color_x),int(color_y)),int(color_radius),(255,0,255),2)
            # 中心偏移量
            center = (150 - color_x)/150

            #转向增益PID调节
            turn_gain_pid.SystemOutput = center
            turn_gain_pid.SetStepSignal(0)
            turn_gain_pid.SetInertiaTime(0.2, 0.1)

            #将转向增益限制在有效范围内
            target_value_turn_gain = 0.15 + abs(turn_gain_pid.SystemOutput)
            if target_value_turn_gain < 0:
                target_value_turn_gain = 0
            elif target_value_turn_gain > 2:
                target_value_turn_gain = 2

            #将输出电机速度保持在有效行驶范围内
            target_value_speedl = speed_widget.value - target_value_turn_gain * center
            target_value_speedr = speed_widget.value + target_value_turn_gain * center
            if target_value_speedl<0.3:
                target_value_speedl=0
            elif target_value_speedl>1:
                target_value_speedl = 1
            if target_value_speedr<0.3:
                target_value_speedr=0
            elif target_value_speedr>1:
                target_value_speedr = 1
            #设置马达速度
            robot.set_motors(target_value_speedl, target_value_speedr)
    # 没有检测到目标
    else:
        robot.stop()

    # 更新图像显示至小部件
    image_widget.value = bgr8_to_jpeg(frame)
这里是关键部分,检测目标(这里是红颜色),然后通过其检测的位置来控制左右马达的速度,驱动无人车的行驶与转弯,后台通过图像部件来显示无人车的跟踪情况,方便看到无人车在整个行驶过程中的各种状态。
3、调用并执行
execute({'new': camera.value})
camera.unobserve_all()
camera.observe(execute, names='value')这里就是前面介绍的,通过调用observer方法来更新摄像头的数据,使用的是一个上面定义的execute的一个回调方法。
4、停止无人车
import time
camera.unobserve_all()
time.sleep(1.0)
robot.stop()
5、倒车
前面介绍的是向前行驶和转弯,还缺少一个能倒车的功能,恩,很简单,调用backward函数即可
robot.backward(0.8)
time.sleep(0.5)
robot.stop()
6、调节颜色数组
我这里是用红色的胶带粘贴在地板上,所以使用的是红色的数组,当然这里我们可以显示mask来测试颜色数组是否设置的比较恰当,代码如下
from  matplotlib import pyplot as plt
%matplotlib inline
from IPython import display

for i in range(10):
    frame = camera.value
    frame = cv2.resize(frame, (300, 300))
    frame_=cv2.GaussianBlur(frame,(5,5),0)
    hsv=cv2.cvtColor(frame,cv2.COLOR_BGR2HSV)
    mask=cv2.inRange(hsv,color_lower,color_upper) # 颜色数组的取值范围
    mask=cv2.erode(mask,None,iterations=2)
    mask=cv2.dilate(mask,None,iterations=2)
    mask=cv2.GaussianBlur(mask,(3,3),0)
    plt.imshow(mask)
    plt.show()
#display.clear_output(wait=True)这里我将display.clear_output(wait=True)注释,将会连续生成10张图片,全部在Jupyter中展示出来。我们也可以去掉注释,这样每次的生成将会清除上一次的图片,这样便于更好地观察。10张连续图片也做成了动图便于大家了解:
如果这里没有出现mask或者比较少的情况,就需要调节颜色数组,让其更好地匹配线路。
7、模拟方向盘
有些时候不想要自动驾驶来控制,而且很多场景更需要人来远程控制,比如在矿山等危险地方,最好的方法就是能够远程去控制工程车去进行作业。
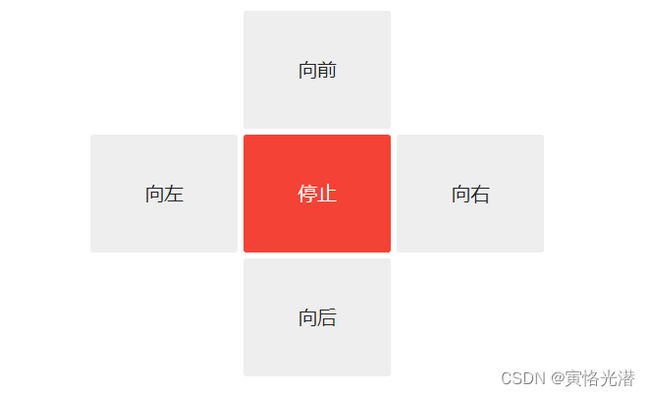
有了上面的向前向后和转弯的了解后,我们就可以制作一个模拟方向盘来控制无人车了。
7.1、按钮部件
# 创建按钮
button_layout = widgets.Layout(width='100px', height='80px', align_self='center')
stop_button = widgets.Button(description='停止', button_style='danger', layout=button_layout)
forward_button = widgets.Button(description='向前', layout=button_layout)
backward_button = widgets.Button(description='向后', layout=button_layout)
left_button = widgets.Button(description='向左', layout=button_layout)
right_button = widgets.Button(description='向右', layout=button_layout)

# 显示按钮
middle_box = widgets.HBox([left_button, stop_button, right_button], layout=widgets.Layout(align_self='center'))
controls_box = widgets.VBox([forward_button, middle_box, backward_button])
display(controls_box)
如图:
方向盘的布局,通过widgets.Layout创建层,在这个上面通过widgets.Button创建按钮,然后将按钮通过widgets.HBox和widgets.VBox进行横向和垂直的排版即可。Horizontal:水平的,横向。Vertical:垂直的
7.2、方向控制方法
def stop(change):
    robot.stop()

def step_forward(change):
    robot.forward(0.8)
    time.sleep(0.5)
    robot.stop()

def step_backward(change):
    robot.backward(0.8)
    time.sleep(0.5)
    robot.stop()

def step_left(change):
    robot.left(0.6)
    time.sleep(0.5)
    robot.stop()

def step_right(change):
    robot.right(0.6)
    time.sleep(0.5)
    robot.stop()
前后左右加停止按钮的方法,方法体很简单,就是控制左右马达的速度。
7.3、按钮动作
定义好了各自方法之后,只需要将方法绑定到各自的按钮就可以了。
stop_button.on_click(stop)
forward_button.on_click(step_forward)
backward_button.on_click(step_backward)
left_button.on_click(step_left)
right_button.on_click(step_right)
这样就可以点击按钮,远程控制无人车了。
8、心跳开关
最后就是介绍下心跳开关,检测无人车与浏览器的连接是否还存在的一种简单方法。可以通过下面显示的滑块调整心跳周期(以秒为单位),如果两次心跳之内不能在浏览器之间往返通信的,那么心跳的status(状态)属性值将会设置为dead,一旦连接恢复连接,status属性将设置为alive
from jetbotmini import Heartbeat

heartbeat = Heartbeat()

# 这个函数将在心跳状态改变时被调用
def handle_heartbeat_status(change):
    if change['new'] == Heartbeat.Status.dead:
        robot.stop()

heartbeat.observe(handle_heartbeat_status, names='status')

period_slider = widgets.FloatSlider(description='period', min=0.001, max=0.5, step=0.01, value=0.5)
traitlets.dlink((period_slider, 'value'), (heartbeat, 'period'))

display(period_slider, heartbeat.pulseout)
自动驾驶的相关知识点介绍完毕,有错误之处,请指正,一起学习与进步!


