vue3组件之间通信(一)——父传子属性和方法
文章目录
-
-
-
- 一:setup函数传递
-
- 1:父组件传值给子组件
- 2:父组件传方法给子组件(使用了“:”和“@”两种形式来传方法)
- 二:script setup 语法糖(由于这个比较简单,就不单独说明了)
-
- 1:父组件传值和方法给子组件
- 2:对比
-
-
前言:讲解组件中的通信会有script setup 语法糖和setup函数两种讲解。这是由于实际开发中,比如 ant disign vue的示例是setup函数的,而element-plus是script setup的,就都有实际的运用场景,对于程序员来说,掌握两种方式都是很有必要的。需要注意的是:使用script setup 语法糖需要vue3.2以上的版本(虽然3.1.3就可以使用,但是会有一些实验性提案的提示,个人不推荐使用3.2以下版本的,我使用的是 “vue”: "^3.2.13"版本的)
一:setup函数传递
1:父组件传值给子组件
// 语法
 :变量名="值"  // 父组件
 // 子组件 使用props定义要使用的值,然后可以直接使用值或者使用props.值
 props: {
 	值: 属性
 }
①:父组件代码 father.vue
<template>
  <div class="father">
      <h1>父组件</h1>
      <son :msg="message"></son>
  </div>
</template>
<script >
import { defineComponent, ref } from 'vue'
import son from "./son.vue";
export default defineComponent({
  components:{
    son,
  },
  setup () {
    const message = ref('父组件的值---张三');
    return {
        message
    }
  }

})
</script>
<style scoped>
.father {
    width: 200px;
    height:200px;
    border: 1px solid red;
}
</style>
②:子组件代码:son.vue
<template>
  <div class="son">
      <h2>子组件</h2>
      <p>子组件的值:{{prop.msg}}</p>
  </div>
</template>
<script >
import { defineComponent, ref } from 'vue'
export default defineComponent({
  props:{
    msg: String,
  },
  setup (prop) {
      console.log(prop);
    return {
      prop
    }
  }
})
</script>
<style scoped>
.son {
    width: 200px;
    height:100px;
    border: 1px solid green;
}
</style>
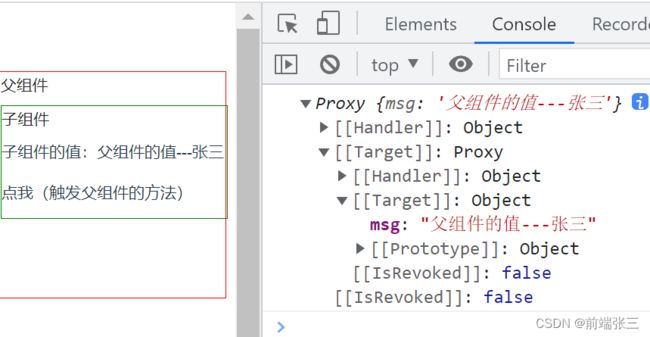
③:显示效果
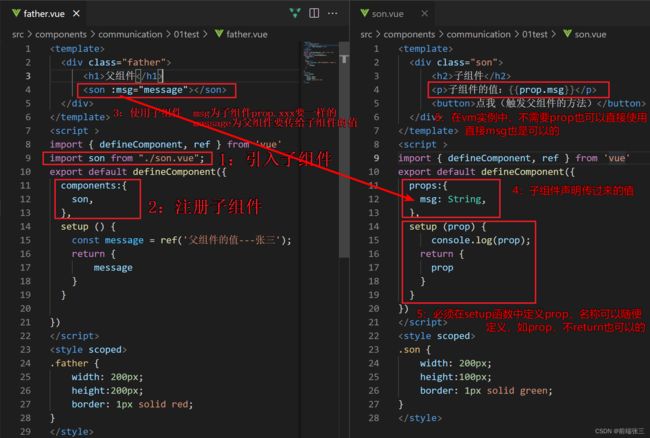
④:详细讲解和注意要点
⑤:总结说明
1:子组件上的值,左边是子组件接收定义的变量名,为了不容易出错,一般使用一样的变量名,如:message=“message”。
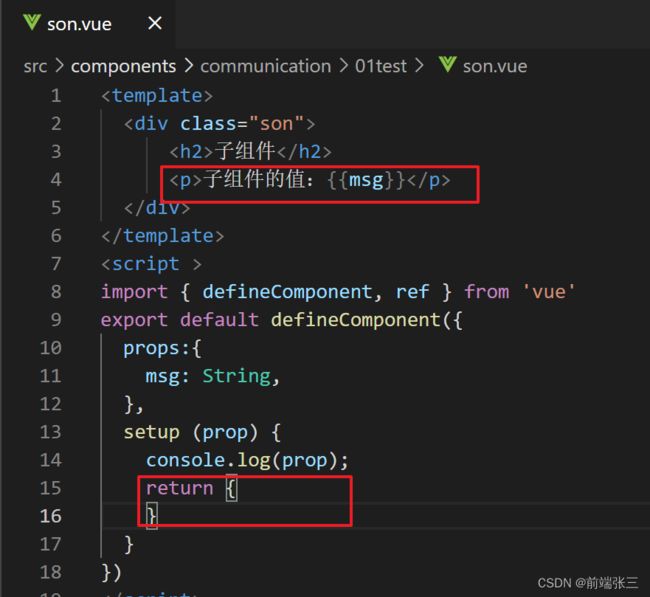
2:子组件的prop是可以不用return的,在页面上显示的部分也可以不用{{prop.msg}},而直接使用{{msg}},如下图也是有一样的效果的
2:父组件传方法给子组件(使用了“:”和“@”两种形式来传方法)
// 语法
@变量名=“方法有效果”   // 父组件
setup(prop,ctx){ ctx.emit('变量名',‘传参’)}  // 子组件
①:父组件 father.vue
<template>
  <div class="father">
    <h1>父组件</h1>
    <son :msg="message"
      :clickFatherone="clickFatherone"
      @clickFathertwo="clickFathertwo"/>
  </div>
</template>
<script>
import { defineComponent, ref } from "vue";
import son from "./son.vue";
export default defineComponent({
  components: {
    son,
  },
  setup() {
    const message = ref("父组件的值---张三");
    function clickFatherone(params) {
      console.log("父组件的方法被触发了one",params);
    }
    function clickFathertwo(params) {
      console.log("父组件的方法被触发了two",params);
    }
    return {
      message,
      clickFatherone,
      clickFathertwo,
    };
  },
});
</script>
<style scoped>
.father {
  width: 200px;
  height: 200px;
  border: 1px solid red;
}
</style>
②:子组件 son.vue
<template>
  <div class="son">
      <h2>子组件</h2>
      <p>子组件的值:{{msg}}</p>
      <button @click="clickSonOne">点我1(触发父组件的方法)</button>
      <button @click="clickSonTwo">点我2(触发父组件的方法)</button>
  </div>
</template>
<script >
import { defineComponent, ref } from 'vue'
export default defineComponent({
  props:{
    msg: String,
  },
  setup (prop,ctx) {
    console.log(prop,ctx);
    function clickSonOne() {
        ctx.emit('clickFatherone','子组件的值1')
    }
    function clickSonTwo() {
        ctx.emit('clickFathertwo','子组件的值2')
    }
    return {
      clickSonOne,
      clickSonTwo,
    }
  }
})
</script>
<style scoped>
.son {
    width: 200px;
    height:100px;
    border: 1px solid green;
}
</style>
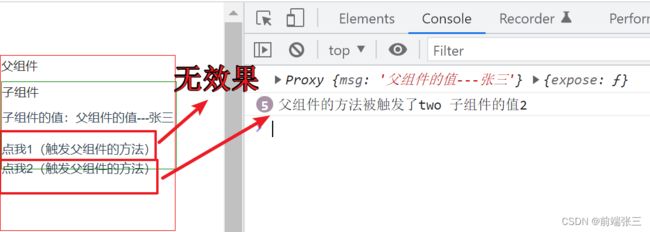
③效果: :变量名=“方法名”没有效果 @变量名=“方法有效果”
4:详细讲解:
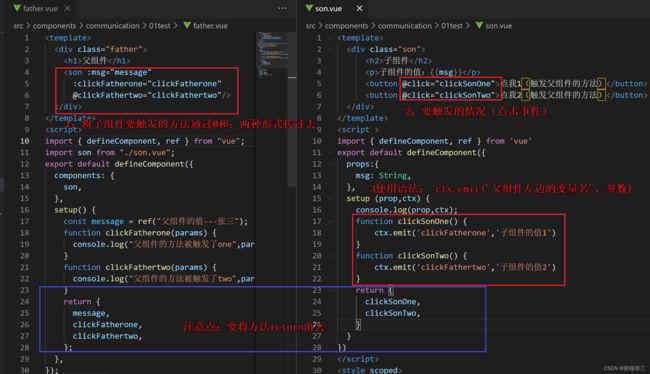
⑤总结说明: :变量名=“方法名”没有效果 @变量名=“方法有效果”,,要注意的是,需要将所有的方法在setup函数中return出去。
二:script setup 语法糖(由于这个比较简单,就不单独说明了)
1:父组件传值和方法给子组件
①父组件
<template>
  <div class="father">
    <h1>父组件</h1>
    <son :msg="message"
      :clickFatherone="clickFatherone"
      @clickFathertwo="clickFathertwo"/>
  </div>
</template>
<script setup>
import { ref } from "vue";
import son from "./son.vue";

const message = ref("父组件的值---李四");
function clickFatherone(params) {
  console.log("父组件的方法被触发了one",params);
}
function clickFathertwo(params) {
  console.log("父组件的方法被触发了two",params);
}
</script>
<style scoped>
.father {
  width: 200px;
  height: 200px;
  border: 1px solid red;
}
</style>
②子组件
<template>
  <div class="son">
      <h2>子组件</h2>
      <p>子组件的值:{{props.msg}}</p>
      <button @click="clickSonOne">点我1(触发父组件的方法)</button>
      <button @click="clickSonTwo">点我2(触发父组件的方法)</button>
  </div>
</template>
<script setup>
import { defineProps, defineEmits, ref } from 'vue'
const props = defineProps({
    msg: String,
})
const emits = defineEmits(['clickFatherone','clickFathertwo'])
function clickSonOne() {
  emits('clickFatherone','子组件的值3')
}
function clickSonTwo() {
  emits('clickFathertwo','子组件的值4')
}
</script>
<style scoped>
.son {
    width: 200px;
    height:150px;
    border: 1px solid green;
}
</style>
③效果图
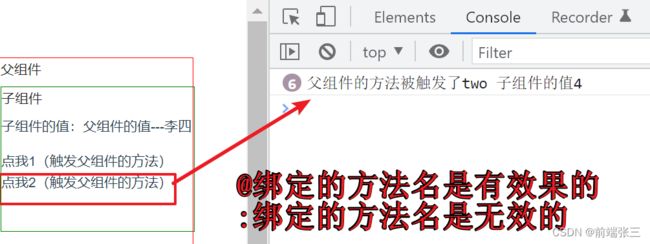
④详细讲解
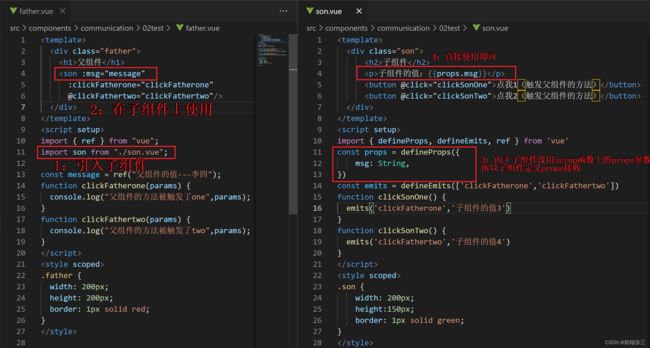
(1):父组件传值给子组件
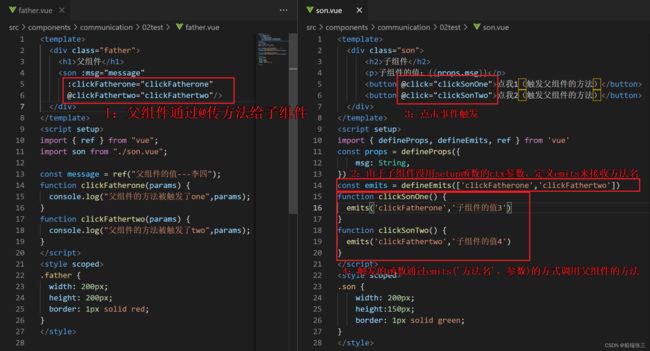
(2):父组件传方法给子组件
⑤:总结:
(1):传值的话,需要在子组件定义props来接收传过去的值,并且使用要通过props.xxx的形式来获取值
(2):传方法的话,需要在子组件定义emits来接收传过去的方法名,通过使用emits.xxx的形式来触发父组件的方法。
2:对比
script setup 相对于setup函数来说,没有参数props和ctx,所以props、emits包括后面会说到的atts等等都需要重新定义一个变量来接收后才能使用,这个就是两种语法使用上的不同之处。