React Native 列表组件基础知识
ScrollView 组件
ScrollView组件是一个容器滚动组件,当容器超出指定宽高时就可以进行滚动交互。
ScrollView组件是一次性渲染所有的 React 子组件,这在性能上是比较差的,所以不建议当列表特别长的时候使用此组件。
接下来列举几个常用的一些属性:
-
contentContainerStyle 属性
相当于为
ScrollView组件设置样式,具体的实例如下:<ScrollView contentContainerStyle={styles.container}></ScrollView>; const styles = StyleSheet.create({ container: { padding: 8, }, }); -
refreshControl 属性
结合
RefreshControl组件一起使用,用于为 ScrollView 提供下拉刷新功能。仅适用于垂直 ScrollViews(horizontalprop 必须是 false)。具体实例如下:
const App: React.FC = () => { const [refreshing, setRefreshing] = React.useState(false); const onRefresh = React.useCallback(() => { setRefreshing(true); setTimeout(() => { setRefreshing(false); }, 2000); }, []); return ( <SafeAreaView style={styles.container}> <ScrollView contentContainerStyle={styles.scrollView} refreshControl={ <RefreshControl refreshing={refreshing} onRefresh={onRefresh} /> } > <Text>下拉刷新</Text> </ScrollView> </SafeAreaView> ); }; -
scrollEnabled 属性
当为 false 时,视图无法通过触摸交互滚动。请注意,视图始终可以通过调用来滚动 scrollTo。
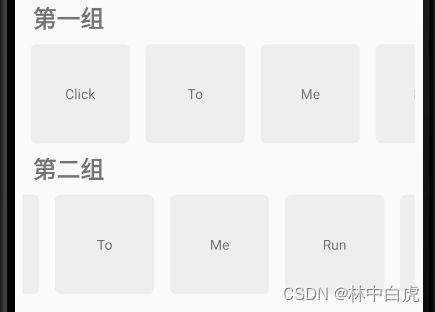
export default function ScrollCards() { return ( <View> <Text style={BaseStyle.headingText}>Scroll Cards</Text> <ScrollView contentContainerStyle={styles.container}> {/* 第一组关闭滑动 */} <Text style={BaseStyle.headingText}>第一组</Text> <ScrollView horizontal={true} scrollEnabled={false}> <View style={styles.card}> <Text>Click</Text> </View> <View style={styles.card}> <Text>To</Text> </View> <View style={styles.card}> <Text>Me</Text> </View> <View style={styles.card}> <Text>Run</Text> </View> <View style={styles.card}> <Text>Demo</Text> </View> </ScrollView> {/* 第二组开启滑动 */} <Text style={BaseStyle.headingText}>第二组</Text> <ScrollView horizontal={true}> <View style={styles.card}> <Text>Click</Text> </View> <View style={styles.card}> <Text>To</Text> </View> <View style={styles.card}> <Text>Me</Text> </View> <View style={styles.card}> <Text>Run</Text> </View> <View style={styles.card}> <Text>Demo</Text> </View> </ScrollView> </ScrollView> </View> ); } -
horizontal 属性
SectionList 组件
此组件主要是用于分段列表展示,并且在性能上要比ScrollView组件更好。
此组件主要有如下:
- 可配置的可见度回调
- 列表标题支持
- 列表页脚支持
- 项目分隔符支持
- 节标题支持
- 节分隔符支持
- 异构数据和项目渲染支持
- 拉动刷新
- 滚动加载
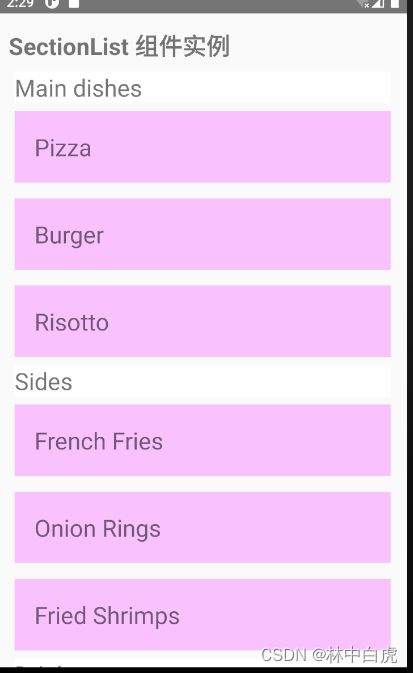
简单实例如下:
export default function SectionListCards() {
  const DATA = [
    {
      title: "Main dishes",
      data: ["Pizza", "Burger", "Risotto"],
    },
    {
      title: "Sides",
      data: ["French Fries", "Onion Rings", "Fried Shrimps"],
    },
    {
      title: "Drinks",
      data: ["Water", "Coke", "Beer"],
    },
    {
      title: "Desserts",
      data: ["Cheese Cake", "Ice Cream"],
    },
  ];

  return (
    <View>
      <Text style={BaseStyle.headingText}>SectionList 组件实例</Text>
      <SectionList
        style={styles.container}
        sections={DATA}
        keyExtractor={(item, index) => item + index}
        renderItem={({ item }) => (
          <View style={styles.item}>
            <Text style={styles.title}>{item}</Text>
          </View>
        )}
        renderSectionHeader={({ section: { title } }) => (
          <Text style={styles.header}>{title}</Text>
        )}
      />
    </View>
  );
}
使用此组件需要注意以下几点:
-
当内容滚动出渲染窗口时,超出窗口的数据不会自动保存的系统变量中。所以需要我们使用 Flux、Redux 或者 Relay 来存储是有需要展示的数据。
-
SectionList组件是 PureComponent 类型组件,这意味着如果 props 保持浅层拷贝的话,它将不会重新渲染。确保您的 renderItem 函数所依赖的所有内容都作为 prop(例如 extraData)传递,并且在更新后不是 === ,否则您的 UI 可能不会因更改而更新。 -
SectionList组件为了节省内存和实现平滑的滚动,页面的内容展示是异步实现的,这就意味着当滑动速度快于页面内容渲染速度的话,页面会出现空白内容。 -
默认情况下,列表会在每个项目上查找 key 属性,并将其用作 React key。或者,您可以提供自定义 keyExtractor 属性。
组件必须的参数说明
-
renderItem
每个部分中每个项目的默认渲染器。可以在每个部分的基础上覆盖。应该返回一个 React 元素。具体代码实例:
renderItem={({ item, index, section, separators }) => ( )}- item(类型为对象): 需要渲染的内容数据
- index(类型为数字):渲染内容的项目下标
- section(类型为对象):
SectionList当前渲染节点的完整对象 - separators(类型为对象):具体有如下属性:
- highlight(类型为函数):监听元素变为高亮后可以触发的事件
- unhighlight(类型为函数):监听元素取消高亮后可以触发的事件
- updateProps(类型为函数):函数接收
select和newProps两个属性。
-
sections
需要渲染的数据
FlatList 组件
FlatList组件租用是用于展示基本、平面列表的高性能界面,具有如下功能:
- 可选水平模式
- 可配置的可见度回调
- 标头支持
- 页脚支持
- 分隔符支持
- 拉动刷新
- 滚动加载
- 滚动到索引支持
- 多列支持
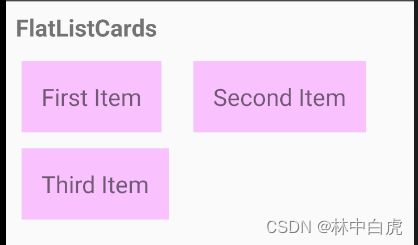
具体的实例如下:
const DATA = [
  {
    id: "bd7acbea-c1b1-46c2-aed5-3ad53abb28ba",
    title: "First Item",
  },
  {
    id: "3ac68afc-c605-48d3-a4f8-fbd91aa97f63",
    title: "Second Item",
  },
  {
    id: "58694a0f-3da1-471f-bd96-145571e29d72",
    title: "Third Item",
  },
];

type ItemProps = { title: string };

const Item = ({ title }: ItemProps) => (
  <View style={styles.item}>
    <Text style={styles.title}>{title}</Text>
  </View>
);

export default function FlatListCards() {
  return (
    <View>
      <Text style={BaseStyle.headingText}>FlatListCards</Text>
      <FlatList
        data={DATA}
        renderItem={({ item }) => <Item title={item.title} />}
        keyExtractor={(item) => item.id}
      />
    </View>
  );
}

const styles = StyleSheet.create({
  container: {
    flex: 1,
  },
  item: {
    backgroundColor: "#f9c2ff",
    padding: 20,
    marginVertical: 8,
    marginHorizontal: 16,
  },
  title: {
    fontSize: 24,
  },
});
运行效果如下:

要渲染多列,请使用numColumns。 使用此方法而不是 flexWrap 布局可以防止与项目高度逻辑发生冲突。在上述的例子中,我们添加numColumns属性就可以,关键代码如下:
<FlatList
  numColumns={2}
  data={DATA}
  renderItem={({ item }) => <Item title={item.title} />}
  keyExtractor={(item) => item.id}
/>
type ItemData = {
  id: string;
  title: string;
};

const DATA: ItemData[] = [
  {
    id: "bd7acbea-c1b1-46c2-aed5-3ad53abb28ba",
    title: "First Item",
  },
  {
    id: "3ac68afc-c605-48d3-a4f8-fbd91aa97f63",
    title: "Second Item",
  },
  {
    id: "58694a0f-3da1-471f-bd96-145571e29d72",
    title: "Third Item",
  },
];

type ItemProps = {
  item: ItemData;
  onPress: () => void;
  backgroundColor: string;
  textColor: string;
};

const Item = ({ item, onPress, backgroundColor, textColor }: ItemProps) => (
  <TouchableOpacity
    onPress={onPress}
    style={[styles.item, { backgroundColor }]}
  >
    <Text style={[styles.title, { color: textColor }]}>{item.title}</Text>
  </TouchableOpacity>
);

export default function FlarCardsClick() {
  const [selectedId, setSelectedId] = useState<string>();

  const renderItem = ({ item }: { item: ItemData }) => {
    const backgroundColor = item.id === selectedId ? "#6e3b6e" : "#f9c2ff";
    const color = item.id === selectedId ? "white" : "black";

    return (
      <Item
        item={item}
        onPress={() => setSelectedId(item.id)}
        backgroundColor={backgroundColor}
        textColor={color}
      />
    );
  };

  return (
    <View>
      <Text style={BaseStyle.headingText}>FlarCardsClick</Text>
      <FlatList
        data={DATA}
        renderItem={renderItem}
        keyExtractor={(item) => item.id}
        extraData={selectedId}
      />
    </View>
  );
}

const styles = StyleSheet.create({
  item: {
    padding: 20,
    marginVertical: 8,
    marginHorizontal: 16,
  },
  title: {
    fontSize: 24,
  },
});
使用此组件需要注意以下几点:
-
当内容滚动出渲染窗口时,超出窗口的数据不会自动保存的系统变量中。所以需要我们使用 Flux、Redux 或者 Relay 来存储是有需要展示的数据。
-
flatList组件是 PureComponent 类型组件,这意味着如果 props 保持浅层拷贝的话,它将不会重新渲染。确保您的 renderItem 函数所依赖的所有内容都作为 prop(例如 extraData)传递,并且在更新后不是 === ,否则您的 UI 可能不会因更改而更新。 -
flatList组件为了节省内存和实现平滑的滚动,页面的内容展示是异步实现的,这就意味着当滑动速度快于页面内容渲染速度的话,页面会出现空白内容。 -
默认情况下,列表会在每个项目上查找 key 属性,并将其用作 React key。或者,您可以提供自定义 keyExtractor 属性。
组件必须的参数说明
-
renderItem
每个部分中每个项目的默认渲染器。可以在每个部分的基础上覆盖。应该返回一个 React 元素。具体代码实例:
renderItem={({ item, index, section, separators }) => ( )}- item(类型为对象): 需要渲染的内容数据
- index(类型为数字):渲染内容的项目下标
- separators(类型为对象):具体有如下属性:
- highlight(类型为函数):监听元素变为高亮后可以触发的事件
- unhighlight(类型为函数):监听元素取消高亮后可以触发的事件
- updateProps(类型为函数):函数接收
select和newProps两个属性。
-
data
需要渲染的数据
VirtualizedList 组件
一般来说,只有当您需要比 FlatList 提供的更多灵活性时才应该真正使用VirtualizedList。可以通过对应的属性来对需要渲染的数据进行操作后再渲染,比之前的列表组件更加灵活一些。
VirtualizedList 组件通过对应的属性来维护需要渲染的页面元素,并且用适当的空白区域来替换窗口之外的所有项目,从而极大地提高了大型列表的内存消耗和性能。
具体实例如下:
type ItemData = {
  id: string;
  title: string;
};

// 获取数据,这里是直接就返回处理后的数据
const getItem = (_data: unknown, index: number): ItemData => ({
  id: Math.random().toString(12).substring(0),
  title: `Item ${index + 1}`,
});

// 列表的总数
const getItemCount = (_data: unknown) => 50;

type ItemProps = {
  title: string;
};

// 渲染的组件
const Item = ({ title }: ItemProps) => (
  <View style={styles.item}>
    <Text style={styles.title}>{title}</Text>
  </View>
);

export default function VirtualizedListCaards() {
  return (
    <View>
      <Text style={BaseStyle.headingText}>VirtualizedListCards</Text>
      <VirtualizedList
        initialNumToRender={10}
        renderItem={({ item }) => <Item title={item.title} />}
        keyExtractor={(item) => item.id}
        getItemCount={getItemCount}
        getItem={getItem}
      />
    </View>
  );
}

const styles = StyleSheet.create({
  item: {
    backgroundColor: "#f9c2ff",
    height: 150,
    justifyContent: "center",
    marginVertical: 8,
    marginHorizontal: 16,
    padding: 20,
  },
  title: {
    fontSize: 32,
  },
});
使用此组件需要注意以下几点:
-
当内容滚动出渲染窗口时,超出窗口的数据不会自动保存的系统变量中。所以需要我们使用 Flux、Redux 或者 Relay 来存储是有需要展示的数据。
-
flatList组件是 PureComponent 类型组件,这意味着如果 props 保持浅层拷贝的话,它将不会重新渲染。确保您的 renderItem 函数所依赖的所有内容都作为 prop(例如 extraData)传递,并且在更新后不是 === ,否则您的 UI 可能不会因更改而更新。 -
flatList组件为了节省内存和实现平滑的滚动,页面的内容展示是异步实现的,这就意味着当滑动速度快于页面内容渲染速度的话,页面会出现空白内容。 -
默认情况下,列表会在每个项目上查找 key 属性,并将其用作 React key。或者,您可以提供自定义 keyExtractor 属性。
组件必备的参数说明
-
getItem
从数据中提取需要渲染的数据
-
getItemCount
确认需要渲染的组件有多少
-
renderItem
从 data 数据中获取一个数据并进行渲染


