Kubernetes+EFK构建日志分析平台
目录
Fluentd 工作原理
1.1、主机初始化配置
1.2、部署docker环境
二、部署kubernetes集群
2.1、组件介绍
2.2、配置阿里云yum源
2.3、安装kubelet kubeadm kubectl
2.4、配置init-config.yaml
2.5、安装master节点
2.6、安装node节点
2.7、安装flannel
3、部署企业镜像仓库
3.1、部署Harbor仓库
3.2、导入EFK镜像
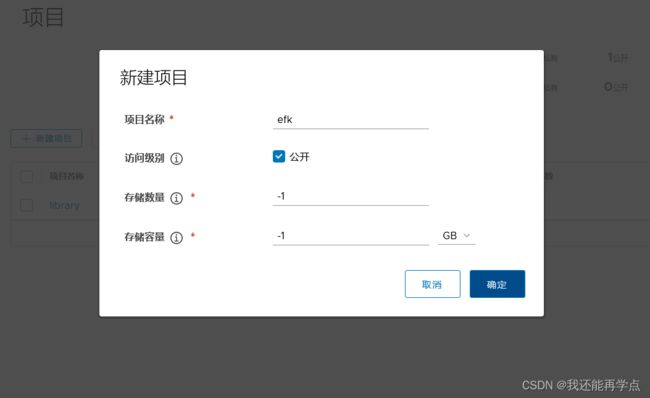
编辑
4、部署EFK业务环境
4.1、准备组件Yaml文件
4.2、部署Elasticsearch
4.3、部署kibana
4.4、部署Fluentd
4.5、验证容器日志收集
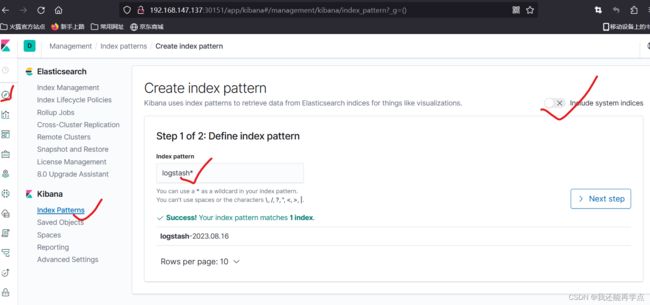
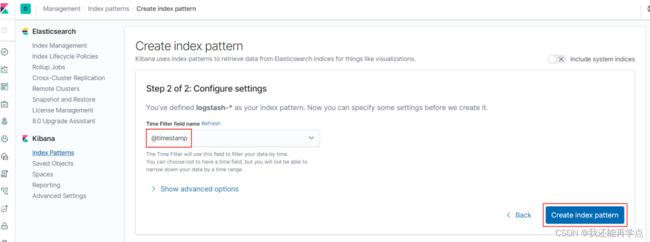
4.6、配置 Kibana
Fluentd 工作原理
Fluentd 是一个日志的收集、处理、转发系统。通过丰富的插件,可以收集来自各种系统或应用的日志,转化为用户指定的格式后,转发到用户所指定的日志存储系统中。
一、环境准备
| 操作系统 |
IP地址 |
主机名 |
组件 |
| CentOS7.x |
192.168.147.137 |
k8s-master |
kubeadm、kubelet、kubectl、docker-ce |
| CentOS7.x |
192.168.147.139 |
k8s-node01 |
kubeadm、kubelet、kubectl、docker-ce、elasticsearch、fluentd |
| CentOS7.x |
192.168.147.140 |
k8s-node02 |
kubeadm、kubelet、kubectl、docker-ce、kibana、fluentd |
| CentOS7.x |
192.168.147.141 |
harbor |
docker-ce、docker-compose、harbor |
注意:所有主机配置推荐CPU:2C+ Memory:4G+、运行 Elasticsearch 的节点要有足够的内存(不低于 4GB)。若 Elasticsearch 容器退出,请检查宿主机中的/var/log/message 日志,观察是否因为系统 OOM 导致进程被杀掉。
1.1、主机初始化配置
所有主机配置禁用防火墙和selinux
[root@client2 ~]#  setenforce 0
[root@client2 ~]# iptables -F
[root@client2 ~]# systemctl stop firewalld
[root@client2 ~]# systemctl disable firewalld
Removed symlink /etc/systemd/system/multi-user.target.wants/firewalld.service.
Removed symlink /etc/systemd/system/dbus-org.fedoraproject.FirewallD1.service.
[root@client2 ~]#  systemctl stop NetworkManager
[root@client2 ~]#  systemctl disable NetworkManager
Removed symlink /etc/systemd/system/multi-user.target.wants/NetworkManager.service.
Removed symlink /etc/systemd/system/dbus-org.freedesktop.nm-dispatcher.service.
Removed symlink /etc/systemd/system/network-online.target.wants/NetworkManager-wait-online.service.
[root@client2 ~]#  sed -i '/^SELINUX=/s/enforcing/disabled/' /etc/selinux/config
所有配置主机名并绑定hosts,不同主机名称不同
[root@k8s-master ~]# cat << EOF >> /etc/hosts
> 192.168.147.137 k8s-master
> 192.168.147.139 k8s-node01
> 192.168.147.140 k8s-node02
> EOF
[root@k8s-master ~]# scp /etc/hosts 192.168.147.139:/etc/hosts
[root@k8s-master ~]# scp /etc/hosts 192.168.147.140:/etc/hosts
主机配置初始化
[root@k8s-master ~]# yum -y install vim wget net-tools lrzsz

[root@k8s-master ~]# swapoff -a
[root@k8s-master ~]# sed -i '/swap/s/^/#/' /etc/fstab

[root@k8s-node01 ~]# cat << EOF >> /etc/sysctl.conf
net.bridge.bridge-nf-call-ip6tables = 1
net.bridge.bridge-nf-call-iptables = 1
EOF
[root@k8s-node01 ~]# modprobe br_netfilter
[root@k8s-node01 ~]# sysctl -p
1.2、部署docker环境
三台主机上分别部署 Docker 环境,因为 Kubernetes 对容器的编排需要 Docker 的支持。
[root@k8s-master ~]# wget -O /etc/yum.repos.d/CentOS-Base.repo http://mirrors.aliyun.com/repo/Centos-7.repo
[root@k8s-master ~]# yum install -y yum-utils device-mapper-persistent-data lvm2
使用 YUM 方式安装 Docker 时,推荐使用阿里的 YUM 源。
[root@k8s-master ~]# yum-config-manager --add-repo https://mirrors.aliyun.com/docker-ce/linux/centos/docker-ce.repo

[root@k8s-master ~]# yum clean all && yum makecache fast

[root@k8s-master ~]# yum -y install docker-ce
[root@k8s-master ~]# systemctl start docker
[root@k8s-master ~]# systemctl enable docker
镜像加速器(所有主机配置)
[root@k8s-master ~]# cat << END > /etc/docker/daemon.json
{
        "registry-mirrors":[ "https://nyakyfun.mirror.aliyuncs.com" ]
}
END
[root@k8s-master ~]# systemctl daemon-reload
[root@k8s-master ~]# systemctl restart docker
二、部署kubernetes集群
2.1、组件介绍
三个节点都需要安装下面三个组件
- kubeadm:安装工具,使所有的组件都会以容器的方式运行
- kubectl:客户端连接K8S API工具
- kubelet:运行在node节点,用来启动容器的工具
2.2、配置阿里云yum源
使用 YUM 方式安装 Kubernetes时,推荐使用阿里的 YUM 源。
[root@k8s-master ~]# cat < /etc/yum.repos.d/kubernetes.repo
[kubernetes]
name=Kubernetes
baseurl=https://mirrors.aliyun.com/kubernetes/yum/repos/kubernetes-el7-x86_64/
enabled=1
gpgcheck=1
repo_gpgcheck=1
gpgkey=https://mirrors.aliyun.com/kubernetes/yum/doc/yum-key.gpg
       https://mirrors.aliyun.com/kubernetes/yum/doc/rpm-package-key.gpg
EOF

[root@k8s-master ~]# ls /etc/yum.repos.d/
backup  Centos-7.repo  CentOS-Media.repo  CentOS-x86_64-kernel.repo  docker-ce.repo  kubernetes.repo
2.3、安装kubelet kubeadm kubectl
所有主机配置
[root@k8s-master ~]# yum install -y kubelet-1.19.0 kubeadm-1.19.0 kubectl-1.19.0
[root@k8s-master ~]# systemctl enable kubelet
kubelet 刚安装完成后,通过 systemctl start kubelet 方式是无法启动的,需要加入节点或初始化为 master 后才可启动成功。
2.4、配置init-config.yaml
Kubeadm 提供了很多配置项,Kubeadm 配置在 Kubernetes 集群中是存储在ConfigMap 中的,也可将这些配置写入配置文件,方便管理复杂的配置项。Kubeadm 配内容是通过 kubeadm config 命令写入配置文件的。
在master节点安装,master 定于为192.168.147.137,通过如下指令创建默认的init-config.yaml文件:
[root@k8s-master ~]# kubeadm config print init-defaults > init-config.yamlinit-config.yaml配置
[root@k8s-master ~]# cat init-config.yaml
apiVersion: kubeadm.k8s.io/v1beta2
bootstrapTokens:
- groups:
  - system:bootstrappers:kubeadm:default-node-token
  token: abcdef.0123456789abcdef
  ttl: 24h0m0s
  usages:
  - signing
  - authentication
kind: InitConfiguration
localAPIEndpoint:
  advertiseAddress: 192.168.147.137		//master节点IP地址
  bindPort: 6443
nodeRegistration:
  criSocket: /var/run/dockershim.sock
  name: k8s-master		//如果使用域名保证可以解析,或直接使用 IP 地址
  taints:
  - effect: NoSchedule
    key: node-role.kubernetes.io/master
---
apiServer:
  timeoutForControlPlane: 4m0s
apiVersion: kubeadm.k8s.io/v1beta2
certificatesDir: /etc/kubernetes/pki
clusterName: kubernetes
controllerManager: {}
dns:
  type: CoreDNS
etcd:
  local:
    dataDir: /var/lib/etcd		//etcd 容器挂载到本地的目录
imageRepository: registry.aliyuncs.com/google_containers	//修改为国内地址
kind: ClusterConfiguration
kubernetesVersion: v1.19.0
networking:
  dnsDomain: cluster.local
  serviceSubnet: 10.96.0.0/12
  podSubnet: 10.244.0.0/16 	//新增加 Pod 网段
scheduler: {}
2.5、安装master节点
拉取所需镜像
[root@k8s-master ~]#  kubeadm config images list --config init-config.yaml
W0816 13:56:45.430833    9144 configset.go:348] WARNING: kubeadm cannot validate component configs for API groups [kubelet.config.k8s.io kubeproxy.config.k8s.io]
registry.aliyuncs.com/google_containers/kube-apiserver:v1.19.0
registry.aliyuncs.com/google_containers/kube-controller-manager:v1.19.0
registry.aliyuncs.com/google_containers/kube-scheduler:v1.19.0
registry.aliyuncs.com/google_containers/kube-proxy:v1.19.0
registry.aliyuncs.com/google_containers/pause:3.2
registry.aliyuncs.com/google_containers/etcd:3.4.9-1
registry.aliyuncs.com/google_containers/coredns:1.7.0
[root@k8s-master ~]# ls | while read line
> do
> docker load < $line
> done
archive/tar: invalid tar header
archive/tar: invalid tar header
安装matser节点
[root@k8s-master ~]# kubeadm init --config=init-config.yaml
根据提示操作
kubectl 默认会在执行的用户家目录下面的.kube 目录下寻找config 文件。这里是将在初始化时[kubeconfig]步骤生成的admin.conf 拷贝到.kube/config
[root@k8s-master ~]# mkdir -p $HOME/.kube
[root@k8s-master ~]# cp -i /etc/kubernetes/admin.conf $HOME/.kube/config
[root@k8s-master ~]# chown $(id -u):$(id -g) $HOME/.kube/config
Kubeadm 通过初始化安装是不包括网络插件的,也就是说初始化之后是不具备相关网络功能的,比如 k8s-master 节点上查看节点信息都是“Not Ready”状态、Pod 的 CoreDNS无法提供服务等。
2.6、安装node节点
根据master安装时的提示信息
[root@k8s-node01 ~]# kubeadm join 192.168.147.137:6443 --token abcdef.0123456789abcdef --discovery-token-ca-cert-hash sha256:c511cdce7b1e9f89b90fea958ad50a539fba02dff2d4dc4d9b2f1dd631e07f04
[root@k8s-master ~]# kubectl get nodes
NAME         STATUS     ROLES    AGE   VERSION
k8s-master   NotReady   master   71s   v1.19.0
k8s-node01   NotReady      28s   v1.19.0
k8s-node02   NotReady      25s   v1.19.0
前面已经提到,在初始化 k8s-master 时并没有网络相关配置,所以无法跟 node 节点通信,因此状态都是“NotReady”。但是通过 kubeadm join 加入的 node 节点已经在k8s-master 上可以看到。
2.7、安装flannel
Master 节点NotReady 的原因就是因为没有使用任何的网络插件,此时Node 和Master的连接还不正常。目前最流行的Kubernetes 网络插件有Flannel、Calico、Canal、Weave 这里选择使用flannel。
所有主机上传flannel_v0.12.0-amd64.tar
[root@k8s-master ~]# docker load < flannel_v0.12.0-amd64.tar
256a7af3acb1: Loading layer  5.844MB/5.844MB
d572e5d9d39b: Loading layer  10.37MB/10.37MB
57c10be5852f: Loading layer  2.249MB/2.249MB
7412f8eefb77: Loading layer  35.26MB/35.26MB
05116c9ff7bf: Loading layer   5.12kB/5.12kB
Loaded image: quay.io/coreos/flannel:v0.12.0-amd64
所有主机上传cni网络插件
[root@k8s-master ~]# tar xf cni-plugins-linux-amd64-v0.8.6.tgz
[root@k8s-master ~]# cp flannel /opt/cni/bin/
master上传kube-flannel.yml
master主机配置:
[root@k8s-master ~]# kubectl get nodes
NAME         STATUS   ROLES    AGE     VERSION
k8s-master   Ready    master   5m53s   v1.19.0
k8s-node01   Ready       5m10s   v1.19.0
k8s-node02   Ready       5m7s    v1.19.0

[root@k8s-master ~]#  kubectl get pods -n kube-system
NAME                                 READY   STATUS    RESTARTS   AGE
coredns-6d56c8448f-qchcp             1/1     Running   0          6m15s
coredns-6d56c8448f-wsgvr             1/1     Running   0          6m15s
etcd-k8s-master                      1/1     Running   0          6m23s
kube-apiserver-k8s-master            1/1     Running   0          6m23s
kube-controller-manager-k8s-master   1/1     Running   0          6m23s
kube-flannel-ds-amd64-jlrvc          1/1     Running   0          2m43s
kube-flannel-ds-amd64-rd2lr          1/1     Running   0          2m43s
kube-flannel-ds-amd64-vm9rd          1/1     Running   0          2m43s
kube-proxy-bcxh6                     1/1     Running   0          5m50s
kube-proxy-hv8lz                     1/1     Running   0          5m47s
kube-proxy-qmw6j                     1/1     Running   0          6m14s
kube-scheduler-k8s-master            1/1     Running   0          6m23s
已经是ready状态
3、部署企业镜像仓库
3.1、部署Harbor仓库
harbor主机配置禁用防火墙和selinux
[root@localhost ~]# setenforce 0
[root@localhost ~]# iptables -F
[root@localhost ~]# systemctl stop firewalld
[root@localhost ~]# systemctl disable firewalld
[root@localhost ~]# systemctl stop NetworkManager
[root@localhost ~]# systemctl disable NetworkManager
[root@localhost ~]# sed -i '/^SELINUX=/s/enforcing/disabled/' /etc/selinux/config
配置主机名
[root@localhost ~]# hostname harbor
[root@localhost ~]# bash
[root@harbor ~]#
Harbor 仓库需要 Docker 容器支持,所以 Docker 环境是必不可少的。
[root@k8s-harbor ~]# wget -O /etc/yum.repos.d/CentOS-Base.repo http://mirrors.aliyun.com/repo/Centos-7.repo
[root@k8s-harbor ~]# yum install -y yum-utils device-mapper-persistent-data lvm2
使用 YUM 方式安装 Docker 时,推荐使用阿里的 YUM 源。
[root@k8s-harbor ~]# yum-config-manager --add-repo https://mirrors.aliyun.com/docker-ce/linux/centos/docker-ce.repo

[root@k8s-harbor ~]# yum clean all && yum makecache fast

[root@k8s-harbor ~]# yum -y install docker-ce
[root@k8s-harbor ~]# systemctl start docker
[root@k8s-harbor ~]# systemctl enable docker
镜像加速器(所有主机配置)
[root@k8s-harbor ~]# cat << END > /etc/docker/daemon.json
{
        "registry-mirrors":[ "https://nyakyfun.mirror.aliyuncs.com" ]
}
END
[root@k8s-harbor ~]# systemctl daemon-reload
[root@k8s-harbor ~]# systemctl restart docker
上传部署docker-compose
[root@harbor ~]# mv docker-compose /usr/local/bin/
[root@harbor ~]# chmod +x /usr/local/bin/docker-compose
部署harbor
Harbor 私有仓库程序采用 docker-compose 方式部署,不同的功能和应用处于不同的容器,这样带来了很好的兼容性,可在众多支持 Docker 的系统上运行 Harbor。
[root@harbor ~]# tar xf harbor-offline-installer-v1.10.4.tgz -C /usr/local/Harbor 的配置文件是/usr/local/harbor/harbor.yml 文件,默认的 hostname 要修改为
Harbor 虚拟机节点的 IP 地址。
[root@harbor ~]# vim /usr/local/harbor/harbor.yml
  5 hostname: 192.168.147.141
  7 # http related config
  8 #http:
  9   # port for http, default is 80. If https enabled, this port will redirect to https port
 10 #  port: 80
 11
 12 # https related config
13 #https:   //https 相关配置都注释掉,包括 https、port、certificate 和 private_key
 14   # https port for harbor, default is 443
 15   #port: 443
 16   # The path of cert and key files for nginx
 17   #certificate: /your/certificate/path
 18   #private_key: /your/private/key/path
启动harbor
[root@harbor ~]# cd /usr/local/harbor/
[root@harbor harbor]# sh install.sh
Creating network "harbor_harbor" with the default driver
Creating harbor-log ... done
Creating harbor-db     ... done
Creating redis         ... done
Creating harbor-portal ... done
Creating registry      ... done
Creating registryctl   ... done
Creating harbor-core   ... done
Creating harbor-jobservice ... done
Creating nginx             ... done
✔ ----Harbor has been installed and started successfully.----


[root@harbor harbor]# docker-compose ps
      Name                     Command                  State                      Ports
--------------------------------------------------------------------------------------------------------
harbor-core         /harbor/harbor_core              Up (healthy)
harbor-db           /docker-entrypoint.sh            Up (healthy)   5432/tcp
harbor-jobservice   /harbor/harbor_jobservice  ...   Up (healthy)
harbor-log          /bin/sh -c /usr/local/bin/ ...   Up (healthy)   127.0.0.1:1514->10514/tcp
harbor-portal       nginx -g daemon off;             Up (healthy)   8080/tcp
nginx               nginx -g daemon off;             Up (healthy)   0.0.0.0:80->8080/tcp,:::80->8080/tcp
redis               redis-server /etc/redis.conf     Up (healthy)   6379/tcp
registry            /home/harbor/entrypoint.sh       Up (healthy)   5000/tcp
registryctl         /home/harbor/start.sh            Up (healthy)
Harbor 启动完成后,浏览器访问 http://192.168.147.141,打开 Harbor Web 页面
修改所有主机docker启动脚本
[root@harbor ~]# vim /usr/lib/systemd/system/docker.service
ExecStart=/usr/bin/dockerd -H fd:// --containerd=/run/containerd/containerd.sock --insecure-registry 192.168.147.141

[root@harbor ~]# scp /usr/lib/systemd/system/docker.service 192.168.147.137:/usr/lib/systemd/system/
[root@harbor ~]# scp /usr/lib/systemd/system/docker.service 192.168.147.139:/usr/lib/systemd/system/
[root@harbor ~]# scp /usr/lib/systemd/system/docker.service 192.168.147.140:/usr/lib/systemd/system/
所有主机重启docker服务
[root@harbor ~]# systemctl daemon-reload
[root@harbor ~]# systemctl restart docker
3.2、导入EFK镜像
[root@harbor harbor]# sh install.sh

[root@harbor ~]# docker login -u admin -p Harbor12345 http://192.168.147.141
WARNING! Using --password via the CLI is insecure. Use --password-stdin.
WARNING! Your password will be stored unencrypted in /root/.docker/config.json.
Configure a credential helper to remove this warning. See
https://docs.docker.com/engine/reference/commandline/login/#credentials-store

Login Succeeded

docker pull下载镜像,我是已经下载了
[root@harbor ~]# ll
总用量 2946776
-rw-r--r--. 1 root root    4291072 5月  22 2020 alpine-3.6.tar
-rw-r--r--. 1 root root  870117376 5月  22 2020 elasticsearch-7.4.2.tar
-rw-r--r--. 1 root root  268387328 5月  22 2020 fluentd-es.tar
-rw-r--r--. 1 root root  678912854 8月  27 2020 harbor-offline-installer-v1.10.4.tgz
-rw-r--r--. 1 root root 1195774464 5月  22 2020 kibana-7.4.2.tar
[root@harbor ~]# docker load < elasticsearch-7.4.2.tar
[root@harbor ~]# docker load < fluentd-es.tar
[root@harbor ~]# docker load < kibana-7.4.2.tar
[root@harbor ~]# docker load < alpine-3.6.tar

[root@harbor ~]# docker tag b1179d 192.168.147.141/efk/elasticsearch:7.4.2
[root@harbor ~]# docker tag 636f3d 192.168.147.141/efk/fluentd-es-root:v2.5.2
[root@harbor ~]# docker tag 230d3d 192.168.147.141/efk/kibana:7.4.2
[root@harbor ~]# docker tag 43773d 192.168.147.141/efk/alpine:3.6

[root@harbor ~]# docker push 192.168.147.141/efk/elasticsearch:7.4.2
[root@harbor ~]# docker push 192.168.147.141/efk/fluentd-es-root:v2.5.2
[root@harbor ~]# docker push 192.168.147.141/efk/kibana:7.4.2
[root@harbor ~]# docker push 192.168.147.141/efk/alpine:3.6
4、部署EFK业务环境
4.1、准备组件Yaml文件
Yaml文件中涉及到镜像地址和 nodeSelector 选择器地址需要注意修改。
[root@k8s-master ~]# mkdir /opt/efk	#上传对应的yaml文件
[root@k8s-master ~]# cd /opt/efk/

[root@k8s-master efk]# grep "image:" elasticsearch.yaml
        image: 192.168.147.141/efk/elasticsearch:7.4.2
        image: 192.168.147.141/efk/alpine:3.6
        image: 192.168.147.141/efk/alpine:3.6
NodeSelector 节点选择器的修改,实际作用是决定将 Elasticsearch 服务部署到哪个节点。当前配置文件内是调度到 k8s-node01 节点,请根据实际负载情况进行调整。节点名称可以通过 kubectl get nodes 获取,在选择节点时务必确保节点有足够的资源。
[root@k8s-master efk]# grep -A1 "nodeSelector" elasticsearch.yaml
      nodeSelector:
        kubernetes.io/hostname: k8s-node01
对kibana.yaml文件镜像地址和调度节点进行修改,将 Kibana 部署到 k8s-node02 节点。
[root@k8s-master efk]# vim kibana.yaml
[root@k8s-master efk]# grep "image:" kibana.yaml
        image: 192.168.147.141/efk/kibana:7.4.2
[root@k8s-master efk]# grep -A1 "nodeSelector" kibana.yaml
      nodeSelector:
        kubernetes.io/hostname: k8s-node02
修改 fluentd.yaml的镜像地址
[root@k8s-master efk]# grep "image:" fluentd.yaml
        image: 192.168.147.141/efk/fluentd-es-root:v2.5.2
修改 test-pod.yaml的镜像地址
[root@k8s-master efk]# grep "image:" test-pod.yaml
    image: 192.168.147.141/efk/alpine:3.6
4.2、部署Elasticsearch
创建命名空间
创建名为 logging 的命名空间,用于存放 EFK 相关的服务。在 k8s-master节点的/opt/efk 目录下。
[root@k8s-master efk]# rz -E
rz waiting to receive.
[root@k8s-master efk]# kubectl create -f namespace.yaml
namespace/logging created
创建 es 数据存储目录
Elasticsearch 服务通常可以简写为 es。到 k8s-node01 节点创建数据目录/esdata。
[root@k8s-node01 ~]# mkdir /esdata
部署 es 容器
进入 k8s-master节点的/opt/efk 目录,部署 es 容器,执行如下操作。
[root@k8s-master efk]# kubectl create -f elasticsearch.yaml
statefulset.apps/elasticsearch-logging created
service/elasticsearch created
等待片刻,即可查看到 es 的 Pod,已经部署到 k8s-node01 节点,状态变为 running。
[root@k8s-master efk]# kubectl -n logging get pods -o wide
NAME                      READY   STATUS    RESTARTS   AGE   IP           NODE         NOMINATED NODE   READINESS GATES
elasticsearch-logging-0   1/1     Running   0          41s   10.244.1.2   k8s-node01
[root@k8s-master efk]# kubectl -n logging get svc
NAME            TYPE        CLUSTER-IP      EXTERNAL-IP   PORT(S)    AGE
elasticsearch   ClusterIP   10.100.107.86           9200/TCP   58s
通过 curl 命令访问服务,验证 es 是否部署成功。
[root@k8s-master efk]# curl 10.100.107.86:9200
{
  "name" : "elasticsearch-logging-0",
  "cluster_name" : "docker-cluster",
  "cluster_uuid" : "eScNPv9oT7CjuW8V8jnvjQ",
  "version" : {
    "number" : "7.4.2",
    "build_flavor" : "default",
    "build_type" : "docker",
    "build_hash" : "2f90bbf7b93631e52bafb59b3b049cb44ec25e96",
    "build_date" : "2019-10-28T20:40:44.881551Z",
    "build_snapshot" : false,
    "lucene_version" : "8.2.0",
    "minimum_wire_compatibility_version" : "6.8.0",
    "minimum_index_compatibility_version" : "6.0.0-beta1"
  },
  "tagline" : "You Know, for Search"
}
4.3、部署kibana
进入 k8s-master 的/opt/efk 目录,执行如下命令
[root@k8s-master efk]# kubectl create -f kibana.yaml
service/kibana created
deployment.apps/kibana created
查看pod的状态
[root@k8s-master efk]# kubectl -n logging get pods
NAME                      READY   STATUS    RESTARTS   AGE
elasticsearch-logging-0   1/1     Running   0          3m19s
kibana-686684c455-t6vj7   1/1     Running   0          54s
查看对应的 Service,得到 NodePort 值为 30151,此端口为随机端口,不同环境会不一致,请以实际结果为准。
[root@k8s-master efk]# kubectl -n logging get svc |grep kibana
kibana          NodePort    10.102.53.169           5601:30151/TCP   107s
4.4、部署Fluentd
给集群节点打标签
为了自由控制需要采集集群中节点上业务容器的服务日志。因此,需要给 k8s-node01和 k8s-node02 节点打上 fluentd=true 的标签 label。
[root@k8s-master efk]# kubectl label node k8s-node01 fluentd=true
node/k8s-node01 labeled
[root@k8s-master efk]# kubectl label node k8s-node02 fluentd=true
node/k8s-node02 labeled
k8s-node01 和 k8s-node02 已经打上了 fluentd=true 的 label,那么 Fluentd 服务就会启动到这两个节点,也就意味着运行在这两个节点的 Pod 日志会被收集起来。
启动 Fluentd 服务
在 k8s-master节点的/opt/efk 目录,启动 Fluentd 服务
[root@k8s-master efk]# rz -E
rz waiting to receive.
[root@k8s-master efk]# kubectl create -f fluentd-es-config-main.yaml
configmap/fluentd-es-config-main created
[root@k8s-master efk]# rz -E
rz waiting to receive.
[root@k8s-master efk]# kubectl create -f fluentd-configmap.yaml
configmap/fluentd-config created
[root@k8s-master efk]# kubectl create -f fluentd.yaml
serviceaccount/fluentd-es created
clusterrole.rbac.authorization.k8s.io/fluentd-es created
clusterrolebinding.rbac.authorization.k8s.io/fluentd-es created
daemonset.apps/fluentd-es-v2.5.2 created
查看 Pod 是否已经在 k8s-node01 和 k8s-node02 节点启动成功。
[root@k8s-master efk]# kubectl -n logging get pods
NAME                      READY   STATUS    RESTARTS   AGE
elasticsearch-logging-0   1/1     Running   0          9m57s
fluentd-es-v2.5.2-nvf4d   1/1     Running   0          47s
fluentd-es-v2.5.2-nxrql   1/1     Running   0          47s
kibana-686684c455-t6vj7   1/1     Running   0          7m32s
4.5、验证容器日志收集
创建测试容器
进入 k8s-master的/opt/efk 目录,执行如下命令。
[root@k8s-master efk]# kubectl create -f test-pod.yaml
pod/counter created
[root@k8s-master efk]# kubectl get pods
NAME      READY   STATUS    RESTARTS   AGE
counter   1/1     Running   0          10s
4.6、配置 Kibana
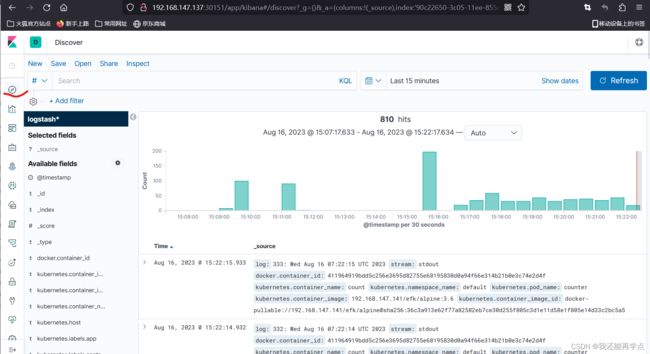
索引创建完成后,可以发现已经生成了多个索引域,稍等片刻再次点击左上角的
discover 图标,进入日志检索页面。


