CICD -- (二) jenkins 部署 java 项目并集成SonarQube
-
- 一、了解java项目发布流程
- 二、模拟java部署项目环境
- 三、在Gitlab上新建项目,并提交java项目代码
- 四、配置maven流水线
-
- 1. 安装maven工具
- 2. 配置maven镜像源
- 3. 将项目源码打包到本地,用maven编译测试
- 4. 创建maven流水线
- 5. 编写自动上线脚本
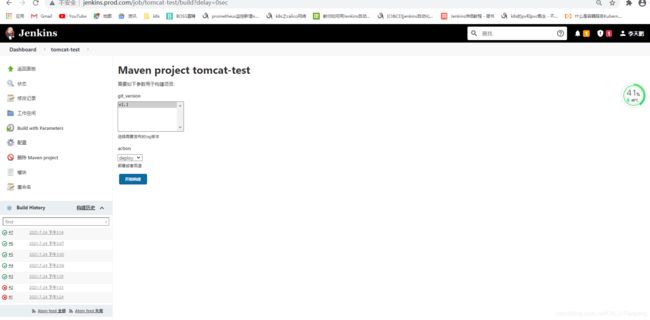
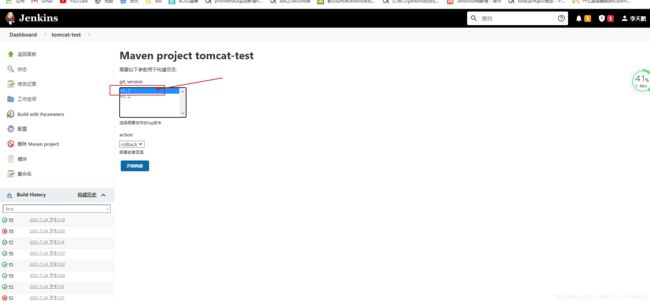
- 6. 模拟上传 v1.1 版本,测试流水线
- 7. 上传 v1.2 版本代码,测试回退功能
- 五、认识Sonar代码质检
-
- 1. 什么是SonarQube
- 2. SonarQube服务安装
-
- 2.1、安装mysql-5.6
- 2.2、启动数据库,配置数据库密码,创建Sonar库
- 2.3、sonarqube安装
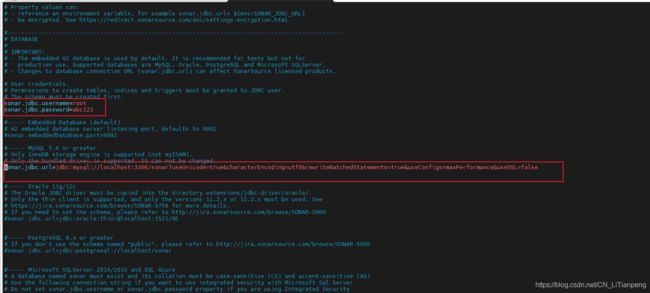
- 2.4、修改SonarQube配置,配上数据库信息
- 2.5、启动SonarQube
- 2.6、到10.4.7.14 DNS机器上做域名解析和代理
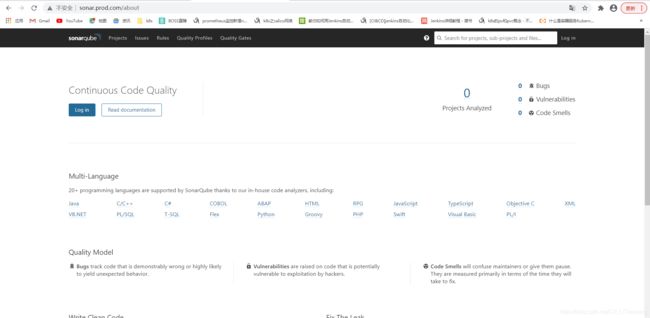
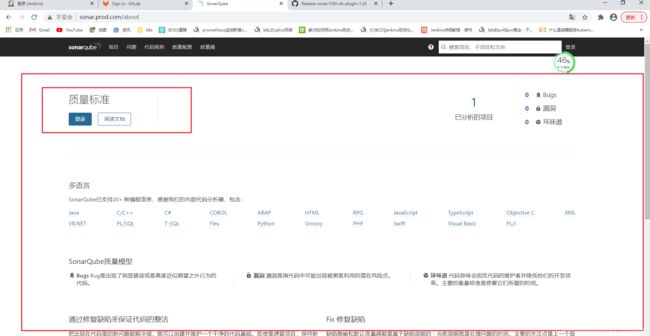
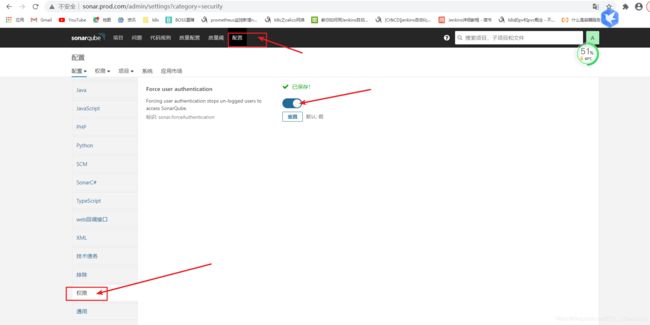
- 2.7、登入SonarQube,进行初始设置
- 2.8、安装相关插件
- 3、手动执行对pytho、html、PHP等项目的代码质量检测,验证效果
-
- 3.1、安装sonar客户端工具
- 3.2、修改sonar-scanner配置
- 3.3、到jenkins项目目录下执行扫描检查命令测试
- 4、手动执行对java项目的代码质量检测,验证效果
-
- 4.1、第一种:直接使用maven来扫描
- 4.2、第二种:使用sonar-scanner工具来扫描
- 六、jenkins集成Sonar代码质检
-
- 1、jenkins安装集成SonarQube的相关插件
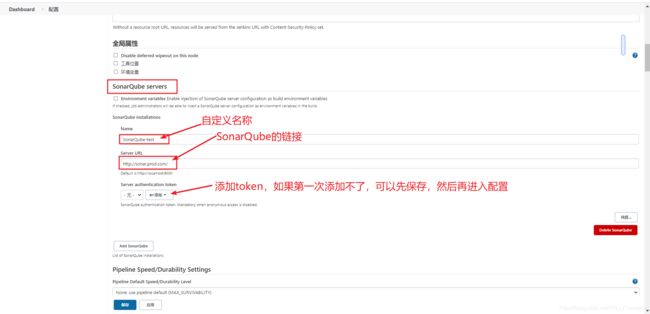
- 2、jenkins上配置SonarQube服务端地址
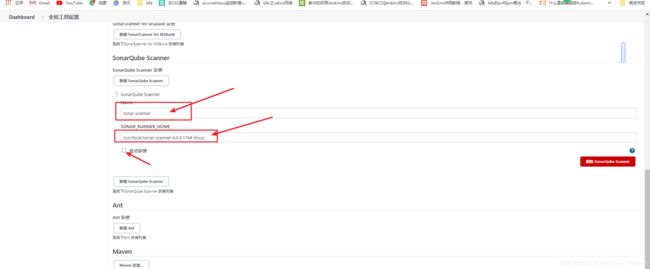
- 3、添加SonarQube客户端sonar-scanner工具位置
- 4、将SonarQube嵌入到一个静态页面流水线中(不使用maven的项目等)
-
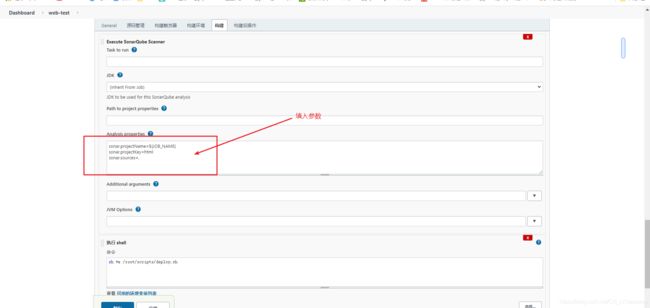
- 4.1、配置流水线参数
- 4.2、重新发布一个web-test的静态项目的版本,来测试
- 5、java项目的代码质检
-
- 5.1、配置流水线参数
- 5.2、重新发布一个web-test的静态项目的版本,来测试
一、了解java项目发布流程
- java项目编写的程序无法直接在服务器上运行,因此需要用到maven,最Java代码进行编译打包
- 实现java项目构建的过程:
- 1.首先我们拿到一个java源代码
- 2.提交Gitlab
- 3.使用maven进行手动构建
- 4.推送war至tomcat发布
二、模拟java部署项目环境
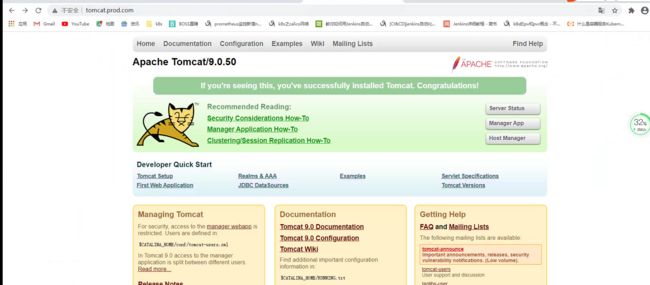
- 10.4.7.14:tomcat后端,nginx负载均衡
- 10.4.7.15:tomcat后端
- 10.4.7.14:mariadb数据库
1、在 10.4.7.14 和 10.4.7.15 上安装tomcat
[root@localhost ~]# wget 'https://apache.osuosl.org/tomcat/tomcat-9/v9.0.50/bin/apache-tomcat-9.0.50.tar.gz'

# 创建存放tomcat的目录
[root@localhost ~]# mkdir /root/soft

# 解压tomcat
[root@localhost ~]# tar zxvf apache-tomcat-9.0.50.tar.gz -C soft/

# 给tomcat创建软连接,便于管理
[root@localhost ~]# cd soft/
[root@localhost soft]# ln -s ~/soft/apache-tomcat-9.0.50 ~/soft/tomcat

# 修改tomcat端口,防止端口占用
[root@localhost soft]# cd tomcat
[root@localhost tomcat]# vim conf/server.xml
  ……省略部分
    <Connector port="8881" protocol="HTTP/1.1"    # 将这里的8080改掉,我这里就用8081

# 启动tomcat
[root@localhost tomcat]# sh bin/startup.sh
2、在 10.4.7.14 上配置负载均衡
[root@deploy tomcat]# cat /etc/nginx/conf.d/tomcat.prod.com.conf
upstream backend-tomcat-web {
        server 10.4.7.14:8881;
        server 10.4.7.15:8881;
}

server {
    listen       80;
    server_name  tomcat.prod.com;
    client_max_body_size 1000m;

    location / {
        proxy_pass http://backend-tomcat-web;
        proxy_set_header Host $http_host;
        proxy_set_header X-Real_IP $remote_addr;
        proxy_set_header X-Forwarded-For $proxy_add_x_forwarded_for;
    }
}
3、在 10.4.7.14 上配置dns解析
[root@deploy tomcat]# cat /var/named/prod.com.zone
$ORIGIN prod.com.
$TTL 600    ; 10 minutes
@       IN SOA    dns.prod.com. dnsadmin.host.com. (
                  2019111001 ; serial
                  10800      ; refresh (3 hours)
                  900        ; retry (15 minutes)
                  604800     ; expire (1 week)
                  86400      ; minimum (1 day)
                  )
              NS   dns.prod.com.
$TTL 60       ; 1 minute
dns     A       10.4.7.14
nginx   A       10.4.7.14
gitlab  A       10.4.7.15
jenkins A       10.4.7.14
tomcat  A       10.4.7.14
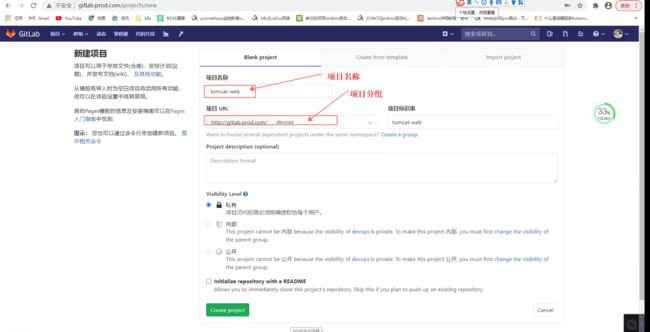
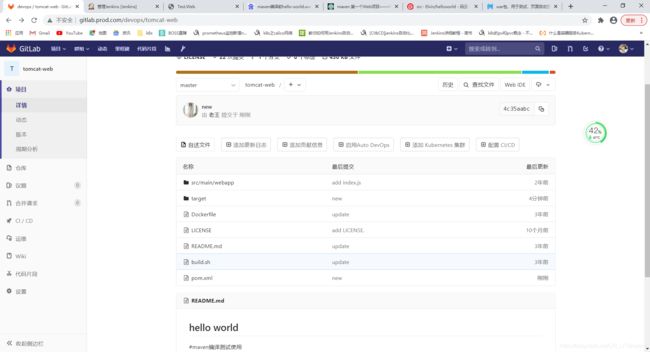
三、在Gitlab上新建项目,并提交java项目代码
[root@deploy src]# git remote remove origin
# 初始项目仓库
[root@deploy src]# git clone git@gitlab.prod.com:devops/tomcat-web.git
[root@deploy tomcat-web]# touch README.md
[root@deploy tomcat-web]# git add README.md
[root@deploy tomcat-web]# git commit -m "add README"
[master (root-commit) eb72404] add README
[root@deploy tomcat-web]# git push -u origin master

# 提交代码
[root@deploy src]# git add .
[root@deploy src]# git commit -m 'java'
[root@deploy tomcat-web]# git push -u origin master
四、配置maven流水线
java代码获取方式:git clone https://gitee.com/alivv/helloworld.git
1. 安装maven工具
- 在jenkins机器上安装maven:可以yum安装也可以二进制安装
第一种:直接使用yum安装
[root@deploy ~]# yum -y install maven
第二种: 使用二进制包安装
# 下载二进制包
[root@deploy ~]# wget 'https://archive.apache.org/dist/maven/maven-3/3.6.1/binaries/apache-maven-3.6.1-bin.tar.gz'
[root@deploy ~]# mkdir /data/nfs-volume/jenkins_home/maven-3.6.1-8u232

[root@deploy ~]# tar -zxf apache-maven-3.6.1-bin.tar.gz

[root@deploy ~]# mv apache-maven-3.6.1-bin /usr/local/

[root@deploy ~]# ln -s /usr/lcoal/apache-maven-3.6.1-bin  /usr/local/maven

# 设置环境变量
[root@deploy ~]# export PATH=/usr/local/apache-maven-3.6.1-bin/bin:$PATH

# 查看maven版本
root@deploy ~]# mvn -v
2. 配置maven镜像源
# 在配置文件中添加下面内容,在159行上面,注意:不要加在注释内容中
[root@deploy ~]# vim /usr/share/maven/conf/settings.xml
    <mirror>
        <id>nexus-aliyun</id>
        <mirrorOf>*</mirrorOf>
        <name>Nexus aliyun</name>
        <url>http://maven.aliyun.com/nexus/content/groups/public</url>
    </mirror>
3. 将项目源码打包到本地,用maven编译测试
[root@deploy ~]# git clone git@gitlab.prod.com:devops/tomcat-web.git
# 进入到项目仓库目录
[root@deploy ~]# cd tomcat-web/

# 使用mvn命令进行编译
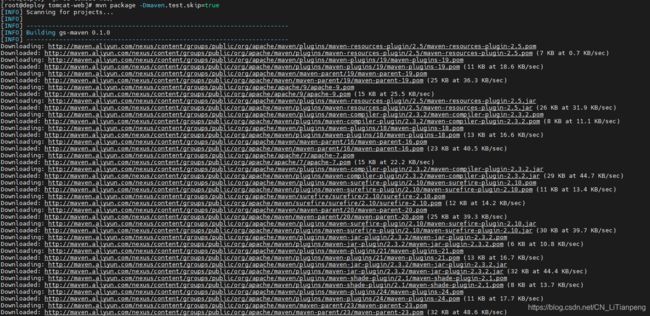
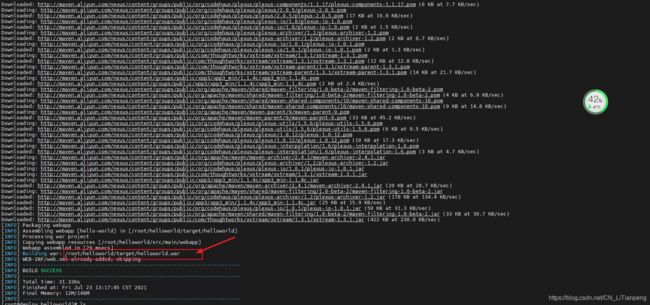
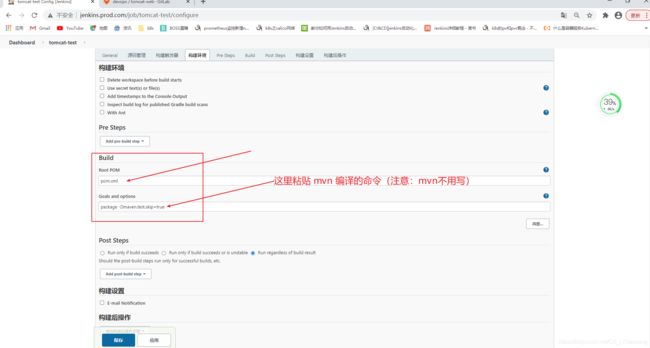
[root@deploy tomcat-web]# mvn package -Dmaven.test.skip=true
# 删除tomcat原本的ROOT目录
[root@deploy helloworld]# for i in {14..15};do ssh 10.4.7.$i "rm -rf /root/soft/tomcat/webapps/ROOT";done

# 上传生成的war到tomcat节点,上传成ROOT.war后会自动解压到tomcat的webapp下的ROOT目录中
[root@deploy helloworld]# for i in {14..15};do scp /root/helloworld/target/helloworld.war 10.4.7.$i:/root/soft/tomcat/webapps/ROOT.war;done

# 重启tomcat
[root@deploy helloworld]# for i in {14..15};do ssh 10.4.7.$i "sh /root/soft/tomcat/bin/shutdown.sh && sh /root/soft/tomcat/bin/startup.sh";done
4. 创建maven流水线
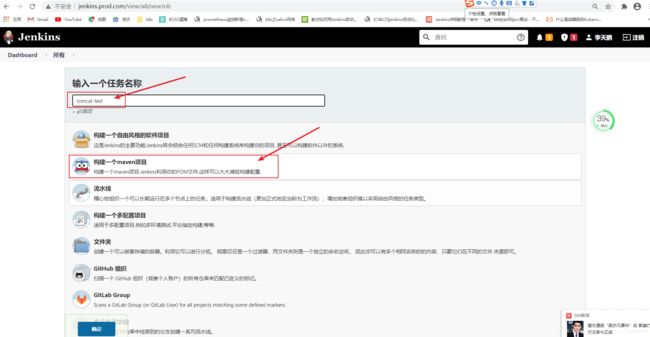
创建一个maven项目流水线
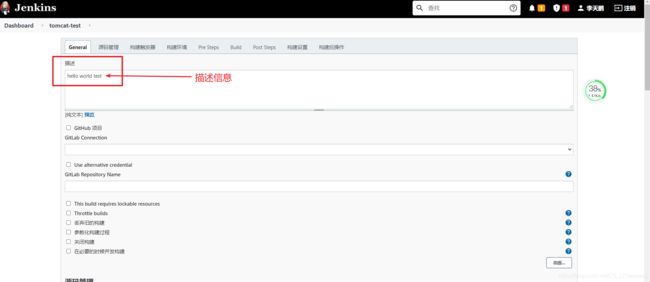
填写描述信息
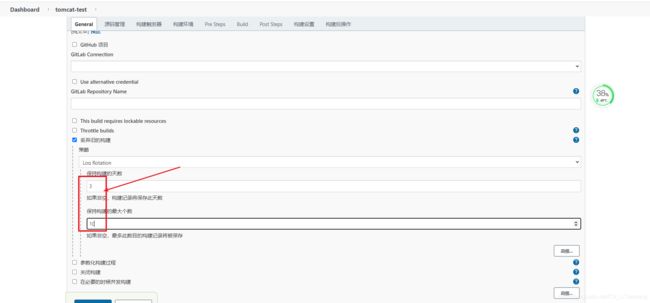
填写丢弃策略
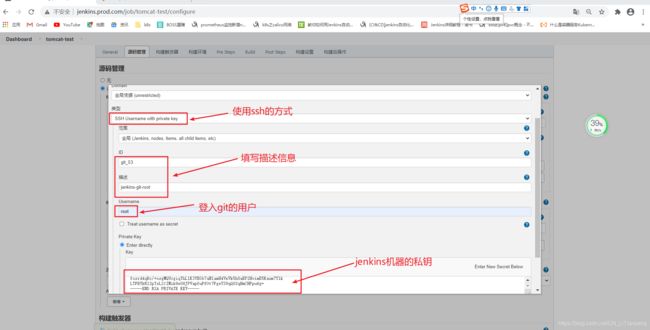
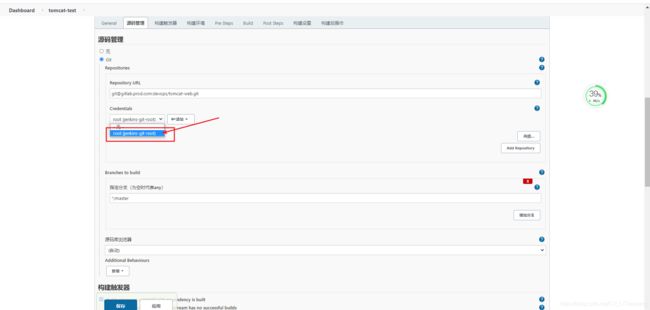
选择ssh的连接方式,创建 jenkins 的登入认证,并选择创建的用户
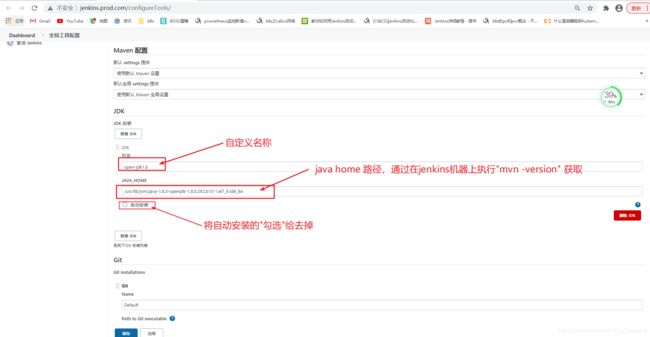
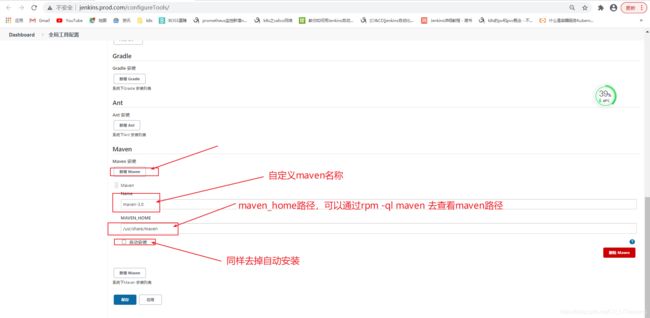
Build选项下,点击 “the tool configuration”,配置maven工具的路径信息(这时候,我们可以先将项目流水线保存,去配置maven,让jenkins知道maven位置)
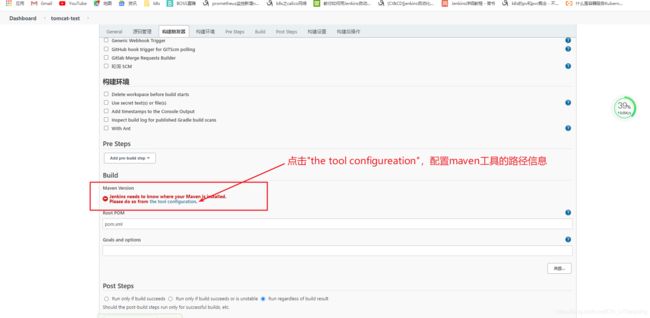
到新弹出的 maven 路径配置页面进行配置
# 示例
[root@deploy ~]# mvn -version
Apache Maven 3.0.5 (Red Hat 3.0.5-17)
Maven home: /usr/share/maven
Java version: 1.8.0_292, vendor: Red Hat, Inc.
Java home: /usr/lib/jvm/java-1.8.0-openjdk-1.8.0.292.b10-1.el7_9.x86_64/jre    # 这里将“/jre”去掉,就是java home地址
Default locale: en_US, platform encoding: UTF-8
OS name: "linux", version: "3.10.0-957.el7.x86_64", arch: "amd64", family: "unix"
- 新增maven,配置maven的家目录路径
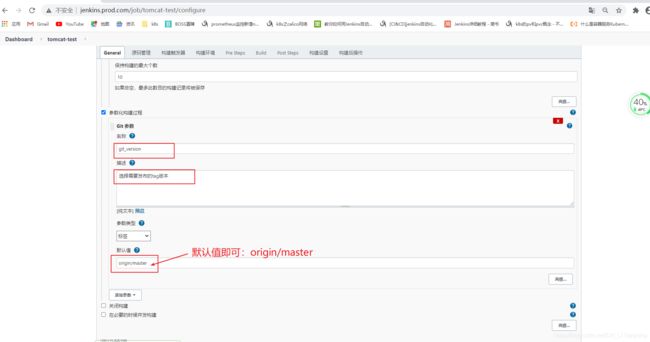
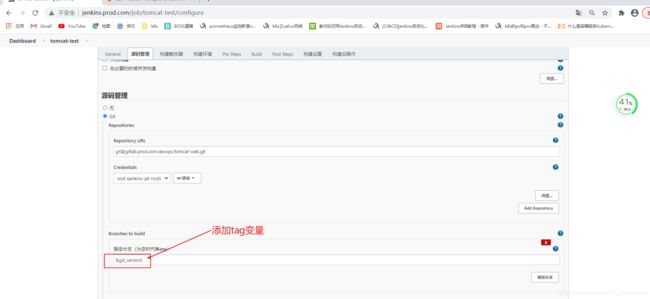
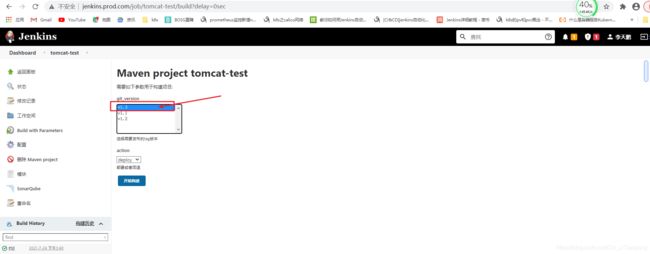
添加参数化构建参数
5. 编写自动上线脚本
[root@deploy scripts]# vim /root/scripts/tomcat-deploy.sh
#!/bin/bash

DATE=$(date +%Y-%m-%d-%H-%M-%S)
webserver="10.4.7.14 10.4.7.15"
Sdir=/opt
Ddir=/root/soft/tomcat/webapps
Postfix=${DATE}-${git_version}

# 到项目目录,将拉取下来的项目文件进行打包(打包的目的是为了方便传输给其他worker节点)
get_code(){
    cd ${WORKSPACE}
}

# 将内容scp到各个节点
scp_webserver(){
    for host in ${webserver};do
        scp target/*.war root@${host}:${Sdir}/ROOT-${Postfix}.war
        ssh ${host} "mkdir -p ${Ddir}/ROOT-${Postfix} &&\
                     unzip ${Sdir}/ROOT-${Postfix}.war -d ${Ddir}/ROOT-${Postfix} &&\
                     rm -rf ${Ddir}/ROOT &&\
                     ln -s ${Ddir}/ROOT-${Postfix} ${Ddir}/ROOT &\
                     sh /root/soft/tomcat/bin/shutdown.sh && sh /root/soft/tomcat/bin/startup.sh"
    done
}

rollback(){
    rollback_dir=$(find /root/soft/tomcat/webapps -maxdepth 1 -type d -name "*-${git_version}")
    for host in ${webserver};do
        ssh ${host} "
                     rm -rf ${Ddir}/ROOT &&\
                     ln -s ${rollback_dir} ${Ddir}/ROOT &\
                     sh /root/soft/tomcat/bin/shutdown.sh && sh /root/soft/tomcat/bin/startup.sh"
    done
}

deploy(){
    get_code
    scp_webserver
}

if [[ ${action} == deploy ]];then
    if [[ ${GIT_COMMIT} == ${GIT_PREVIOUS_SUCCESSFUL_COMMIT} ]];then
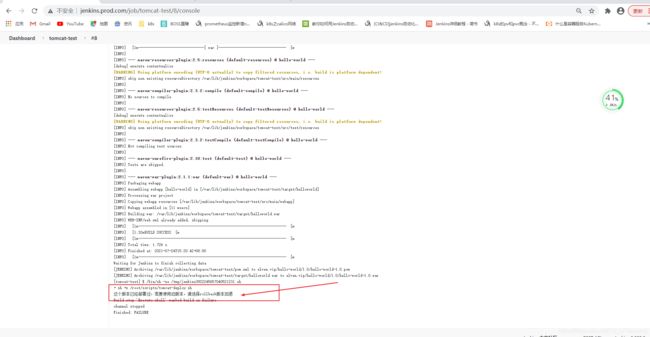
        echo "这个版本已经部署过,若要使用旧版本,请选择rollback版本回退"
        exit 1
    else
        deploy
    fi
elif [[ ${action} == rollback ]];then
    rollback
fi
6. 模拟上传 v1.1 版本,测试流水线
# 修改 src/main/webapp/index.jsp 文件中内容,模拟v1.1版本代码
<h1><font color="blue">Hello World V1.1</font></h1>

# 提交上传代码
[root@deploy tomcat-web]# git add -A .
[root@deploy tomcat-web]# git commit -m 'new v1.1'
[root@deploy tomcat-web]# git tag -a 'v1.1' -m 'new'
[root@deploy tomcat-web]# git push -u origin master v1.1
7. 上传 v1.2 版本代码,测试回退功能
- 解决同版本重复部署问题:
[[ ${GIT_COMMIT} == ${GIT_PREVIOUS_SUCCESSFUL_COMMIT} ]]判断语句解决这个问题
if [[ ${action} == deploy ]];then
    if [[ ${GIT_COMMIT} == ${GIT_PREVIOUS_SUCCESSFUL_COMMIT} ]];then
        echo "这个版本已经部署过,若要使用旧版本,请选择rollback版本回退"
        exit 1
    else
        deploy
    fi
- 部署 v1.2 版本,用户后面测试回退
[root@deploy ~]# cd tomcat-web/
[root@deploy webapp]# vim src/main/webapp/index.jsp
[root@deploy tomcat-web]# git add .
[root@deploy tomcat-web]# git commit -m 'v1.2'
[root@deploy tomcat-web]# git tag -a 'v1.2' -m 'new'
[root@deploy tomcat-web]# git push -u origin v1.2
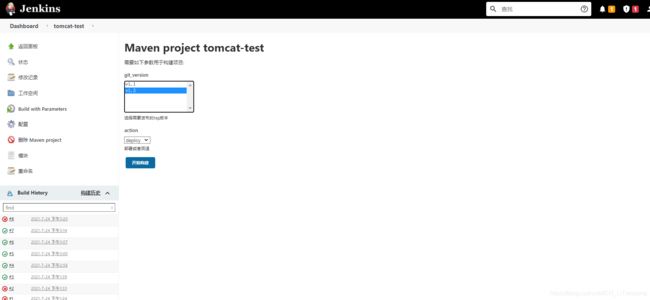
再次访问tomcat.prod.com,v1.2版本部署成功

五、认识Sonar代码质检
1. 什么是SonarQube
- SonarQube 是一个开源的代码质量管理系统,用于检测代码中的错误,漏洞和代码规范。它可以与Gitlab 与 jenkins集成。以便在项目拉取后进行连续的代码检查
- 使用SonarQube的前提:
- SonarQube 基于 java开发的,所以需要安装java
- SonarQube 需要依赖mysql数据库,至少 5.6 以上版本
- SonarQube 的小型实例至少需要4GB内存,如果是大型实例则需要16GB以上
2. SonarQube服务安装
- 10.4.7.12:SonarQube,mysql
2.1、安装mysql-5.6
- 下载地址:https://mirrors.tuna.tsinghua.edu.cn/mysql/yum/mysql-5.6-community-el7-x86_64/
[root@sonar ~]# yum -y install java wget unzip git

# 下载二进制包
[root@sonar ~]# wget https://mirrors.tuna.tsinghua.edu.cn/mysql/yum/mysql-5.6-community-el7-x86_64/mysql-community-client-5.6.45-2.el7.x86_64.rpm
[root@sonar ~]# wget https://mirrors.tuna.tsinghua.edu.cn/mysql/yum/mysql-5.6-community-el7-x86_64/mysql-community-common-5.6.45-2.el7.x86_64.rpm
[root@sonar ~]# wget https://mirrors.tuna.tsinghua.edu.cn/mysql/yum/mysql-5.6-community-el7-x86_64/mysql-community-libs-5.6.45-2.el7.x86_64.rpm
[root@sonar ~]# wget https://mirrors.tuna.tsinghua.edu.cn/mysql/yum/mysql-5.6-community-el7-x86_64/mysql-community-server-5.6.45-2.el7.x86_64.rpm

# 安装本地rpm包
[root@sonar ~]# yum -y localinstall mysql-community-*.rpm

# 查看rpm包
[root@sonar ~]# rpm -qa |grep mysql
mysql-community-server-5.6.45-2.el7.x86_64
mysql-community-common-5.6.45-2.el7.x86_64
mysql-community-libs-5.6.45-2.el7.x86_64
mysql-community-client-5.6.45-2.el7.x86_64
2.2、启动数据库,配置数据库密码,创建Sonar库
[root@sonar ~]# systemctl start mysqld
[root@sonar ~]# mysqladmin password abc123
# 创建sonar库
[root@sonar ~]# mysql -uroot -pabc123 -e "CREATE DATABASE sonar DEFAULT CHARACTER SET utf8;"

# 查看是否创建成功
[root@sonar ~]# mysql -uroot -pabc123 -e 'show databases;'
Warning: Using a password on the command line interface can be insecure.
+--------------------+
| Database           |
+--------------------+
| information_schema |
| mysql              |
| performance_schema |
| sonar              |
| test               |
+--------------------+
2.3、sonarqube安装
- 下载地址:https://binaries.sonarsource.com/Distribution/sonarqube/
- 注意:SonarQube必须要由一个普通用户启动,因此需要创建一个 sonar 普通用户
[root@sonar ~]# wget https://binaries.sonarsource.com/Distribution/sonarqube/sonarqube-7.0.zip

[root@sonar ~]# unzip sonarqube-7.0.zip -d /usr/local/

[root@sonar ~]# ln -s /usr/local/sonarqube-7.0 /usr/local/sonarqube

[root@sonar ~]# useradd sonar

[root@sonar ~]# chown -R sonar.sonar /usr/local/sonarqube-7.0
[root@sonar ~]# chown -R sonar.sonar /usr/local/sonarqube
2.4、修改SonarQube配置,配上数据库信息
[root@sonar ~]# vim /usr/local/sonarqube/conf/sonar.properties
……省略部分
# 取消掉下面几条参数的注释,并进行修改
sonar.jdbc.username=root             # 配置上数据库的用户名和密码
sonar.jdbc.password=abc123
# 下面这个是连接的数据库信息,由于数据库在本地,所以不用改localhost:3306,而且默认是sonar普通系统用户启动
sonar.jdbc.url=jdbc:mysql://localhost:3306/sonar?useUnicode=true&characterEncoding=utf8&rewriteBatchedStatements=true&useConfigs=maxPerformance&useSSL=false
2.5、启动SonarQube
- SonarQube默认使用9000端口
# 使用sonar用户启动SonarQube
[root@sonar ~]# su - sonar -c "/usr/local/sonarqube/bin/linux-x86-64/sonar.sh start"

# 查看9000端口
[root@sonar ~]# netstat -anput |grep 9000
tcp6       0      0 :::9000                 :::*                    LISTEN      20800/java
2.6、到10.4.7.14 DNS机器上做域名解析和代理
- 配置正向解析文件后重启named
[root@deploy scripts]# vim /var/named/prod.com.zone
$ORIGIN prod.com.
$TTL 600    ; 10 minutes
@       IN SOA    dns.prod.com. dnsadmin.host.com. (
                  2019111001 ; serial
                  10800      ; refresh (3 hours)
                  900        ; retry (15 minutes)
                  604800     ; expire (1 week)
                  86400      ; minimum (1 day)
                  )
              NS   dns.prod.com.
$TTL 60       ; 1 minute
harbor  A       10.4.7.14
dns     A       10.4.7.14
nginx   A       10.4.7.14
gitlab  A       10.4.7.15
jenkins A       10.4.7.14
tomcat  A       10.4.7.14
sonar   A       10.4.7.14
[root@deploy scripts]# systemctl restart named
- 配置nginx代理
server {
    listen       80;
    server_name  sonar.prod.com;

    client_max_body_size 1000m;

    location / {
        proxy_pass http://10.4.7.12:9000;
        proxy_set_header Host $http_host;
        proxy_set_header X-Real_IP $remote_addr;
        proxy_set_header X-Forwarded-For $proxy_add_x_forwarded_for;
    }
}
[root@deploy scripts]# systemctl reload named
2.7、登入SonarQube,进行初始设置
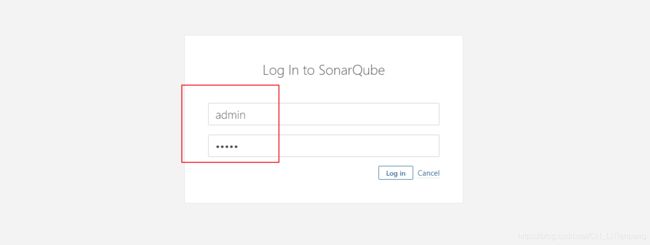
- 默认的用户名/密码:admin/admin
- 登入后会提示"生成一个token令牌"
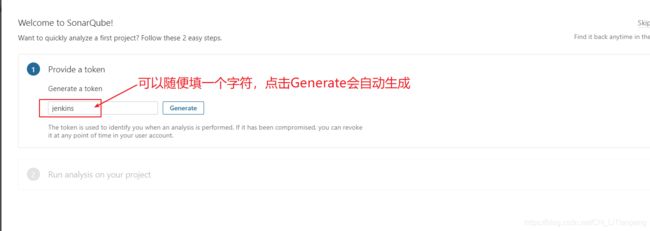
- 复制保存好生成的token令牌,相当于连接SonarQube的密码(如:aee542aa1e9e15578ffbc531bf8a2abe444530a4)
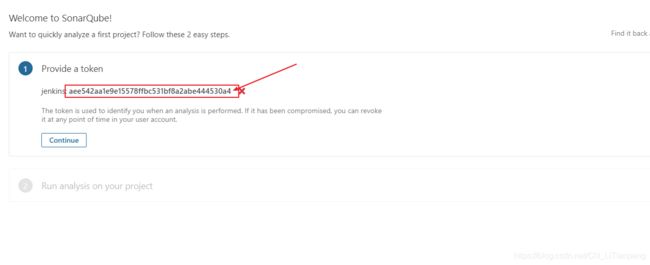
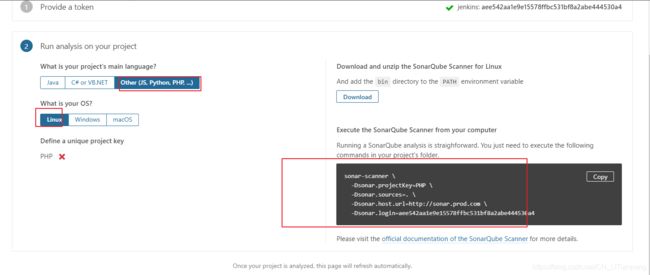
- 点击continue后,出现使用帮助说明
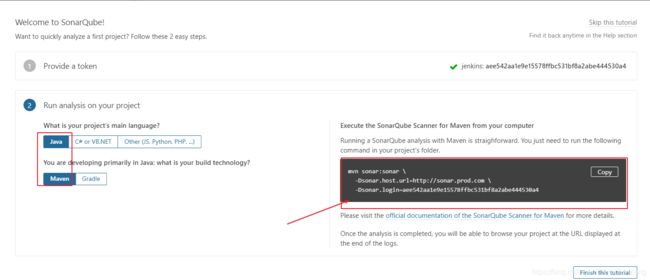
如下maven的SonarQube扫描使用:
mvn sonar:sonar \
  -Dsonar.host.url=http://sonar.prod.com \
  -Dsonar.login=aee542aa1e9e15578ffbc531bf8a2abe444530a4
# php代码检查的命令
sonar-scanner \
  -Dsonar.projectKey=PHP \
  -Dsonar.sources=. \
  -Dsonar.host.url=http://sonar.prod.com \
  -Dsonar.login=aee542aa1e9e15578ffbc531bf8a2abe444530a4
# html代码检查的命令
sonar-scanner \
  -Dsonar.projectKey=html \
  -Dsonar.sources=. \
  -Dsonar.host.url=http://sonar.prod.com \
  -Dsonar.login=aee542aa1e9e15578ffbc531bf8a2abe444530a4
如上面PHP的需要用到其他的sonar-scanner工具,可以在这下载:https://docs.sonarqube.org/latest/analysis/scan/sonarscanner/
2.8、安装相关插件
- 安装汉化插件:点击"Administration",点击“Maketplace”后搜索chines,点击"Chinese Pack" ,点击install
- 安装代码扫描插件:默认已安装c、java、python、php、js等代码质量分析工具,也可以根据项目自行安装html、css、go(sonarqube只会检查安装了插件的代码质量,对于未安装插件的代码不进行检查,因此插件安安装的越完善越好)
1.安装汉化插件
- Sonarqube官方网站链接:https://www.sonarqube.org
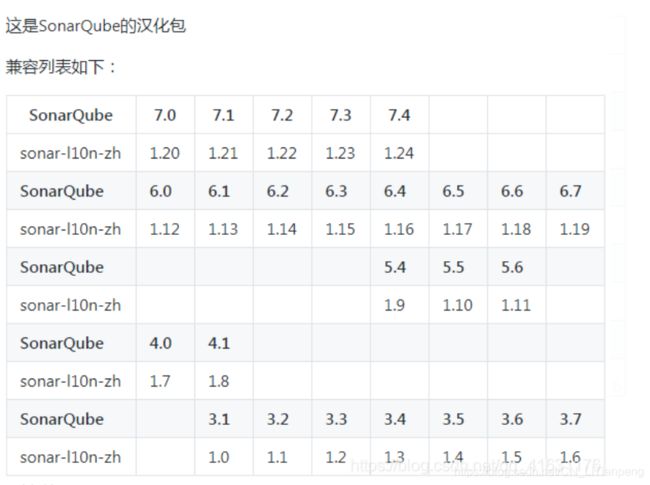
- 旧版本汉化包地址: https://github.com/SonarQubeCommunity/sonar-l10n-zh/releases/latest
- 注意,一定要版本匹配,最好去上面的官网上下载jar包
方法一:直接在SonarQube页面上下载(这个下载的是最新版的,可能不匹配)
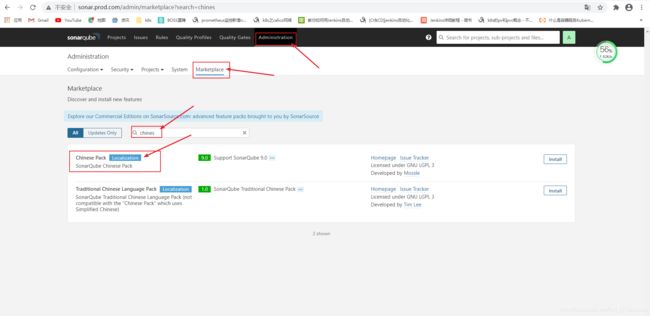
方法二:去官网下载,放到插件目录下,然后重启SonarQube
# 到插件目录下
[root@sonar ~]# cd /usr/local/sonarqube/extensions/plugins/

# 下载SonarQube-7.0的汉化插件
[root@sonar plugins]# wget 'https://github.com/xuhuisheng/sonar-l10n-zh/releases/download/sonar-l10n-zh-plugin-1.20/sonar-l10n-zh-plugin-1.20.jar'

# 重启SonarQube
[root@sonar linux-x86-64]#  su - sonar -c "sh /usr/local/sonarqube/bin/linux-x86-64/sonar.sh restart"
2.安装代码质量扫描插件(之前都打包好了)
- 插件安装可以通过web页面搜索安装,也可以通过替换插件目录来实现安装
# 对原插件目录进行备份
[root@sonar ~]# mv /usr/local/sonarqube/extensions/plugins /usr/local/sonarqube/extensions/plugins-bak

 # 将打包的本地插件解压到插件目录中
[root@sonar ~]# tar xf sonar_plugins.tar.gz -C /usr/local/sonarqube/extensions/plugins

# 改变目录文件属主和属组
[root@sonar ~]# chown sonar.sonar /usr/local/sonarqube/extensions/plugins

# 重启SonarQube
[root@sonar ~]# su - sonar -c "sh /usr/local/sonarqube/bin/linux-x86-64/sonar.sh restart"
-
FAQ常见问题
Q:- 问题现象: 使用sonar用户重启SonarQube失败,
sh sonar.sh console查看日志报错:WrapperSimpleApp: Encountered an error running main: java.nio.file.AccessDeniedException: /usr/local/sonarqube-7.0/temp/conf/es/elasticsearch.yml

- 问题原因:问题原因: 用root启动过会创建temp目录,该目录为root用户所有,使用自己创建的sonar用户启动时就会报错
A:
- 解决办法:删除SonarQube目录下temp目录中的所有目录及文件,然后重启SonarQube。或者将temp目录修改属主和属组为sonar
- 问题现象: 使用sonar用户重启SonarQube失败,
3、手动执行对pytho、html、PHP等项目的代码质量检测,验证效果
- 到 jenkins机器 的一个流水线项目目录下进行试验(因为这个目录下有现成的代码)
- 10.4.7.12:SonarQube机器
- 10.4.7.14:jenkins机器
- 10.4.7.15:Gitlab机器
- 对于这些项目(pytho、html、PHP),需要使用sonar-scanner这个客户端工具
3.1、安装sonar客户端工具
# 下载sonar-scanner(在jenkins机器上执行)
[root@deploy ~]# wget 'https://binaries.sonarsource.com/Distribution/sonar-scanner-cli/sonar-scanner-cli-4.0.0.1744-linux.zip4'

# 解压客户端工具
[root@deploy ~]# unzip sonar-scanner-cli-4.0.0.1744-linux.zip -d /usr/local/
[root@deploy ~]# ls /usr/local/
bin  etc  games  include  lib  lib64  libexec  sbin  share  sonar-scanner-4.0.0.1744-linux  src
# 做软连接
[root@deploy ~]# ln -s /usr/local/sonar-scanner-4.0.0.1744-linux /usr/local/sonar-scanner
3.2、修改sonar-scanner配置
- 修改配置文件
[root@deploy ~]# vim /usr/local/sonar-scanner/conf/sonar-scanner.properties
#----- Default SonarQube server
sonar.host.url=http://10.4.7.12:9000                          # 配置SonarQube的地址
sonar.login=aee542aa1e9e15578ffbc531bf8a2abe444530a4          # 新增这条登入配置,等于号(=)后面是之间获取的token


#----- Default source code encoding
sonar.sourceEncoding=UTF-8                                     # 默认字符集是utf-8
3.3、到jenkins项目目录下执行扫描检查命令测试
# 由于SonarQube机器地址和token都在配置文件中写了,这里执行命令就可以省略
[root@deploy tomcat-test]# /usr/local/sonar-scanner/bin/sonar-scanner \
-Dsonar.projectKey=html \
-Dsonar.sources=.
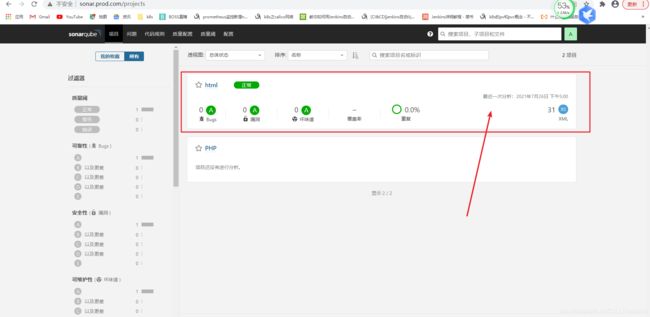
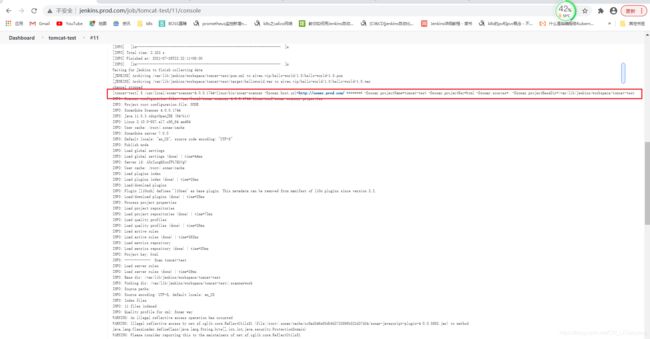
执行效果如图
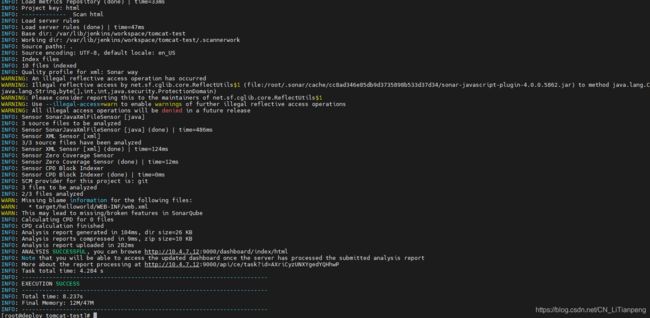
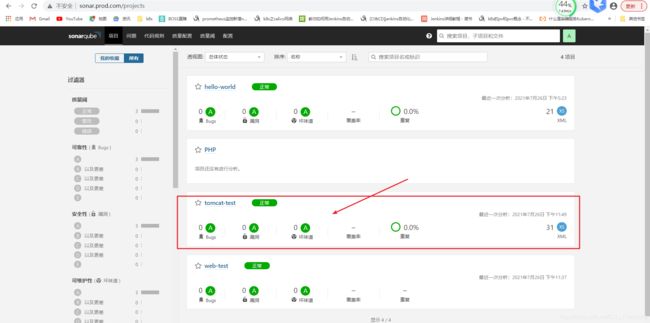
执行结束后,会将结果推送到SonarQube上,登入SonarQube,可以查看到执行结果
4、手动执行对java项目的代码质量检测,验证效果
- java项目可以通过maven进行代码质检,无需使用sonar-scanner工具,安装maven即可
- 使用sonar-scanner客户端工具也可以进行java的检查
4.1、第一种:直接使用maven来扫描
# 使用maven命令即可
[root@deploy tomcat-test]# mvn sonar:sonar \
-Dsonar.host.url=http://sonar.prod.com \
-Dsonar.login=aee542aa1e9e15578ffbc531bf8a2abe444530a4
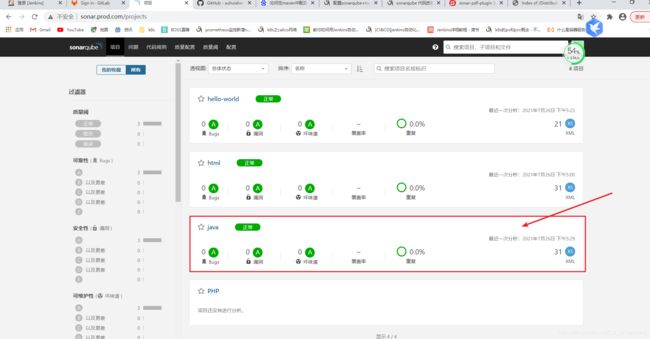
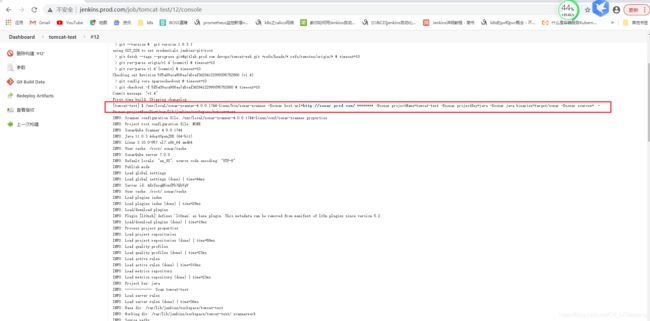
效果如图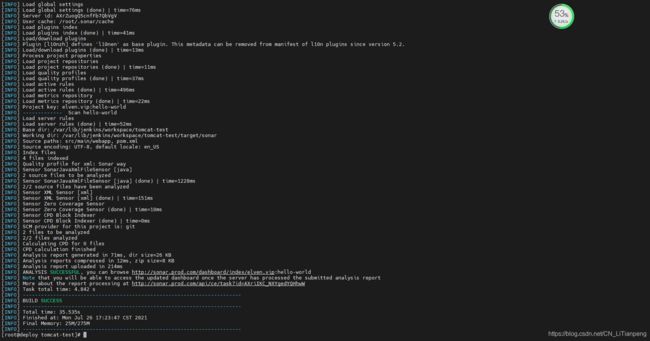
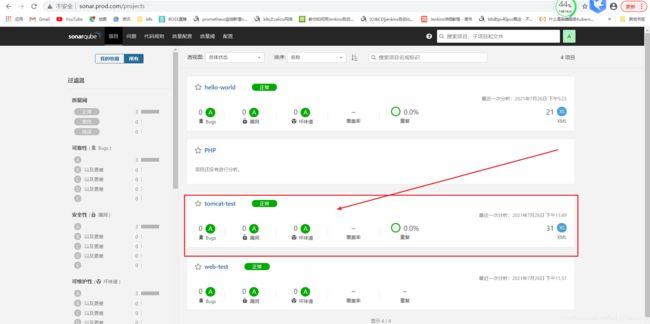
再次登入到sonar.prod,.com页面上查看,多了hello world的java项目
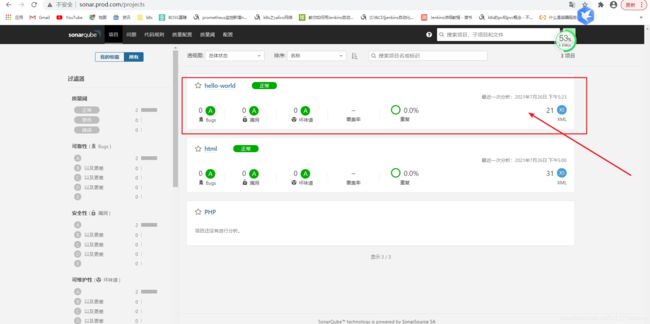
4.2、第二种:使用sonar-scanner工具来扫描
[root@deploy tomcat-test]# /usr/local/sonar-scanner/bin/sonar-scanner \
-Dsonar.projectKey=java \
-Dsonar.sources=.
六、jenkins集成Sonar代码质检
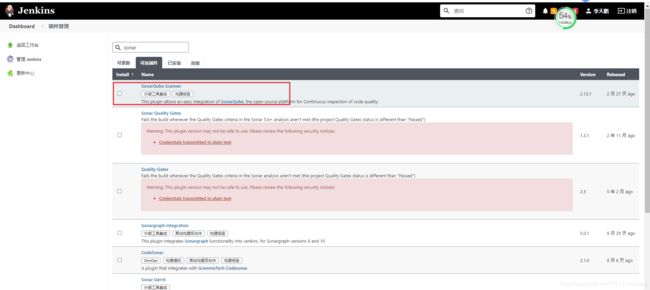
1、jenkins安装集成SonarQube的相关插件
2、jenkins上配置SonarQube服务端地址
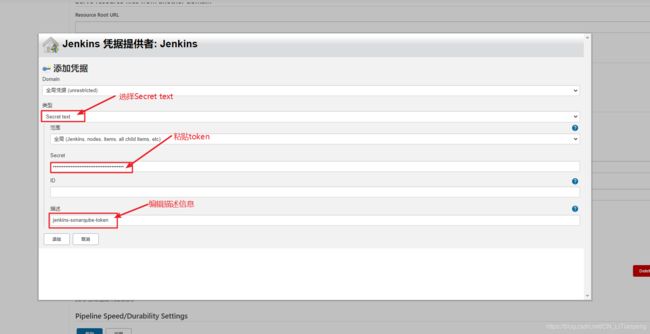
- 点击"系统管理",再点击"系统设置",找到"SonarQube servers"进行配置,点击"add sonarqube"
3、添加SonarQube客户端sonar-scanner工具位置
- 点击"系统管理"---->“全局工具配置”—> 找到"SonarQube Scanner"
- 点击新增配置sonar-scanner
4、将SonarQube嵌入到一个静态页面流水线中(不使用maven的项目等)
4.1、配置流水线参数
- 为了省事,就用之前的 web-test 流水线进行测试
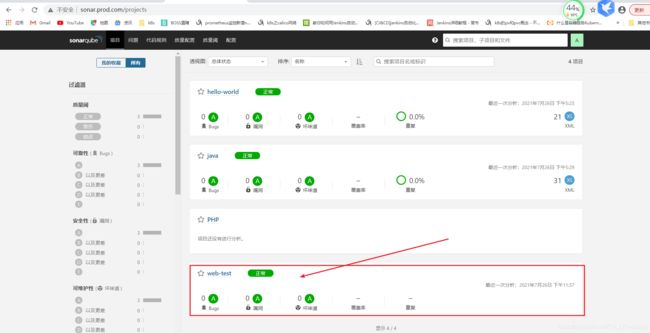
- 在"构建"下,点击"增加构建步骤",选择新增"Execute SonarQube Scanner",只需要在"Analysis properties"栏框内填入sonar-scanner命令的参数即可(并且参数前不用加"-D")
-
示例参数:
sonar.projectName=${JOB_NAME}
# ${JOB_NAME}这个变量是插件内置变量,接收jenkins项目名称,会在SonarQube上显示的 jenkins 项目名称
sonar.projectKey=html
sonar.sources=.
# 扫描哪个项目的源码
-
4.2、重新发布一个web-test的静态项目的版本,来测试
- 提交新代码
# 进入到项目目录
[root@deploy ~]# cd web-test/

# 修改代码,提交v1.3版本
[root@deploy web-test]# vim index.html

[root@deploy web-test]# git add .
[root@deploy web-test]# git commit -m 'v1.3'
[root@deploy web-test]# git tag -a 'v1.3' -m 'sonar test'
[root@deploy web-test]# git push -u origin v1.3
5、java项目的代码质检
- 也是使用之前的tomcat-test流水线项目测试
5.1、配置流水线参数
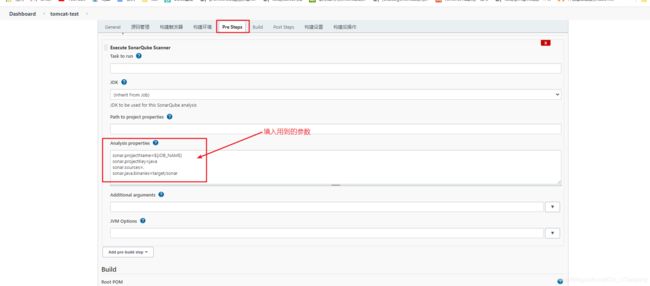
- 点击"pre steps"构建前配置---->点击"add pre-build step"新增构建前配置---->在"Analysis properties"中填入参数即可
示例参数:
sonar.projectName=${JOB_NAME}
sonar.projectKey=java
sonar.sources=.
sonar.java.binaries=target/sonar
5.2、重新发布一个web-test的静态项目的版本,来测试
- 提交新代码
# 进入到项目目录
[root@deploy ~]# cd web-test/

# 修改代码,提交v1.3版本
[root@deploy web-test]# vim index.html

[root@deploy tomcat-web]# git add .
[root@deploy tomcat-web]# git commit -m 'v1.4'
[root@deploy tomcat-web]# git tag -a 'v1.4' -m 'sonar java test'
[root@deploy tomcat-web]# git push -u origin v1.4
参考地址:https://www.cnblogs.com/lqh950422/p/13640027.html
