使用MyBatis-PageHelper + vue实现分页
使用MyBatis-PageHelper实现分页,前端使用vue
文章目录
- 使用MyBatis-PageHelper实现分页,前端使用vue
-
- PageHelper分页
-
- 1、Maven添加依赖:
- 2、在MyBatis的配置文件中添加插件
- 3、编写获得PageInfo对象的接口
- 4、测试接口
- 前端使用Pagination组件
-
- 1、导入Pagination的内容
- 2、在页面中使用Pagination
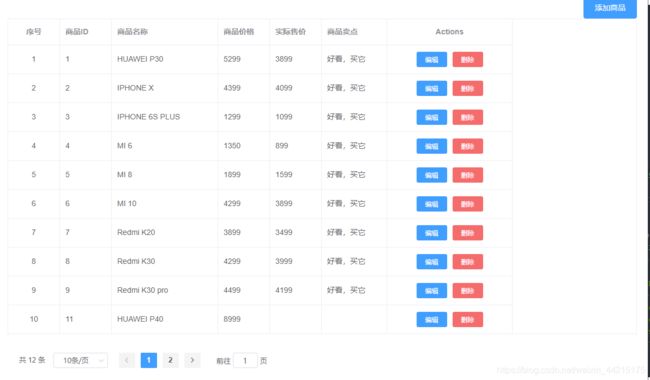
- 实现效果:
PageHelper分页
附上MyBatis-PageHelper地址:
https://github.com/pagehelper/Mybatis-PageHelper/blob/master/wikis/zh/HowToUse.md
1、Maven添加依赖:
<dependency>
    <groupId>com.github.pagehelpergroupId>
    <artifactId>pagehelperartifactId>
    <version>最新版本version>
dependency>
2、在MyBatis的配置文件中添加插件
具体参数看官方文档
    <plugins>

        <plugin interceptor="com.github.pagehelper.PageInterceptor">


            <property name="helperDialect" value="mysql"/>

            <property name="reasonable" value="true"/>
        plugin>
    plugins>
3、编写获得PageInfo对象的接口
    /**
     * 获得分页对象,里面封装了分页需要用到的所有信息
     * @param pageNum 当前第几页
     * @param pageSize 每页几个数据
     * @return 返回分页数据
     */
    @RequestMapping(value = "pageInfo", method = RequestMethod.GET)
    @ResponseBody
    public PageInfo<TProduct> getPageInfo(int pageNum, int pageSize) {
        //1.通过调用 PageHelper 的静态方法开始获取分页数据
        //指定当前第几页以及每页显示的条数
        PageHelper.startPage(pageNum, pageSize);

        //2.获得所有的商品记录
        List<TProduct> list = productService.getList();

        //3.获得当前分页对象
        PageInfo<TProduct> pageInfo = new PageInfo<TProduct>(list);

        return pageInfo;
    }
4、测试接口
以下是接口返回的 json字符串
{
    "total": 12,
    "list": [
        {
            "id": 1,
            "name": "HUAWEI P30",
            "image": "aaa",
            "price": 5299,
            "salePrice": 3899,
            "salePoint": "好看,买它",
            "typeId": 1,
            "typeName": "mobile phone",
            "flag": true,
            "createTime": "2020-10-04 04:51:05",
            "updateTime": "2020-10-07 04:51:24",
            "createUser": 1,
            "updateUser": 1
        },
        {
            "id": 2,
            ...
        },
        {
            "id": 3,
            ...
        },
        {
            "id": 4,
            ...
        },
        {
            "id": 5,
            ...
        }
    ],
    "pageNum": 1,
    "pageSize": 5,
    "size": 5,
    "startRow": 1,
    "endRow": 5,
    "pages": 3,
    "prePage": 0,
    "nextPage": 2,
    "isFirstPage": true,
    "isLastPage": false,
    "hasPreviousPage": false,
    "hasNextPage": true,
    "navigatePages": 8,
    "navigatepageNums": [1,2,3],
    "navigateFirstPage": 1,
    "navigateLastPage": 3
}
前端使用Pagination组件
1、导入Pagination的内容
1、components/Pagination
2、utils/scroll-to
2、在页面中使用Pagination
total: 记录的总条数
listQuery.page: 当前是第几页
listQuery.limit: 每页显示的数量
getList(): 当前页的所有数据
1、在template中
<pagination v-show="total>0" :total="total" :page.sync="listQuery.page"
	:limit.sync="listQuery.limit" @pagination="getList" />
2、在script中注册Pagination,并生明相应的参数(total、limit……)
components: { Pagination },
  data() {
    return {
      list: [],
      total: 0,
      listQuery: {
        limit: 10,
        page: 1
      }
    }
  }
3、声明getList函数,用于获取后端提供的PageInfo对象,该对象封装了分页所需的所有数据
created() {
    // this.fetchData();
    this.getList();
  },
  methods: {
    getList() {
      //得到一个PageInfo对象
      var that = this;
      this.axios({
        method: 'GET',
        url: 'http://localhost:8081/product/pageInfo?pageNum=' +that.listQuery.page+'&pageSize=' + that.listQuery.limit
      }).then(function(resp) {
        //得到一个PageInfo对象
        //将PageInfo中的total赋值给当前的total
        that.total = resp.data.total;
        //当前页显示的所有数据
        that.list = resp.data.list;
      }, function(err) {
        console.log(err);
      })
    }
