uniApp 学习笔记总结(二)
文章目录
- 1. 如何发送get请求
- 2. 数据缓存
- 3. 图片上传 + 预览
-
- 3.1 图片上传
- 3.2 图片预览
- 4. 条件注释实现跨段兼容
- 5. 导航跳转 + 传参
-
- 5.1 利用navigator组件进行跳转 (组价式跳转)
- 5.2 API页面跳转 (编程式导航)
- 6. uni-app组件创建引入 + 组件生命周期
- 7. 组件之间的通讯方式
- 8. uni-ui组件库
- 9. 对于请求可能统一封装js文件来处理
1. 如何发送get请求
官方文档
发起请求方式也都差不多:
- 有一个坑,就是success等等函数最好都要用箭头函数,不然拿不到this指定的data数据!
<template>
	<view>
		<view>这是列表页</view>
		<view class="box-item">
			{{list}}
		</view>
		<button @click="allEmp">查询全部</button>
	</view>
</template>

<script>
	export default{
		data(){
			return {
				list:"123123"
			}
		},
		methods:{
			allEmp(){
				//调用request完成请求,也可以设置方法。
				uni.request({
					url:'https://api.uixsj.cn/hitokoto/get?type=social',
					success:(res)=>{
							this.list = res.data;
					}
				})
			}
		}
	}
</script>

<style>
	.box-item{
		height: 100px;
		line-height: 100px;
	}
</style>
也可以中断请求任务:
// 中断请求任务
requestTask.abort();
2. 数据缓存
https://uniapp.dcloud.io/api/storage/storage.html#setstorage
同样的storage方式:
<template>
	<view>
		<button @click="setStorage">存储本地button>
		<button @click="getStorage">获取本地button>
		<button @click="removeStorage">移除本地button>
	view>
template>

<script>
	export default{
		data(){
			return {
				list:"123123"
			}
		},
		methods:{
			setStorage(){
				uni.setStorage({
					key:'1',
					data:this.list,
					success() {
						console.log("存储成功")
					}
				})
			},
			getStorage(){
				uni.getStorage({
					key:'1',
					success:(res)=>{
						console.log(res.data)
					}
				})
			},
			removeStorage(){
				uni.removeStorage({
					key:'1',
					success() {
						console.log('移除成功')
					}
				})
			}
		}
	}
script>

<style>
	.box-item{
		height: 100px;
		line-height: 100px;
	}
style>
3. 图片上传 + 预览
3.1 图片上传
uni.chooseImage函数方法:
- 从
本地相册选择图片或使用相机拍照。
<template>
	<view>
		<button type="primary" @click="chooseImg">上传图片button>
		<image v-for="item in arrImg" :src="item">image>
	view>
template>

<script>
	export default {
		data(){
			return {
				arrImg:[]
			}
		},
		methods:{
			chooseImg(){
				console.log('上传图片')
				uni.chooseImage({
					count:5,//限制上传图片数量,官方给出在H5上面是没法限制数量的

					//这里有个坑,就是必须是箭头函数,不然这个this没法指向Vue对象。
					success:(res)=>{
						//将上传的对象给arrImg
						this.arrImg = res.tempFilePaths
						console.log(res)
					}
				})
			}
		}
	}
script>

<style>
style>
3.2 图片预览
uni.previewImage函数方法:
图片预览就是我点击图片时,将该图片预览出来。
注意:current 为当前显示图片的链接/索引值,不填或填写的值无效则为 urls 的第一张。App平台在 1.9.5至1.9.8之间,current为必填。不填会报错
<template>
	<view>
		<button type="primary" @click="chooseImg">上传图片button>
		<image v-for="item in arrImg" :src="item" @click="previewImg(item)">image>
	view>
template>

<script>
	export default {
		data(){
			return {
				arrImg:[]
			}
		},
		methods:{
			chooseImg(){
				console.log('上传图片')
				uni.chooseImage({
					count:5,//限制上传图片数量,官方给出在H5上面是没法限制数量的

					//这里有个坑,就是必须是箭头函数,不然这个this没法指向Vue对象。
					success:(res)=>{
						//将上传的对象给arrImg
						this.arrImg = res.tempFilePaths
						console.log(res)
					}
				})
			},
			//图片预览方法
			previewImg(current){
				console.log('预览图片')
				uni.previewImage({
					current:current,//当前图片链接或者索引
					urls: this.arrImg,//当前图片集数组
					indicator: "default", //图片指示器样式
					loop: true//循环预览urls里面的图片
				})
			}
		}
	}
script>

<style>
style>
如果上传云端还需操作一些代码,见官方:
https://uniapp.dcloud.io/uniCloud/storage.html#%E5%AE%A2%E6%88%B7%E7%AB%AFapi
4. 条件注释实现跨段兼容
条件编译使用特殊的注释作为标记,在编译时根据这些特殊的注释,将注释里面的代码编译到不同平台。
格式:
- 以
#ifdef 或 #ifndef加 %PLATFORM% 开头,以#endif 结尾。

案例如下:
<template>
	<view>

		<view>你好世界1111view>


		<view>你好世界2222view>

		<button @click="myFun">点击按钮显示不同信息button>
	view>
template>

<script>
	export default {
		data(){
			return {
			}
		},
		methods:{
			myFun(){
				// #ifdef H5
				console.log('显示在H5平台')
				// #endif
				// #ifdef MP-WEIXIN
				console.log('显示在微信平台')
				// #endif
			}
		}
	}
script>

<style>
	/* #ifdef H5 */
	view{
		color: ;color: #007AFF;
	}
	/* #endif */

	/* #ifdef MP-WEIXIN */
	view{
		color: #4CD964;
	}
	/* #endif */
style>
5. 导航跳转 + 传参
5.1 利用navigator组件进行跳转 (组价式跳转)
navigator组件类似HTML中的组件,但只能跳转本地页面。目标页面必须在pages.json中注册。
<template>
	<view>
		navigator组件 导航跳转的学习

		<navigator url="/pages/list/list">跳转至信息页navigator>

		<navigator url="/pages/index/index" open-type="switchTab">跳转至主页navigator>

		<navigator url="/pages/list/list" open-type="redirect">跳转至信息页navigator>
	view>
template>

<script>
script>

<style>
style>
5.2 API页面跳转 (编程式导航)
uni.navigateTo函数方法:
- 保留当前页面,跳转到应用内的某个页面,使用
uni.navigateBack可以返回到原页面。
uni.switchTab函数方法:
- 跳转到 tabBar 页面,并关闭其他所有非 tabBar 页面。
uni.redirectTo函数方法:
- 关闭当前页面,跳转到应用内的某个页面。
- 跟redirect就算是一种重定向的标识了。
同样如果跳转页面传递参数了,可以使用onLoad(options)函数的options来接收到:

6. uni-app组件创建引入 + 组件生命周期
这个组件的创建引入和生命周期就和vue一样了。
- .vue文件创建 + import引入,生命周期如下:

7. 组件之间的通讯方式
同Vue一样:
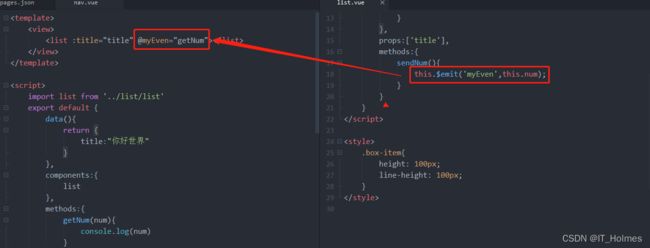
父传子:
- 通过
props: ['xxx']来传递。
子传父:
$emit触发事件。
uni.$emit(eventName,OBJECT)函数方法:
- 触发全局的自定义事件,附加参数都会传给监听器回调函数。
uni.$on(eventName,callback)函数方法:
- 监听全局的自定义事件,事件由 uni.$emit 触发,回调函数会接收事件触发函数的传入参数。
uni.$once(eventName,callback)函数方法:
- 监听全局的自定义事件,事件由 uni.$emit 触发,但仅触发一次,在第一次触发之后移除该监听器。
uni.$off([eventName, callback])函数方法:
- 移除全局自定义事件监听器。
8. uni-ui组件库
uni-uiDCloud提供的一个跨段ui库,它是基于Vue组件的,flex布局的,无dom的跨全端ui框架。
uni-ui不包括基础组件,它是基础组件的补充。
https://uniapp.dcloud.io/component/uniui/uni-calendar.html#%E4%BB%8B%E7%BB%8D
就拿日历来导入演示:

之后就会再HbuilderX上面安装插件去了。

按照官方下面的指示一步步的执行就行:
<template>
	<view>
		<view>
		    <uni-calendar
		        ref="calendar"
		        :insert="false"
		        @confirm="confirm"
		         />
		view>
		<button @click="open">打开日历button>
	view>
template>

<script>
	export default {
		data(){
			return {
				title:"你好世界"
			}
		},
		methods:{
			open(){
				//点击按钮后会触发组件对应的方法。
				this.$refs.calendar.open();
			},
			confirm(e) {
				//简历确定后,会走confirm这里的代码!
				console.log(e);
			}
		}
	}
script>

<style>
style>
9. 对于请求可能统一封装js文件来处理
