# 需求
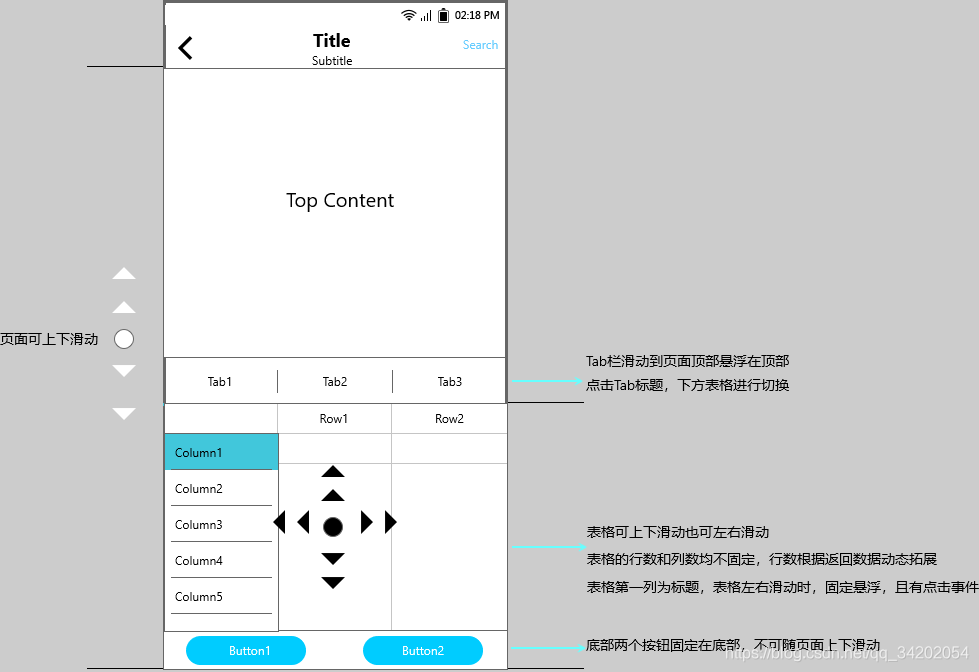
##### 最近Flutter项目中遇到一个稍显复杂的页面,主要是列表和表格的综合运用,感觉有必要总结一下。简单绘制了一下原型,大致要求如下:
- 页面可上下滑动
- 点击Tab标题时,Tab栏下方区域页面进行切换,且Tab栏滑动到顶部也就是紧挨着标题栏下方时,悬浮在顶部,用户再次向上滑动时,Tab下方页面进行上滑,而Tab栏固定不变
- Tab栏下方页面为表格数据,具体有多少列需要根据返回数据动态扩展,不固定。表格可上下左右滑动,左右滑动时,每一行的标题固定不变,仅滑动表格中的数据可滑动

# 分析与实践
### 根据需求分析,初步设计如下:
- 页面上下滑动,这里使用CustomScrollView,除了可上下滑动,其SliverAppBar可以根据滑动距离自动显示隐藏而且可以扩展指定高度,SliverToBoxAdapter可以根据上下滑动自然滑动,这两者都可以用来装Top Content;SliverFillRemaining则是让内容不滑出屏幕,符合Tab栏滑动到顶部之后悬浮的要求:
```java
CustomScrollView(
slivers:
SliverAppBar(
expandedHeight:100.0,
automaticallyImplyLeading: false,
floating: true,
snap: true,
toolbarHeight: 0.0,
elevation: 0.0,
pinned: true,
flexibleSpace: FlexibleSpaceBar(
centerTitle: true,
background: Column(
children: [
// Top content
...
],
),
),
),
// SliverToBoxAdapter(
// child: ...,
// ),
SliverFillRemaining(
child: Column(
children: [
// Tab content
...
],
),
),
],
),
```
如果不想把较多的内容放在SliverAppBar的background(用来放置沉浸式效果的背景图片)中,可以将内容放在SliverToBoxAdapter中。其中SliverAppBar中toolbarHeigh设置0.0,是因为该页面中标题栏是自定义的,并不是和SliverAppBar联动的,即无法实现沉浸式效果,如果不设置0.0,当顶部内容滑出屏幕,Tab栏无法置顶,距离顶部还有toolbarHeigh(默认56.0)空白区域,若使用SliverToBoxAdapter则没有这种问题,只是相比较SliverAppBar滑动效果稍微生硬了一些,但不是卡顿,不影响使用。
- 点击Tab栏标题,Tab栏下方可进行切换,这里使用TabBar和TabBarView,效果和Android中TabLayout和ViewPager一样。这里还要在CustomScrollView外层再加上DefaultTabController,因为TabBar和TabBarView一般建议使用在Scaffold中的appBar和body中,使用比较死板,而加上DefaultTabController后可根据需要灵活使用:
```java
return DefaultTabController(
length: tabTitles.length,
child: CustomScrollView(
...
SliverFillRemaining(
child: Column(
children: [
TabBar(
controller: _tabController,
tabs: titles
.map((e) => Tab(
child: Text(
e,
style:
TextStyle(fontSize: 14.0, fontWeight: FontWeight.w500),
),
))
.toList(),
isScrollable: false,
labelColor: CommonColors.color_1376ee,
indicatorColor: CommonColors.color_1376ee,
unselectedLabelColor: CommonColors.color_66,
),
Expanded(
flex: 1,
child: Container(
color: CommonColors.color_white,
child: TabBarView(
controller: tabController,
physics: NeverScrollableScrollPhysics(),
children:
...
],
),
)),
],
),
),
),
);
```
tabTitles就是Tab栏标题数组,TabBarView用Expanded包裹是为了防止出现屏幕溢出错误,使用NeverScrollableScrollPhysics()是不让TabBarView左右滑动。
- 表格区域可上下左右活动,上下滑动用ListView,因为每一行的标题悬浮的,所以在Row使用Expanded按比列划分屏幕的宽度。左边悬浮标题区域使用ListView且禁止滑动,右边内容区域也使用ListView,同样也禁止滑动,两次禁止滑动而外侧的ListView没有禁止滑动,这样就可以保证滑动标题和滑动数据内容的时候可以做到联动统一:
```java
ListView(
children: [
Row(
children: [
// 行名
Expanded(
child: ListView(
physics: NeverScrollableScrollPhysics(),
shrinkWrap: true,
children: titles,
)),
Expanded(
flex: 3,
child: ListView(
physics: NeverScrollableScrollPhysics(),
shrinkWrap: true,
children: [
...
],
),
),
],
)
],
);
```
- 数据行列不确定,这里使用DataTable,可以动态扩展列数:
```java
Expanded(
flex: 3,
child: ListView(
physics: NeverScrollableScrollPhysics(),
shrinkWrap: true,
children: [
SingleChildScrollView(
scrollDirection: Axis.horizontal,
child: DataTable(
dividerThickness: 0.0,
headingTextStyle: TextStyle(
fontSize: 14.0,
color: CommonColors.text_33,
fontWeight: FontWeight.w600),
sortAscending: false,
showBottomBorder: false,
showCheckboxColumn: false,
headingRowHeight: 32.0,
dataRowHeight: 36.0,
columns: dataColumns,
// 列名
rows: dataRows, // 数据
),
)
],
),
),
```
使用SingleChildScrollView,设置Axis.horizontal实现表格左右滑动,DataTable是Flutter专门用来展示表格数据类似于Excel,功能比较多,像排序,全选,单选,点击,上下左右翻页等具备,详细使用请自行查看。
# 全部代码如下:
```java
class TableDemo extends StatefulWidget {
@override
_TableDemoState createState() => _TableDemoState();
}
class _TableDemoState extends State
with SingleTickerProviderStateMixin {
TabController _tabController;
List
"Tab1",
"Tab2",
"Tab3",
];
List
List
List
@override
void initState() {
super.initState();
_tabController = TabController(length: _tabTitles.length, vsync: this);
for (int i = 0; i < 21; i++) {
List
// 表格每行名称-地区或运营商名称
_rowTitles.add(InkWell(
onTap: () => onTitleTap(i),
child: Container(
height: 36.0,
alignment: Alignment.center,
padding: EdgeInsets.symmetric(horizontal: 8.0),
child: Text(
"RowTitle${i + 1}",
style: TextStyle(fontSize: 14.0, color: Color(0xff333333)),
maxLines: 1,
overflow: TextOverflow.ellipsis,
)),
));
for (int j = 0; j < 11; j++) {
if (i == 0) {
// 表格每一列的名称
_dataColumns.add(DataColumn(label: Text("ColumnTitle$j")));
}
fadeData.add(DataCell(Text(
"$i$j",
textAlign: TextAlign.center,
style: TextStyle(fontSize: 14.0, color: Color(0xff666666)),
)));
}
_dataRows.add(DataRow(cells: fadeData));
}
_rowTitles.insert(
0,
Container(
height: 31.0,
));
}
@override
Widget build(BuildContext context) {
return Scaffold(
appBar: AppBar(
elevation: 0.0,
brightness: Brightness.light,
backgroundColor: Colors.white,
centerTitle: true,
//在标题前面显示的一个控件,在首页通常显示应用的 logo;在其他界面通常显示为返回按钮
leading: IconButton(
padding: const EdgeInsets.all(0.0),
icon: Icon(
Icons.arrow_back_ios,
color: Colors.black,
),
onPressed: () => onBack()),
//Toolbar 中主要内容,通常显示为当前界面的标题文字
title: Column(
children: [
Text("title",
style: TextStyle(
fontSize: 16.0,
color: Colors.black38,
)),
Text("subtitle",
style: TextStyle(
fontSize: 12.0,
color: Colors.black38,
))
],
),
//标题右侧显示的按钮组
actions: [
FlatButton(
onPressed: () => doSearch(),
child: Container(
alignment: Alignment.centerRight,
margin: EdgeInsets.only(left: 22.0),
child: Text(
"Search",
style: TextStyle(
fontSize: 14.0,
color: Colors.blue,
),
),
),
),
],
),
body: DefaultTabController(
length: _tabTitles.length,
child: CustomScrollView(
slivers:
SliverAppBar(
expandedHeight: 200.0,
automaticallyImplyLeading: false,
floating: true,
snap: true,
toolbarHeight: 0.0,
elevation: 0.0,
pinned: true,
flexibleSpace: FlexibleSpaceBar(
centerTitle: true,
background: Container(
height: 200.0,
alignment: Alignment.center,
child: Text(
"TopContent",
style: TextStyle(fontSize: 18.0, color: Colors.black),
),
)),
),
SliverFillRemaining(
child: Column(
children: [
Container(
height: 44.0,
decoration: BoxDecoration(
border: Border(
bottom: BorderSide(
style: BorderStyle.solid,
color: Color(0xfff7f7f7),
width: 2.0,
))),
child: TabBar(
controller: _tabController,
tabs: _tabTitles
.map((e) => Tab(
child: Text(
e,
style: TextStyle(
fontSize: 14.0,
fontWeight: FontWeight.w500),
),
))
.toList(),
isScrollable: false,
labelColor: Color(0xff1376ee),
indicatorColor: Color(0xff1376ee),
unselectedLabelColor: Color(0xff666666),
),
),
Expanded(
flex: 1,
child: Container(
color: Colors.white,
child: TabBarView(
controller: _tabController,
physics: NeverScrollableScrollPhysics(),
children:
ListView(
children: [
Row(
children: [
// 行名
Expanded(
child: ListView(
physics: NeverScrollableScrollPhysics(),
shrinkWrap: true,
children: _rowTitles,
)),
Expanded(
flex: 3,
child: ListView(
physics: NeverScrollableScrollPhysics(),
shrinkWrap: true,
children: [
SingleChildScrollView(
scrollDirection: Axis.horizontal,
child: DataTable(
dividerThickness: 0.0,
headingTextStyle: TextStyle(
fontSize: 14.0,
color: Color(0xff333333),
fontWeight: FontWeight.w600),
sortAscending: false,
showBottomBorder: false,
showCheckboxColumn: false,
headingRowHeight: 32.0,
dataRowHeight: 36.0,
columns: _dataColumns,
// 列名
rows: _dataRows, // 数据
),
)
],
),
),
],
)
],
),
Container(),
Container(),
],
),
)),
],
),
),
],
),
),
);
}
@override
void dispose() {
_tabController.dispose();
super.dispose();
}
// 返回事件
onBack() {}
// Search
doSearch() {}
//每一行标题的点击事件
onTitleTap(int i) {}
}
实现起来还是比较简单的。实际中建议一个控件写一个Widget,在body中调用,而不是都写在body中,代码太长不便于查看、管理、维护。
# 效果