PixelSNAIL论文代码学习(3)——自注意力机制的实现
文章目录
-
- 引言
- 正文
-
- 介绍
- 自注意力机制的简单实现样例
- 本文中的自注意力机制
- 具体实现代码分析
-
- nn.nin函数的具体实现
- nn.causal_attention模块实现
- 注意力模块实现代码
- 完整实现代码
- 使用pytorch实现因果注意力模块causal_atttention模块
- 问题
- 总结
- 引用
引言
- 阅读了pixelSNAIL,很简短,就用了几页,介绍了网络结构,介绍了试验效果就没有了,具体论文学习链接
- 这段时间看他的代码,还是挺痛苦的,因为我对于深度学习的框架尚且不是很熟练 ,而且这个作者很厉害,很多东西都是自己实现的,所以看起来十分费力,本来想逐行分析,结果发现逐行分析不现实,所以这里按照模块进行分析。
- 今天就专门来学习一下他自注意力机制是如何实现的。
正文
介绍
-
含义:自注意力机制是一种让模型在处理序列数据时,考虑数据其他位置信息的方法(可以用来考虑时序信息)。对于每一个序列中的元素,自注意力机制会计算其与序列中其他元素的相似度,并使用这些相似度来更新元素本身。
-
基本步骤
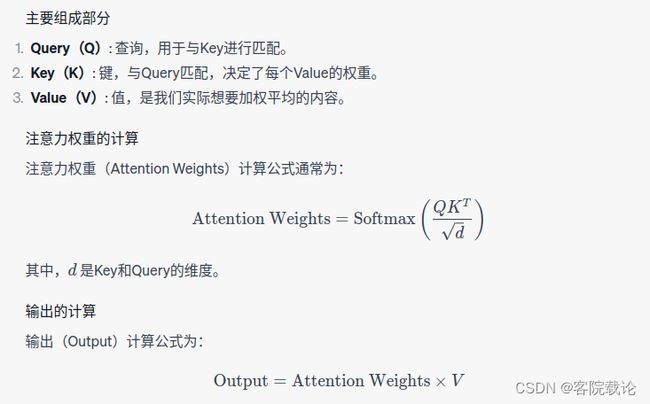
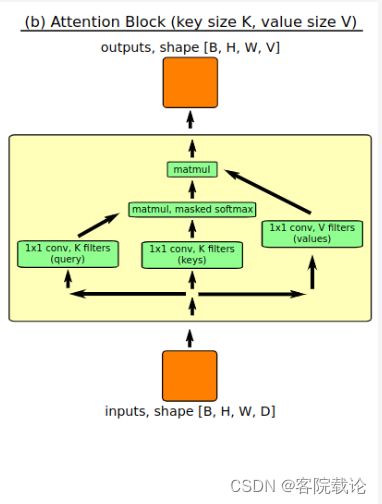
- 线性投影:对于输入序列X,通过三个不同的线性变换得到Query(Q)、Key(K)、Value(V)三个矩阵
- Query:查询,用于和key进行匹配
- key:与Query进行匹配,决定了每一个value的权重
- value:值,实际想要加权平均的内容
- 计算注意力分数:使用Q和K的点积来计算注意力分数
- 缩放:将注意力分数除以 d k d_k dk的平方根, d k d_k dk是key的维度
- 应用softmax:沿着每一行对缩放后的注意力分数应用softmax函数
- 加权求和:使用softmax输出对
- 线性投影:对于输入序列X,通过三个不同的线性变换得到Query(Q)、Key(K)、Value(V)三个矩阵
-
原理解释
-
计算Query和Key的点积,因为通过点积来衡量两个矩阵的相似性,如果相似性越大,那么他们的点积就越大。借此使得模型能够关注与Query相似的key
-
使用softmax函数和缩放因子是为了归一化最终的输出,让最终的输出以概率的方式呈现
-
最终的输出是通过权重和value的加权和计算出的。
-
并没有理论推导,但是在transformer中的效果很好
-
自注意力机制的简单实现样例
-
具体代码实现
-
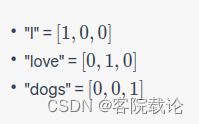
假设我们有一个句子:“I love dogs”,我们希望通过自注意力机制来重新表示每个词。
-
首先,我们需要将每个词转化为一个向量。为了简化,我们假设:
-
具体代码如下,基本上是按照上述公式实现的
import numpy as np
import torch
import torch.nn.functional as F

# Query, Key, Value
Q = torch.Tensor([[1, 0, 0], [0, 1, 0], [0, 0, 1]])
K = torch.Tensor([[1, 0, 0], [0, 1, 0], [0, 0, 1]])
V = torch.Tensor([[1, 0, 0], [0, 1, 0], [0, 0, 1]])

# Attention Weight Calculation
d = 3  # dimension of Q and K
attention_weights = F.softmax(Q @ K.T / np.sqrt(d), dim=-1)

# Output Calculation
output = attention_weights @ V
本文中的自注意力机制
具体实现代码分析
-
下述为整个模型中具体实现自注意力机制的代码部分,要实现自注意力机制,无非是明确三个矩阵的具体是哪个矩阵,具体如下
-
Query矩阵:经过n次门控残差网络处理的ul矩阵和背景矩阵background拼接而成
-
Key矩阵:x, ul, background三个矩阵拼接成的矩阵
-
Value矩阵::经过n次门控残差网络处理的ul矩阵
-
-
这里两个作者自己定义函数,分别是nn.nin和nn.causal_attention两个操作模块。这里简单介绍一下功能,在下一节具体讲解代码
- nn.nin: 1* 1的卷积层,用于减少或者增加数据张量的深度,但是不改变对应的batch_size、H和W
- nn.causal_attention:实现因果注意力机制,确保当前元素之和之前的元素进行交互,不与未来的元素进行交互,通过掩码实现。
nn.nin函数的具体实现
- 这里是实现了1*1卷积,不改变除了深度以外的任何形状,通过这个操作来改变矩阵的深度或者频道数
@add_arg_scope
def nin(x, num_units, **kwargs):
    """ a network in network layer (1x1 CONV) """
    s = int_shape(x)
    # 这里是将前三个维度相乘,保留最后一个维度,将原来的四维度矩阵变成二维度矩阵
    x = tf.reshape(x, [np.prod(s[:-1]), s[-1]])
    # 全连接层实现一乘一卷积
    x = dense(x, num_units, **kwargs)
    return tf.reshape(x, s[:-1] + [num_units])
- 总的来说,实现起来还是很容易的,不过说实话,还是pytorch方便点,直接指定filter_size为1不就行了
nn.causal_attention模块实现
-
这个模块是因果卷积和自注意力机制的结合,在权重矩阵上乘以一个因果掩码矩阵,来抑制未来的信息
-
参数说明
-
key: [bs, h, w, chns]
-
mixin: [bs, h, w, chns]
-
query: [bs, h, w, chns]
-
downsample: int.表示下采样的倍数
- 在必要的情况下,使用下采样减少需要处理的键值数量,加速运算
- 代码中是使用最大池化进行下采样的
-
use_pos_enc: bool.表示是否使用位置编码
- 常规的卷积中,并不考虑到位置信息,通过位置编码来补充信息,因为这里处理的是序列信息。
-
-
下面是这个代码的具体流程,为了方便起见,这里就忽略了对于下采样和位置编码的判断
def causal_attention(key, mixin, query, downsample=1, use_pos_enc=False):
    '''
    key: [bs, h, w, chns]
    mixin: [bs, h, w, chns]
    query: [bs, h, w, chns]
    downsample: int.表示下采样的倍数
    use_pos_enc: bool.表示是否使用位置编码
    '''

    # 获取key的形状
    bs, nr_chns = int_shape(key)[0], int_shape(key)[-1]


    # 下采样
    if downsample > 1:
        pool_shape = [1, downsample, downsample, 1]
        key = tf.nn.max_pool(key, pool_shape, pool_shape, 'SAME')
        mixin = tf.nn.max_pool(mixin, pool_shape, pool_shape, 'SAME')

    # 使用位置编码
    xs = int_shape(mixin)
    if use_pos_enc:
        pos1 = tf.range(0., xs[1]) / xs[1]
        pos2 = tf.range(0., xs[2]) / xs[1]
        mixin = tf.concat([
            mixin,
            tf.tile(pos1[None, :, None, None], [xs[0], 1, xs[2], 1]),
            tf.tile(pos2[None, None, :, None], [xs[0], xs[2], 1, 1]),
        ], axis=3)


    # 因果掩码
    # 通过get_causal_mask函数生成一个上三角矩阵,对角线为0,其余为1
    mixin_chns = int_shape(mixin)[-1]
    canvas_size = int(np.prod(int_shape(key)[1:-1]))
    canvas_size_q = int(np.prod(int_shape(query)[1:-1]))
    causal_mask = get_causal_mask(canvas_size_q, downsample)

    # 注意力权重的计算
    # 使用矩阵乘法来计算查询和键之间的点积
    dot = tf.matmul(
        tf.reshape(query, [bs, canvas_size_q, nr_chns]),
        tf.reshape(key, [bs, canvas_size, nr_chns]),
        transpose_b=True
        # 应用因果掩码和一个小数来抑制未来的信息
    ) - (1. - causal_mask) * 1e10
    dot = dot - tf.reduce_max(dot, axis=-1, keep_dims=True)

    # 实现softmax,计算注意力权重
    causal_exp_dot = tf.exp(dot / np.sqrt(nr_chns).astype(np.float32)) * causal_mask
    causal_probs = causal_exp_dot / (tf.reduce_sum(causal_exp_dot, axis=-1, keep_dims=True) + 1e-6)

    # 输出计算
    mixed = tf.matmul(
        causal_probs,
        tf.reshape(mixin, [bs, canvas_size, mixin_chns])
    )

    return tf.reshape(mixed, int_shape(query)[:-1] + [mixin_chns])
注意力模块实现代码
-
虽然这个流程很好理解,根据代码就可以看出来,就是矩阵的变换,但是有个地方是怪怪的,想问为什么?但是这个是通过实验证明有效的。
- 我知道了,我疑惑的是,作者是如何探索出这种结构的?
- 为什么经过因果注意力机制处理后,又把他丢进了门控残差网络的处理?
- 我知道了,我疑惑的是,作者是如何探索出这种结构的?
-
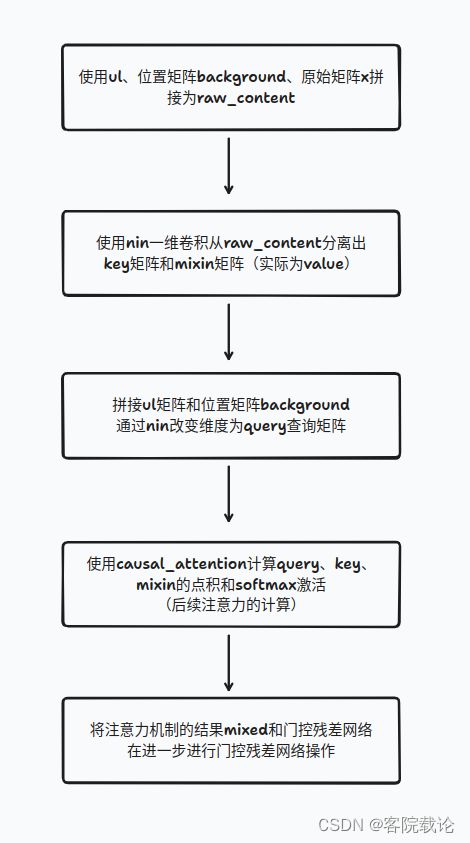
下面是具体的流程图,整个过程主要用到了三个矩阵,分别是
-
x:原始输入矩阵
-
ul:经过n次门控残差网络处理的矩阵
-
background:是一个背景矩阵,用来传递每一个像素的位置信息,主要是在宽度和高度两个维度上的位置信息。维度为[1,4,4,2]
-
-
具体流程图如下
- 重复了若干次注意力机制处理后,为了防止出现梯度消失,将最终的输出在经过elu指数线性单元进行激活,改变输出维度,作为最终输出。
	# 注意力机制具体实现
	# 这个ul是门控残差网络的
    ul = ul_list[-1]

   # 准备原始内容,包括了原始输入x,上一次的输出ul,以及背景信息
   raw_content = tf.concat([x, ul, background], axis=3)

   # 生成key和query
   q_size = 16
   raw = nn.nin(nn.gated_resnet(raw_content, conv=nn.nin), nr_filters // 2 + q_size)
   key, mixin = raw[:, :, :, :q_size], raw[:, :, :, q_size:]

   # 这里是生成query
   raw_q = tf.concat([ul, background], axis=3)
   query = nn.nin(nn.gated_resnet(raw_q, conv=nn.nin), q_size)

   # 计算注意力
   mixed = nn.causal_attention(key, mixin, query, downsample=att_downsample)

   # 将注意力的结果和原始结果通过按位加来是心爱
   ul_list.append(nn.gated_resnet(ul, mixed, conv=nn.nin))
完整实现代码
def _base_noup_smallkey_spec(x, h=None, init=False, ema=None, dropout_p=0.5, nr_resnet=5,
                             nr_filters=256, attn_rep=12, nr_logistic_mix=10,
                             att_downsample=1, resnet_nonlinearity='concat_elu'):
    """
    x:输入张量,形状为(N,H,W,D1),N为batch_size,H,W为图像的高和宽,D1为图像的通道数
    h:可选的N x K矩阵,用于在生成模型上进行条件
    init:是否初始化
    ema:是否使用指数移动平均
    dropout_p:dropout概率
    nr_resnet:残差网络的数量
    nr_filters:卷积核的数量
    attn_rep:注意力机制的重复次数
    nr_logistic_mix:logistic混合的数量
    att_downsample:注意力机制的下采样
    resnet_nonlinearity:残差网络的非线性激活函数

    We receive a Tensor x of shape (N,H,W,D1) (e.g. (12,32,32,3)) and produce
    a Tensor x_out of shape (N,H,W,D2) (e.g. (12,32,32,100)), where each fiber
    of the x_out tensor describes the predictive distribution for the RGB at
    that position.
    'h' is an optional N x K matrix of values to condition our generative model on
    """

    counters = {}
    # 使用arg_scope,可以给函数的参数自动赋予某些默认值
    # 设置一组层[nn.conv2d,nn.deconv2d,nn.gated_resnet,nn.dense]这样一组层的counters,init,ema,dropout_p参数为默认值
    with arg_scope([nn.conv2d, nn.deconv2d, nn.gated_resnet, nn.dense, nn.nin],
                   counters=counters, init=init, ema=ema, dropout_p=dropout_p):


        # 根据传入的resnet_nonlinearity参数,选择不同的激活函数
        if resnet_nonlinearity == 'concat_elu':
            resnet_nonlinearity = nn.concat_elu
        elif resnet_nonlinearity == 'elu':
            resnet_nonlinearity = tf.nn.elu
        elif resnet_nonlinearity == 'relu':
            resnet_nonlinearity = tf.nn.relu
        else:
            raise('resnet nonlinearity ' +
                  resnet_nonlinearity + ' is not supported')

        with arg_scope([nn.gated_resnet], nonlinearity=resnet_nonlinearity, h=h):

            # // 通过PixelCNN进行上行传递
            # 创建一个背景张量,形状为(1,H,W,2),其中H,W为图像的高和宽,用来保存每一个像素位置的相对位置信息
            # 获取输入向量的形状
            xs = nn.int_shape(x)
            background = tf.concat(
                    [
                        # 创建一个长度为xs[1](即输入x的高度)的一维张量。张量的值从−0.5到0.5,表示水平方向上的位置信息
                        # 例如,如果xs[1]为32,则tf.range(xs[1], dtype=tf.float32)的值为[0,1,2,...,31]
                        # 然后将其归一化到[-0.5,0.5],即((tf.range(xs[1], dtype=tf.float32) - xs[1] / 2) / xs[1])
                        # 最后将其扩展为形状为(1,H,W,1)的张量
                        # 这里是扩展在第二个维度,也就是H,然后加上对应形状的矩阵, 使用扩散机制,将背景矩阵复制为同样大小。
                        ((tf.range(xs[1], dtype=tf.float32) - xs[1] / 2) / xs[1])[None, :, None, None] + 0. * x,
                        ((tf.range(xs[2], dtype=tf.float32) - xs[2] / 2) / xs[2])[None, None, :, None] + 0. * x,
                    ],
                    axis=3
                    )

            # add channel of ones to distinguish image from padding later on
            # 增加一个信号,用于区分图像和填充
            x_pad = tf.concat([x, tf.ones(xs[:-1] + [1])], axis=3)

            # 下传递,从左上角开始
            # nn.down_shifted_conv2d:下移卷积:
            # nn.down_right_shifted_conv2d:右下移卷积
            # nn.down_shift:下移
            # nn.right_shift:右移
            ul_list = [nn.down_shift(nn.down_shifted_conv2d(x_pad, num_filters=nr_filters, filter_size=[1, 3])) +
                       nn.right_shift(nn.down_right_shifted_conv2d(x_pad, num_filters=nr_filters, filter_size=[2, 1]))]
            # stream for up and to the left

            # 下传递,从右下角开始
            for attn_rep in range(attn_rep):

                # 重复n次的门控残差网络
                for rep in range(nr_resnet):
                    ul_list.append(nn.gated_resnet(
                        ul_list[-1], conv=nn.down_right_shifted_conv2d))

                # 注意力机制
                ul = ul_list[-1]

                # 准备原始内容,包括了原始输入x,上一次的输出ul,以及背景信息
                raw_content = tf.concat([x, ul, background], axis=3)

                # 生成key和query
                q_size = 16
                raw = nn.nin(nn.gated_resnet(raw_content, conv=nn.nin), nr_filters // 2 + q_size)
                key, mixin = raw[:, :, :, :q_size], raw[:, :, :, q_size:]
                raw_q = tf.concat([ul, background], axis=3)
                query = nn.nin(nn.gated_resnet(raw_q, conv=nn.nin), q_size)

                # 计算注意力
                mixed = nn.causal_attention(key, mixin, query, downsample=att_downsample)

                # 将注意力的结果与原始内容进行拼接
                ul_list.append(nn.gated_resnet(ul, mixed, conv=nn.nin))


            # /// 通过PixelCNN进行下行传递 ///
            x_out = nn.nin(tf.nn.elu(ul_list[-1]), 10 * nr_logistic_mix)

            return x_out
使用pytorch实现因果注意力模块causal_atttention模块
- 实现整个注意力机制,最重要的是实现作者自己定义的causal_attention模块,这个模块实现了三个矩阵query、key还有value的全部操作,同时包含了因果卷积的内容
- 具体实现如下
import torch
import torch
import torch.nn as nn
import torch.nn.functional as F
import torch.nn.init as init
import numpy as np
def get_causal_mask(canvas_size, downsample):
    """
    生成一个上三角矩阵作为因果掩码。

    参数:
    - canvas_size: 整数, 矩阵的维度。
    - downsample: 下采样的倍数。

    返回:
    - 因果掩码: 上三角矩阵。
    """
    # 生成一个canvas_size x canvas_size的上三角矩阵
    mask = torch.triu(torch.ones(canvas_size, canvas_size), diagonal=1+downsample)

    # 转换为float类型并反转矩阵,使得上三角部分为0,其他部分为1
    mask = 1.0 - mask

    return mask


# causal_attention模块的具体实现
class CausalAttention(nn.Module):
    # 这里是实现对应因果注意力机制的模块
    def __init__(self):
        super(CausalAttention,self).__init__()

    def forward(self,query,key,mixin,downSample = 1,use_pos_enc = False):
        '''
        query:查询矩阵
        key:关键字矩阵
        mixin:value矩阵
        前向传播,实现query和key的点积,以及因果掩码的生成
        '''

        # 获取key的形状
        bs,h,w,nr_chns = key.size()

        # 进行下采样
        if downSample > 1:
            key = F.max_pool2d(key,downSample)
            mixin = F.max_pool2d(mixin,dowmSample)

        # 判定是否包含位置编码,这里就是单纯增加了两个维度
        if use_pos_enc:
            pos1 = torch.arange(0.,h) / h
            pos2 = torch.arange(0.,w) / w
            mixin  =torch.cat([
                mixin,
                pos1[None,:,None,None].expand(bs,h,w,1),
                pos2[None,:,None,None].expand(bs,h,w,1)
            ],dim = 3)

        # 因果卷积
        # 生成因果卷积的掩码
        canvas_size = h * w
        canvas_size_q = h * w
        causal_mask = get_causal_mask(canvas_size_q,downSample).to(key.device)

        # 实现key和query的点乘,计算每一个键和查询的相似度,同时屏蔽未来信息
        # view函数,改变张量的形状,但是不改变数据
        query = query.view(bs, canvas_size_q, nr_chns) # 形状为:bs,H*W,nr_chns
        key = key.view(bs, canvas_size, nr_chns)  # 形状为:bs,H*W,nr_chns
        dot = torch.bmm(query, key.permute(0, 2, 1))  # 执行矩阵的批量乘法,bs维度相同,
                                                      # (H*W,nr_chns) 和(nr_chns,H*W)两个矩阵的点积
                                                      # 最终的矩阵为(H*W,H*W)
        # 首先将三角掩码矩阵进行反转,然后再乘以一个极大的负数
        # 确保未来信息在面对进行softmax激活时,能够变为0
        dot = dot - (1. - causal_mask) * 1e10
        # 减去最大值,确保数值稳定性
        dot = dot - torch.max(dot, dim=-1, keepdim=True)[0]

        # 实现softmax激活函数,并且加上掩码卷积,抑制未来信息
        causal_exp_dot = torch.exp(dot / np.sqrt(nr_chns).astype(np.float32)) * causal_mask
        causal_probs = causal_exp_dot / (torch.sum(causal_exp_dot, dim=-1, keepdim=True) + 1e-6)

        # 计算输出矩阵,最终的权重参数乘以对应的因果卷积系数
        mixin = mixin.view(bs, canvas_size, -1)
        mixed = torch.bmm(causal_probs, mixin)

        return mixed.view(bs, h, w, -1)

# Test the PyTorch implementation
key = torch.rand(16, 32, 32, 64)
mixin = torch.rand(16, 32, 32, 64)
query = torch.rand(16, 32, 32, 64)
causal_attention = CausalAttention()
result = causal_attention(key, mixin, query)

result.shape
问题
- 这个结构真的复杂,是怎么探索出来?
- 为什么要重复那么多次门控残差网络?
- 为什么要重复那么多次注意力机制来提取信息?
总结
- 这里是实现了具体的注意力模块,这里重点是他所调用的一个因果注意力模块,通过这个模块能够实现注意力机制的同时调用因果卷积,来屏蔽未来信息。
- 但是具体的执行结果,并不知道作者是怎么探索出来,难道是通过实验吗?如果是这样,自己也可以通过实验,来探索一下,适合特定格式下的声音生成模型的具体结构。
- 这里学到了很多,chatGPT问了几百条,加上自己的理解。
- 通过这篇文章,我还知道,我们确实需要不断看新的论文,要总是试试看新的论文能不能添加到对应结构中。
引用
ChatGPT-Plus


