了解 glTF 2.0 格式
推荐:使用 NSDT场景编辑器快速搭建3D应用场景
介绍
glTF 代表 GL 传输格式。
glTF 是一种用于存储和加载 3D 场景的标准化文件格式,其基本目的是由 3D 创建工具轻松生成并被任何图形应用程序使用,无论使用何种 API,处理最少。
它与其他格式的主要区别在于,glTF 将其数据作为 GPU 就绪的首要任务。这意味着在将文件数据馈送到 GPU 之前,格式化/调整/解释文件上的数据所需的处理步骤更少。
了解文件格式后,您将欣赏整个资产生成流程的点击效果;从 3D 编辑工具到如何将其输出输入图形管线,在我看来,这就是 glTF 的魔力,它以可移植和标准化的方式弥合了设计和实现之间的差距。
文件格式
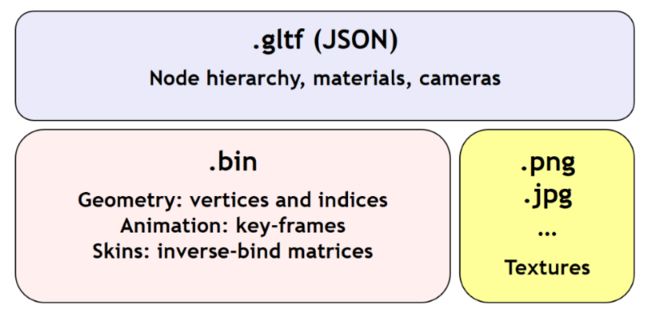
glTF包括:
- JSON 文件:描述场景、节点及其层次结构;网格、材质、相机、光源。它还包含指向二进制和图像数据的指针。
- 二进制数据:场景中的实际几何体和动画数据。
- 图像文件: 图像数据存储为 JPG 或 PNG。
图 1:来自 Khronos glTF 2.0 规范的 glTF2.0 概述,打开gltf编辑器,查看glb模型文件。
生成或第一个 glTF 2.0 文件
Blender 2.8,一个免费的3D建模工具,有一个一流的glTF 2.0导出器:
https://docs.blender.org/manual/en/2.80/addons/io_scene_gltf2.html
使用它的导出器,我从起始场景生成了一个 glTF 2.0 文件:
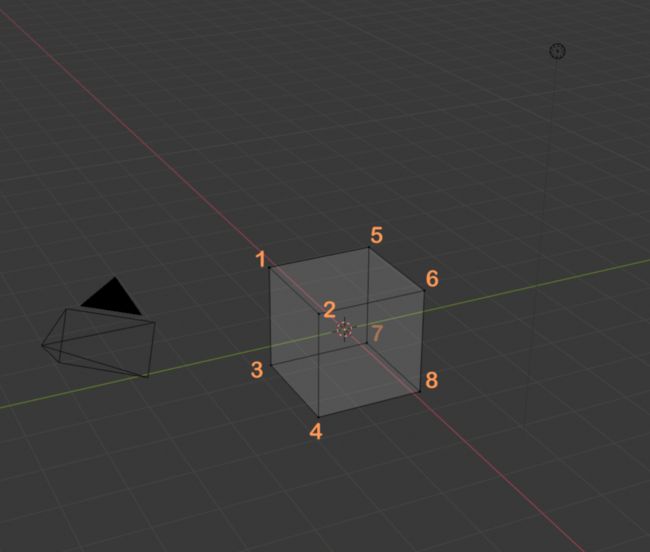
场景描述为:
1.- 每边 2m 的立方体,其中心位于原点,它有 8 个顶点(导出者可能会增加顶点的数量和顺序):
- (-1, -1, 1)
- (1, -1, 1)
- (-1, -1, -1)
- (1, -1, -1)
- (-1, 1, 1)
- (1, 1, 1)
- (-1, 1, -1)
- (1, 1, -1)
立方体具有默认材料分配。
2.- 具有以下功能的相机:
- 位置在 (7.35889 m, -6.92579 m, 4.95831 m)
- 旋转 (0.483536, 0.208704, 0.336872, 0.780483)
3.- 光源具有:
- 位置在 (4.07625 m, 1.00545 m, 5.90386 m)
- 旋转 (0.169076, 0.272171, 0.75588, 0.570948)
图 2:Blender 的开始场景、立方体、摄像机和光源
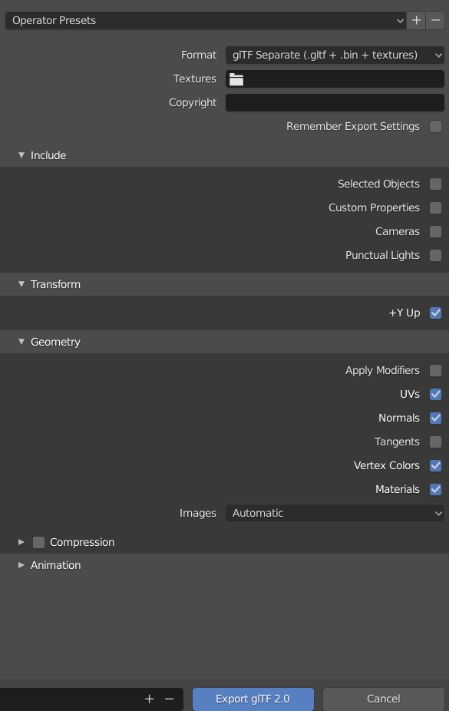
图3.导出此场景时,我使用了以下配置: 请注意 +Y 向上设置。Blender在+Z向上配置下工作,因此导出器将为我们更改它。
按下导出按钮后,您将拥有 2 个文件:
*.gltf
*。.bin
打开gltf文件看一看,它会分为几个部分:
资产和场景
"asset" : { "generator" : "Khronos glTF Blender I/O v1.1.46", "version" : "2.0" }, "scene" : 0, "scenes" : [ { "name" : "Scene", "nodes" : [ 0, 1, 2 ] } ],
- “asset”描述了用于创建文件的生成器和glTF的版本,在我们的例子中它将是2.0
- “scene”指定在加载时将显示场景数组中的哪些可用场景。在我们刚刚生成的文件中,我们只有一个场景,所以它将是0。
- “scenes”是描述需要渲染以显示该场景的对象的场景数组。这些对象称为“节点”,我们在“场景”中的“节点”标签以 [0, 1, 2] 作为其值。
节点
"nodes" : [ { "mesh" : 0, "name" : "Cube" }, { "name" : "Light", "rotation" : [ 0.16907551884651184, 0.7558804154396057, -0.2721710503101349, 0.5709475874900818 ], "translation" : [ 4.076250076293945, 5.903860092163086, -1.0054500102996826 ] }, { "name" : "Camera", "rotation" : [ 0.483536034822464, 0.33687159419059753, -0.20870360732078552, 0.7804827094078064 ], "translation" : [ 7.358890056610107, 4.958310127258301, 6.925789833068848 ] } ],
- “节点”是将要渲染的实际对象,“name”字段是可选的,但大多数 3D 建模工具会为每个对象生成一个名称。请注意这些名称如何与搅拌机场景中的名称相对应。
- “网格”是我们节点的第一个属性,“网格”是我们对象的几何体,稍后会描述。在这里,我们指定此场景的节点中包含哪个网格。
- 它还包含有关这些物体的初始转换的信息,特别是对于我们的相机和光线,还记得两者都有位置和旋转吗?好吧,它们也包括在这里,只需注意 3 件事:
- Y 轴和 Z 轴已从 -Y 更改为 +Z。
- 在 Json 文件中,旋转的顺序为 X、Y、Z、W,在 Blender 中为 W、X、Y、Z。
- 旋转存储为四元数,而不是矩阵或欧拉角。在编写渲染器代码时,我们需要牢记这一点。
材料
推荐使用GTLF编辑器来3D模型的材质属性。
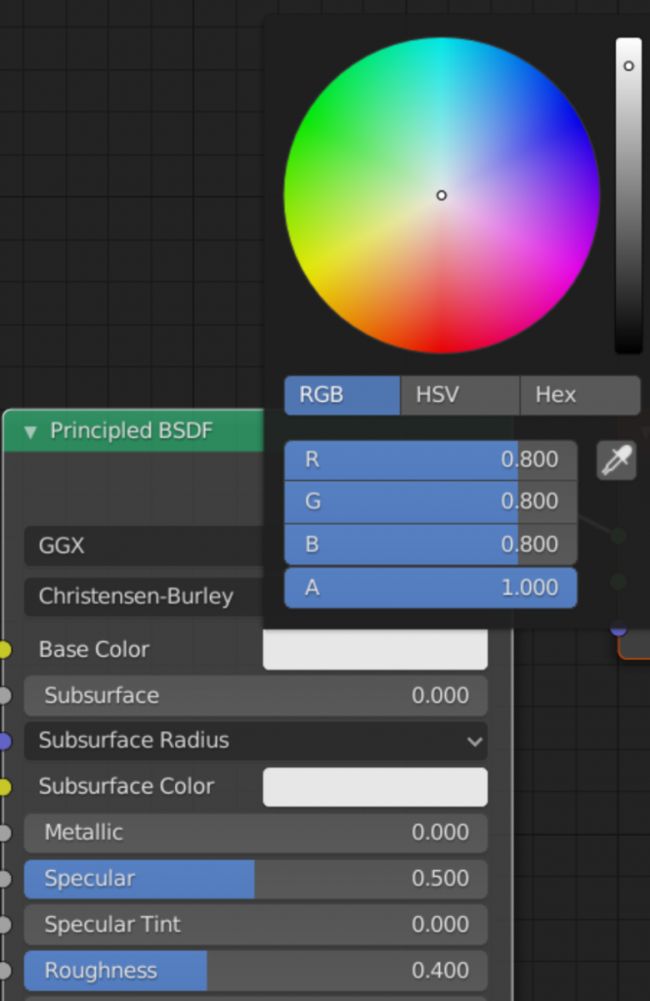
"materials" : [ { "doubleSided" : true, "emissiveFactor" : [ 0, 0, 0 ], "name" : "Material", "pbrMetallicRoughness" : { "baseColorFactor" : [ 0.800000011920929, 0.800000011920929, 0.800000011920929, 1 ], "metallicFactor" : 0, "roughnessFactor" : 0.4000000059604645 } } ],
- “材料”是下一个条目,它将指定我们的几何构成的表面的属性。
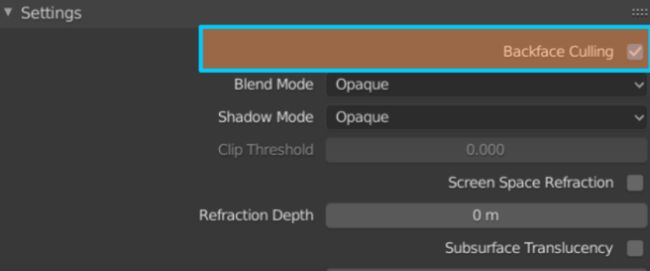
- “双面”指定我们的多边形面是否将被剔除,具体取决于它们的缠绕顺序。此设置可以直接在建模工具中指定,在Blender中,它在材料设置中
图4.在搅拌机中指定剔除参数
- 我们的样本未使用“发射因子”
- “名称”是材料,名称,它与您在Blender中分配的材料名称相匹配。
- “pbr金属粗糙度”是 PBR 渲染中使用的基色、金属和粗糙度的参数值,它们与材质节点的设置相匹配:
图5.搅拌机的材料描述;基色为:R: 0.8克: 0.8深: 0.8A: 1.0 金属色设置为 0 粗糙度设置为 0.4
网 格
"meshes" : [ { "name" : "Cube", "primitives" : [ { "attributes" : { "POSITION" : 0, "NORMAL" : 1, "TEXCOORD_0" : 2 }, "indices" : 3, "material" : 0 } ] } ],
- “网格”:此属性将我们的几何体描述为由多个属性构建的基元;我们的立方体将具有:
- 属性:
- 顶点位置:“位置”
- 顶点法线:“正常”
- 纹理坐标:“TEXCOORD_0”
- 将定义创建每个三角形的顶点的索引。
- 我们的网格将使用的材料。
访问
"accessors" : [ { "bufferView" : 0, "componentType" : 5126, "count" : 24, "max" : [ 1, 1, 1 ], "min" : [ -1, -1, -1 ], "type" : "VEC3" }, { "bufferView" : 1, "componentType" : 5126, "count" : 24, "type" : "VEC3" }, { "bufferView" : 2, "componentType" : 5126, "count" : 24, "type" : "VEC2" }, { "bufferView" : 3, "componentType" : 5123, "count" : 36, "type" : "SCALAR" } ],
- “访问器”是我们访问存储所有强大数据的二进制文件的方式,并检索渲染几何体所需的数据。多维数据集的二进制文件具有:
- 顶点位置、法线、纹理坐标和索引。
- 每个访问器从缓冲区视图中获取数据,它将获取数据类型“类型”的数字“计数”,该数据类型的每个组件也具有特定的“组件类型”。
- 第一个访问器将获取 24(“计数”)VEC3(“类型”),该 VEC3 的每个组件都是一个浮点数(“componentType”),因此总共它将获取 24*3 个浮点数
- 第二个访问器获取相同数量的数据,但从不同的缓冲区视图中,这对应于我们的顶点法线。
- 第三个访问器获取 24 个浮点型 VEC2,这些是纹理坐标。
- 最后一个访问器获取 36 个短整数,这些是将组装我们的三角形的索引的标量。
- 有关访问器类型的详细信息:https://github.com/KhronosGroup/glTF/tree/master/specification/2.0#accessors
缓冲区和缓冲区视图
"bufferViews" : [ { "buffer" : 0, "byteLength" : 288, "byteOffset" : 0 }, { "buffer" : 0, "byteLength" : 288, "byteOffset" : 288 }, { "buffer" : 0, "byteLength" : 192, "byteOffset" : 576 }, { "buffer" : 0, "byteLength" : 72, "byteOffset" : 768 } ],
- “bufferViews”表示缓冲区中包含的数据块。它们使用索引“缓冲区”指向特定的缓冲区,并且该缓冲区中的数据由“byteOffset”和“byteLength”分隔。
- bufferView 0 指向缓冲区 0,它的偏移量为 0,长度为 288 字节。将此数据与我们的访问器结构匹配,您可以看到顶点位置存储在缓冲区的这一部分中,并使用此缓冲区视图进行访问。
"buffers" : [ { "byteLength" : 840, "uri" : "DefaultCube.bin" } ]
“缓冲区”指定我们的数据所在的位置及其大小。这意味着我们的立方体的几何形状存储在“DefaultCube.bin”
将数据提取到C++应用程序 – 使用 nlohmann/json
我们现在知道我们需要获取的数据在哪里,但我们仍然需要一种方法来获取它。
市面上有多个 Json 解释器,但我决定使用这个:
https://github.com/nlohmann/json
因为它可以用作单个标头并且易于使用。
包含“nlohmann/json.hpp”标头并添加命名空间后,可以使用下面的代码将整个 json 文件填充到可解析的 json 对象中。
#include "nlohmann/json.hpp" using json = nlohmann::json; int main(){ std::ifstream input("Content/DefaultCube.gltf"); if (!input) { std::cout << "Could not find gltf file" << std::endl; return -1; } json cubeFile; input >> cubeFile;
拥有此对象后,如果需要,可以逐个访问属性:
例如,要提取“场景”属性:
json scenes = cubeFile["scenes"];
如果你打印出场景的内容,你会得到这个:
[{“名称”:“场景”,“节点”:[0,1,2]}]
该库还使您可以轻松访问存储在其中的各个值,假设您想从“scenes”属性访问节点索引并将它们存储在int向量中:
json nodeOverview = scenes[0]["nodes"]; std::vector
使用Niels Lohmann的这个很酷的json工具,我们可以继续开始从Json和bin文件中填充数据结构。
对于此项目,我们将提取:
网格 – 位置、法线、坐标、索引和材料。
相机 – 位置和旋转。
光 – 位置和旋转。
唯一需要从.bin文件中提取其他信息的是网格。
存储数据
现在,我们将它存储在易于访问的结构中,我使用 glm (https://glm.g-truc.net/0.9.9/index.html ) 作为它们的向量和矩阵结构及其各种数学函数;glm 很方便,因为它已经包含了 vec3 和 vec2 的定义,可以直接与我们的 glTF 文件中的 VEC3 和 VEC2 匹配。从下面的结构中可以看出,我将使用这些类型的向量来存储我的网格数据。
struct pbrMaterial { glm::vec4 color; float metallicFactor; float roughnessFactor;}; struct mesh { std::string name; std::vector
从文件中获取网格数据需要我们:
- 读取 nodes 属性并解析它以检查其中的“mesh”属性:
json nodes = cubeFile["nodes"];for (uint32_t i = 0; i < nodes.size(); i++){ if (nodes[i].find("mesh") != nodes[i].end()) { //There is a mesh in this node:
- 如果 “nodes” 属性中有一个 mesh 属性,然后存储它指向的网格索引,这个索引会让你知道你会从 “meshes” 属性中选择哪个数组元素:
json node = nodes[i];int meshIndex = node["mesh"];
- 使用此索引,您现在可以解析 “meshes” 属性,并在 “mesh” 的 “primives” 属性中查找我们想要查找的相应“属性”;找到要查找的属性后,它将为您提供“accessor”属性的索引
- 日清
json meshes = cubeFile["meshes"];json meshPrimitives = meshes[meshIndex]["primitives"];if (meshPrimitives[0]["attributes"].find("POSITION") != meshPrimitives[0]["attributes"].end()){ positionAccessorIndex = meshPrimitives[0]["attributes"]["POSITION"];}
- 现在您知道了访问器索引,您已经拥有了从二进制文件中获取实际数据所需的一切!!
- accessor[positionAccessorIndex][“count”] 会让你知道你需要为多少个数据类型的元素分配。
- accessor[positionAccessorIndex][“bufferView”] 会告诉你要访问哪个缓冲区视图索引,bufferViewIndex。
- bufferView[bufferViewIndex][“byteLength”] 将为您提供将从缓冲区获取的字节数。
- bufferView[bufferViewIndex][“byteOffset”] 提供偏移量,您可以在缓冲区中找到属性。
json accessors = cubeFile["accessors"];json bufferViews = cubeFile["bufferViews"]; std::ifstream binFile("Content/DefaultCube.bin", std::ios_base::binary); meshes.positions.resize(accessors[cubeScene.meshes[0].positionAccessorIndex]["count"]); uint32_t bufferViewIndex = accessors[positionAccessorIndex]["bufferView"];uint32_t bytesCount = bufferViews[bufferViewIndex]["byteLength"];uint32_t byteOffset = bufferViews[bufferViewIndex]["byteOffset"];binFile.seekg(0);binFile.seekg(byteOffset);binFile.read((char *)meshes.positions.data(), bytesCount);
完成此步骤后,您的仓位即可发送到任何图形 API。
将数据馈送到 Vulkan 图形管道
大部分代码是直接从以下位置窃取的:
https://github.com/Overv/VulkanTutorial/blob/master/code/27_model_loading.cpp
删除了他们的tinyobjloader依赖项,并添加了我们自己的原始glTF解析器来获取顶点和正常数据。
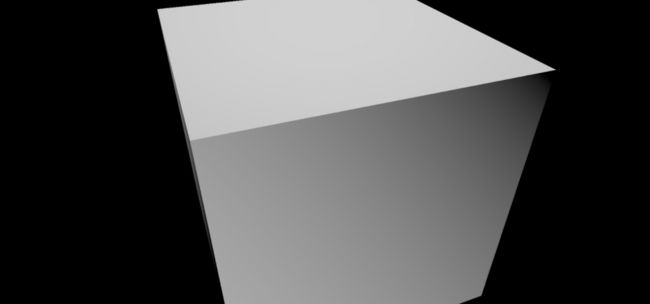
图6.由 Vulkan 图形管道呈现的默认立方体。
由3D建模学习工作室 整理翻译,转载请注明出处!
