CNN(五):DenseNet+SE-Net实战
- 本文为365天深度学习训练营中的学习记录博客
- 原作者:K同学啊|接辅导、项目定制
SE-Net(Squeeze-and-Excitation Networks)是ImageNet2017(ImageNet收官赛)的冠军模型,是由WMW团队发布。具有复杂度低,参数少和计算量小的优点。且SENet思路简单,很容易扩展到已有网络结构如Inception和ResNet中。
1 SENet原理
目前已有很多工作在空间维度上来提升网络的性能,如Inception等,而SENet将关注点放在了特征通道之间的关系上。其具体策略为:通过学习的方式来自动获取到每个特征通道的重要程度,然后依照这个重要程度去提升有用的特征并抑制对当前任务用处不大的特征,这又被叫做“特征标定”策略。
具体的SE模块如上图所示。给定一个输入![]() ,其特征通道数为
,其特征通道数为![]() ,通过一系列卷积等变换
,通过一系列卷积等变换![]() 后得到一个特征通道数为
后得到一个特征通道数为![]() 的特征。与传统的卷积神经网络不同,我们需要通过下面三个操作来重标定前面得到的特征。
的特征。与传统的卷积神经网络不同,我们需要通过下面三个操作来重标定前面得到的特征。
(1)Squeeze:顺着空间维度来进行特征压缩,将一个通道中整个空间(![]() )特征编码为一个全局特征,这个实数某种程度上具有全局的感受野,并且输出的通道数和输入的特征通道数相等,例如将形状为(1, 32, 32, 10)的feature map压缩成(1, 1, 1, 10)。此操作通常采用global average pooling来实现。
)特征编码为一个全局特征,这个实数某种程度上具有全局的感受野,并且输出的通道数和输入的特征通道数相等,例如将形状为(1, 32, 32, 10)的feature map压缩成(1, 1, 1, 10)。此操作通常采用global average pooling来实现。
(2)Excitation:得到全局描述特征后,通过Excitation来获取特征通道之间的关系,它是一个类似于循环神经网络中门的机制。
![]()
这里采用包含两个全连接层的bottleneck结构,即中间小两头大的结构:其中第一个全连接层起到降维的作用,并通过ReLU激活,第二个全连接层用来将其恢复至原始的维度。进行Excitation操作的最终目的是为每个特征通道生成权重,即学习到各个通道的激活值(sigmoid激活,值在0~1之间)。
(3)Scale:我们将Excitation的输出权重看做是经过特征选择后的每个特征通道的重要性,然后通过乘法逐通道加权到先前的特征上,完成在通道维度上的对原始特征的重标定,从而使得模型对各个通道的特征更具有辨别能力,这类似于attention机制。
2 SE模块应用分析
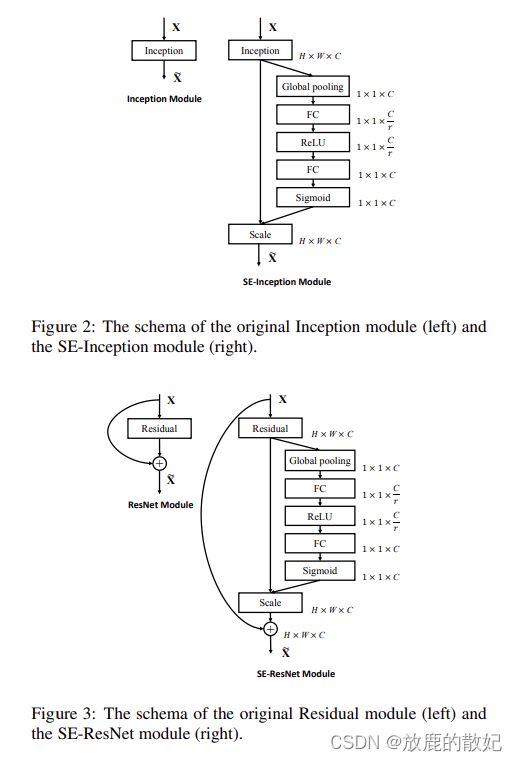
SE模块的灵活性在于它可以直接应用现有的网络结构中,以Inception和ResNet为例,我们只需要在Inception模块或Residual模块后添加一个SE模块即可,具体如下图所示,其中方框旁边的维度信息代表该层的输出,r表示Excitation操作中的降维系数。
3 SE模型效果对比
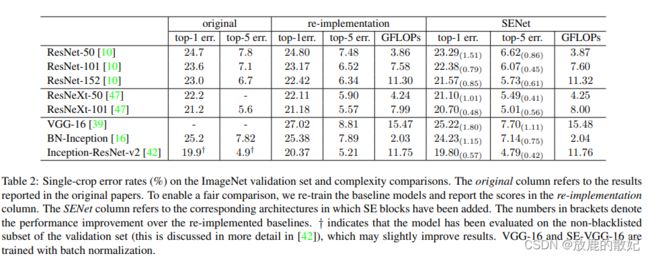
SE模块很容易嵌入到其他网络中,为了验证SE模块的作用,在其它流行网络如ResNet和Inception中引入SE模块,测试其在ImageNet上的效果,如下表所示:
通过表格内容可以得知SE在不同深度的网络的影响。上表分别展示了ResNet-50、ResNet-101、ResNet-152、ResNeXt-50、ResNeXt-101、VGG-16、BN-Inception、Inception-ResNet-v2嵌入SE模型的结果。original一栏为原作者的实验结果,为公平比较,重新进行了实现,即re-implementation的结果。最后一栏的SE-module是指嵌入了SE模块的结果,它的训练参数和第二栏的re-implementation一致。括号中的值是指相对于re-implementation的精度提升幅度。
由此可知,嵌入了SE的网络在各种深度的网络中都超过了其原始版本的精度,说明无论网络深度如何,SE模块都能够给网络带来性能上的增益。而且,SE-ResNet-50可以达到和ResNet-101差不多的精度,甚至,SE-ResNet-101超过了更深的ResNet-152的精度。
4 代码实现
4.1 开发环境
电脑系统:ubuntu16.04
编译器:Jupter Lab
语言环境:Python 3.7
深度学习环境:tensorflow
4.2 前期准备
4.2.1 设置GPU
import tensorflow as tf

gpus = tf.config.list_physical_devices("GPU")

if gpus:
    tf.config.experimental.set_memory_growth(gpus[0], True) # 设置GPU显存用量按需使用
    tf.config.set_visible_devices([gpus[0]], "GPU")
4.2.2 导入数据
import matplotlib.pyplot as plt
# 支持中文
plt.rcParams['font.sans-serif'] = ['SimHei'] # 用来正常显示中文标签
plt.rcParams['axes.unicode_minus'] = False # 用来正常显示负号

import os, PIL, pathlib
import numpy as np

from tensorflow import keras
from tensorflow.keras import layers,models

data_dir = "../data/bird_photos"
data_dir = pathlib.Path(data_dir)

image_count = len(list(data_dir.glob('*/*')))
print("图片总数为:", image_count)
4.2.3 加载数据
batch_size = 8
img_height = 224
img_width = 224

train_ds = tf.keras.preprocessing.image_dataset_from_directory(
    data_dir,
    validation_split=0.2,
    subset="training",
    seed=123,
    image_size=(img_height, img_width),
    batch_size=batch_size)

val_ds = tf.keras.preprocessing.image_dataset_from_directory(
    data_dir,
    validation_split=0.2,
    subset="validation",
    seed=123,
    image_size=(img_height, img_width),
    batch_size=batch_size)

class_Names = train_ds.class_names
print("class_Names:",class_Names)
4.2.4 可视化数据
plt.figure(figsize=(10, 5)) # 图形的宽为10,高为5
plt.suptitle("imshow data")

for images,labels in train_ds.take(1):
    for i in range(8):
        ax = plt.subplot(2, 4, i+1)
        plt.imshow(images[i].numpy().astype("uint8"))
        plt.title(class_Names[labels[i]])
        plt.axis("off")
4.2.5 检查数据
for image_batch, lables_batch in train_ds:
    print(image_batch.shape)
    print(lables_batch.shape)
    break
4.2.6 配置数据集
AUTOTUNE = tf.data.AUTOTUNE

train_ds = train_ds.cache().shuffle(1000).prefetch(buffer_size=AUTOTUNE)
val_ds = val_ds.cache().prefetch(buffer_size=AUTOTUNE)
4.3 SE模块代码实现
SE模块的网络结果如下图所示,其参数采用DenseNet121中的SE模块参数。这里降维未使用降维率,而直接将其降维为filter_sq(16)。
import tensorflow as ft

def squeeze_excitation_block(inputs, filter_sq):
    squeeze = tf.keras.layers.GlobalAveragePooling2D()(inputs)

    excitation = tf.keras.layers.Dense(filter_sq)(squeeze)
    excitation = tf.keras.layers.Activation('relu')(excitation)
    excitation = tf.keras.layers.Dense(inputs.shape[-1])(excitation)
    excitation = tf.keras.layers.Activation('sigmoid')(excitation)
    excitation = tf.keras.layers.Reshape((1, 1, inputs.shape[-1]))(excitation)

    scale = inputs * excitation

    return scale
4.4 SE模块嵌入到DenseNet代码实现
各网络结构如下图所示:
其相应的代码为:
from tensorflow.keras.models import Model
from tensorflow.keras import layers, backend

def dense_block(x, blocks, name):
    for i in range(blocks):
        x = conv_block(x, 32, name=name+'_block'+str(i+1))
    return x

def conv_block(x, growth_rate, name):
    bn_axis = 3

    x1 = layers.BatchNormalization(axis=bn_axis,
                                  epsilon=1.001e-5,
                                  name=name+'_0_bn')(x)
    x1 = layers.Activation('relu', name=name+'_0_relu')(x1)
    x1 = layers.Conv2D(4*growth_rate, 1, use_bias=False, name=name+'_1_conv')(x1)

    x1= layers.BatchNormalization(axis=bn_axis,
                                  epsilon=1.001e-5,
                                  name=name+'_1_bn')(x1)
    x1 = layers.Activation('relu', name=name+'_1_relu')(x1)
    x1 = layers.Conv2D(growth_rate, 3, padding='same', use_bias=False, name=name+'_2_conv')(x1)

    x = layers.Concatenate(axis=bn_axis, name=name+'_concat')([x, x1])
    return x

def transition_block(x, reduction, name):
    bn_axis = 3
    x = layers.BatchNormalization(axis=bn_axis, epsilon=1.001e-5,
                                 name=name+'_bn')(x)
    x = layers.Activation('relu', name=name+'_relu')(x)
    x = layers.Conv2D(int(backend.int_shape(x)[bn_axis] * reduction), 1,
                     use_bias=False, name=name+'_conv')(x)
    x = layers.AveragePooling2D(2, strides=2, name=name+'_pool')(x)
    return x

def DenseNet(blocks, input_shape=None, classes=4, **kwargs):
    img_input = layers.Input(shape=input_shape)
    bn_axis = 3

    # 224, 224, 3 -> 112, 112, 64
    x = layers.ZeroPadding2D(padding=((3,3), (3,3)))(img_input)
    x = layers.Conv2D(64, 7, strides=2, use_bias=False, name='conv1/conv')(x)
    x = layers.BatchNormalization(axis=bn_axis, epsilon=1.001e-5, name='conv1/bn')(x)
    x = layers.Activation('relu', name='conv1/relu')(x)

    # 112, 112, 64 -> 56, 56, 64
    x = layers.ZeroPadding2D(padding=((1,1), (1,1)))(img_input)
    x = layers.MaxPooling2D(3, strides=2, name='pool1')(x)

    # 56, 56, 64 -> 56, 56, 64+32*block[0]
    # Densenet121  56, 56, 64 -> 56, 56, 64+32*6 == 56, 56, 256
    x = dense_block(x, blocks[0], name='conv2')

    # 56, 56, 64+32*block[0] --> 28, 28, 32+16*block[0]
    # Densenet121  56, 56, 256 -> 28, 28, 32+16*6 == 28, 28, 128
    x = transition_block(x, 0.5, name='pool2')


    # 28, 28, 32+16*block[0] -> 28, 28, 32+16*block[0]+32*block[1]
    # Densenet121  28, 28, 128 -> 28, 28, 128+32*12 == 28, 28, 512
    x = dense_block(x, blocks[1], name='conv3')

    # Densenet121  28, 28, 512 -> 14, 14, 256
    x = transition_block(x, 0.5, name='pool3')


    # Densenet121  14, 14, 256 -> 14, 14, 256+32*block[2] == 14, 14, 1024
    x = dense_block(x, blocks[2], name='conv4')

    # Densenet121  14, 14, 1024 -> 7, 7, 512
    x = transition_block(x, 0.5, name='pool4')


    # Densenet121  7, 7, 512 -> 7, 7, 256+32*block[3] == 7, 7, 1024
    x = dense_block(x, blocks[3], name='conv5')

    # 加SE注意力机制
    x = squeeze_excitation_block(x, 16) #Squeeze_excitation_layer(16)(x)

    x = layers.BatchNormalization(axis=bn_axis, epsilon=1.001e-5, name='bn')(x)
    x = layers.Activation('relu', name='relu')(x)

    x = layers.GlobalAveragePooling2D(name='avg_pool')(x)
    x = layers.Dense(classes, activation='softmax', name='fc4')(x)

    inputs = img_input

    if blocks == [6, 12, 24, 16]:
        model = Model(inputs, x, name='densenet121')
    elif blocks == [6, 12, 32, 32]:
        model = Model(inputs, x, name='densenet169')
    elif blocks == [6, 12, 48, 32]:
        model = Model(inputs, x, name='densenet201')
    else:
        model = Model(inputs, x, name='densenet')

    return model

def DenseNet121(input_shape=[224, 224, 3], classes=4, **kwargs):
    return DenseNet([6, 12, 24, 16], input_shape, classes, **kwargs)

def DenseNet169(input_shape=[224, 224, 3], classes=4, **kwargs):
    return DenseNet([6, 12, 32, 32], input_shape, classes, **kwargs)

def DenseNet121(input_shape=[224, 224, 3], classes=4, **kwargs):
    return DenseNet([6, 12, 48, 32], input_shape, classes, **kwargs)

model = DenseNet121(input_shape=(224,224,3))
model.summary()
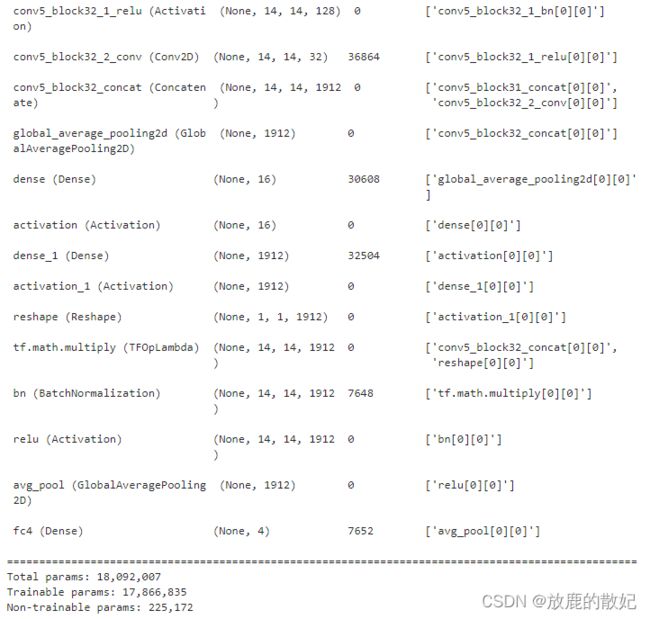
结果显示如下(由于结果内容较多,只展示前后部分内容):
(中间内容省略)
4.5 正式训练
# 设置优化器
opt = tf.keras.optimizers.Adam(learning_rate=1e-4)

model.compile(optimizer="adam",
             loss='sparse_categorical_crossentropy',
             metrics=['accuracy'])

epochs = 10

history = model.fit(
                train_ds,
                validation_data=val_ds,
                epochs=epochs)
结果如下图所示:
4.6 模型评估
acc = history.history['accuracy']
val_acc = history.history['val_accuracy']

loss = history.history['loss']
val_loss = history.history['val_loss']

epochs_range = range(epochs)

plt.figure(figsize=(12, 4))
plt.subplot(1, 2, 1)
plt.suptitle("DenseNet-SE test")

plt.plot(epochs_range, acc, label='Training Accuracy')
plt.plot(epochs_range, val_acc, label='Validation Accuracy')
plt.legend(loc='lower right')
plt.title('Training and Validation Accuracy')

plt.subplot(1, 2, 2)
plt.plot(epochs_range, loss, label='Training Loss')
plt.plot(epochs_range, val_loss, label='Validation loss')
plt.legend(loc='upper right')
plt.title('Training and Validation loss')
plt.show()
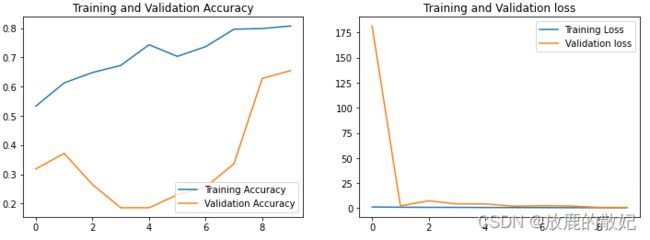
结果如下图所示:
5 总结
普通的卷积实际上是对局部区域进行的特征融合,因此其感受野不大,若设计出更多的通道特征来增加这个,不可避免的将导致计算量大大的增加。而SENet网络的创新点在于关注channel之间的关系,希望模型可以自动学习到不同channel特征的重要程度。
简而言之,在每个channel上将整个特征图浓缩成一个值,即在Squeeze步骤中通过averagepooling的操作计算每个通道的特征,此时每个通道只有一个特征,即size为c;然后在Excitation步骤中,通过降维+ReLU+升维+sigmoid操作,建模出特征通道之间的相互依赖关系,计算出每个特征通道的重要程度,此时size仍为c,c中的每个元素代表着相应通道的重要程度,越重要则越接近1;最后在Scale步骤中,将之前的操作得出的特征图进行scale操作,而scale的权重就是刚刚计算出的Excitation特征(size为c)通过reshape后(size为1*1*c)的矩阵,即对各个通道的特征进行相应的放大或缩小。


