TheRouter 框架原理
TheRouter 框架入口方法
通过InnerTheRouterContentProvider 注册在AndroidManifest.xml中,在应用启动时初始化
入口方法为TheRouter.init(applicationContext)
    /**
     * TheRouter初始化方法。内部流程:

     * 同步流程:

     *     1. 首先初始化FlowTask的内置事件,BEFORE_THEROUTER_INITIALIZATION,以及依赖这个Task的全部任务。
     *         这个事件的目的是在TheRouter的路由初始化前做某些操作,例如修改路由表、添加路由拦截器等……
     *     2. 初始化跨模块依赖表
     *     3. 初始化路由表
     * 异步流程:

     *     1. 调用FlowTask的外部事件
     *     2. 添加 @Autowired 路由解析器
     */
    @JvmStatic
    fun init(context: Context?) {
        if (!inited) {
            ......
            addFlowTask(context, digraph)
            ......
        }
    }
在初始化前先调用addFlowTask(context, digraph)方法。
在跳转到对应方法实现处发现,该方法为空方法,没有具体业务逻辑。
@file:JvmName("TheRouterServiceProvideInjecter")

package a

import android.content.Context
import com.therouter.flow.Digraph

/**
 * Created by ZhangTao on 18/2/24.
 */
fun trojan() {}
fun autowiredInject(obj: Any?) {}
fun addFlowTask(context: Context?, digraph: Digraph) {}
fun initDefaultRouteMap() {}
在学习了相关博客后,发现这里暗藏了TheRouter设计的巧妙之处,也正是因为这个特点,TheRouter框架在没有使用反射机制情况下,可以动态注入逻辑。
我们在按照TheRouter框架添加了各种注解后,在编译期间,会自动生成一个合成类,将我们添加了@FlowTask(taskName = "xxx")注解的方法全部放到一个静态public static void addFlowTask(android.content.Context context, com.therouter.flow.Digraph digraph)方法中。
Debug 时,编译器生成的对应合成文件在目录
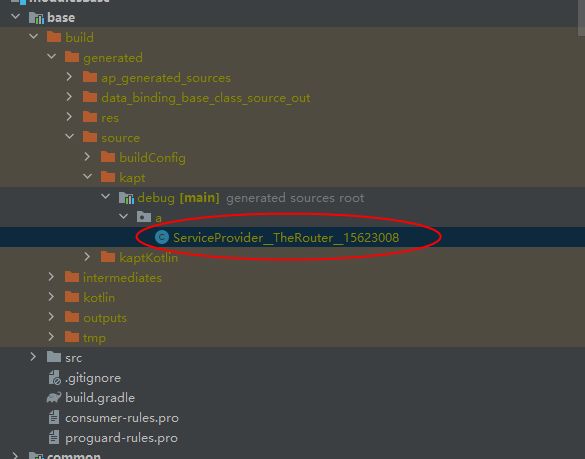
编译时生成对应方法如下
	public static void addFlowTask(android.content.Context context, com.therouter.flow.Digraph digraph) {
		digraph.addTask(new com.therouter.flow.Task(false, "base_init", "", new com.therouter.flow.FlowTaskRunnable() {
			@Override
			public void run() {
				com.ugreen.modulesbase.base.BaseInitTaskKt.initBase(context);
			}

			@Override
			public String log() {
				return "com.ugreen.modulesbase.base.BaseInitTaskKt.initBase(context);";
			}
		}));
		digraph.addTask(new com.therouter.flow.Task(false, "init_device_info", "base_init", new com.therouter.flow.FlowTaskRunnable() {
			@Override
			public void run() {
				com.ugreen.modulesbase.base.BaseInitTaskKt.initDeviceInfo(context);
			}

			@Override
			public String log() {
				return "com.ugreen.modulesbase.base.BaseInitTaskKt.initDeviceInfo(context);";
			}
		}));
		digraph.addTask(new com.therouter.flow.Task(false, "base_init_language", "", new com.therouter.flow.FlowTaskRunnable() {
			@Override
			public void run() {
				com.ugreen.modulesbase.base.BaseInitTaskKt.initLanguage(context);
			}

			@Override
			public String log() {
				return "com.ugreen.modulesbase.base.BaseInitTaskKt.initLanguage(context);";
			}
		}));
		digraph.addTask(new com.therouter.flow.Task(false, "base_init_smartRefresh", "", new com.therouter.flow.FlowTaskRunnable() {
			@Override
			public void run() {
				com.ugreen.modulesbase.base.BaseInitTaskKt.initSmartRefresh(context);
			}

			@Override
			public String log() {
				return "com.ugreen.modulesbase.base.BaseInitTaskKt.initSmartRefresh(context);";
			}
		}));
		digraph.addTask(new com.therouter.flow.Task(false, "base_init_titleBar", "", new com.therouter.flow.FlowTaskRunnable() {
			@Override
			public void run() {
				com.ugreen.modulesbase.base.BaseInitTaskKt.initTitleBar(context);
			}

			@Override
			public String log() {
				return "com.ugreen.modulesbase.base.BaseInitTaskKt.initTitleBar(context);";
			}
		}));
	}
这个方法名是不是很熟悉,只看它的方法名和入参数,这和前面提到的空方法一模一样。
是的,你没有看错,这里编译期间生成的方法就是要通过字节码插桩技术替换空方法实现。
是不是很巧妙。
那么接着看TheRouter的init方法,开始执行digraph.beforeSchedule()方法
    /**
     * 由于initSchedule执行比较耗时需要放到异步,而Before需要在路由表初始化之前执行,需要同步
     * 所以单独列出一个方法,检测dependsOn只有beforTheRouterInit的任务,提前执行
     */
    fun beforeSchedule() {
        val virtualFlowTask = getVirtualTask(TheRouterFlowTask.BEFORE_THEROUTER_INITIALIZATION)
        virtualTasks[TheRouterFlowTask.BEFORE_THEROUTER_INITIALIZATION] = virtualFlowTask
        virtualFlowTask.run()

        tasks.values.forEach {
            if (!it.async && it.dependencies.size == 1
                && it.dependencies.contains(TheRouterFlowTask.BEFORE_THEROUTER_INITIALIZATION)
            ) {
                // 此时一定在主线程,所以直接调用
                it.run()
            }
        }
    }
该方法同步执行,首先检测出dependsOn为beforTheRouterInit的任务,开始执行
查看源码发现,即使接入端未添加该dependsOn注解,这里也会默认创建一个virtualTask任务,这里不是很理解,后续补充。
beforeSchedule在执行完成virtualFlowTask后,开始执行依赖该task的任务,这里过滤条件要求,任务为同步执行且只依赖beforTheRouterInit的任务列表。
接着看TheRouter的init方法,通过execute执行一个异步的代码片段
            execute {
                debug("init", "TheRouter.init() method do @FlowTask init")
                digraph.initSchedule()
                debug("init", "TheRouter.init() method do @FlowTask schedule")
                runInitFlowTask()
            }
initSchedule具体内容如下
    /**
     * 初始化方法
     */
    fun initSchedule() {
        for (task in tasks.values) {
            fillTodoList(task)
        }
        inited = true
        pendingTaskRunnableList.forEach {
            it.run()
        }
    }
这里重点方法如下
    private fun fillTodoList(root: Task) {
        if (!root.isDone()) {
            val dependsSet = getDepends(root)
            if (isNotEmpty(dependsSet)) {
                if (loopDependStack.contains(root)) {
                    throw IllegalArgumentException(
                        "TheRouter::Digraph::Cyclic dependency " + getLog(
                            loopDependStack,
                            root
                        )
                    )
                }
                loopDependStack.add(root)
                for (depend in dependsSet) {
                    fillTodoList(depend)
                }
                loopDependStack.remove(root)
                if (!todoList.contains(root)) {
                    todoList.add(root)
                }
            } else {
                if (!todoList.contains(root)) {
                    todoList.add(root)
                }
            }
        }
    }
通过递归调用将task依赖任务转化成一个todoList队列里面,这样就能保证被依赖的task放在队列的前面,依赖的放置在队列后面。关于这个队列具体如何作用后续继续说明
继续回到execute 代码片段里,继续执行runInitFlowTask方法
/**
 * 当TheRouter初始化时,执行的FlowTask
 */
fun runInitFlowTask() {
    TheRouter.runTask(TheRouterFlowTask.THEROUTER_INITIALIZATION)
}
接着继续查看Init方法,执行routerInject.asyncInitRouterInject(context)方法
该方法就是将路由相关的进行注入,例如配置的路由拦截器和自定义的拦截器
在asyncInitRouterInject方法中,判断mInterceptors为空时会从dex 文件中解析对应的拦截器,并实例化放入到mInterceptors对象里面,mInterceptors = TheRouterLinkedList
    fun asyncInitRouterInject(context: Context?) {
        execute {
            trojan()
            if (mInterceptors.isEmpty()) {
                initServiceProvider(context)
            }
        }
    }
继续接着执行Init方法,开始执行asyncInitRouteMap()方法,该方法主要是用来加载路由配置
/**
 * 在异步初始化路由表
 */
fun asyncInitRouteMap() {
    execute {
        debug("RouteMap", "will be add route map from: initDefaultRouteMap()")
        initDefaultRouteMap()
        initedRouteMap = true
        if (initTask == null) {
            initRouteMap()
        } else {
            debug("RouteMap", "will be add route map from: RouterMapInitTask")
            initTask?.asyncInitRouteMap()
        }
        executeInMainThread {
            sendPendingNavigator()
        }
    }
}
这里为异步执行,首先执行一个initDefaultRouteMap的空方法,这里也应该是在编译期间通过字节码插桩替换,不过这里没有发现具体逻辑。
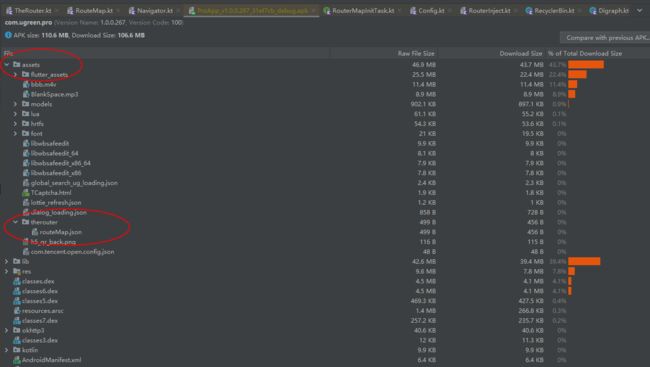
如何initTask为空,也就是前面空方法没有具体业务实现,那么这里就会从assets资源目录里面读取对应的路由配置,assets目录下var ROUTE_MAP_ASSETS_PATH = "therouter/routeMap.json" 在编译时会生成这样一个json文件
接着回来继续执行Init方法
            execute {
                context?.apply {
                    (applicationContext as Application).registerActivityLifecycleCallbacks(TheRouterLifecycleCallback)
                }
                parserList.addFirst(DefaultObjectParser())
                parserList.addFirst(DefaultServiceParser())
                parserList.addFirst(DefaultUrlParser())
                parserList.addFirst(DefaultIdParser())
            }
这里注册全局的Activity生命周期监听,注册各种解析器,在编译期间根据添加@Autowired注解进行代码生成
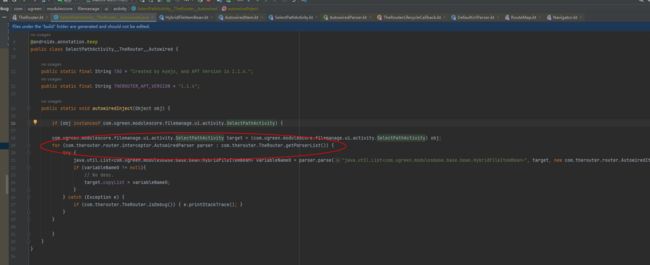
这里使用不是很理解,后面补充。
以上就是TheRouter Init方法整体初始化流程。