Unity溶解Shader
Unity溶解Shader
- 一、前言
-
- 1.1 思路
- 1.2 效果图
- 1.3 准备工作
-
- 1.3.1 噪声贴图
- 1.3.2 贴图设置
- 二、Shader内容
-
- 2.1 初版Shader
- 2.2 效果
- 2.3 分析
- 2.4 优化
- 三、完整代码
一、前言
嘿嘿,今天我们继续来实现溶解效果
1.1 思路
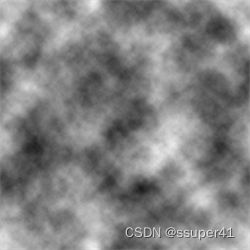
思路:我们可以运用一张噪声贴图,然后采样噪声贴图的透明度,接着定义一个_ThresholdAlpha透明度阈值变量,当噪声贴图的透明度小于_ThresholdAlpha。我们可以运用clip(x)函数来裁剪掉像素。随着_ThresholdAlpha的变大即可实现溶解效果
1.2 效果图
1.3 准备工作
1.3.1 噪声贴图
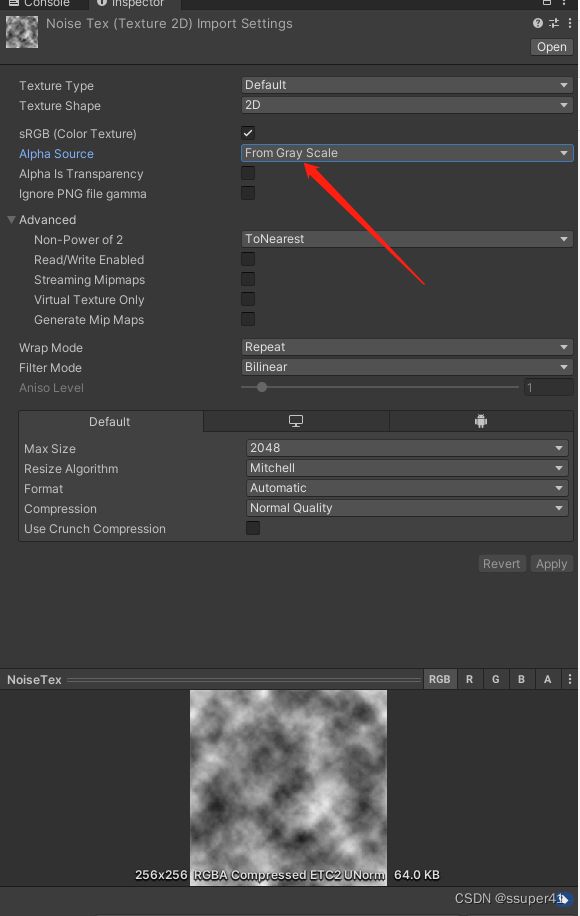
1.3.2 贴图设置
二、Shader内容
2.1 初版Shader
Shader "Unlit/Dissolve"
{
    Properties
    {
        _MainTex ("Texture", 2D) = "white" {}
        _NoiseTex("Texture", 2D) = "white" {}
        _ThresholdAlpha("ThresholdAlpha",Range(0,1)) = 0

    }
    SubShader
    {
        Tags { "RenderType"="Opaque" }
        LOD 100

        Pass
        {
            Blend SrcAlpha OneMinusSrcAlpha
            CGPROGRAM
            #pragma vertex vert
            #pragma fragment frag
            // make fog work
            #pragma multi_compile_fog

            #include "UnityCG.cginc"

            struct appdata
            {
                float4 vertex : POSITION;
                float2 uv : TEXCOORD0;
            };

            struct v2f
            {
                float2 uv : TEXCOORD0;
                float2 noiseUV : TEXCOORD1;
                UNITY_FOG_COORDS(1)
                float4 vertex : SV_POSITION;
            };

            sampler2D _MainTex;
            float4 _MainTex_ST;

            sampler2D _NoiseTex;
            float4 _NoiseTex_ST;
            float _ThresholdAlpha;


            v2f vert (appdata v)
            {
                v2f o;
                o.vertex = UnityObjectToClipPos(v.vertex);
                o.uv = TRANSFORM_TEX(v.uv, _MainTex);
                o.noiseUV = TRANSFORM_TEX(v.uv,_NoiseTex);
                UNITY_TRANSFER_FOG(o,o.vertex);
                return o;
            }

            fixed4 frag (v2f i) : SV_Target
            {
                // sample the texture
                fixed4 col = tex2D(_MainTex, i.uv);

                //裁剪掉低于阈值的alpha
                fixed4 noiseCol = tex2D(_NoiseTex,i.noiseUV);
                clip(noiseCol.a - _ThresholdAlpha);

                // apply fog
                UNITY_APPLY_FOG(i.fogCoord, col);
                return col;
            }
            ENDCG
        }
    }
}
2.2 效果
2.3 分析
我们代码按照前面的思路所说的,随着_ThresholdAlpha的增加,实现了溶解效果。但是可以看出溶解效果是比较一般的,最前面的效果图明显会好一点。我们可以接着优化一下Shader
2.4 优化
透明度小于_ThresholdAlpha的会被溶解掉,我们可以设置一个变量_DissolveAlpha,让透明度大于_ThresholdAlpha 但 小于_ThresholdAlpha + _DissolveAlpha 的变成火烧的颜色;
即下面:
透明度< _ThresholdAlpha : 溶解
_ThresholdAlpha < 透明度< _ThresholdAlpha + _DissolveAlpha :火烧颜色
这样颜色在被溶解前会有火烧的效果,接着才被裁剪掉,会有更好的效果。
我们来实现一下
		//先加入3个变量
        _DissolveColor("DissolveColor",Color) = (1,1,1,1)
        _DissolveAlpha("DissolveAlpha",Range(0,0.3)) = 0 //
        _DissolveLight("DissolveLight",Range(1,5)) = 1
修改片元着色器
            fixed4 frag (v2f i) : SV_Target
            {
                // sample the texture
                fixed4 col = tex2D(_MainTex, i.uv);

                //裁剪掉低于阈值的alpha
                fixed4 noiseCol = tex2D(_NoiseTex,i.noiseUV);
                clip(noiseCol.a - _ThresholdAlpha);

                //大于阈值_ThresholdAlpha,但小于_ThresholdAlpha + DissolveAlpha的变色
                float progress = (noiseCol.a - _ThresholdAlpha) / _DissolveAlpha;
                progress = saturate(progress);

                //变色并应用上亮度
                float4 result = lerp(_DissolveColor *  _DissolveLight,col,progress);
                result.a = col.a;

                // apply fog
                UNITY_APPLY_FOG(i.fogCoord, col);
                return result;
            }
效果就如我们最放在最前面的动画,就不重复放了
三、完整代码
到此,我们的代码就写完了。接下来附上完整的代码
Shader "Unlit/Dissolve"
{
    Properties
    {
        _MainTex ("Texture", 2D) = "white" {}
        _NoiseTex("Texture", 2D) = "white" {}
        _ThresholdAlpha("ThresholdAlpha",Range(0,1)) = 0

        _DissolveColor("DissolveColor",Color) = (1,1,1,1)
        _DissolveAlpha("DissolveAlpha",Range(0,0.3)) = 0
        _DissolveLight("DissolveLight",Range(1,5)) = 1

    }
    SubShader
    {
        Tags { "RenderType"="Opaque" }
        LOD 100

        Pass
        {
            Blend SrcAlpha OneMinusSrcAlpha
            CGPROGRAM
            #pragma vertex vert
            #pragma fragment frag
            // make fog work
            #pragma multi_compile_fog

            #include "UnityCG.cginc"

            struct appdata
            {
                float4 vertex : POSITION;
                float2 uv : TEXCOORD0;
            };

            struct v2f
            {
                float2 uv : TEXCOORD0;
                float2 noiseUV : TEXCOORD1;
                UNITY_FOG_COORDS(1)
                float4 vertex : SV_POSITION;
            };

            sampler2D _MainTex;
            float4 _MainTex_ST;

            sampler2D _NoiseTex;
            float4 _NoiseTex_ST;
            float _ThresholdAlpha;

            float4 _DissolveColor;
            float _DissolveAlpha;
            float _DissolveLight;

            v2f vert (appdata v)
            {
                v2f o;
                o.vertex = UnityObjectToClipPos(v.vertex);
                o.uv = TRANSFORM_TEX(v.uv, _MainTex);
                o.noiseUV = TRANSFORM_TEX(v.uv,_NoiseTex);
                UNITY_TRANSFER_FOG(o,o.vertex);
                return o;
            }

            fixed4 frag (v2f i) : SV_Target
            {
                // sample the texture
                fixed4 col = tex2D(_MainTex, i.uv);

                //裁剪掉低于阈值的alpha
                fixed4 noiseCol = tex2D(_NoiseTex,i.noiseUV);
                clip(noiseCol.a - _ThresholdAlpha);

                //大于阈值_ThresholdAlpha,但小于_ThresholdAlpha + DissolveAlpha的变色
                float progress = (noiseCol.a - _ThresholdAlpha) / _DissolveAlpha;
                progress = saturate(progress);

                //变色并应用上亮度
                float4 result = lerp(_DissolveColor *  _DissolveLight,col,progress);
                result.a = col.a;

                // apply fog
                UNITY_APPLY_FOG(i.fogCoord, col);
                return result;
            }
            ENDCG
        }
    }
}


