【设计模式】组合模式实现部门树实践
1.前言
几乎在每一个系统的开发过程中,都会遇到一些树状结构的开发需求,例如:组织机构树,部门树,菜单树等。只要是需要开发这种树状结构的需求,我们都可以使用组合模式来完成。
本篇将结合组合模式与Mysql实现一个部门树,完成其增删改和树形结构的组装。
2.组合模式
组合模式是一种结构型设计模式,它允许我们将对象组合成树形结构来表现部分-整体的层次结构。以部门树为例,我们可以将上级部门与下级部门组合起来,形成一个单边树,用代码来描述的话,就是这个样子的:
public class DeptNode {
    private List<DeptNode> children = new ArrayList<>();
}
提供一个部门节点类,里面会有一个集合,用于保存当前部门的下级部门,同理在children这个集合中的部门节点,也可能会有它的下级部门节点。
当然,这不是实现组合模式的唯一方式,还有其他复杂一点方式,会区分不同的节点类型,是根节点、分支节点、还是叶子节点等。这里之所以做这种简单的设计,是因为我们的树状结构的数据一般都会交给前端去做渲染,在很多前端的组件库中,就是用这种简单的方式来组织树的,例如在Element-UI中的树状结构:

3.实现方式
3.1.数据结构设计
先看数据库的设计,数据库必要的字段比较简单,直接看一下建表的sql:
create table dept
(
    id        bigint auto_increment comment '部门id'
        primary key,
    parent_id bigint       null comment '上级部门id',
    name      varchar(200) null comment '部门名称',
    tree_path varchar(255) null comment '树路径'
)
id与parent_id很好理解,主要是用来维护部门的上下级关系,name不解释,tree_path这个字段其实不是必须要的,没有它也可以实现部门树,但是加上这个path之后,可以比较方便的查询子树。
PO对象与数据库字段保持一致,这里就不过多赘述,代码中需要返回给前端的树对象要修改一下字段名,name->label:
@Getter
@Setter
public class DeptNode {

    private List<DeptNode> children = new ArrayList<>();

    private Long id;
    private Long parentId;
    private String label;
    private String treePath;
}
3.2.数据新增
由于是自增主键,数据的新增需要再保存之后获取到主键id,再更新treePath。
这里为了方便,我用了dept对象直接透传,使用的是mybatis-plus操作数据库,可以替换成自己喜欢的ORM。
@Service("deptService")
public class DeptServiceImpl extends ServiceImpl<DeptDao, Dept> implements DeptService {

    @Override
    @Transactional(rollbackFor = Exception.class)
    public void insert(Dept dept) {
        // 如果有上级部门id,则获取上级机构
        Dept parentDept = null;
        if (dept.getParentId() != null) {
            parentDept = this.getById(dept.getParentId());
            // 上级机构不能为空
            if (parentDept == null) {
                throw new RuntimeException("上级机构不存在");
            }
        }
        // MybatisPlus新增后可以获取主键
        this.save(dept);

        // 更新树路径
        if (parentDept != null) {
            dept.setTreePath(parentDept.getTreePath() + dept.getId() + "/");
        } else {
            dept.setTreePath("/" + dept.getId() + "/");
        }
        this.updateById(dept);
    }
}
3.2.数据更新
数据更新需要注意两个点:
- 新的上级部门不能是自己,也不能是自己的子部门(避免成环)。
- 更新树路径之后,树路径上的所有子部门都需要更新树路径。
@Override
@Transactional(rollbackFor = Exception.class)
public void update(Dept dept) {
    Dept newParentDept = null;
    if (dept.getParentId() != null) {
        newParentDept = this.getById(dept.getParentId());
        if (newParentDept == null) {
            throw new RuntimeException("上级部门不存在");
        }
        if (newParentDept.getTreePath().contains("/" + dept.getId() + "/")) {
            throw new RuntimeException("上级部门不能是自己或子部门");
        }
    }
    this.updateById(dept);

    // 组装新的树路径
    String newTreePath = (newParentDept == null ? "" : newParentDept.getTreePath()) + dept.getId() + "/"; + dept.getId() + "/";
    // 获取原有的树路径
    String oldTreePath = this.getById(dept.getId()).getTreePath();

    // 获取所有子部门(循环更新也可以替换为使用Mysql的replace函数批量更新)
    LambdaQueryWrapper<Dept> queryWrapper = new LambdaQueryWrapper<>();
    // likeRight表示右模糊查询,即以oldTreePath开头的
    queryWrapper.likeRight(Dept::getTreePath, oldTreePath);
    this.list(queryWrapper).forEach(childDept -> {
        // 更新子部门的树路径
        childDept.setTreePath(childDept.getTreePath().replace(oldTreePath, newTreePath));
        this.updateById(childDept);
    });
}
上面的循环更新在数据量不大的时候可以这么做,如果量较大的话,推荐使用mysql中的replace函数替换:
update dept set tree_path = replace(tree_path,'旧路径','新路径')
where tree_path like '旧路径%'
把sql中的旧路径,新路径替换为上面代码中获取到的路径即可。
3.4.部门树组装
部门树组装只需要把需要组装的部门列表查询出来,然后根据parent_id的关联关系组装数据即可。这里tree_path就可以派上用场了,如果只有parent_id的话,要么必须全量查询所有的部门再过滤,要么需要根据parent_id做递归查询,而通过tree_path可以直接做右模糊查询,查询到的部门都是需要的部门。
我们可以在接口中接收一个部门的id,把这个部门作为部门子树的根节点:
@Override
public List<DeptNode> tree(Long id) {
    // 传入了主键id,则通过主键id对于treePath做右模糊查询,没有传入主键id,则查询所有
    List<Dept> list;
    if (id != null) {
        Dept baseDept = this.getById(id);
        list = this.list(new LambdaQueryWrapper<Dept>().likeRight(Dept::getTreePath, baseDept.getTreePath()));
    } else {
        list = this.list();
    }

    // 将Dept转换为DeptNode
    List<DeptNode> deptNodes = new ArrayList<>();
    for (Dept dept : list) {
        DeptNode deptNode = BeanUtil.copyProperties(dept, DeptNode.class);
        deptNode.setLabel(dept.getName());
        deptNodes.add(deptNode);
    }

    // 循环遍历,将子节点放入父节点的children中
    for (DeptNode node : deptNodes) {
        deptNodes.stream().filter(item -> node.getId().equals(item.getParentId())).forEach(item -> {
            if (node.getChildren() == null) {
                node.setChildren(CollUtil.newArrayList(item));
            } else {
                node.getChildren().add(item);
            }
        });
    }

    // 返回根节点
    return deptNodes.stream()
            .filter(item -> item.getParentId() == null || item.getId().equals(id))
            .collect(Collectors.toList());
}
4.测试
通过一个Controller接口发起测试:
@RestController
@RequestMapping("dept")
public class DeptController {

    @Resource
    private DeptService deptService;

    @PostMapping("insert")
    public void insert(@RequestBody @Valid Dept dept) {
        this.deptService.insert(dept);
    }

    @PostMapping("update")
    public void update(@RequestBody @Valid Dept dept) {
        this.deptService.update(dept);
    }

    @PostMapping("/tree")
    public List<DeptNode> tree(Long id) {
        return this.deptService.tree(id);
    }
}
4.1.部门新增
按照下面的请求参数顺序发起insert请求,为了验证的方便,这里的部门加了数字后缀:
{
  "parentId": null,
  "name": "根部门"
}
{
  "parentId": 1,
  "name": "一级部门-1"
}
{
  "parentId": 1,
  "name": "一级部门-2"
}
{
  "parentId": 2,
  "name": "二级部门-1-1"
}
{
  "parentId": 3,
  "name": "二级部门-2-1"
}
{
  "parentId": 5,
  "name": "三级部门-2-1-1"
}
{
  "parentId": 5,
  "name": "三级部门-2-1-2"
}
执行后数据的结果如下,我们可以看到tree_path已经正常添加好了:

通过tree接口,不传id获取到的树结构如下,按照上面说的部门后缀进行对比验证,可以看出部门树已经正确组装了。
[
    {
        "children": [
            {
                "children": [
                    {
                        "children": [],
                        "id": 4,
                        "parentId": 2,
                        "label": "二级部门-1-1",
                        "treePath": "/1/2/4/"
                    }
                ],
                "id": 2,
                "parentId": 1,
                "label": "一级部门-1",
                "treePath": "/1/2/"
            },
            {
                "children": [
                    {
                        "children": [
                            {
                                "children": [],
                                "id": 6,
                                "parentId": 5,
                                "label": "三级部门-2-1-1",
                                "treePath": "/1/3/5/6/"
                            },
                            {
                                "children": [],
                                "id": 7,
                                "parentId": 5,
                                "label": "三级部门-2-1-2",
                                "treePath": "/1/3/5/7/"
                            }
                        ],
                        "id": 5,
                        "parentId": 3,
                        "label": "二级部门-2-1",
                        "treePath": "/1/3/5/"
                    }
                ],
                "id": 3,
                "parentId": 1,
                "label": "一级部门-2",
                "treePath": "/1/3/"
            }
        ],
        "id": 1,
        "parentId": null,
        "label": "根部门",
        "treePath": "/1/"
    }
]
4.2.部门修改
假设现在我想把二级部门-2-1直接挂接到根部门下,则两个三级部门也会跟着一起迁移,尝试一下做这个修改,请求参数如下:
{
  "id": 5,
  "parentId": null,
  "name": "二级部门-2-1(改)"
}
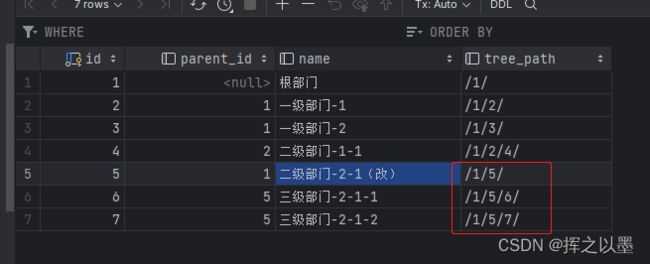
执行后,数据库的结果如下,tree_path中间的/3/已经去掉了:

4.3.子树查询
传入二级部门-2-1(改)的id,查询子树,期望可以返回三个部门,一个父部门,两个子部门,请求tree接口的结果与期望相符:
[
    {
        "children": [
            {
                "children": [],
                "id": 6,
                "parentId": 5,
                "label": "三级部门-2-1-1",
                "treePath": "/1/5/6/"
            },
            {
                "children": [],
                "id": 7,
                "parentId": 5,
                "label": "三级部门-2-1-2",
                "treePath": "/1/5/7/"
            }
        ],
        "id": 5,
        "parentId": 1,
        "label": "二级部门-2-1(改)",
        "treePath": "/1/5/"
    }
]
5.结语
通过组合模式加上一点数据库的设计,可以实现大部分常规的树状结构的需求,希望对大家能有所帮助。