opencv基础
c++配置opencv
- 项目右击>>属性>>配置属性>>VC++目录
包含目录里添加X:\xxx…\opencv\build\include(###不是X:\xxx…\opencv\build\include\opencv2)
库目录里添加X:\xxx…\opencv\build\x64\vc15\lib - C/C++>>常规
附加包含目录里添加X:\xxx…\opencv\build\include(###不是X:\xxx…\opencv\build\include\opencv2) - 链接器>>常规
附加库目录里添加X:\xxx…\opencv\build\x64\vc15\lib - 链接器>>输入
附加依赖项里添加opencv_world344d.lib - 把界面上调试器左边的x86改为x64
第一课
#include "pch.h"
#include
#include
#include
using namespace cv;
using namespace std;

int main()
{
	Mat img = imread("C:/Users/DELL/Pictures/Saved Pictures/2.png");
	if (img.empty()) {
		cout << " could not load image...";
		return -1;
	}
	namedWindow("picture", WINDOW_AUTOSIZE); // 命名窗口名称和显示模式
	imshow("picture", img);


	Mat dst;
	dst = Mat::zeros(img.size(), img.type()); //初始化成全0的mat
	Mat kernel = (Mat_(3, 3) << 0, -1, 0, -1, 5, -1, 0, -1, 0); //输入图像掩模
	double t = getTickCount();
	filter2D(img, dst, img.depth(), kernel);
	double timeconsume = (getTickCount() - t) / getTickFrequency();
	cout << timeconsume;
	/*
	int cols = (img.cols-1)*img.channels();
	int rows = img.rows;
	int offset = img.channels();
	cout << offset;

	for (int row = 1; row < (rows - 1); row++) {
		const uchar* current = img.ptr(row);
		const uchar* previous = img.ptr(row-1);
		const uchar* next = img.ptr(row+1);
		uchar* output = dst.ptr(row);
		for (int col = offset; col < cols; col++) {
			output[col] = saturate_cast(5 * current[col] - (previous[col] + current[col - offset] + current[col + offset] + next[col]));
		}
	}
*/
	imshow("output", dst);
	Matx33d matrix(1, 2, 3, 4, 5, 6, 7, 8, 9);
	Matx31d vector(1, 2, 3);
	Mat imageROI;
	imageROI = img(Rect(0, 0, 50, 50));


	waitKey(0);// 延时时间
	destroyAllWindows(); //关闭所有窗口
	return 0;

}
saturate_cast为饱和函数,大于255为255,小于0为0
Mat kernel = (Mat_(3, 3) << 0, -1, 0, -1, 5, -1, 0, -1, 0); //输入图像掩模
掩模效果等于注释的代码段
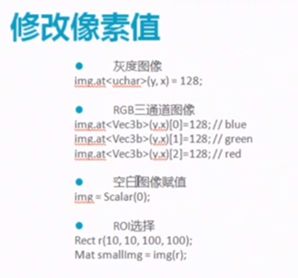
ROI区域选取:
	Mat mat;
	Rect rect(0, 0, 50, 50);
	mat = img(rect);
	imshow("34", mat);
利用指针指向Mat的某一行,img.ptr为图像的指针
const uchar* current = img.ptr(row)
代码运行时间:
	double t = getTickCount();
	//运行代码块
	double timeconsume = (getTickCount() - t) / getTickFrequency();
	cout << timeconsume;
第二课 Mat对象
创建Mat对象的两种方式:
①
3,3为Mat大小
CV_8UC3为8位的uchar类型,通道数为3
Scalar(0, 0, 255)表示三个通道中的数分别为多少
Mat M(3, 3, CV_8UC3, Scalar(0, 0, 255)); //8uc3 8位 uchar 3通道
②
先定义一个Mat m
规定m的尺寸和类型和Mat img相同
给m赋值
Mat m;
m.create(img.size(), img.type());
m = Scalar(0, 0, 244);
第三课
图像像素操作的两种方法
①单通道的灰度图像
利用Mat.at(i,j)的方法访问坐标为i,j的像素点,类型为uchar
Mat gray;
cvtColor(img, gray, COLOR_BGR2GRAY);
int rows = img.rows;
int cols = img.cols;
for (int i = 0; i < rows; i++) {
	for (int j = 0; j < cols; j++) {
		gray.at(i, j) = 255 - gray.at(i, j); //单通道类型uchar
	}
}
	imshow("gray", gray);
②三通道彩色图像
利用Mat.at(i,j)[0]访问坐标为i,j,通道为0的像素,8U类型的RGB彩色图像类型vec3b
Mat dst;
dst.create(img.size(), img.type());
int height = img.rows;
int width = img.cols;
int channel = img.channels();
for (int row = 0; row < height; row++) {
	for (int col = 0; col < width; col++) {
		if (channel==1){
			img.at(row, col) = 255 - img.at(row, col);
		}
		else if (channel == 3) {
			int b = img.at(row, col)[0]; //8U类型的RGB彩色图像类型vec3b
			int g = img.at(row, col)[1];//顺序为bgr
			int r = img.at(row, col)[2];
			dst.at(row, col)[0] = 255 - b;
			dst.at(row, col)[1] = 255 - g;
			dst.at(row, col)[2] = 255 - r;
		}
	}
}
等于api : bitwise_not(img, dst);


总代码:
#include "pch.h"
#include
#include
#include
#include
using namespace cv;
using namespace std;

int main()
{
	Mat img = imread("C:/Users/DELL/Pictures/Saved Pictures/2.png");
	if (img.empty()) {
		cout << " could not load image...";
		return -1;
	}
	namedWindow("picture", WINDOW_AUTOSIZE); // 命名窗口名称和显示模式
	imshow("picture", img);

	Mat mat;
	Rect rect(0, 0, 50, 50);
	mat = img(rect);
	imshow("34", mat);
	Mat gray;
	cvtColor(img, gray, COLOR_BGR2GRAY);
	int rows = img.rows;
	int cols = img.cols;
	for (int i = 0; i < rows; i++) {
		for (int j = 0; j < cols; j++) {
			gray.at(i, j) = 255 - gray.at(i, j);
		}
	}
	imshow("gray", gray);

	Mat dst;
	dst.create(img.size(), img.type());
	int height = img.rows;
	int width = img.cols;
	int channel = img.channels();

	/*
	for (int row = 0; row < height; row++) {
		for (int col = 0; col < width; col++) {
			if (channel==1){
				img.at(row, col) = 255 - img.at(row, col);
			}
			else if (channel == 3) {
				int b = img.at(row, col)[0];
				int g = img.at(row, col)[1];
				int r = img.at(row, col)[2];
				dst.at(row, col)[0] = 255 - b;
				dst.at(row, col)[1] = 255 - g;
				dst.at(row, col)[2] = 0;

				gray.at(row, col) = min(r, min(g, b));
			}
		}
	}
*/
	bitwise_not(img, dst);

	imshow("111", gray);

	Matx33d matrix(1, 2, 3, 4, 5, 6, 7, 8, 9);
	Matx31d vector(1, 2, 3);
	Mat imageROI;
	imageROI = img(Rect(0, 0, 50, 50));


	waitKey(0);// 延时时间
	destroyAllWindows(); //关闭所有窗口
	return 0;

}
第四课调整亮度和对比度
像素变换——点操作
领域操作——区域
调整亮度和对比度属于像素变换
![]()

#include "pch.h"
#include
#include
#include
#include
using namespace cv;
using namespace std;

int main()
{
	Mat img = imread("C:/Users/DELL/Pictures/Saved Pictures/2.png");

	if (img.empty()) {
		cout << " could not load image...";
		return -1;
	}

	string input = "input image";

	namedWindow(input, WINDOW_AUTOSIZE); // 命名窗口名称和显示模式
	imshow(input, img);
	cvtColor(img, img, CV_BGR2GRAY);
	Mat mat,gray;
	mat=Mat::zeros(img.size(), img.type());


	int rows = img.rows;
	int cols = img.cols;
	float alpha = 1.5;
	float beta = 8;
	for (int i = 0; i < rows; i++) {
		for (int j = 0; j < cols; j++) {
			if (img.channels() == 3) {
				float b = img.at(i, j)[0];
				float g = img.at(i, j)[1];
				float r = img.at(i, j)[2];

				mat.at(i, j)[0] = saturate_cast(b*alpha + beta);
				mat.at(i, j)[1] = saturate_cast(g*alpha + beta);
				mat.at(i, j)[2] = saturate_cast(r*alpha + beta);

			}
			else if (img.channels() == 1) {
				float v=img.at(i, j);
				mat.at(i, j) = saturate_cast(v*alpha + beta);

			}

		}
	}
	imshow("output", mat);


	waitKey(0);// 延时时间
	destroyAllWindows(); //关闭所有窗口
	return 0;

}
第五课 绘制形状与文字
- 使用cv::Point与cv::Scalar
- 绘制线、矩形、圆、椭圆等
- 随机生成与绘制文本
- line(img, p1, p2, color, 1, LINE_8); //背景图片,点1,点2,颜色,线宽
- rectangle(img, rect, color, 2, LINE_8);//背景图片,正方形四个尺寸,颜色,线宽
- ellipse(img, Point(img.cols / 2, img.rows / 2), Size(img.cols / 4, img.rows / 8), 0, 0, 360, color, 2, LINE_8);//背景图像,中心点,长短轴,旋转角度,起止范围(0~360°),颜色,线宽
- circle(img, center, 150, color, 2, LINE_8);//背景图像,圆心,半径,颜色,粗细
- RNG rng(12345);//随机数生成函数【rng.gaussian(最小值,最大值)生成高斯随机数,rng.uniform(最小值,最大值)正态分布随机数】
#include "pch.h"
#include
#include
#include
#include
using namespace cv;
using namespace std;

Mat img;

void myline();
void myrect();
void myellipse();
void mycircle();
void mypolygon();
void RandomLine();
int main()
{
	img = imread("C:/Users/DELL/Pictures/Saved Pictures/2.png");

	if (img.empty()) {
		cout << " could not load image...";
		return -1;
	}

	string input = "input image";
	myline();
	myrect();
	myellipse();
	mycircle();
	mypolygon();//填充多边形
	RandomLine();
	putText(img, "Hello", Point(300, 300), CV_FONT_HERSHEY_COMPLEX, 2.0, Scalar(12, 255, 22), 1, 8);//文字内容,位置,字体,2.0为字体放大倍数
	namedWindow(input, WINDOW_AUTOSIZE); // 命名窗口名称和显示模式
	imshow(input, img);

	waitKey(0);// 延时时间
	destroyAllWindows(); //关闭所有窗口
	return 0;

}

void myline() {
	Point p1 = Point(20, 30);
	Point p2;
	p2.x = 200;
	p2.y = 300;
	Scalar color = Scalar(0, 0, 255);
	line(img, p1, p2, color, 1, LINE_8); //背景图片,点1,点2,颜色,线宽
}

void myrect() {
	Rect rect = Rect(200, 100, 300, 300);
	Scalar color = Scalar(255, 0, 0);
	rectangle(img, rect, color, 2, LINE_8);//背景图片,正方形四个尺寸,颜色,线宽
}

void myellipse() {
	Scalar color = Scalar(0, 255,0);
	ellipse(img, Point(img.cols / 2, img.rows / 2), Size(img.cols / 4, img.rows / 8), 0, 0, 360, color, 2, LINE_8);//背景图像,中心点,长短轴,旋转角度,起止范围(0~360°),颜色,线宽
}
void mycircle() {
	Scalar color = Scalar(0, 255, 255);
	Point center = Point(img.cols / 2, img.rows/2);
	circle(img, center, 150, color, 2, LINE_8);//背景图像,圆心,半径,颜色,粗细
}
void mypolygon() {
	Point pts[1][5];
	pts[0][0] = Point(100, 100);
	pts[0][1] = Point(100, 200);
	pts[0][2] = Point(200, 200);
	pts[0][3] = Point(200, 100);
	pts[0][4] = Point(100, 100);
	const Point*ppts[] = { pts[0] };
	int n[] = { 5 };
	Scalar color = Scalar(255, 34, 56);
	fillPoly(img,ppts,n,1,color,8);
}
void RandomLine(){
	RNG rng(12345);//随机数生成函数
	Point pt1;
	Point pt2;
	Mat bg = Mat::zeros(img.size(), img.type());
	//namedWindow("random line", CV_WINDOW_AUTOSIZE);
	for (int i = 0; i < 1000; i++) {
		pt1.x = rng.uniform(0, img.cols);
		pt2.x = rng.uniform(0, img.cols);
		pt1.y = rng.uniform(0, img.rows);
		pt2.y = rng.uniform(0, img.rows);
		Scalar color = Scalar(rng.uniform(0, 255), rng.uniform(0, 255), rng.uniform(0, 255));
		if (waitKey(50) > 0) { //运行大于ms自动停止
			break;
		}
		line(bg, pt1, pt2, color, 1, 8);
		imshow("random line", bg);
	}
}
第六课 模糊图像
#include "pch.h"
#include
#include
#include
using namespace cv;
using namespace std;

int main()
{
	Mat img = imread("C:/Users/DELL/Pictures/Saved Pictures/2.png");
	Mat dst,dst_gaussian;
	if (img.empty()) {
		cout << " could not load image...";
		return -1;
	}
	string input = "input image";
	namedWindow(input, WINDOW_AUTOSIZE); // 命名窗口名称和显示模式
	imshow(input, img);
	blur(img, dst, Size(5, 1), Point(-1, -1));
	imshow("blur", dst);
	GaussianBlur(img, dst_gaussian, Size(5, 5), 11, 11);
	imshow("gaussian blur", dst_gaussian);
	waitKey(0);// 延时时间
	destroyAllWindows(); //关闭所有窗口
	return 0;
}
2、非线性模糊
- 中值滤波
- 双边滤波


API:

d=15——计算半径,半径之内的像素都被计算
150——决定多少差值之内的像素会被计算
3——如果d的值大于0则无效,否则根据该值计算d的值
中值模糊中的ksize必须大于1且为奇数
第七课 腐蚀与膨胀
1、膨胀:图像A和结构元素B,B在A上面移动,以B中心为锚点,计算B覆盖下A的最大像素值来代替锚点的像素,B的结构可以为任意形状。
dilate(src,dst,kernel)
2、腐蚀(消除小的噪声):图像A和结构元素B,B在A上面移动,以B中心为锚点,计算B覆盖下A的最小像素值来代替锚点的像素,B的结构可以为任意形状
erode(src,dst,kernel)
kernel=getStructuringElement(int shape,Size ksize,Point anchor) //形状、大小、锚点
3、滑动条——动态调整结构元素大小

#include "pch.h"
#include
#include
#include
using namespace cv;
using namespace std;

int element_size = 3;
int max_size = 21;
void CallBack_demo(int, void*);
Mat img, dst;
string input = "input image";
string output = "output image";

int main()
{
	img = imread("C:/Users/DELL/Pictures/Saved Pictures/2.png");

	if (img.empty()) {
		cout << " could not load image...";
		return -1;
	}
	namedWindow(input, WINDOW_AUTOSIZE); // 命名窗口名称和显示模式
	imshow(input, img);
	namedWindow(output, CV_WINDOW_AUTOSIZE);
	createTrackbar("Element_size", output, &element_size, max_size, CallBack_demo);
	CallBack_demo(0, 0);
	waitKey(0);// 延时时间
	destroyAllWindows(); //关闭所有窗口
	return 0;
}
void CallBack_demo(int, void*) {
	int s = element_size * 2 + 1;
	Mat structureElement = getStructuringElement(MORPH_RECT, Size(s, s), Point(-1, -1));
	dilate(img, dst, structureElement, Point(-1, -1), 1);
	imshow(output, dst);
第八课 形态学操作
- 开操作(先腐蚀后膨胀)——去掉小的对象
- 闭操作(先膨胀后腐蚀)——可以填补小的洞
- 形态学梯度(膨胀减去腐蚀)
- 顶帽(原图像与开操作之间的插值)
- 黑帽(原图像与闭操作之间的插值)可以找出有缺陷的地方
1、开操作
Mat kernel = getStructuringElement(MORPH_RECT, Size(3, 3), Point(-1, -1));
morphologyEx(img, dst, CV_MOP_OPEN, kernel);
imshow(output, dst);
2、闭操作
Mat kernel = getStructuringElement(MORPH_RECT, Size(3, 3), Point(-1, -1));
morphologyEx(img, dst, CV_MOP_CLOSE, kernel);//形态学函数,CLOSE为闭操作
imshow(output, dst);
3、形态学梯度
Mat kernel = getStructuringElement(MORPH_RECT, Size(3, 3), Point(-1, -1));
morphologyEx(img, dst, CV_MOP_GRADIENT, kernel);
imshow(output, dst);
4、顶帽
Mat kernel = getStructuringElement(MORPH_RECT, Size(3, 3), Point(-1, -1));
morphologyEx(img, dst, CV_MOP_TOPHAT, kernel);
imshow(output, dst);
5、黑帽
Mat kernel = getStructuringElement(MORPH_RECT, Size(3, 3), Point(-1, -1));
morphologyEx(img, dst, CV_MOP_BLACKHAT, kernel);
imshow(output, dst);
第九课 形态学操作-提取水平与垂直线
步骤
- 输入图像
- 转化为灰度图像
- 转化为二值图像

自适应方法①把块中像素值取平均,再减去常数c,得到阈值
自适应方法②把块中元素取高斯加权和(权值和距离有关),减去常数C,得到阈值 - 定义结构元素
- 开操作提取水平与垂直线
通过对某一方向上先进行腐蚀再进行膨胀(开运算),可以得到该方向上的直线,除掉了其他东西 。
int main()
{
	Mat img, dst,gray,binimg;
	img = imread("C:/Users/DELL/Pictures/Saved Pictures/4.png");

	if (img.empty()) {
		cout << " could not load image...";
		return -1;
	}
	namedWindow(input, WINDOW_AUTOSIZE); // 命名窗口名称和显示模式
	imshow(input, img);
	cvtColor(img, gray, CV_BGR2GRAY);
	adaptiveThreshold(~gray, binimg, 255, ADAPTIVE_THRESH_GAUSSIAN_C, THRESH_BINARY, 15, -2);
	Mat hline = getStructuringElement(MORPH_RECT, Size(img.cols / 16, 1), Point(-1, -1));//设置结构体
	Mat vline = getStructuringElement(MORPH_RECT, Size(1, img.rows / 16), Point(-1, -1));
	Mat kernel = getStructuringElement(MORPH_RECT, Size(3,3), Point(-1, -1));
	Mat temp;
	erode(binimg, temp, vline);
	dilate(temp, dst, vline);
	//morphologyEx(binimg, dst, CV_MOP_OPEN,hline);
	bitwise_not(dst, dst);
	blur(dst, dst, Size(3, 3), Point(-1, -1));
	imshow(output, binimg);
	imshow("hline", dst);
	waitKey(0);// 延时时间
	destroyAllWindows(); //关闭所有窗口
	return 0;
}
第十课 金字塔上下采样

上采样为得到分辨率更高的图像,下采样为得到分辨率低的图像
图像处理中需要通过图像金字塔得到分辨率不同的图像,在不同的尺度空间寻找图像对应的特征,而且图像的金字塔变化可以保证图像的特征一直存在。
- 高斯金字塔:用来对图像进行逐层下采样(先对当前层进行高斯模糊,再删除当前层的偶数行与列)
- 拉普拉斯金字塔:用来重建一张图像,根据上层降采样图片
高斯不同:
把同一张图像在不同参数下做高斯模糊之后进行相减,得到输出的图像叫做高斯不同
常用于灰度图像增强、角点检测。

#include "pch.h"
#include
#include
#include
#include
#include
using namespace cv;
using namespace std;

int main()
{
	int numb=0;
	Mat img, dst,gray,dst1;
	img = imread("C:/Users/DELL/Pictures/Saved Pictures/2.png");
	if (img.empty()) {
		cout << "could not load image";
		return -1;
	}
	cvtColor(img, gray, CV_BGR2GRAY);
	namedWindow("output", WINDOW_AUTOSIZE);
	//上采样
	pyrUp(gray, dst, Size(gray.cols * 2, gray.rows * 2));
	//降采样
	pyrDown(gray, dst1, Size(gray.cols/2, gray.rows / 2));
	Mat blur1, blur2,out;
	//高斯不同
	GaussianBlur(gray, blur1, Size(5, 5), 0, 0);
	GaussianBlur(blur1, blur2, Size(5, 5), 0, 0);
	subtract(blur1, blur2, out, Mat());
	//归一化显示,图像差异增强
	normalize(out, out, 255, 0, NORM_MINMAX);
	imshow("output", out);
	waitKey(0);// 延时时间
	destroyAllWindows(); //关闭所有窗口
	return 0;
}
第十一课 阈值操作
- 二值化(大于阈值取一个值,小于阈值取0)
- 反二值化
- 截断(大于阈值取阈值,小于阈值保持)
- 阈值取零(大于阈值保持不变,小于阈值取0)
- 阈值反取零
#include "pch.h"
#include
#include
#include
#include
#include
using namespace cv;
using namespace std;


int threshold_value = 127;
int threshold_max = 255;
void Threshold_demo(int, void*);
Mat img, dst,gray,dst1;
int type_value = 2;
int type_max = 4;
int main()
{
	int numb=0;
	img = imread("C:/Users/DELL/Pictures/Saved Pictures/2.png");
	if (img.empty()) {
		cout << "could not load image";
		return -1;
	}
	cvtColor(img, gray, CV_BGR2GRAY);
	namedWindow("output", WINDOW_AUTOSIZE);
	createTrackbar("Threshold Value", "output", &threshold_value, threshold_max, Threshold_demo);
	createTrackbar("Type_value", "output", &type_value, type_max, Threshold_demo);
	Threshold_demo(0, 0);


	waitKey(0);// 延时时间
	destroyAllWindows(); //关闭所有窗口
	return 0;
}
void Threshold_demo(int, void*) {

	threshold(gray, dst, threshold_value,threshold_max,type_value);//只能用灰度图像
	imshow("output", dst);
}
第十二课 边缘处理
在图像进行卷积操作的时候,因为卷积核大小的存在,所以图像边缘的像素点不能被卷积操作。在卷积开始前增加边缘像素,填充的像素值为0或者RGB黑色,比如在3×3的四周各田中一个像素的边缘。
第十三课 直方图
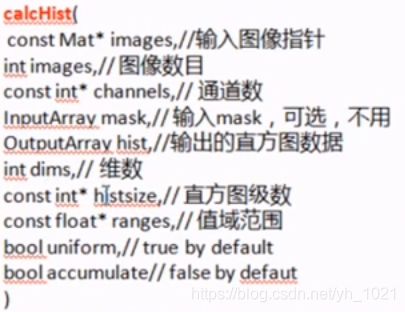
1、直方图是指针对整个图像在灰度范围内的像素值(0-255)统计出现频率次数,反应了图像灰度的分布情况。
直方图均衡化可以提高图像对比度。
API:
equalizeHist(InputArray src,     //输入图像,8位的灰度图像
OutputArray dst )


