双系统ubuntu20.04(neotic版本)从0实现Gazebo仿真slam建图
双系统ubuntu20.04(neotic版本)从0实现Gazebo仿真slam建图
昨晚完成了ROS的多机通讯,还没来得及整理相关操作步骤,在进行实际小车的实验之前,还是先打算在仿真环境中进行测试,熟悉相关的操作步骤,计划通过虚拟机(笔记本)来操纵双系统(台式机)完成在仿真环境中的地图构建,导航等功能。
ps:别问为什么不直接通过向日葵远程操控,后面要进行实际环境中多机器人编队的测试,多机器人编队功能已经被写好了,但是需要安装在远程PC的工作空间中进行多机器人的控制
1、安装ROS(neotic)版本依赖
  sudo apt-get install ros-noetic-joy ros-noetic-teleop-twist-joy \
  ros-noetic-teleop-twist-keyboard ros-noetic-laser-proc \
  ros-noetic-rgbd-launch ros-noetic-rosserial-arduino \
  ros-noetic-rosserial-python ros-noetic-rosserial-client \
  ros-noetic-rosserial-msgs ros-noetic-amcl ros-noetic-map-server \
  ros-noetic-move-base ros-noetic-urdf ros-noetic-xacro \
  ros-noetic-compressed-image-transport ros-noetic-rqt* ros-noetic-rviz \
  ros-noetic-gmapping ros-noetic-navigation ros-noetic-interactive-markers
ROS1和ROS2其他版本安装相关依赖参考网址(ROS1&ROS2依赖包)注意☝的是一行指令,分行输入会报错的。
2、安装turtlebot3软件包
Install TurtleBot3 via Debian Packages.
 sudo apt install ros-noetic-dynamixel-sdk
 sudo apt install ros-noetic-turtlebot3-msgs
 sudo apt install ros-noetic-turtlebot3
3、设置环境变量
source ~/.bashrc
4、创建工作空间安装TB3功能包
mkdir -p ~/catkin_ws/src
cd ~/catkin_ws/src/
git clone -b noetic-devel http://ghproxy.com/https://github.com/ROBOTIS-GIT/DynamixelSDK.git
git clone -b noetic-devel http://ghproxy.com/https://github.com/ROBOTIS-GIT/turtlebot3_msgs.git
git clone -b noetic-devel http://ghproxy.com/https://github.com/ROBOTIS-GIT/turtlebot3.git
git clone -b noetic-devel http://ghproxy.com/https://github.com/ROBOTIS-GIT/turtlebot3_simulations.git
cd ~/catkin_ws && catkin_make
ROS1其他版本的TB3功能包参考ROS1功能包
ROS2(foxy)版本功能包参考ROS2功能包
注意ROS1&ROS2的其他版本连接中改对应版本名称
编译成功
5、Gazebo仿真
(1)选择启动的机器人模型
export TURTLEBOT3_MODEL=waffle_pi
export TURTLEBOT3_MODEL=burger
(2)启动gazebo仿真环境
roslaunch turtlebot3_gazebo turtlebot3_world.launch
可能会出现以下报错:
找到错误原因“环境变量设置有问题”
错误原因为环境变量设置有问题(后面进行优化)
运行下方代码后再执行roslaunch
source ~/catkin_ws/devel/setup.bash
roslaunch turtlebot3_slam turtlebot3_slam.launch
turtlebot3_world.launch

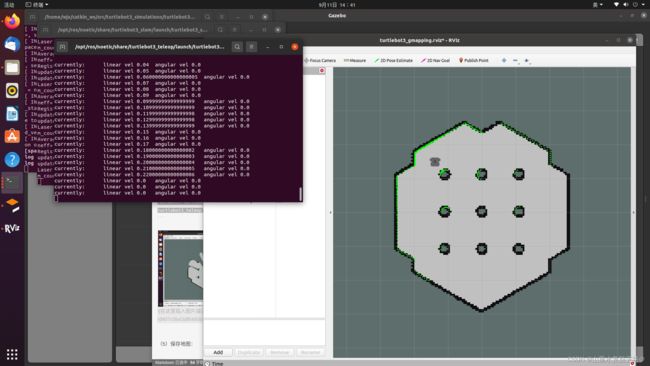
(3)启动rviz进行建图
打开新的终端,还要在输入一边机器人选择模型的指令,在输入以下指令(后面进行优化)
roslaunch turtlebot3_slam turtlebot3_slam.launch
(4)控制小车移动实现建图
打开新的终端,还要在输入一边机器人选择模型的指令
roslaunch turtlebot3_teleop turtlebot3_teleop_key.launch

(5)保存地图:
rosrun map_server map_saver -f ~/map_world
地图自动保存在~/home/map目录下,名为map_world.yaml和map_world.pgm
优化
目前在启动机器人小车在仿真环境中的建图非常麻烦,每次启动新的节点都要输入指令选择一遍机器人的模型,且在启动turtlebot3_world.launch文件前还要进行以便环境的配置,总之是非常麻烦的!
下面把这些指令提前配置到source ~/.bashrc文件中
(1)手动配置
输入:
sudo gedit ~/.bashrc
在文本的最后加入以下这些指令:
source ~/catkin_ws/devel/setup.bash
export TURTLEBOT3_MODEL=waffle_pi//如果你要选择burger型机器人输入export TURTLEBOT3_MODEL=burger
export ROS_DOMAIN_ID=30 #TURTLEBOT3
export GAZEBO_MODEL_PATH=$GAZEBO_MODEL_PATH:~/catkin_ws/src/turtlebot3/turtlebot3_simulations/turtlebot3_gazebo/models
然后保存后关闭文件,打开终端输入source ~/.bashrc更新环境即可完成。
(2)输入指令配置
我参考其他配置环境指令,输入后可达到相同效果。
echo 'source ~/catkin_ws/devel/setup.bash' >> ~/.bashrc
echo 'export TURTLEBOT3_MODEL=waffle_pi' >> ~/.bashrc
echo 'export ROS_DOMAIN_ID=30 #TURTLEBOT3' >> ~/.bashrc
echo 'export GAZEBO_MODEL_PATH=$GAZEBO_MODEL_PATH:~/catkin_ws/src/turtlebot3/turtlebot3_simulations/turtlebot3_gazebo/models' >> ~/.bashrc
输入完成后打开新终端输入:
source ~/.bashrc
设置完成后,现在启动建图,仅需要输入:
(1)启动gazebo仿真环境
roslaunch turtlebot3_gazebo turtlebot3_world.launch
(2)启动RVIZ
roslaunch turtlebot3_slam turtlebot3_slam.launch
(3)启动键盘控制节点即可
roslaunch turtlebot3_teleop turtlebot3_teleop_key.launch