uni-app入门教程(7)第三方登录和分享
文章目录
- 前言
- 一、通用配置
-
- 1.微信小程序端配置
- 2.APP端配置
- 二、微信小程序第三方登录
-
- 1.判断是否登录
- 2.登录页面开发
- 三、APP第三方登录
- 四、分享接口
-
- 1.小程序分享
- 2.APP分享
- 总结
前言
本文主要介绍了APP开发的两大基本功能,即第三方登录登录和分享:包括登录通用配置,微信小程序和APP的第三方登录方式,和分享到聊天和朋友圈,使用uni-app实现有不同的接口和实现方式。
一、通用配置
因为小程序和APP登录接口不同,需要在前端进行跨端兼容处理,同时微信等平台的小程序一般只支持所属宿主程序的第三方登录,而无法包括其他的常见第三方登录方式,如微博、QQ等,因此需要与APP分开。
1.微信小程序端配置
微信小程序端必须配置appid,需要申请小程序开发者并获取appid及相关秘钥,支持个人开发者。
获取appid后编辑manifest.json,可以选择微信小程序配置完成,也可以选择源码视图填充,示意如下:
"mp-weixin" : {
    "appid" : "appid"
}
可点击https://developers.weixin.qq.com/miniprogram/dev/api/open-api/user-info/wx.getUserInfo.html查看微信官方文档。
在使用HBuilder提供的测试AppID可能会报错,例如Cannot read property 'forceUpdate' of undefined,此时可以在微信公众平台https://developers.weixin.qq.com/community/welogin?redirect_url=%2Fsandbox中申请沙箱环境测试号的AppID和AppSecret信息,并用于项目测试,就不会再输出错误。
2.APP端配置
APP端支持微信、QQ、微博等多种第三方登录方式,都需要申请对应的开发者并获取对应的appid。
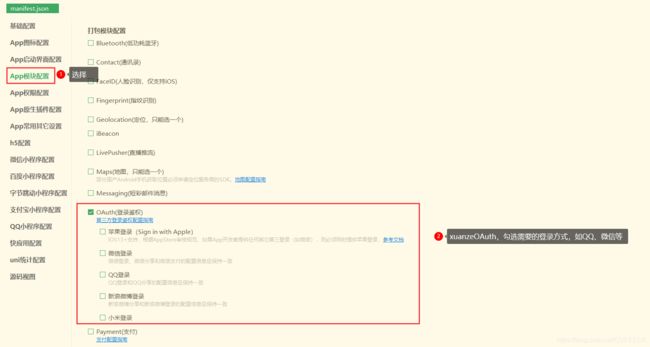
获取对应的appid后,编辑manifest.json,进行可视化操作,选择App模块配置,进行OAuth鉴权配置,选择所需要的登录方式,如QQ、微信等,如下:

选择对应的登录方式后需要填写AppID等信息。
二、微信小程序第三方登录
1.判断是否登录
在微信小程序登录前需要判断是否登录,此时可以在App.vue中定义,因为App.vue中定义的变量和方法为全局变量和方法,可以在其他页面中可以调用,只需要用global关键字声明即可。
登录的一般原理为:
从本地缓存根据键获取到用户id和随机码等信息,再向服务端请求验证识别是否存在该用户。
随机码是为了提高数据接口的安全性建立的,除此之外也可以使用Redis、MemCache等实现安全保证。
先在App.vue中定义全局的判断是否登录的方法,如下:
<script>
	export default {
		onLaunch: function() {
			console.log('App Launch')
		},
		onShow: function() {
			console.log('App Show')
		},
		onHide: function() {
			console.log('App Hide')
		}
	}
	global.isLogin = function() {
		try{
			var suid = uni.getStorageSync('suid');
			var srand = uni.getStorageSync('srand');
		}catch(e){
			//TODO handle the exception
		}
		if(suid == '' || srand == ''){
			return false;
		}
		else{
			return [suid, srand];
		}
	}
script>

<style>
	/*每个页面公共css */
	.red{
		color:#ff0000;
	}
style>
再在index.vue中调用全局方法,如下:
<template>
	<view>
		Index...
	view>
template>

<script>
	export default {
		data() {
			return {
			}
		},
		onLoad() {
			var res = global.isLogin();
			if(!res){
				uni.showModal({
					title: '登录提醒',
					content: '请登录',
					success:function(){
						uni.navigateTo({
							url: '/pages/login'
						})
					}
				})
			}
		},
		onShow() {
		},
		onHide() {
		},
		methods: {
		}
	}
script>

<style>

style>
同时在pages目录下新建login.vue页面,如下:
<template>
	<view>
		login...
	view>
template>

<script>
	export default {
		data() {
			return {
			}
		},
		onLoad() {
		},
		onShow() {
		},
		onHide() {
		},
		methods: {
		}
	}
script>

<style>

style>
并将其添加进pages.json中,如下:
{
	"pages": [ //pages数组中第一项表示应用启动页,参考:https://uniapp.dcloud.io/collocation/pages
		{
			"path": "pages/index/index",
			"style": {
				"navigationBarTitleText": "Uni Index",
				"backgroundColor": "#F0AD4E",
				"navigationBarTextStyle":"black"
			}
		},
		{
			"path": "pages/about/about",
			"style": {
				"navigationBarTitleText": "Uni About"
			}
		},
		{
			"path": "pages/news",
			"style": {
				"navigationBarTitleText": "Uni News",
				"navigationBarBackgroundColor":"#DD524D"
			}
		},
		{
			"path": "pages/login",
			"style": {
				"navigationBarTitleText": "Uni Login",
				"navigationBarBackgroundColor":"#00aaff"
			}
		}
	],
	"globalStyle": {
		"navigationBarTextStyle": "white",
		"navigationBarTitleText": "hello uniapp",
		"navigationBarBackgroundColor": "#ff557f",
		"backgroundColor": "#fffae8"
	},
	"tabBar": {
		"color":"#F0AD4E",
		"selectedColor":"#007AFF",
		"backgroundColor":"#FFFFFF",
		"list": [
			{
				"pagePath":"pages/index/index",
				"iconPath":"static/imgs/index_0.png",
				"selectedIconPath":"static/imgs/index_1.png",
				"text": "首页"
			},
			{
				"pagePath":"pages/about/about",
				"iconPath":"static/imgs/about_0.png",
				"selectedIconPath":"static/imgs/about_1.png",
				"text":"关于我们"
			}
		]
	},
	"condition": { //模式配置,仅开发期间生效
	    "current": 0, //当前激活的模式(list 的索引项)
	    "list": [{
	            "name": "index", //模式名称
	            "path": "pages/index/index", //启动页面,必选
	            "query": "interval=4000&autoplay=false" //启动参数,在页面的onLoad函数里面得到。
	        },
	        {
	            "name": "about", //模式名称
	            "path": "pages/about/about", //启动页面,必选
	            "query": "interval=4000&autoplay=false" //启动参数,在页面的onLoad函数里面得到。
	        }
	    ]
	}
}
显然,获取到了未登录的状态后,跳转到了登录页。
2.登录页面开发
登录需要判断所在平台、进行跨端开发,因此需要进行条件编译,login.vue如下:
<template>
	<view>

		<button type="primary" open-type="getUserInfo" @getuserinfo="getuserinfo" withCredentials="true">微信登录button>

	view>
template>

<script>
	export default {
		data() {
			return {}
		},
		onLoad() {},
		onShow() {},
		onHide() {},
		methods: {
			getuserinfo: function(res){
				console.log(res)
			}
		}
	}
script>

<style>

style>
显示:
可以看到,在成功登录后,会返回用户的相关信息;
在清除缓存并重新编译后,之前的登录状态不存在,需要重新登录。
登录后查看返回值res包含了一些不加密的基础信息,detail属性下面有iv属性,是加密算法的初始向量,可以解密得到信息,还可以作为是否授权登录的判断标准;
rawData,不包括敏感信息的原始数据字符串,用于计算签名。
其中不包含openid和session_key等信息,需要进一步获取:
先通过uni.login(OBJECT)获取到code,即用户登录凭证;
再携带code,通过uni.request(OBJECT)获取到openid和session_key。
login.vue如下:
<template>
	<view>

		<button type="primary" open-type="getUserInfo" @getuserinfo="getuserinfo" withCredentials="true">微信登录button>

	view>
template>

<script>
	export default {
		data() {
			return {}
		},
		onLoad() {},
		onShow() {},
		onHide() {},
		methods: {
			getuserinfo: function(res1) {
				console.log(res1)
				if (!res1.detail.iv) {
					uni.showToast({
						title: '您已取消授权,登录失败',
						icon: "none"
					})
					return false;
				}
				uni.login({
					provider: 'weixin',
					success: function(res2) {
						console.log(res2);
						uni.request({
							url: 'https://api.weixin.qq.com/sns/jscode2session?appid=wxd3d4ee5ed8017903&secret=83c0d5efdfca99fc0509ff0d8956b830&js_code='+res2.code+'&grant_type=authorization_code',
							success:function(res3){
								// get the openid and seesion key
								console.log(res3)
							},
							fail:function(res4){
								console.log(re4)
							}
						})
					},
					fail:function(r){
						console.log(r)
					}
				});
			}
		}
	}
script>

<style>

style>
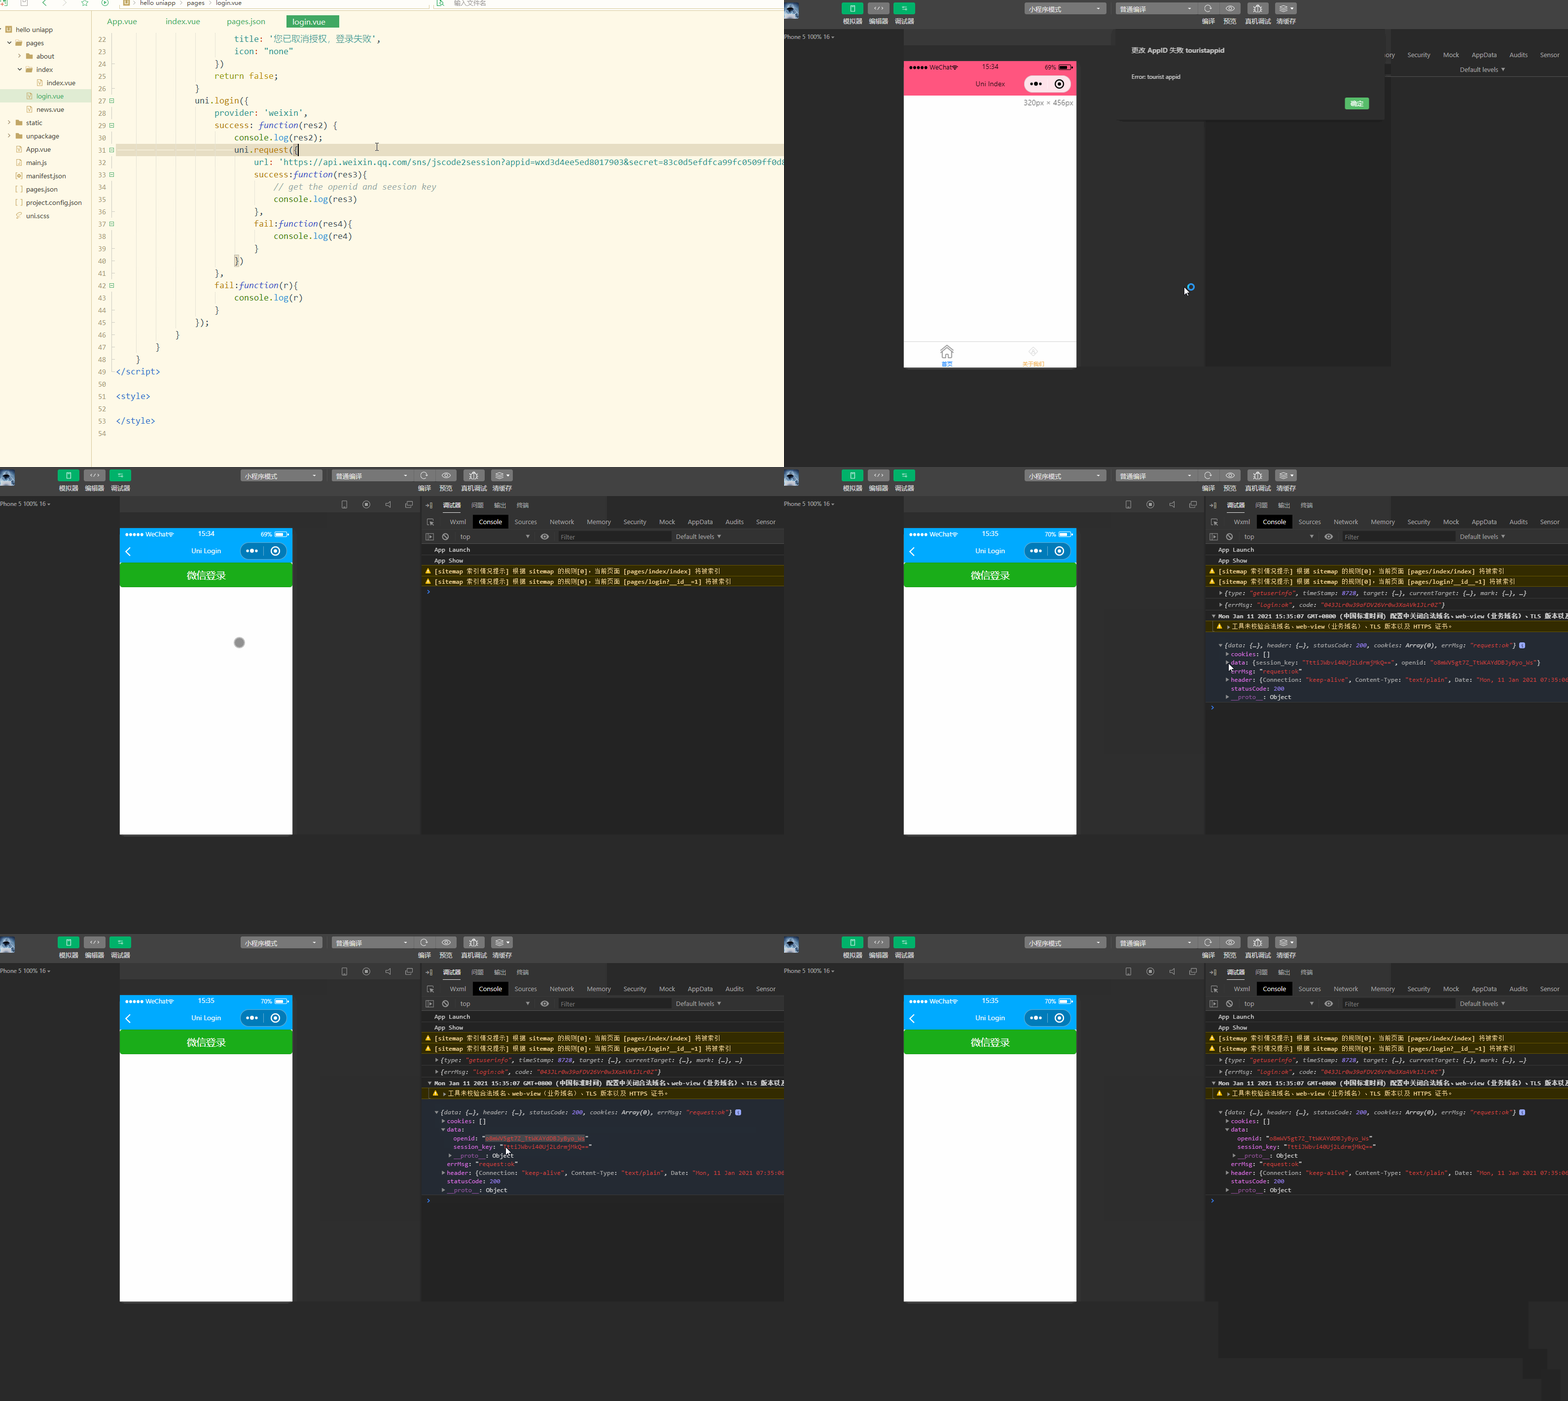
显然,此时获取到了openid和session key。
此外还可以获取unionid,其在满一定条件的情况下才会返回。
获取到了openid和session key后,可以解密iv。
通过微信官方提供的SDK进行解密,可以实现解密的接口,如下:
login.vue如下:
<template>
	<view>

		<button type="primary" open-type="getUserInfo" @getuserinfo="getuserinfo" withCredentials="true">微信登录button>

	view>
template>

<script>
	export default {
		data() {
			return {}
		},
		onLoad() {},
		onShow() {},
		onHide() {},
		methods: {
			getuserinfo: function(res1) {
				console.log(res1)
				if (!res1.detail.iv) {
					uni.showToast({
						title: '您已取消授权,登录失败',
						icon: "none"
					})
					return false;
				}
				uni.login({
					provider: 'weixin',
					success: function(res2) {
						console.log(res2);
						uni.request({
							url: 'https://api.weixin.qq.com/sns/jscode2session?appid=wxd3d4ee5ed8017903&secret=83c0d5efdfca99fc0509ff0d8956b830&js_code='+res2.code+'&grant_type=authorization_code',
							success:function(res3){
								// get the openid and seesion key
								console.log(res3)
								// decrypt
								uni.request({
									method: 'POST',
									url: 'https://hoa.hcoder.net/xcxencode/',
									header: {'content-type':'application/x-www-form-urlencoded'},
									data: {
										appid: 'wxd3d4ee5ed8017903',
										sessionKey: res3.data.session_key,
										iv: res1.detail.iv,
										encryptedData: res1.detail.encryptedData
									},
									success:function(res4){
										console.log(res4)
									}
								})
							},
							fail:function(res5){
								console.log(re5)
							}
						})
					},
					fail:function(r){
						console.log(r)
					}
				});
			}
		}
	}
script>

<style>

style>
小程序登录时,可以设置选择携带手机号。
从之前button组件的open-type属性中可以发现,getPhoneNumber属性可以获取用户手机号,可以从@getphonenumber回调中获取到用户信息。
三、APP第三方登录
实现APP登录也是通过条件编译实现。
login.vue如下:
<template>
	<view>

		<button type="primary" open-type="getUserInfo" @getuserinfo="getuserinfo" withCredentials="true">微信登录button>


		<button type="primary" @click="appWxLoin" withCredentials="true">用微信登录button>

		<button style="margin-top:50px;">手机号码登录button>
	view>
template>

<script>
	export default {
		data() {
			return {}
		},
		onLoad() {},
		onShow() {},
		onHide() {},
		methods: {
			// miniprogram
			getuserinfo: function(res1) {
				console.log(res1)
				if (!res1.detail.iv) {
					uni.showToast({
						title: '您已取消授权,登录失败',
						icon: "none"
					})
					return false;
				}
				uni.login({
					provider: 'weixin',
					success: function(res2) {
						console.log(res2);
						uni.request({
							url: 'https://api.weixin.qq.com/sns/jscode2session?appid=wxd3d4ee5ed8017903&secret=83c0d5efdfca99fc0509ff0d8956b830&js_code=' +
								res2.code + '&grant_type=authorization_code',
							success: function(res3) {
								// get the openid and seesion key
								console.log(res3)
								// decrypt
								uni.request({
									method: 'POST',
									url: 'https://hoa.hcoder.net/xcxencode/',
									header: {
										'content-type': 'application/x-www-form-urlencoded'
									},
									data: {
										appid: 'wxd3d4ee5ed8017903',
										sessionKey: res3.data.session_key,
										iv: res1.detail.iv,
										encryptedData: res1.detail.encryptedData
									},
									success: function(res4) {
										console.log(res4)
									}
								})
							},
							fail: function(res5) {
								console.log(re5)
							}
						})
					},
					fail: function(r) {
						console.log(r)
					}
				});
			},
			appWxLoin: function(){
				console.log('login...')
			}
		}
	}
script>

<style>

style>
此时不需要open-type等属性,只需要进行事件绑定就可以。
显然,此时实现了条件编译,在不同的设备显示不同的按钮;
同时手机端点击时,控制台也输出信息。
先实现登录,需要获取服务商,判断是否安装微信,如果已安装则申请登录验证,如下:
<template>
	<view>

		<button type="primary" open-type="getUserInfo" @getuserinfo="getuserinfo" withCredentials="true">微信登录button>


		<button type="primary" @click="appWxLogin" withCredentials="true">用微信登录button>

		<button style="margin-top:50px;">手机号码登录button>
	view>
template>

<script>
	export default {
		data() {
			return {}
		},
		onLoad() {},
		onShow() {},
		onHide() {},
		methods: {
			// miniprogram
			getuserinfo: function(res1) {
				console.log(res1)
				if (!res1.detail.iv) {
					uni.showToast({
						title: '您已取消授权,登录失败',
						icon: "none"
					})
					return false;
				}
				uni.login({
					provider: 'weixin',
					success: function(res2) {
						console.log(res2);
						uni.request({
							url: 'https://api.weixin.qq.com/sns/jscode2session?appid=wxd3d4ee5ed8017903&secret=83c0d5efdfca99fc0509ff0d8956b830&js_code=' +
								res2.code + '&grant_type=authorization_code',
							success: function(res3) {
								// get the openid and seesion key
								console.log(res3)
								// decrypt
								uni.request({
									method: 'POST',
									url: 'https://hoa.hcoder.net/xcxencode/',
									header: {
										'content-type': 'application/x-www-form-urlencoded'
									},
									data: {
										appid: 'wxd3d4ee5ed8017903',
										sessionKey: res3.data.session_key,
										iv: res1.detail.iv,
										encryptedData: res1.detail.encryptedData
									},
									success: function(res4) {
										console.log(res4)
									}
								})
							},
							fail: function(res5) {
								console.log(re5)
							}
						})
					},
					fail: function(r) {
						console.log(r)
					}
				});
			},
			appWxLogin: function() {
				console.log('login...');
				uni.getProvider({
					service: 'oauth',
					success: function(res) {
						console.log(res.provider)
						if (~res.provider.indexOf('weixin')) {
							uni.login({
								provider: 'weixin',
								success: function(loginRes) {
									console.log(JSON.stringify(loginRes));
									uni.getUserInfo({
										provider: 'weixin',
										success: function(infoRes) {
											console.log(JSON.stringify(infoRes));
											console.log('用户昵称为:' + infoRes.userInfo.nickName);
										}
									});
								}
							});
						}
					}
				});
			}
		}
	}
script>

<style>

style>
显然,实现了在APP端调用微信登录;
登录后,输出了相应的信息。
四、分享接口
分享是一个很重要的功能。
1.小程序分享
小程序只支持分享到聊天界面(包括微信好友和微信群),不支持分享到朋友圈,是使用onShareAppMessage生命周期实现的。
index.vue如下:
<template>
	<view>
		Index...
	view>
template>

<script>
	export default {
		data() {
			return {
			}
		},
		onLoad() {
			var res = global.isLogin();
			if(!res){
				uni.showModal({
					title: '登录提醒',
					content: '请登录',
					success:function(){
						uni.navigateTo({
							url: '/pages/login'
						})
					}
				})
			}
		},
		onShow() {
		},
		onHide() {
		},
		onShareAppMessage:function(){
			return {
				title: 'Share test...',
				path: 'pages/index/index'
			}
		},
		methods: {
		}
	}
script>

<style>

style>
可以看到,实现了分享功能。
2.APP分享
APP中要实现分享,需要在manifest.json中进行配置,如下:

先实现分享纯文字,index.vue如下:
<template>
	<view>

		<button type="primary" @click="share">点击分享button>

	view>
template>

<script>
	export default {
		data() {
			return {
			}
		},
		onLoad() {
		},
		onShow() {
		},
		onHide() {
		},
		onShareAppMessage:function(){
			return {
				title: 'Share test...',
				path: 'pages/index/index'
			}
		},
		methods: {
			share: function(){
				uni.share({
				    provider: "weixin",
				    scene: "WXSceneSession",
				    type: 1,
				    summary: "我正在参加CSDN年度博客之星活动,请点击链接 https://bss.csdn.net/m/topic/blog_star2020/detail?username=cufeecr 投一票吧,先在此谢过啦!!",
				    success: function (res) {
				        console.log("success:" + JSON.stringify(res));
				    },
				    fail: function (err) {
				        console.log("fail:" + JSON.stringify(err));
				    }
				});
			}
		}
	}
script>

<style>

style>
手机端显示:
显然,控制台输出了分享成功的信息;
同时,APP成功调用了微信分享。
再实现分享图文,如下:
<template>
	<view>

		<button type="primary" @click="share">点击分享button>

	view>
template>

<script>
	export default {
		data() {
			return {
			}
		},
		onLoad() {
		},
		onShow() {
		},
		onHide() {
		},
		onShareAppMessage:function(){
			return {
				title: 'Share test...',
				path: 'pages/index/index'
			}
		},
		methods: {
			share: function(){
				uni.share({
				    provider: "weixin",
				    scene: "WXSceneSession",
				    type: 0,
				    href: "https://bss.csdn.net/m/topic/blog_star2020/detail?username=cufeecr",
				    title: "cufeecr年度博客之星评选",
				    summary: "我正在参加CSDN年度博客之星活动,请点击链接 https://bss.csdn.net/m/topic/blog_star2020/detail?username=cufeecr 投一票吧,先在此谢过啦!!",
				    imageUrl: "https://img-blog.csdnimg.cn/20210112093810423.png",
				    success: function (res) {
				        console.log("success:" + JSON.stringify(res));
				    },
				    fail: function (err) {
				        console.log("fail:" + JSON.stringify(err));
				    }
				});
			}
		}
	}
script>

<style>

style>
手机端显示:
显然,实现了分享图文到微信好友或微信群。
还可以分享到微信朋友圈,如下:
<template>
	<view>

		<button type="primary" @click="share">点击分享button>

	view>
template>

<script>
	export default {
		data() {
			return {
			}
		},
		onLoad() {
		},
		onShow() {
		},
		onHide() {
		},
		onShareAppMessage:function(){
			return {
				title: 'Share test...',
				path: 'pages/index/index'
			}
		},
		methods: {
			share: function(){
				uni.share({
				    provider: "weixin",
					scene: "WXSenceTimeline",
					type: 2,
					imageUrl: "https://img-blog.csdnimg.cn/20210112093810423.png",
					success: function (res) {
						console.log("success:" + JSON.stringify(res));
					},
					fail: function (err) {
						console.log("fail:" + JSON.stringify(err));
					}
				});
			}
		}
	}
script>

<style>

style>
手机端显示:
已经实现了分享消息到朋友圈。
总结
第三方登录和分享是APP和小程序的基本功能,对于APP和小程序有不同的实现方式,相比较而言,APP实现更简单,都是其他功能的基础和起步。


