JAVA工具篇--3 maven项目转gradle项目
前言:将已有的Maven 项目转换为Gradle 项目;
1 项目转换:
1.1 win+r 打开cmd命令窗口, 然后进入到maven项目根目录后,输入命令:
gradle init --info --type pom
1.2 选择构建的语言:

输入 1 然后回车;
1.3 提示是否使用新的api 默认不使用(回车即可):
![]()
1.4 完成转换:

2 使用idea 打开转换后项目,完成Gradle 配置:
2.1 修改 build.gradle 文件:
// 插件设置
plugins {
    id 'org.springframework.boot' version '2.7.5'
    id 'io.spring.dependency-management' version '1.0.15.RELEASE'
    id 'java'
}
// 分组设置
group = 'com.demo'
version = '1.0-SNAPSHOT'
description = 'Gradle项目'
// java 版本设置
sourceCompatibility = JavaVersion.VERSION_17
// 镜像设置
repositories {
    mavenLocal()// 直接借用Maven本地的仓库来索取jar包
   // maven {
   //   允许 gradle 使用“不安全”的仓库并且不报警告信息
   //     allowInsecureProtocol = true
   //   仓库地址
   //     url = uri('http://xxxxx')
   // }
    maven { url = uri('https://maven.aliyun.com/nexus/content/groups/public') }
    maven { url = uri('https://repo.spring.io/plugins-release/') }
    maven { url = uri('https://repo.maven.apache.org/maven2/') }
    mavenCentral()
}
// 项目版本设置--设置Map类型的变量
ext {
    set('springCloudVersion', "2021.0.4")
    set('springCloudAlibabaVersion', "2021.0.4.0")
}
// 依赖项设置
dependencies {
//    implementation 'org.springframework.boot:spring-boot-starter-data-elasticsearch'
//    implementation 'org.springframework.boot:spring-boot-starter-data-jpa'
//    implementation 'org.apache.commons:commons-pool2'
//    implementation 'org.springframework.boot:spring-boot-starter-data-redis'
    implementation 'org.springframework.boot:spring-boot-starter-web'
    implementation 'org.springframework.cloud:spring-cloud-starter'
    implementation 'org.springframework.cloud:spring-cloud-starter-bootstrap'
    developmentOnly 'org.springframework.boot:spring-boot-devtools'
    compileOnly 'org.projectlombok:lombok:1.18.24'
    annotationProcessor 'org.projectlombok:lombok:1.18.24'
    testAnnotationProcessor 'org.projectlombok:lombok:1.18.24'
    testCompileOnly 'org.projectlombok:lombok:1.18.24'
//    runtimeOnly 'com.mysql:mysql-connector-j'
    testImplementation 'org.springframework.boot:spring-boot-starter-test'
//    implementation 'com.alibaba.cloud:spring-cloud-starter-alibaba-nacos-discovery:2.2.3.RELEASE'
//    implementation 'com.alibaba.cloud:spring-cloud-starter-alibaba-nacos-config:2.2.3.RELEASE'
//    implementation 'com.alibaba.nacos:nacos-client:1.1.4'
//    implementation 'com.xuxueli:xxl-job-core:2.2.0'
//    implementation 'com.baomidou:mybatis-plus-boot-starter:3.5.1'
//    implementation 'com.github.pagehelper:pagehelper:4.2.1'
    implementation 'javax.validation:validation-api:2.0.1.Final'
    implementation 'org.springframework.boot:spring-boot-starter-validation'
    implementation 'com.alibaba.fastjson2:fastjson2:2.0.12'
//    implementation 'org.springframework.cloud:spring-cloud-starter-openfeign:2.2.6.RELEASE'
//    implementation 'io.github.openfeign:feign-okhttp:11.0'


}
// 统一管理版本
dependencyManagement {
    imports {
        mavenBom "org.springframework.cloud:spring-cloud-dependencies:${springCloudVersion}"
        mavenBom "com.alibaba.cloud:spring-cloud-alibaba-dependencies:${springCloudAlibabaVersion}"
    }
}
// 使用gradle编译项目时,若指定了测试目录,则进行gradle build时会
// 在编译完成后自动执行gradle test任务
test {
    enabled(false)
}
// 定义名字为test 的任务
tasks.named('test') {
    useJUnitPlatform()
}
// 定义编译类型任务
tasks.withType(JavaCompile) {
    options.encoding = 'UTF-8'
    options.compilerArgs << '-Xlint:none'
    options.compilerArgs << '-nowarn' // same as '-Xlint:none'

    // Turn them off manually
    options.compilerArgs << '-Xlint:-auxiliaryclass'
    options.compilerArgs << '-Xlint:-cast'
    options.compilerArgs << '-Xlint:-classfile'
    options.compilerArgs << '-Xlint:-deprecation'
    options.compilerArgs << '-Xlint:-dep-ann'
    options.compilerArgs << '-Xlint:-divzero'
    options.compilerArgs << '-Xlint:-empty'
    options.compilerArgs << '-Xlint:-fallthrough'
    options.compilerArgs << '-Xlint:-finally'
    options.compilerArgs << '-Xlint:-options'
    options.compilerArgs << '-Xlint:-overloads'
    options.compilerArgs << '-Xlint:-overrides'
    options.compilerArgs << '-Xlint:-path'
    options.compilerArgs << '-Xlint:-processing'
    options.compilerArgs << '-Xlint:-rawtypes'
    options.compilerArgs << '-Xlint:-serial'
    options.compilerArgs << '-Xlint:-static'
    options.compilerArgs << '-Xlint:-try'
    options.compilerArgs << '-Xlint:-unchecked'
    options.compilerArgs << '-Xlint:-varargs'
}
2.2 settings.grandle 项目名称设置
/*
 * This file was generated by the Gradle 'init' task.
 */

rootProject.name = 'myproject'
3 jdk 版本设置:
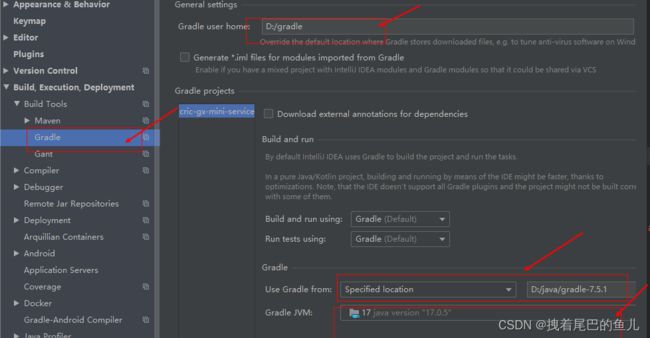
3.1 设置gradle 仓库路径和jvm版本:

3.2 设置向jdk版本:

3.3 通过idea 有下角的导入將maven 项目转为gradle 项目:

3.4 项目编译,在idea 左下角:
3.4.1 将test 目录启动类修改:
package com.example.demo;


import org.junit.jupiter.api.Test;
import org.springframework.boot.test.context.SpringBootTest;

@SpringBootTest
public class DemoApplicationTests {

   @Test
   public void contextLoads() {
   }

}
3.4.2 idea 右侧栏目点开Gradle:

3.4.3 3 先进行清除:

清除成功:

4.1 删除之前的pom.xml 文件;
4.2 设置项目启动端口:
application.properties:
server.port= 8961
4.3 项目启动类中增加测试类
package com.cric.wechat;

import org.springframework.boot.SpringApplication;
import org.springframework.boot.autoconfigure.SpringBootApplication;
import org.springframework.web.bind.annotation.GetMapping;
import org.springframework.web.bind.annotation.RestController;

@RestController
@SpringBootApplication
public class WechatServiceApplication {

    public static void main(String[] args) {
        SpringApplication.run(WechatServiceApplication.class, args);
    }

    @GetMapping("/test")
    public String testFeign() {
        return "success  access";
    }
}
5 构建jar包:
5.1 构建jar
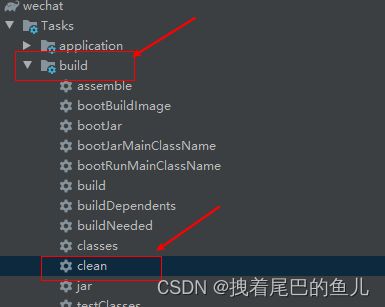
先进行 Gradle->Tasks->build->clean
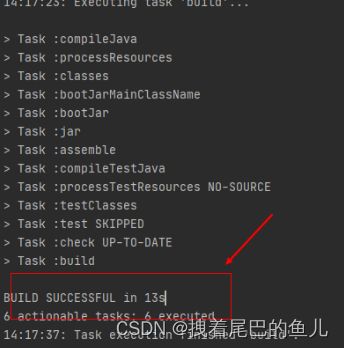
然后进行: Gradle->Tasks->build->build
打出的jar 包被保存在项目根目录build\libs 下
5.2 在jdk17 的bin 目录下打开cmd
使用 java -jar 打出的jar 包路径完成项目启动:

扩展:
1 Groovy和Kotlin 的特点:
1.1 常用对比:
(1) groovy可以使用单引号和双引号,而kotlin只能使用双引号
(2) groovy在函数调用时可以省略括号,而kotlin必须加上括号
(3) groovy在赋值时可以省略等于号,而kotlin必须加上等号
为了减少迁移成本,在groovy时就应该约定使用双引号,调用加上括号,使用等号赋值
1.2 插件引用对比
Groovy DSL有两种方式去引用插件:
(1) plugins{} //强烈推荐
(2)apply plugin
dsl 比较:
//groovy dsl
plugins {
    id 'java' //核心插件,可以省略version
    id 'jacoco'
    id 'maven-publish'
    id 'org.springframework.boot' version '2.4.1'
}
//kotlin dsl
plugins {
    java //核心插件,可以直接用短名称
    jacoco
    `maven-publish`
    id("org.springframework.boot") version "2.4.1"
}
2 mavenLocal():
Gradle默认会按以下顺序去查找本地的maven仓库:USER_HOME/.m2/settings.xml >> M2_HOME/conf/settings.xml >> USER_HOME/.m2/repository。注意,环境变量要加入M2_HOME, 我们配环境时很多时候都是使用MAVEN_HOME或者直接在path中输入bin路径了,导致mavenLocal无法生效。
如果本地没有相关jar包,则会根据maven的url属性查找远程仓库,而后gradle会下载到USER_HOME/.gradle文件夹下,若想让gradle下载到指定文件夹,需配置 GRADLE_USER_HOME 环境变量。

或者在idea 中手动指定Gradle user home 配置仓库的地址:

3 mavenCentral():
build.gradle里下列这段配置信息,意思是告诉Gradle从Maven中央仓库获取工具库的内容,即url https://repo.maven.apache.org/maven2/ 下加载jar包;
具体详情:传送门


