【SpringBoot学习】03SpringCache
SpringBoot(B站黑马)学习笔记
01基础篇
02-1运维实用篇(打包与运行、多环境配置、日志)
02-2开发实用篇(热部署、配置、NoSQL、整合第三方技术)
03SpringCache
04SpringSecurity
文章目录
- SpringBoot(B站黑马)学习笔记
- 前言
- 03SpringCache
-
- SpringCache 介绍
- SpringCache常用注解
-
- @Cacheable
- @CachePut
- @CacheEvict
- SpringCache快速入门
- SpringBoot整合Redis缓存
- 关于缓存序列化的问题
- 注:
前言
SpringBoot(B站黑马)学习笔记 03SpringCache
03SpringCache
SpringCache 介绍
Spring Cache是一个框架,实现了基于注解的缓存功能,只需要简单地加一个注解,就能实现缓存功能。
Spring Cache提供了一层抽象,底层可以切换不同的cache实现。具体就是通过CacheManager接口来统一不同的缓存技术。
CacheManager是Spring提供的各种缓存技术抽象接口。
(其实SpringBoot已经帮我们做好了,直接用就行,不过想要实现自定义序列化之类的操作就需要自定义Bean了)
SpringCache常用注解

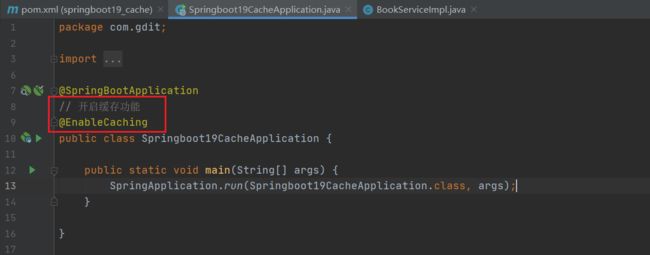
在spring boot项目中,使用某种缓存技术只需在项目中导入相关缓存技术的依赖包,并在启动类上使用@EnableCaching开启缓存支持即可。
@Cacheable
@Cacheable(value = “cacheSpace”, key = “#id”)
@Cacheable注解是由Spring提供的,可以作用与类或方法上(通常在数据查询方法上),用于对方法的查询结果进行缓存存储。@Cacheable 执行顺序:先进行缓存查询,如果为空则进行方法查询,并将返回值进行缓存;如果缓存中有数据,不进行方法查询,而是直接使用缓存数据进行返回。
查询完后就会把数据放到key叫id的空间内,而存储空间是value叫cacheSpace。value配置缓存的位置,可以理解是变量名,但它不是完整的变量名,最终存储的变量以key的名称为准。简单来说value=“cacheSpace"是大空间,key=”#id"是小的名称。value名称可以随便起,key名称要保障唯一性,key默认值是使用方法参数值。
@CachePut
@CachePut注解是由Spring提供的,可以作用与类或方法上(通常用在数据更新方法上),该注解的作用是更新缓存数据。@CachePut执行顺序:先进性方法调用,然后将返回值进行缓存。
@CachePut注解也提供了多个属性,这些属性与@Cacheable注解的属性完全一样
注意:缓存的内容是返回值,如果方法没有返回值是无法缓存的
@CacheEvict
@CacheEvict 注解是由 Spring 提供的,可以作用于类或方法(通常用在数据删除方法上 ),该注解的作用是删除缓存数据。@CacheEvict 注解的默认执行顺序:先进行方法调用,然后清除缓存。
@CacheEvict注解提供了多个属性,这些属性与@Cacheable 注解的属性基本相同。除此之外,@CacheEvic 注解额外提供了两个特殊属性 allEntries 和 beforelnvocation,其说明如下。
(1)allEntries 属性
allEntries 属性表示是否清除指定缓存空间中的所有缓存数据,默认值为 false(即默认只删除指定 key 对应的缓存数据。例如@CacheEvict(cacheNames =“comment” ,allEntries = true表示方法执行后会删除缓存空间 comment 中所有的数据。
(2)beforelnvocation 属性
beforelnvocation 属性表示是否在方法执行之前进行缓存清除,默认值为 false( 即默认在执行方法后再进行缓存清除)。例如@CacheEvictcacheNames =“comment”,beforelnvocation = true)表示会在方法执行之前进行缓存清除。
SpringCache快速入门
环境准备
<dependencies>

    <dependency>
        <groupId>org.projectlombokgroupId>
        <artifactId>lombokartifactId>
        <optional>trueoptional>
    dependency>


    <dependency>
        <groupId>com.baomidougroupId>
        <artifactId>mybatis-plus-boot-starterartifactId>
        <version>3.4.3version>
    dependency>


    <dependency>
        <groupId>com.alibabagroupId>
        <artifactId>druid-spring-boot-starterartifactId>
        <version>1.2.6version>
    dependency>


    <dependency>
        <groupId>com.mysqlgroupId>
        <artifactId>mysql-connector-jartifactId>
        <scope>runtimescope>
    dependency>

    <dependency>
        <groupId>org.springframework.bootgroupId>
        <artifactId>spring-boot-starter-webartifactId>
    dependency>

    <dependency>
        <groupId>org.springframework.bootgroupId>
        <artifactId>spring-boot-starter-testartifactId>
        <scope>testscope>
    dependency>
dependencies>
1.引入springboot缓存的依赖
<dependency>
    <groupId>org.springframework.bootgroupId>
    <artifactId>spring-boot-starter-cacheartifactId>
dependency>
2.启用缓存
在springboot启动类上加上@EnableCaching注解开启缓存功能

SpringBoot整合Redis缓存
SpringBoot提供的缓存技术除了默认的缓存方案,还可以对其它缓存技术进行整合,统一接口,方便缓存技术的开发与管理(就是说使用缓存技术的话,这一套接口是通用的,只需要换实现就行了,代码不用动)


<dependency>
    <groupId>org.springframework.bootgroupId>
    <artifactId>spring-boot-starter-data-redisartifactId>
dependency>
整合Redis使用缓存,光有注解的方式实现缓存并不能满足所有的业务需求,使用注解只能对该方法的返回值进行缓存,有时需要对数据进行修改后才加入缓存,所以还需要搭配API的方式来实现缓存
详细请看:https://note.youdao.com/s/A9KL4xMe
关于缓存序列化的问题
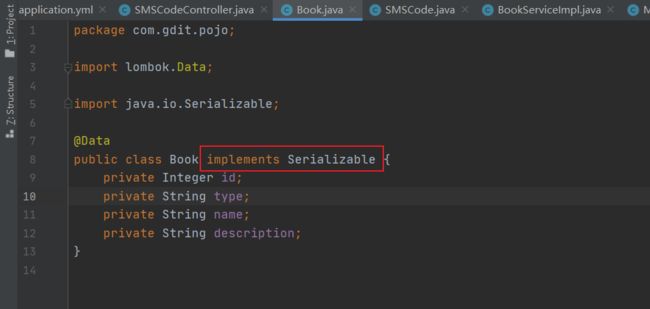
注解的方式使用redis作为缓存时,缓存pojo类型的数据,发现能成功查询,但控制台报错了,Book没有序列化的异常。为什么要对Book做序列化呢,Java中我们以对象的形式操作数据,但现在对象要放到Redis中去,而Redis是以字符串操作为基本单元,不支持存储Java的对象。所以应该先把Java对象转一个能够让redis存储的东西,然后再存进去。其内部用了序列化和反序列化机制,存的时候序列化,取的时候反序列化。在Java中,如果一个对象需要被序列化,那么这个对象必须实现Serializable接口,否则就会出现这个异常。所以在Book类实现一个接口Serializable就好了。

补充
前面虽然实现类pojo的序列化与反序列化,但我们发现它都是一串码,可视化不太友好,针对这个我们可以在项目中加入配置类RedisConfig用以实现自动序列化与反序列化
(相关详情请看:https://note.youdao.com/s/A9KL4xMe)
RedisConfig.java
package com.gdit.config;

import com.fasterxml.jackson.annotation.JsonAutoDetect;
import com.fasterxml.jackson.annotation.PropertyAccessor;
import com.fasterxml.jackson.databind.ObjectMapper;
import org.springframework.context.annotation.Bean;
import org.springframework.context.annotation.Configuration;
import org.springframework.data.redis.cache.RedisCacheConfiguration;
import org.springframework.data.redis.cache.RedisCacheManager;
import org.springframework.data.redis.connection.RedisConnectionFactory;
import org.springframework.data.redis.core.RedisTemplate;
import org.springframework.data.redis.serializer.RedisSerializationContext;
import org.springframework.data.redis.serializer.RedisSerializer;
import org.springframework.data.redis.serializer.StringRedisSerializer;

import java.time.Duration;

/**
 * 自定义RedisTemplate的序列化方式,实现自动序列化与反序列化
 */
@Configuration
public class RedisConfig {

    @Bean
    public RedisTemplate<Object, Object> redisTemplate(RedisConnectionFactory redisConnectionFactory){
        // 创建Template
        RedisTemplate<Object, Object> template = new RedisTemplate<>();
        // 设置连接工厂
        template.setConnectionFactory(redisConnectionFactory);
        // 设置序列化工具(可根据业务需求更换序列化工具,如FastJson等)
        //GenericJackson2JsonRedisSerializer jsonRedisSerializer = new GenericJackson2JsonRedisSerializer();
        //Jackson2JsonRedisSerializer jsonRedisSerializer = new Jackson2JsonRedisSerializer(Object.class);

        FastJson2JsonRedisSerializer jsonRedisSerializer = new FastJson2JsonRedisSerializer(Object.class);
        // 解决查询缓存转换异常的问题
        ObjectMapper mapper = new ObjectMapper();
        mapper.setVisibility(PropertyAccessor.ALL, JsonAutoDetect.Visibility.ANY);
        mapper.enableDefaultTyping(ObjectMapper.DefaultTyping.NON_FINAL);
        jsonRedisSerializer.setObjectMapper(mapper);

        // key和 hashKey采用 string序列化
        template.setKeySerializer(RedisSerializer.string());
        template.setHashKeySerializer(RedisSerializer.string());
        // value和 hashValue采用 JSON序列化
        template.setValueSerializer(jsonRedisSerializer);
        template.setHashValueSerializer(jsonRedisSerializer);
        template.afterPropertiesSet();
        return template;

    }

    @Bean
    public RedisCacheManager cacheManager(RedisConnectionFactory redisConnectionFactory) {
        // 分别创建String和JSON格式序列化对象,对缓存数据key和value进行转换
        RedisSerializer<String> strSerializer = new StringRedisSerializer();
        //使用Fastjson2JsonRedisSerializer来序列化和反序列化redis的value值
        FastJson2JsonRedisSerializer serializer = new FastJson2JsonRedisSerializer(Object.class);
        // 解决查询缓存转换异常的问题
        ObjectMapper om = new ObjectMapper();
        om.setVisibility(PropertyAccessor.ALL, JsonAutoDetect.Visibility.ANY);
        om.enableDefaultTyping(ObjectMapper.DefaultTyping.NON_FINAL);
        serializer.setObjectMapper(om);

        // 定制缓存数据序列化方式及时效
        RedisCacheConfiguration config = RedisCacheConfiguration.defaultCacheConfig()
                .entryTtl(Duration.ofDays(1))
                .serializeKeysWith(RedisSerializationContext.SerializationPair.fromSerializer(strSerializer))
                .serializeValuesWith(RedisSerializationContext.SerializationPair.fromSerializer(serializer))
                .disableCachingNullValues();

        RedisCacheManager cacheManager = RedisCacheManager.builder(redisConnectionFactory).cacheDefaults(config).build();
        return cacheManager;
    }
}
FastJson2JsonRedisSerializer.java
package com.gdit.config;

import com.alibaba.fastjson.JSON;
import com.alibaba.fastjson.parser.ParserConfig;
import com.alibaba.fastjson.serializer.SerializerFeature;
import com.fasterxml.jackson.databind.JavaType;
import com.fasterxml.jackson.databind.ObjectMapper;
import com.fasterxml.jackson.databind.type.TypeFactory;
import org.springframework.data.redis.serializer.RedisSerializer;
import org.springframework.data.redis.serializer.SerializationException;
import org.springframework.util.Assert;

import java.nio.charset.Charset;

/**
 *  FastJson2JsonRedisSerializer
 *  Redis使用FastJson序列化
 *  https://blog.csdn.net/moshowgame/article/details/83246363
 */
public class FastJson2JsonRedisSerializer<T> implements RedisSerializer<T> {
    private ObjectMapper objectMapper = new ObjectMapper();
    public static final Charset DEFAULT_CHARSET = Charset.forName("UTF-8");

    private Class<T> clazz;

    static {
        ParserConfig.getGlobalInstance().setAutoTypeSupport(true);
        //如果遇到反序列化autoType is not support错误,请添加并修改一下包名到bean文件路径
         ParserConfig.getGlobalInstance().addAccept("com.gdit");
    }
    public FastJson2JsonRedisSerializer(Class<T> clazz) {
        super();
        this.clazz = clazz;
    }

    public byte[] serialize(T t) throws SerializationException {
        if (t == null) {
            return new byte[0];
        }
        return JSON.toJSONString(t, SerializerFeature.WriteClassName).getBytes(DEFAULT_CHARSET);
    }

    public T deserialize(byte[] bytes) throws SerializationException {
        if (bytes == null || bytes.length <= 0) {
            return null;
        }
        String str = new String(bytes, DEFAULT_CHARSET);

        return JSON.parseObject(str, clazz);
    }
    public void setObjectMapper(ObjectMapper objectMapper) {
        Assert.notNull(objectMapper, "'objectMapper' must not be null");
        this.objectMapper = objectMapper;
    }

    protected JavaType getJavaType(Class<?> clazz) {
        return TypeFactory.defaultInstance().constructType(clazz);
    }

}
其内除了配置自定义RedisTemplate的序列化方式,还配置了RedisCacheManager,它可以将使用缓存注解的内容指定序列化方式,让其可视化看得更加舒服,这样也不用每个pojo类都实现Serializable接口。

注:
该内容是根据B站黑马程序员学习时所记,相关资料可在B站查询:黑马程序员SpringBoot2全套视频教程,springboot零基础到项目实战(spring boot2完整版)


