LLM-2-ChatGLM2
1 训练
1.1 训练参数配置理解
训练的输入长度=source的长度+target的长度
–pre_seq_len:pre_seq_len的取值范围一般是1到512,它表示自然语言指令的长度,即输入序列中的前pre_seq_len个token,具体的值需要根据自然语言指令的长度和复杂度来确定。一般来说,指令越长越复杂,pre_seq_len就需要越大,以便模型能够充分理解指令的含义。但是,pre_seq_len也不能太大,否则会占用过多的输入序列长度,导致生成内容过于单一或重复。因此,pre_seq_len的取值需要在保证指令完整性和生成多样性之间进行权衡。一种可能的方法是,根据不同的指令类型设置不同的pre_seq_len值,例如,对于简单的指令,如“生成一个笑话”,可以设置pre_seq_len为4;对于复杂的指令,如“生成一个关于环保主题的故事”,可以设置pre_seq_len为16。当然,这些值也需要根据实际的效果进行调整和优化。
–pre_seq_len和max_source_length的含义是差不多的,或者取值是可以参照的?不完全是的,pre_seq_len和max_source_length的含义是不同的,但是它们之间有一定的关系。pre_seq_len是指自然语言指令的长度,而max_source_length是指整个输入序列的最大长度。一般来说,pre_seq_len应该小于或等于max_source_length,因为输入序列除了包含指令之外,还可能包含其他内容,例如上下文信息或对话历史。如果pre_seq_len大于max_source_length,那么模型就无法接收到完整的指令,也就无法正确地生成输出内容。因此,pre_seq_len和max_source_length的取值需要协调一致,以保证模型能够有效地利用输入信息。
P-Tuning的时候的 soft prompt的长度,越大可微调的参数越多
PRE_SEQ_LEN=128
LR=2e-2
NUM_GPUS=2

torchrun --standalone --nnodes=1 --nproc-per-node=$NUM_GPUS main.py \
    --do_train \
    --train_file AdvertiseGen/train.json \
    --validation_file AdvertiseGen/dev.json \
    --preprocessing_num_workers 10 \
    --prompt_column content \
    --response_column summary \
    --overwrite_cache \
    --model_name_or_path /usr/local/serving/models/chatglm/chatglm2-6b \
    --output_dir output/adgen-chatglm2-6b-pt-$PRE_SEQ_LEN-$LR \
    --overwrite_output_dir \
    --max_source_length 64 \
    --max_target_length 128 \
    --per_device_train_batch_size 1 \
    --per_device_eval_batch_size 1 \
    --gradient_accumulation_steps 16 \
    --predict_with_generate \
    --max_steps 3000 \
    --logging_steps 10 \
    --save_steps 1000 \
    --learning_rate $LR \
    --pre_seq_len $PRE_SEQ_LEN \
    --quantization_bit 4
这段代码使用了 `torchrun` 命令来以分布式训练的方式运行 `main.py` 文件。具体来说,代码参数解释如下:

- `--standalone` 表示以独立模式启动分布式训练(即在同一台机器上的多个 GPU 上运行)。如果在多个机器上运行,则需要设置其他参数,例如 `--nnodes` 和 `--nproc-per-node` 等。

- `--nnodes` 指定节点数。在这个例子中,只有一个节点,所以设置为 1。

- `--nproc-per-node` 指定每个节点上的进程数。在这个例子中,只使用一个 GPU,所以设置为 1。

- `--do_train` 表示执行训练任务。

- `--train_file` 指定训练数据文件路径。

- `--validation_file` 指定验证数据文件路径。

- `--preprocessing_num_workers` 指定数据预处理时的工人数。

- `--prompt_column` 指定输入数据中输入文本所在的列。

- `--response_column` 指定输出数据中输出文本所在的列。

- `--overwrite_cache` 表示覆盖缓存文件。

- `--model_name_or_path` 指定使用的预训练模型的名称或路径。

- `--output_dir` 指定输出目录,即训练结果和模型保存目录。

- `--overwrite_output_dir` 表示覆盖输出目录。

- `--max_source_length` 指定输入文本的最大长度。

- `--max_target_length` 指定输出文本的最大长度。

- `--per_device_train_batch_size` 指定每个 GPU 上每次训练时的批量大小。

- `--per_device_eval_batch_size` 指定每个 GPU 上每次验证时的批量大小。

- `--gradient_accumulation_steps` 指定累积多少个梯度之后再进行一次反向传播。

- `--predict_with_generate` 表示在预测时使用生成模式。

- `--max_steps` 指定最大训练步数。

- `--logging_steps` 指定多少步记录一次日志。

- `--save_steps` 指定多少步保存一次模型。

- `--learning_rate` 指定初始学习率。

- `--pre_seq_len` 指定预处理时选取的序列长度。

- `--quantization_bit` 指定量化位数。

该命令将会在 PyTorch 1.7 或更高版本上运行。在此之前的版本中,可能需要单独设置分布式环境,享用多 GPU 训练所带来的好处。
1.2 多级多卡运行配置
好的,请容许我再详细解释一下多级多卡运行的调整步骤:

假设我们有两台机器 m1 和 m2,每台机器上有两块 GPU,我们希望在这两台机器上使用 PyTorch 的分布式训练模式运行代码:

1. 安装 PyTorch

首先在 m1 和 m2 上安装 PyTorch,并确保安装相同版本的 PyTorch。

2. 设置环境变量

在每台机器上设置相同的环境变量,以指定 PyTorch 使用分布式训练模式:
export WORLD_SIZE=
export RANK=
export MASTER_ADDR=
export MASTER_PORT=
其中,`number_of_processes` 是进程数,假设使用四个 GPU,所以 `number_of_processes` 是 4 。`rank_of_current_process` 是当前进程的排名,假设在 m1 中的排名为 0 和 1,m2 中的排名为 2 和 3。`address_of_master_machine` 是主节点的 IP 地址或主机名,假设主节点为 m1。`port_of_master_machine` 是主节点的端口号,假设主节点端口号为 1234。

3. 同步时间

确保所有机器的系统时间是同步的,可以使用如下命令同步时间:
sudo ntpdate cn.pool.ntp.org
4. 配置 SSH 免密登录

在每台机器上都需要通过 SSH 连接到其他机器。为此,需要在每台机器上配置 SSH 免密登录,以便不需要密码就可以登录到其他机器。可以使用如下命令生成公私钥对:
ssh-keygen -t rsa -P “”
然后将生成的公钥复制到其他机器的 `authorized_hosts` 文件中。

5. 编写工作节点程序

在工作节点上,需要自己定义需要运行的 Python 脚本代码。例如,我们编写了 worker.py 文件:

```python
# worker.py
import torch

# 定义需要执行的 PyTorch 代码
def run():
    rank = torch.distributed.get_rank()
    print(f"Rank {rank} is running on {torch.cuda.device_count()} GPUs.")

if __name__ == '__main__':
    # 设置分布式环境
    torch.distributed.init_process_group(backend='nccl')

    # 执行 PyTorch 代码
    run()
可以发现,这段程序中主要定义了需要运行的 PyTorch 代码。在 main.py/dataload.py/… 中,您可以根据自己的需要修改和编写相应的代码,例如模型定义、数据加载等等。
- 启动多进程
在 m1 的启动终端中运行以下命令:
# 启动第一个进程
python -m torch.distributed.launch --nproc_per_node=2 --use_env --master_port=1234 --node_rank=0 worker.py &

# 启动第二个进程
python -m torch.distributed.launch --nproc_per_node=2 --use_env --master_port=1234 --node_rank=1 worker.py &
在 m2 的启动终端中运行以下命令:
# 启动第三个进程
python -m torch.distributed.launch --nproc_per_node=2 --use_env --master_addr=<m1-ip> --master_port=1234 --node_rank=2 worker.py &

# 启动第四个进程
python -m torch.distributed.launch --nproc_per_node=2 --use_env --master_addr=<m1-ip> --master_port=1234 --node_rank=3 worker.py &
注意:
--use_env参数,以便子进程能够继承主节点的环境变量。--nproc_per_node参数指定每台机器上的 GPU 数量。- 对于每个进程指定不同的
--node_rank参数,对应上面步骤 2 中设置的当前进程的排名。 - 对于主节点,可以选择启动 main.py 文件作为第一个进程。
启动后,各个进程就会分别运行 worker.py 文件中定义的函数,并借助分布式环境来执行其任务。
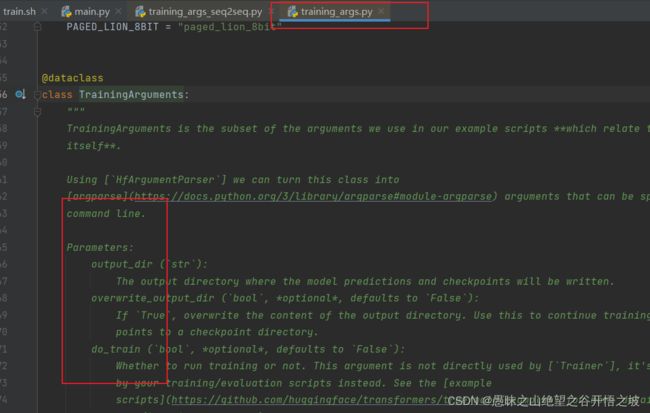
1.3 @dataclass 装饰器
@dataclass 是 Python 3.7 及更高版本中提供的一个装饰器。它能够自动为类生成一些常用的方法和属性,例如 `__init__` 方法、`__repr__` 方法以及属性的 getter 和 setter 方法。

在上面的代码中,@dataclass 被用于定义了两个类:ModelArguments 和 DataTrainingArguments。

这样使用 @dataclass 装饰器的类可以省略一些常见的代码,例如不再需要手动定义 init 方法、repr 方法和 getter/setter 方法。取而代之的是,使用 @dataclass 装饰器后, Python 会自动根据类的字段生成这些方法。

此外,通过给字段添加 field() 函数的调用,还可以为字段提供额外的元数据,例如字段的默认值和帮助文档。field()函数通常用于指定字段的元数据,例如默认值和帮助文档。

总之,@dataclass 能够简化类的定义过程,减少重复的代码,提高代码的可读性和可维护性。在上述代码中, @dataclass 装饰器和 field 函数的使用可以使 ModelArguments 和 DataTrainingArguments 类拥有自动生成的初始化方法、表示方法和 getter/setter 方法,并且提供了一些元数据,方便后续使用这些类的对象。
1.4 系统参数,模型参数配置,HF已经内置默认参数
Seq2SeqTrainingArguments(
_n_gpu=0,
adafactor=False,
adam_beta1=0.9,
adam_beta2=0.999,
adam_epsilon=1e-08,
auto_find_batch_size=False,
bf16=False,
bf16_full_eval=False,
data_seed=None,
dataloader_drop_last=False,
dataloader_num_workers=0,
dataloader_pin_memory=True,
ddp_backend=None,
ddp_bucket_cap_mb=None,
ddp_find_unused_parameters=None,
ddp_timeout=1800,
debug=[],
deepspeed=None,
disable_tqdm=False,
do_eval=False,
do_predict=False,
do_train=True,
eval_accumulation_steps=None,
eval_delay=0,
eval_steps=None,
evaluation_strategy=no,
fp16=False,
fp16_backend=auto,
fp16_full_eval=False,
fp16_opt_level=O1,
fsdp=[],
fsdp_config={'fsdp_min_num_params': 0, 'xla': False, 'xla_fsdp_grad_ckpt': False},
fsdp_min_num_params=0,
fsdp_transformer_layer_cls_to_wrap=None,
full_determinism=False,
generation_config=None,
generation_max_length=None,
generation_num_beams=None,
gradient_accumulation_steps=16,
gradient_checkpointing=False,
greater_is_better=None,
group_by_length=False,
half_precision_backend=auto,
hub_model_id=None,
hub_private_repo=False,
hub_strategy=every_save,
hub_token=<HUB_TOKEN>,
ignore_data_skip=False,
include_inputs_for_metrics=False,
jit_mode_eval=False,
label_names=None,
label_smoothing_factor=0.0,
learning_rate=0.02,
length_column_name=length,
load_best_model_at_end=False,
local_rank=0,
log_level=passive,
log_level_replica=warning,
log_on_each_node=True,
logging_dir=output/adgen-chatglm-6b-pt-$PRE_SEQ_LEN-$LR\runs\Jul25_14-10-13_Jett,
logging_first_step=False,
logging_nan_inf_filter=True,
logging_steps=10,
logging_strategy=steps,
lr_scheduler_type=linear,
max_grad_norm=1.0,
max_steps=3000,
metric_for_best_model=None,
mp_parameters=,
no_cuda=False,
num_train_epochs=3.0,
optim=adamw_hf,
optim_args=None,
output_dir=output/adgen-chatglm-6b-pt-$PRE_SEQ_LEN-$LR,
overwrite_output_dir=True,
past_index=-1,
per_device_eval_batch_size=1,
per_device_train_batch_size=1,
predict_with_generate=True,
prediction_loss_only=False,
push_to_hub=False,
push_to_hub_model_id=None,
push_to_hub_organization=None,
push_to_hub_token=<PUSH_TO_HUB_TOKEN>,
ray_scope=last,
remove_unused_columns=True,
report_to=[],
resume_from_checkpoint=None,
run_name=output/adgen-chatglm-6b-pt-$PRE_SEQ_LEN-$LR,
save_on_each_node=False,
save_safetensors=False,
save_steps=1000,
save_strategy=steps,
save_total_limit=None,
seed=42,
sharded_ddp=[],
skip_memory_metrics=True,
sortish_sampler=False,
tf32=None,
torch_compile=False,
torch_compile_backend=None,
torch_compile_mode=None,
torchdynamo=None,
tpu_metrics_debug=False,
tpu_num_cores=None,
use_ipex=False,
use_legacy_prediction_loop=False,
use_mps_device=False,
warmup_ratio=0.0,
warmup_steps=0,
weight_decay=0.0,
xpu_backend=None,
)


1.5 单个轮次需要的步数,跟数据并行的卡NUM_GPUS、样本量、单批次batch_size有关
1.5.1 默认

1.5.2 避免额外计算,可以指配置迭代轮次,去掉步数限制,根据数据量自己决定步数

1.5.3 最新训练参数配置
PRE_SEQ_LEN=128
LR=2e-2
NUM_GPUS=2

torchrun --standalone --nnodes=1 --nproc-per-node=$NUM_GPUS main.py \
    --do_train \
    --train_file AdvertiseGen/train.json \
    --validation_file AdvertiseGen/dev.json \
    --preprocessing_num_workers 10 \
    --prompt_column content \
    --response_column summary \
    --overwrite_cache \
    --model_name_or_path /usr/local/serving/models/chatglm/chatglm2-6b \
    --output_dir output/adgen-chatglm2-6b-pt-$PRE_SEQ_LEN-$LR \
    --overwrite_output_dir \
    --max_source_length 64 \
    --max_target_length 128 \
    --per_device_train_batch_size 128 \
    --per_device_eval_batch_size 128 \
    --gradient_accumulation_steps 1 \
    --predict_with_generate \
    --logging_steps 10 \
    --learning_rate $LR \
    --pre_seq_len $PRE_SEQ_LEN \
    --quantization_bit 4 \
    --num_train_epochs 3 \
    --evaluation_strategy epoch \
    --save_strategy epoch
1.6 Ptuning训练记录,多卡数据并行


![]()

![]()

![]()

1.6.1 训练报错nable to create tensor, you should probably activate truncation and/or padding with ‘padding=True’ ‘truncation=True’ to have batched tensors with the same length. Perhaps your features (input_ids in this case) have excessive nesting (inputs type list where type int is expected).

1.6.1.1 解决方法
label_pad_token_id = -100 if data_args.ignore_pad_token_for_loss else tokenizer.pad_token_id
data_collator = DataCollatorForSeq2Seq(
tokenizer,
model=model,
label_pad_token_id=label_pad_token_id,
pad_to_multiple_of=None,
padding=False
)

在main.py中找到这几行程序,然后修改padding=True,即可,问题得以解决
1.6.2 16个样本,训练集作为验证集,在56个epoch的时候,达到完全收敛

1.7 推理部署,注意超参数、模型量化选择,训练和推理,保持一致,答案才可控


1.8 mdtex2html.convert函数的理解
Markdown中的LaTeX公式转换为带有MathML的HTML的功能,是将LaTeX格式的数学公式转换为网页上可以渲染的MathML格式,从而使数学公式在网页上能够以高质量的方式呈现。
以下是一个示例,将一些常用的LaTeX公式转换为带有MathML的HTML代码:
- 行内公式
LaTeX格式: E = m c 2 E = mc^2 E=mc2
转换为MathML格式:
<math xmlns="http://www.w3.org/1998/Math/MathML">
  <mi>Emi>
  <mo>=mo>
  <mi>mmi>
  <msup>
    <mi>cmi>
    <mn>2mn>
  msup>
math>
- 行间公式
LaTeX格式:
$$
\int_{-\infty}^{\infty} e^{-x^2} dx = \sqrt{\pi}
$$
转换为MathML格式:
<math xmlns="http://www.w3.org/1998/Math/MathML">
  <mrow>
    <mo>∫mo>
    <msubsup>
      <mi>xmi>
      <mo>−mo>
      <mi>∞mi>
      <mi>∞mi>
    msubsup>
    <msup><mi>emi><mrow><mo>-mo><msup><mi>xmi><mn>2mn>msup>mrow>msup>
    <mi>dxmi>
    <mo>=mo>
    <msqrt><mi>πmi>msqrt>
  mrow>
math>
这些MathML代码可以嵌入网页中并进行渲染,以呈现高质量的数学公式。
1.9 parse_text(text)函数的理解
这段代码是一个用于解析文本的函数,它的作用是将带有特殊标记的文本(使用了类似Markdown的语法)转换为可以在网页上正确显示的HTML代码。

函数的具体解释如下:

1. 首先,函数接受一个文本参数 `text`。
2. 函数将文本按换行符进行分割,得到一个行列表 `lines`。
3. 然后,函数通过列表解析的方式,过滤掉空行,将结果重新赋值给 `lines`。
4. 函数定义了一个变量 `count`,用于记录出现特殊标记的次数。
5. 函数遍历 `lines` 列表,通过使用 `enumerate` 函数同时获取行的索引和内容。
6. 如果当前行包含 "```",则表示遇到了代码块的标记,执行以下操作:
   - `count` 加1,用于判断代码块是开启还是关闭。
   - 将行按 "`" 进行分割,获取最后一个元素(表示代码块的语言类型)。
   - 如果 `count` 为奇数,将当前行修改为代码块的开启标记 `<pre><code class="language-语言类型">`。
   - 否则,将当前行修改为代码块的关闭标记 `<br></code></pre>`。
7. 如果当前行不包含代码块标记:
   - 如果当前行的索引大于0,表示不是第一行,执行以下操作:
     - 如果 `count` 为奇数,替换特殊字符,将特殊字符转换为对应的 HTML 实体。
     - 将当前行添加 `<br>` 标签,并更新 `lines` 列表中对应的元素。
8. 最后,将经过处理的 `lines` 列表通过空字符串连接起来,得到最终的转换结果,并返回。

总体来说,这段代码可以将特殊标记的文本转换为适用于在网页上显示的HTML代码。具体转换过程包括处理代码块标记以及替换特殊字符为对应的HTML实体。
好的,让我通过一个具体的例子来说明这段代码的作用。

假设我们有以下的 Markdown 格式文本,其中包含了代码块:
Hello World
这是一段普通文本。
下面是一个代码块:
print("Hello World")
这是另一段普通文本。
我们可以调用 `parse_text` 函数对这段文本进行解析,得到以下的 HTML 代码:

```html
Hello World
这是一段普通文本。

print("Hello World")


这是另一段普通文本。
我们可以看到,代码块被转换为了 标签包裹起来,并且代码块中的特殊字符(比如引号和尖括号)被替换为对应的 HTML 实体。其他的文本也被正确地转换为了段落标签 并添加了
这样,在网页上就可以正确地显示这段文本和代码块了。
```clike
``、`
`、`
` 和 `
` 都是HTML标签,用于在网页上呈现不同类型的内容。以下是它们的具体解释:
- `` 标签用于表示网页中的一级标题,通常用于网页的头部和主要内容的标题。在本例中,`` 标签用于表示 Markdown 中的一级标题 `# Hello World`。
- `
` 标签用于表示段落,通常用于呈现网页中的普通文本内容。在本例中,`
` 标签用于表示 Markdown 中的常规文本段落。
- `
` 标签用于在文本中添加一个换行符,通常用于在一段文本中进行手动换行。在本例中,`
` 标签用于表示 Markdown 文本中的手动换行符。
- `
` 标签用于表示**预格式化的文本**,可以用于呈现文本中的代码块和其他特殊格式的文本。在本例中,`` 标签用于将 Markdown 中的代码块进行呈现。
这些标签都是HTML最基本的构建模块,它们通过不同的属性和样式可以呈现出各种丰富多彩的网页内容。
1.10 gradio函数的理解
    chatbot = gr.Chatbot()
    with gr.Row():
        with gr.Column(scale=4):
            with gr.Column(scale=12):
                user_input = gr.Textbox(show_label=False, placeholder="Input...", lines=10).style(
                    container=False)
            with gr.Column(min_width=32, scale=1):
                submitBtn = gr.Button("Submit", variant="primary")
        with gr.Column(scale=1):
            emptyBtn = gr.Button("Clear History")
            max_length = gr.Slider(0, 32768, value=2049, step=1.0, label="Maximum length", interactive=True)
            top_p = gr.Slider(0, 1, value=0.7, step=0.01, label="Top P", interactive=True)
            temperature = gr.Slider(0, 1, value=0.95, step=0.01, label="Temperature", interactive=True)
with gr.Row():代表下面的组件是在同一行
with gr.Column(scale=1):代表下面的组件是在同一列
click函数的输出列表指定了在点击按钮后需要更新的变量或状态。在这段代码中,使用了gr模块的click函数来绑定按钮的点击事件。该函数的第三个参数是一个列表,包含需要更新的变量或状态。

在这段代码中,有三个click函数绑定了按钮的点击事件,它们分别是:

1. `submitBtn.click(predict, [user_input, chatbot, max_length, top_p, temperature, history, past_key_values], [chatbot, history, past_key_values], show_progress=True)`:
   - predict函数被绑定到submitBtn按钮的点击事件上。
   - 参数列表包括user_input, chatbot, max_length, top_p, temperature, history和past_key_values,它们将作为predict函数的参数传递进去。
   - 输出列表包括chatbot, history和past_key_values,表示在点击按钮后需要更新这些变量的值。
   - show_progress参数被设置为True,表示在点击按钮后显示进度。

2. `submitBtn.click(reset_user_input, [], [user_input])`:
   - reset_user_input函数被绑定到submitBtn按钮的点击事件上。
   - 参数列表为空,不传递任何参数给reset_user_input函数。
   - 输出列表包括user_input,表示在点击按钮后需要更新这个变量的值。

3. `emptyBtn.click(reset_state, outputs=[chatbot, history, past_key_values], show_progress=True)`:
   - reset_state函数被绑定到emptyBtn按钮的点击事件上。
   - 参数列表为空,不传递任何参数给reset_state函数。
   - 输出列表包括chatbot, history和past_key_values,表示在点击按钮后需要更新这些变量的值。
   - show_progress参数被设置为True,表示在点击按钮后显示进度。

通过指定输出列表,可以在按钮点击后更新指定的变量或状态,并且可以选择在更新完成后显示进度条。
输入和输出的自动映射,输入和输出都是gradio对应的对象,按钮触发函数事件,输入的按钮给到函数输入,函数输出映射到显示框
text_button.click(flip_text, inputs=text_input, outputs=text_output)
import gradio as gr
import os

# save your HF API token from https:/hf.co/settings/tokens as an env variable to avoid rate limiting
auth_token = os.getenv("auth_token")

# load a model from https://hf.co/models as an interface, then use it as an api
# you can remove the api_key parameter if you don't care about rate limiting.
api = gr.load("huggingface/gpt2-xl", hf_token=auth_token)

def complete_with_gpt(text):
    return text[:-50] + api(text[-50:])

with gr.Blocks() as demo:
    textbox = gr.Textbox(placeholder="Type here...", lines=4)
    btn = gr.Button("Autocomplete")

    # define what will run when the button is clicked, here the textbox is used as both an input and an output
    btn.click(fn=complete_with_gpt, inputs=textbox, outputs=textbox, queue=False)

demo.launch()
gr.state函数,保存同一个demo的状态值变量
Special hidden component that stores session state across runs of the demo by the same user. The value of the State variable is cleared when the user refreshes the page.
语言模型输出的内容固定
配置,do_sample=False
    for response, history, past_key_values in model.stream_chat(tokenizer, input, history,
                                                                past_key_values=past_key_values,
                                                                return_past_key_values=True,
                                                                max_length=max_length, top_p=top_p,
                                                                temperature=temperature,
                                                                do_sample=False):
2 Deepspeed多机多卡训练
2.1 参考
https://hub.yzuu.cf/THUDM/ChatGLM2-6B/issues/226
https://hub.yzuu.cf/THUDM/ChatGLM-6B/issues/843
因为Adam optimizer的特点,全参数微调需要的显存大小是 fp16参数大小 + fp32参数大小* 3,应该已经超过了 80GB 显存。你可以在 deepspeed.json 里的 zero_optimization 部分增加

"offload_optimizer": {
            "device": "cpu",
        }
5 报错
5.1 显存不够报OOM
因为Adam optimizer的特点,全参数微调需要的显存大小是 fp16参数大小 + fp32参数大小* 3,应该已经超过了 80GB 显存。你可以在 deepspeed.json 里的 zero_optimization 部分增加
“offload_optimizer”: {
“device”: “cpu”,
}
5.2 Deepspeed多卡训练报错exits with return code = -9
参考:https://hub.yzuu.cf/microsoft/DeepSpeed/issues/3160
And from the above snippet of your log, the failure seems to occur during optimizer state initialization in CPU memory. The last log line shows that prior to this, CPU memory consumed was 28GB which is 22.6%. This suggests a total CPU memory of ~80GB. However, the Adam optimizer requires 12 bytes per param (excluding gradients), and so for a 6.7B model means ~80.4GB.
So can you (1) confirm your CPU memory size, and (2) increase it assuming it matches my estimation.
@heroes999
heroes999 commented on Jul 17
@tjruwase Very helpful, thanks. I encountered the same problems as the PC station only has 32GB ram. When I expanded it to 128GB, the issue was gone.
解决方案
增大CPU容量,或者取消pin_memory字段

5.3 exits with return code = -7
解决方案
docker run 官方质量:https://docs.docker.com/engine/reference/commandline/run/
``https://hub.yzuu.cf/microsoft/DeepSpeed/issues/4002
https://github.com/microsoft/DeepSpeed/issues/2897
Setting the shm-size to a large number instead of default 64MB when creating docker container solves the problem in my case. It appears that multi-gpu training relies on the shared memory.
I ran with this aks cluster yaml
https://stackoverflow.com/questions/43373463/how-to-increase-shm-size-of-a-kubernetes-container-shm-size-equivalent-of-doc
or docker command docker run --rm --runtime=nvidia --gpus all --shm-size 3gb imagename
it worked
Also talking with @jomayeri a bit offline it sounds like increasing docker shared memory might help with this as well. One way to bump that up is by passing something like --shm-size=“2gb” to your docker run command. The default is pretty small and can sometimes cause issues like this.
Thank you for your advice. I check the default docker shm and find it’s only 64M. When I change it up to 64g the script goes well. And I also try “deepspeed all_reduce_bench_v2.py”, it exits successfully. Appreciate it for your answer.