jenkins学习笔记
记录jenkins学习笔记
一.jenkins是什么?
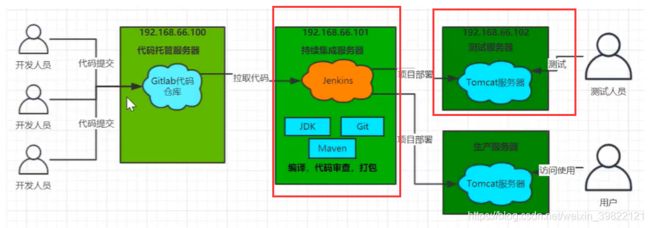
持续集成服务器
在这上面可以不停的集成部署新的功能代码到主干,然后上面就相当于测试环境已经部署好了,在这个环境,可以安心地进行自动化测试,测试通过就直接编译打包;
二.Jenkins特征
- 开源java开发,CI/CD
- 集成RSS/E-mail,可以通过Rss构建部署发布构建结果,或者当构建完成的时候通过e-mail发送,生成的junit/testNg测试报告;
- 分布式构建,多计算机同时构建测试;
- 跟踪每次构建所生成和使用的jar包版本,对于每一次构建所产生和使用的jar包有版本标签;
三.jenkins和测试
四.安装相关软件
我是拉了一个centos7基本镜像开始以下步骤,安装了vim;
4.1 安装sshd
yum update -y #更新
yum list installed | grep openssh-server #检查安装ssh,若无,进行下一步,否则跳过
yum install openssh-server
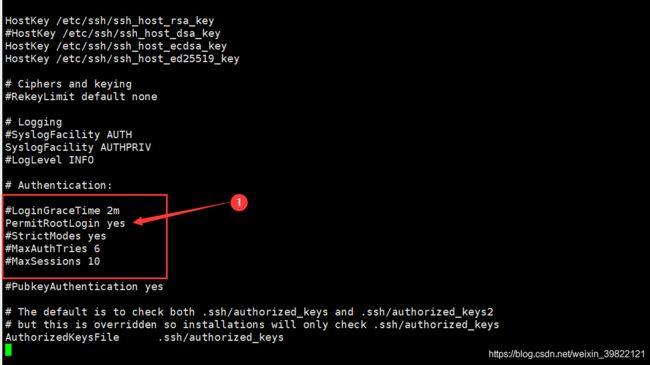
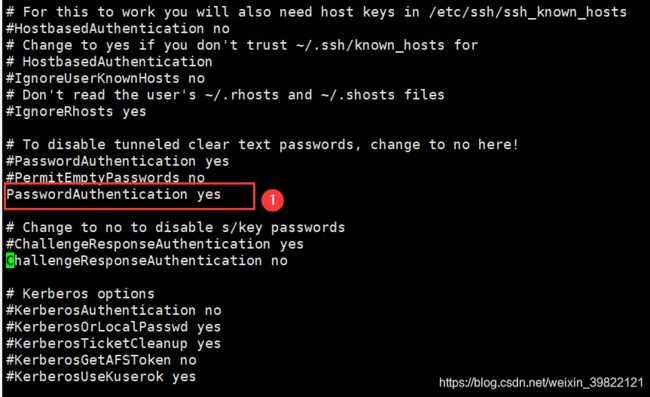
vi /etc/ssh/sshd_config
修改sshd_config文件,移动光标修改,最后:wq保存退出

[root@e7e48273150b ssh]# /usr/sbin/sshd -D
Could not load host key: /etc/ssh/ssh_host_rsa_key
Could not load host key: /etc/ssh/ssh_host_ecdsa_key
Could not load host key: /etc/ssh/ssh_host_ed25519_key
sshd: no hostkeys available -- exiting.
[root@e7e48273150b ssh]# ssh-keygen -q -t rsa -b 2048 -f /etc/ssh/ssh_host_rsa_key -N ''
[root@e7e48273150b ssh]# ssh-keygen -q -t ecdsa -f /etc/ssh/ssh_host_ecdsa_key -N ''
[root@e7e48273150b ssh]# ssh-keygen -t dsa -f /etc/ssh/ssh_host_ed25519_key -N ''
Generating public/private dsa key pair.
Your identification has been saved in /etc/ssh/ssh_host_ed25519_key.
Your public key has been saved in /etc/ssh/ssh_host_ed25519_key.pub.
The key fingerprint is:
SHA256:TtVfyiqv0Hsb44XT2eo7vhVWBJDi18Uo7kQSRvtZcSU root@e7e48273150b
The key's randomart image is:
+---[DSA 1024]----+
|         .+..oE+=|
|         .oo+ .=o|
|         .o=.o..o|
|         ...+=.o.|
|        S  +o +o |
|       o .  .+.o.|
|        o o * + o|
|         . =.=.o |
|          oo++*+ |
+----[SHA256]-----+
[root@e7e48273150b ssh]# /usr/sbin/sshd -D &
[1] 194
[root@e7e48273150b ssh]# ps -a
    PID TTY          TIME CMD
    194 pts/0    00:00:00 sshd
    195 pts/0    00:00:00 ps
4.2 解决容器内无法使用使用systemctl命令
之前安装sshd就发现无法使用这个命令
[root@bb674d3b1ff3 /]# systemctl
Failed to get D-Bus connection: Operation not permitted
原因(转):docker的设计理念就是在容器里面不运行后台服务,容器本身就是宿主机上的一个独立的主进程,这个容器的生命周期是围绕这个主进程存在的,所以正确使用容器的方法是将里面的服务运行在前台.
而systemd维护系统服务程序,需要特权访问linux内核,而容器不能算作是一个完整的操作系统,只能算一个文件系统,而且默认启动只是一个普通用户的权限;也就是没有特权
以特权模式进入容器
ad@LINUX:~$ sudo docker images
REPOSITORY        TAG       IMAGE ID       CREATED          SIZE
centos7_vim_ssh   latest    bb72adb30d59   32 minutes ago   693MB
centos_with_vim   latest    43cfc5fa08fd   9 days ago       451MB
hello-world       latest    d1165f221234   5 months ago     13.3kB
centos            latest    300e315adb2f   8 months ago     209MB
centos            7         8652b9f0cb4c   9 months ago     204MB
ad@LINUX:~$ sudo docker run -itd --name centos1 --privileged=true -p 10002:2 bb72adb30d59 /usr/sbin/init
a7aeeb011b7a776248b9a0e1879fdb1529c86edd07ab7d27b77d6726df7a5bfa
ad@LINUX:~$
结果
ad@LINUX:~$ sudo docker run -itd --name centos1 --privileged=true -p 10002:2 bb72adb30d59 /usr/sbin/init
a7aeeb011b7a776248b9a0e1879fdb1529c86edd07ab7d27b77d6726df7a5bfa
ad@LINUX:~$ sudo docker exec -it centos1 bin/bash
[root@a7aeeb011b7a /]# systemctl
UNIT                                   LOAD   ACTIVE     SUB       DESCRIPTION
proc-sys-fs-binfmt_misc.automount      loaded active     waiting   Arbitrary Executable File Formats File System Automount Point
dev-sda5.device                        loaded activating tentative /dev/sda5
-.mount                                loaded active     mounted   /
dev-hugepages.mount                    loaded active     mounted   Huge Pages File System
dev-mqueue.mount                       loaded active     mounted   POSIX Message Queue File System
etc-hostname.mount                     loaded active     mounted   /etc/hostname
etc-hosts.mount                        loaded active     mounted   /etc/hosts
etc-resolv.conf.mount                  loaded active     mounted   /etc/resolv.conf
sys-fs-fuse-connections.mount          loaded active     mounted   FUSE Control File System
sys-kernel-config.mount                loaded active     mounted   Configuration File System
sys-kernel-debug.mount                 loaded active     mounted   Debug File System
systemd-ask-password-console.path      loaded active     waiting   Dispatch Password Requests to Console Directory Watch
systemd-ask-password-wall.path         loaded active     waiting   Forward Password Requests to Wall Directory Watch
dbus.service                           loaded active     running   D-Bus System Message Bus
[email protected]                     loaded active     running   Getty on tty1
sshd.service                           loaded active     running   OpenSSH server daemon
systemd-hwdb-update.service            loaded active     exited    Rebuild Hardware Database
systemd-journal-catalog-update.service loaded active     exited    Rebuild Journal Catalog
systemd-journal-flush.service          loaded active     exited    Flush Journal to Persistent Storage
systemd-journald.service               loaded active     running   Journal Service
systemd-logind.service                 loaded active     running   Login Service
systemd-random-seed.service            loaded active     exited    Load/Save Random Seed
systemd-sysctl.service                 loaded active     exited    Apply Kernel Variables
systemd-tmpfiles-setup-dev.service     loaded active     exited    Create Static Device Nodes in /dev
systemd-tmpfiles-setup.service         loaded active     exited    Create Volatile Files and Directories
systemd-udev-trigger.service           loaded active     exited    udev Coldplug all Devices
systemd-udevd.service                  loaded active     running   udev Kernel Device Manager
systemd-update-done.service            loaded active     exited    Update is Completed
systemd-update-utmp.service            loaded active     exited    Update UTMP about System Boot/Shutdown
systemd-user-sessions.service          loaded active     exited    Permit User Sessions
systemd-vconsole-setup.service         loaded active     exited    Setup Virtual Console
-.slice                                loaded active     active    Root Slice
--More--
4.3安装防火墙
yum install firewalld systemd -y
然后开启防火墙
service firewalld start
又再次报错,
[root@a7aeeb011b7a /]# service firewalld  start
bash: service: command not found
解决办法
[root@a7aeeb011b7a /]# rpm -qa | grep initscripts
[root@a7aeeb011b7a /]# yum list | grep initscripts
initscripts.x86_64                       9.49.53-1.el7_9.1              updates
[root@a7aeeb011b7a /]# yum install initscripts
#将SSH服务设置成开机自启动
systemctl enable sshd

#启动SSH服务
systemctl start sshd

#开启防火墙
service firewalld  start

#添加http服务到firewalld,pemmanent表示永久生效,若不加–permanent系统下次启动后就会失效。
firewall-cmd --permanent --add-service=http

#重启防火墙
systemctl reload firewalld
4.4 安装Postfix
yum install postfix
然后设置postfix开机自启动
[root@a7aeeb011b7a /]# systemctl enable postfix
[root@a7aeeb011b7a /]# systemctl start postfix
Job for postfix.service failed because the control process exited with error code. See "systemctl status postfix.service" and "journalctl -xe" for details.
又报错,解决办法
和防火墙冲突
[root@a7aeeb011b7a /]# systemctl stop firewalld.service
[root@a7aeeb011b7a /]# ps -ef
UID          PID    PPID  C STIME TTY          TIME CMD
root           1       0  0 08:45 ?        00:00:00 /usr/sbin/init
root          20       1  0 08:45 ?        00:00:00 /usr/lib/systemd/systemd-journald
root          30       1  0 08:45 ?        00:00:00 /usr/lib/systemd/systemd-udevd
dbus          54       1  0 08:45 ?        00:00:00 /usr/bin/dbus-daemon --system --address=systemd: --nofork --nopidfile --systemd-activation
root          62       1  0 08:45 ?        00:00:00 /usr/lib/systemd/systemd-logind
root          63       1  0 08:45 ?        00:00:00 /usr/sbin/sshd -D
root          65       1  0 08:45 tty1     00:00:00 /sbin/agetty --noclear tty1 linux
root          67       0  0 08:59 pts/1    00:00:00 bin/bash
root          83      67  0 09:00 pts/1    00:00:00 systemctl
root          84      83  0 09:00 pts/1    00:00:00 more
root         407      67  1 09:20 pts/1    00:00:00 /usr/bin/python /usr/bin/yum -y install sendmail
root         469     407  0 09:20 pts/1    00:00:00 /bin/sh /var/tmp/rpm-tmp.oS9px0 1
root         510     469  0 09:20 pts/1    00:00:00 /bin/sh /etc/mail/make aliases
root         512     510  0 09:20 pts/1    00:00:00 /usr/bin/newaliases
root         537      67 16 09:21 pts/1    00:00:00 ps -ef
[root@a7aeeb011b7a /]# vim /etc/postfix/main.cf
# 修改inet_protocols = ipv4
#inet_interfaces = all保存退出

[root@a7aeeb011b7a /]# systemctl start postfix
#设置自启动
[root@266795f5b0ed /]# systemctl enable postfix
Created symlink from /etc/systemd/system/multi-user.target.wants/postfix.service to /usr/lib/systemd/system/postfix.service.
4.5 安装wget
#有没有安装wget,用wget -v试一下
yum  install wget

#安装gitlab镜像源
[root@266795f5b0ed /]# wget https://mirrors.tuna.tsinghua.edu.cn/gitlab-ce/yum/el7/gitlab-ce-10.0.0-ce.0.el7.x86_64.rpm

#安装gitlab指令
[root@266795f5b0ed /]# rpm -i gitlab-ce-10.0.0-ce.0.el7.x86_64.rpm
warning: gitlab-ce-10.0.0-ce.0.el7.x86_64.rpm: Header V4 RSA/SHA1 Signature, key ID f27eab47: NOKEY
error: Failed dependencies:
	policycoreutils-python is needed by gitlab-ce-10.0.0-ce.0.el7.x86_64
啊啊啊啊啊,wdnm我要爆炸了,还报错
按照指挥,安装个policycoreutils-python
[root@266795f5b0ed /]#  yum install policycoreutils-python

[root@266795f5b0ed /]# rpm -i gitlab-ce-10.0.0-ce.0.el7.x86_64.rpm
这个过程很久,建议掏出手机玩一会

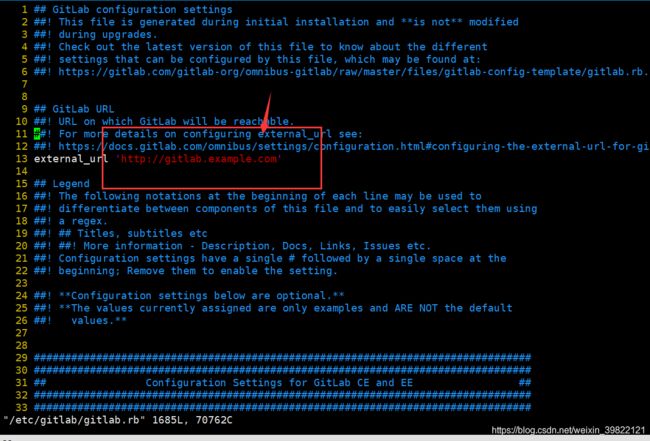
修改gitlab配置文件指定服务器ip和自定义端口(不用80的话):
vim  /etc/gitlab/gitlab.rb


external_url 'http://域名:端口'

nginx['listen_port'] = 端口


#重启gitlab
gitlab-ctl reconfigure
gitlab-ctl restart
4.6修改了端口就回来改防火墙
firewall-cmd --zone=public --add-port=端口/tcp --permanent
firewall-cmd --reload
4.7登录gitlab界面
用你自己的之前的设置的url登陆界面修改密码,之后就可以root+密码成功登录;
4.8 后续
五. 安装jenkins
wget http://pkg.jenkins-ci.org/redhat-stable/jenkins-2.190.3-1.1.noarch.rpm


##下载成功后安装
rpm -ivh jenkins-2.190.3-1.1.noarch.rpm
5.1 修改配置
[root@localhost ad]# vi /etc/sysconfig/jenkins

#修改参数如下
#
JENKINS_PORT="8888"
5.2 启动jenkins
[root@localhost ad]# systemctl start jenkins
由于防火墙在运行,加个端口吧
[root@localhost java-1.8.0-openjdk]# systemctl status firewalld
● firewalld.service - firewalld - dynamic firewall daemon
   Loaded: loaded (/usr/lib/systemd/system/firewalld.service; enabled; vendor preset: enabled)
   Active: active (running) since 二 2021-08-17 15:10:38 CST; 18h ago
     Docs: man:firewalld(1)
 Main PID: 824 (firewalld)
    Tasks: 2
   CGroup: /system.slice/firewalld.service
           └─824 /usr/bin/python2 -Es /usr/sbin/firewalld --nofork --nopid

8月 17 15:10:38 localhost.localdomain systemd[1]: Starting firewalld - dynamic firewall daemon...
8月 17 15:10:38 localhost.localdomain systemd[1]: Started firewalld - dynamic firewall daemon.
8月 17 15:10:38 localhost.localdomain firewalld[824]: WARNING: AllowZoneDrifting is enabled. This is considered an insecure config...t now.
Hint: Some lines were ellipsized, use -l to show in full.
[root@localhost java-1.8.0-openjdk]# firewall-cmd --zone=public --add-port=8888/tcp --permanent
success
[root@localhost java-1.8.0-openjdk]# firewall-cmd --reload
success
