数据库变更管理:Liquibase or Flyway
《从零打造项目》系列文章
工具
- 比MyBatis Generator更强大的代码生成器
ORM框架选型
SpringBoot项目基础设施搭建
SpringBoot集成Mybatis项目实操
SpringBoot集成MybatisPlus项目实操
SpringBoot集成Spring Data JPA项目实操
数据库变更管理
- 数据库变更管理:Liquibase or Flyway
前言
研发过程中经常涉及到数据库变更,对表结构的修复及对数据的修改,为了保证各环境都能正确的进行变更,我们可能需要维护一个数据库升级文档来保存这些记录,有需要升级的环境按文档进行升级。
这样手工维护有几个缺点:
- 无法保证每个环境都按要求执行
- 遇到问题不一定有相对的回滚语句
- 无法自动化
为了解决这些问题,我们进行了一些调研,主要调研对象是 Liquibase 和 Flyway,我们希望通过数据库版本管理工具实现以下几个目标:
- 数据库升级
- 数据库回滚
- 版本标记
Liquibase还是Flyway
Flyway 和 Liquibase 都支持专业数据库重构和版本控制所需的所有功能,因此您将始终知道要处理的数据库模式的版本以及它是否与软件版本匹配。两种工具都集成在 Maven 或 Gradle 构建脚本中以及 Spring Boot 生态系统中,因此您可以完全自动化数据库重构。
Flyway 使用 SQL 定义数据库更改,因此您可以定制 SQL 脚本,使其与基础数据库技术(例如Oracle或PostgreSQL)良好地配合使用。另一方面,使用 Liquibase,您可以通过使用 XML,YAML 或 JSON 来定义数据库更改来引入抽象层。因此,Liquibase 更适合在具有不同基础数据库技术的不同环境中安装的软件产品中使用。
Flyway
数据库的变更可以用 SQL 或者 Java 来记录,Flyway 通过下面的步骤实现数据库变更:
- Flyway 先在数据库中检查自己的元数据表(默认为SCHEMA_VERSION)是否存在,如果没有,则创建一个;
- 检查 classpath 中所有的变更;
- 对比变更和自己的表,如果变更的版本低于或等于当前版本,不做任何变动;
- 否则,变更会按从低到高排序,并依次执行;
- 执行完,在 SCHEMA_VERSION 做相应的记录
Liquibase
工作方式与 Flyway 非常类似,但是 Liquibase 稍微复杂点,这点后续会单独介绍。
对比
两者的基本功能其实都差不多:
- 都是 Java 开发的开源数据库变更管理工具
- 支持大部分的数据库
- 和 Maven/Gradle 无缝集成
- 和 Spring 无缝集成
- 非常类似的变更实现方式
- 复杂变更如果 SQL 不能满足的话,都可以用 Java 代码实现
较大区别是 Flyway 的变更以纯 SQL 为脚本,简单直接;Liquibase 比较厚重,当然花样也比较多,包括:
- 可指定不同的 profile
- 具有通用的变更操作支持不同的数据库,如 createTable
- Liquibase 开源版本支持 diff 模式,而此特性 Flyway 必须用商业版
- Liquibase 开源版本支持回滚 rollback,而此特性 Flyway 必须用商业版,Liquibase 的付费版本据说对不同种类的回滚有更复杂的支持。
- 两者指定变更执行顺序的方法不同,Flyway 通过固定的文件名格式来确定顺序,而 Liquibase 就是通过给定文件的顺序来执行,所以开发人员还要遵守好命名规则,例如按照日期/时间顺序命名
如果您想完全控制 SQL,Flyway 是首选工具,因为您可以使用完全定制的 SQL 甚至 Java 代码来更改数据库。多种数据源的情况下使用 Liquibase 会更加合适,不需要维护多种数据库脚本,和学习多种数据库语言,Liquibase 对于大型项目更加友好。
综上所述,我们在项目中选择 Liquibae。接下来简单来认识一下 Liquibase。
Liquibase
介绍
Liquibase 是一个用于数据库重构和迁移的开源工具,通过日志文件的形式记录数据库的变更,然后执行日志文件中的修改,将数据库更新或回滚到一致的状态。它的目标是提供一种数据库类型无关的解决方案,通过执行 schema 类型的文件来达到迁移。其优点主要有以下:
- 支持几乎所有主流的数据库,如MySQL, PostgreSQL, Oracle, Sql Server, DB2等;
- 支持多开发者的协作维护;
- 日志文件支持多种格式,如XML, YAML, JSON, SQL等;
- 支持多种运行方式,如命令行、Spring集成、Maven插件、Gradle插件等。
liquibase 官方文档地址: http://www.liquibase.org/documentation/index.html
本地安装
根据自己的操作系统下载对应的二进制包,下载地址:https://www.liquibase.org/dow…
我这里下载的是 Mac 版本的压缩包,然后在本地解压,解压包存放位置为:
/Library/liquibase-4.4.3
sudo vi ~/.bash_profile,修改环境变量配置文件:
export PATH="/Library/liquibase-4.4.3:$PATH"
然后 source ~/.bash_profile,使配置文件生效。
最后执行下述命令,验证是否安装成功。
 % liquibase --version
####################################################
##   _     _             _ _                      ##
##  | |   (_)           (_) |                     ##
##  | |    _  __ _ _   _ _| |__   __ _ ___  ___   ##
##  | |   | |/ _` | | | | | '_ \ / _` / __|/ _ \  ##
##  | |___| | (_| | |_| | | |_) | (_| \__ \  __/  ##
##  \_____/_|\__, |\__,_|_|_.__/ \__,_|___/\___|  ##
##              | |                               ##
##              |_|                               ##
##                                                ##
##  Get documentation at docs.liquibase.com       ##
##  Get certified courses at learn.liquibase.com  ##
##  Free schema change activity reports at        ##
##      https://hub.liquibase.com                 ##
##                                                ##
####################################################
Starting Liquibase at 10:06:20 (version 4.4.3 #53 built at 2021-08-05 18:32+0000)
Running Java under /Library/Java/JavaVirtualMachines/jdk1.8.0_301.jdk/Contents/Home/jre (Version 1.8.0_301)

Liquibase Version: 4.4.3
Liquibase Community 4.4.3 by Datical
下载 PostgreSQL 驱动到 lib 包中,下载地址为:https://jdbc.postgresql.org/download.html
本次下载版本为:42.2.12
结合Idea使用
Liquibase问题
随着项目的发展,一个项目中的代码量会非常庞大,同时数据库表也会错综复杂。如果一个项目使用了Liquibase对数据库结构进行管理,越来越多的问题会浮现出来。
- ChangeSet 文件同时多人在修改,自己的 ChangeSet 被改掉,甚至被删除掉。
- 开发人员将 ChangeSet 添加到已经执行过的文件中,导致执行顺序出问题。
- 开发人员擅自添加对业务数据的修改,其它环境无法执行并报错。
- ChangeSet 中 SQL 包含 schema 名称,导致其它环境 schema 名称变化时,ChangeSet 报错。
- 开发人员不小心改动了已经执行过的 ChangeSet,在启动时会报错。
Liquibase基本规范
- ChangeSet id 使用[任务ID]-[日期]-[序号],如 T100-20181009-001
- ChangeSet 必须填写 author
- Liquibase 禁止对业务数据进行 sql 操作
- 使用
- Liquibase 禁止使用存储过程
- 所有表,列要加 remarks 进行注释
- 已经执行过的 ChangeSet 严禁修改。
- 不要随便升级项目 liquibase 版本,特别是大版本升级。不同版本 ChangeSet MD5SUM 的算法不一样。
根据发布进行管理
- 每个发布新建一个文件夹,所有发布相关的 ChangeSet 文件以及数据初始化文件,均放在些文件夹中。
- 每个发布新建一个 master.xml。此 master.xml 中,include 本次发布需要执行的 ChangeSet 文件
- 根据开发小组独立 ChangeSet文件(可选)
- 根据功能独立 ChangeSet 文件。例如 user.xml, company.xml
resources
  |-liquibase
    |-user
    | |- master.xml
    | |- release.1.0.0
    | | |- release.xml
    | | |- user.xml -- 用户相关表ChangeSet
    | | |- user.csv -- 用户初始化数据
    | | |- company.xml -- 公司相关表ChangeSet
    | |- release.1.1.0
    | | |- release.xml
    | | |- ...
模块化管理
首先说明一下 Spring Boot 中 Liquibase 默认是如何执行以及执行结果。
- 在启动时,LiquibaseAutoConfiguration 会根据默认配置初始化 SpringLiquibase
- SpringLiquibase.afterPropertiesSet()中执行 ChangeSet 文件
- 第一次跑 ChangeSets 的时候,会在数据库中自动创建两个表
databasechangelog和databasechangeloglock
因此我们可以认为一个 SpringLiquibase 执行为一个模块。
引入多模块管理时,基于上节文件管理规范,我们基于模块管理再做下调整。
resources
  |-liquibase
    |-user
    | |- master.xml
    | |- release.1.0.0
    | | |- release.xml
    | | |- user.xml -- 用户相关表ChangeSet
    | | |- user.csv -- 用户初始化数据
    | | |- company.xml -- 公司相关表ChangeSet
    | |- release.1.1.0
    | | |- release.xml
    | | |- ...
    |- order
    | |- master.xml
    | |- release.1.0.0
    | | |- ...
如何在一个Spring Boot运行多个SpringLiquibase呢?
1、禁用Spring Boot自动运行Liquibase。
# application.properties
# spring boot 2以上
spring.liquibase.enabled=false
# spring boot 2以下
liquibase.enabled=false
2、修改配置项
@Configuration
public class LiquibaseConfiguration() {

    /**
     *  用户模块Liquibase
     */
    @Bean
    public SpringLiquibase userLiquibase(DataSource dataSource) {
        SpringLiquibase liquibase = new SpringLiquibase();
        // 用户模块Liquibase文件路径
        liquibase.setChangeLog("classpath:liquibase/user/master.xml");
        liquibase.setDataSource(dataSource);
        liquibase.setShouldRun(true);
        liquibase.setResourceLoader(new DefaultResourceLoader());
        // 覆盖Liquibase changelog表名
        liquibase.setDatabaseChangeLogTable("user_changelog_table");
        liquibase.setDatabaseChangeLogLockTable("user_changelog_lock_table");
        return liquibase;
    }
    /**
     *  订单模块Liquibase
     */
    @Bean
    public SpringLiquibase orderLiquibase() {
      SpringLiquibase liquibase = new SpringLiquibase();
      liquibase.setChangeLog("classpath:liquibase/order/master.xml");
      liquibase.setDataSource(dataSource);
      liquibase.setShouldRun(true);
      liquibase.setResourceLoader(new DefaultResourceLoader());
      liquibase.setDatabaseChangeLogTable("order_changelog_table");
      liquibase.setDatabaseChangeLogLockTable("order_changelog_lock_table");
      return liquibase;
    }
}
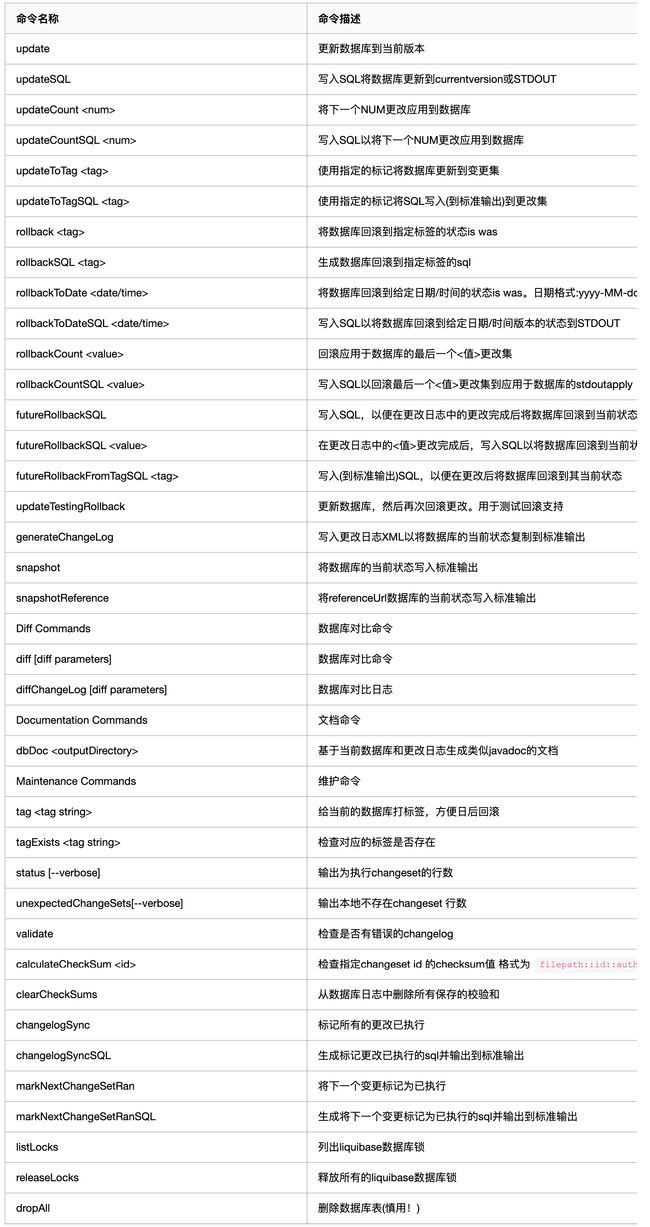
Liquibase命令
对应在 IDEA 中的位置如下图所示:
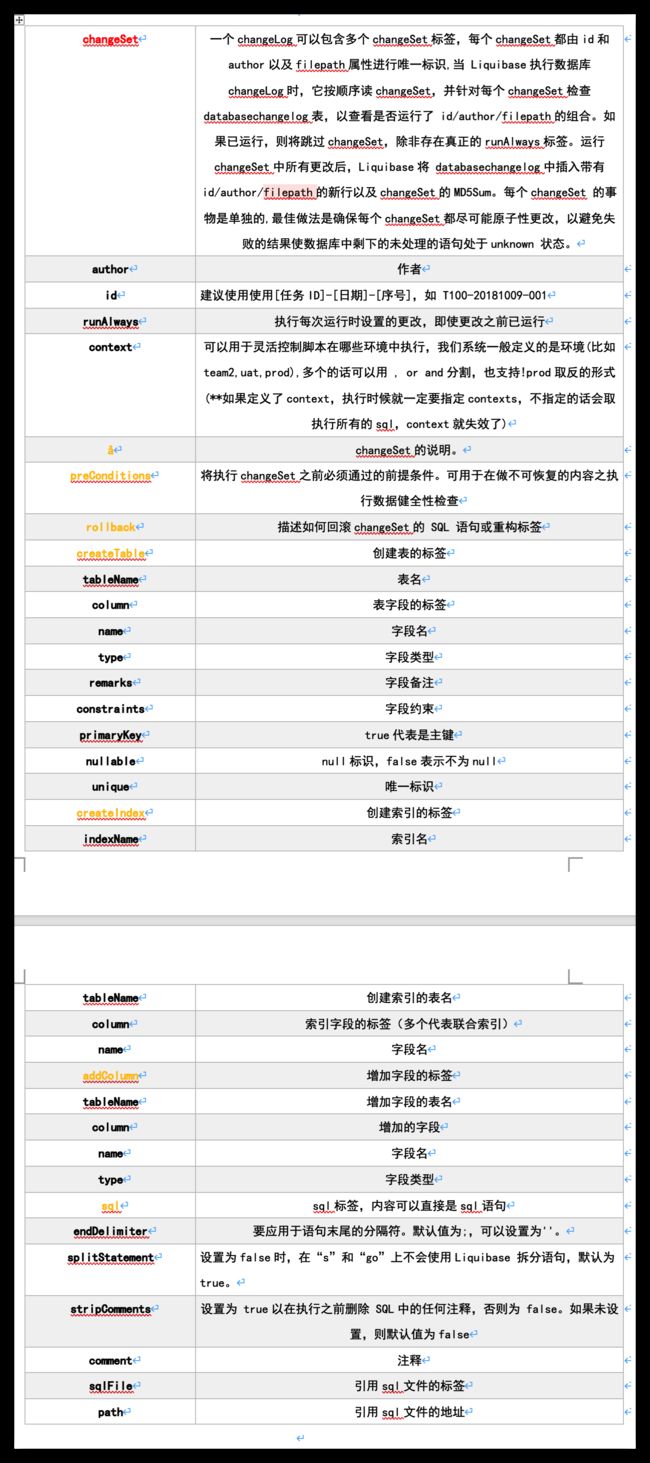
changelog文件
变更集 changeset 是通过 author + id 的方式来保证唯一性
<?xml version="1.1" encoding="UTF-8" standalone="no"?>
<databaseChangeLog xmlns="http://www.liquibase.org/xml/ns/dbchangelog"
                   xmlns:xsi="http://www.w3.org/2001/XMLSchema-instance"
                   xsi:schemaLocation="http://www.liquibase.org/xml/ns/dbchangelog http://www.liquibase.org/xml/ns/dbchangelog/dbchangelog-3.6.xsd">
   <!--第一种标签建表方式-->
  <changeSet author="future_zwp (generated)" id="reference-2019082600-00" context="team2,uat,prod">
        <createTable tableName="personal_bank_swift">
            <column name="id" type="serial">
                <constraints primaryKey="true"/>
            </column>
            <column name="bank_code" type="text" remarks="银行编码"></column>
            <column name="clearing_code" type="text" ></column>
            <column name="swift_code" type="text" ></column>
            <column name="create_by" type="text" ></column>
            <column name="created_at" type="timestamp"></column>
            <column name="updated_by" type="text" ></column>
            <column name="updated_at" type="timestamp"></column>
            <column name="pt" type="text"></column>
        </createTable>
        <rollback>
            <dropTable tableName="personal_bank_swift"/>
        </rollback>
    </changeSet>

    <changeSet author="future_zwp (generated)" id="reference-2019082600-01" context="team2,uat,prod">
        <createIndex indexName="idx_bank_info_bank_clearing" tableName="personal_bank_swift">
            <column name="bank_code"/>
            <column name="clearing_code"/>
        </createIndex>
    </changeSet>

    <changeSet author="future_zwp (generated)" id="reference-2019082600-02" context="team2,uat,prod">
        <createIndex indexName="idx_personal_bank_swift_swift_code" tableName="personal_bank_swift">
            <column name="swift_code"/>
        </createIndex>
    </changeSet>

   <!--第二种sql建表方式,所有的sql语句都支持,学习成本低,更灵活-->
  <changeSet author="zhaowenpeng" id="reference-2019082600-03" context="team2,uat,prod">
        <sql splitStatements="true">
            drop table if exists personal_bank_swift;

            create table personal_bank_swift
            (
              id serial primary key,
            bank_code     text,
            clearing_code text,
            swift_code    text,
            create_by     text,
            create_at     timestamp(6),
            updated_by    text,
            updated_at    timestamp(6)
            );

            comment on column personal_bank_swift.bank_code
            is '银行编码';

            create index idx_bank_info_bank_clearing on personal_bank_swift(bank_code,clearing_code);
            create index idx_personal_bank_swift_swift_code on personal_bank_swift(swift_code);
        </sql>
    </changeSet>

   <!--引用sql文件-->
   <changeSet author="hresh" id="reference-2019082600-04" context="team2,uat,prod">
        <sqlFile  path="sql/init-personal_bank_swift.sql"></sqlFile>
    </changeSet>
</databaseChangeLog>
默认表
第一次执行完成后目标数据库会多出两张表:
- DATABASECHANGELOG 表
- DATABASECHANGELOGLOCK表
1、databasechangelog
Liquibase 使用 databasechangelog 表来跟踪已运行的changeSet。
该表将每个更改设置作为一行进行跟踪,由存储changelog文件的路径的id、author和filename列的组合标识。
2、databasechangeloglock
Liquibase 使用 databasechangeloglock 表确保一次只运行一个 Liquibase 实例。
因为Liquibase 只是从 databasechangelog 表读取以确定需要运行的changeSet,因此,如果同时对同一数据库执行多个 Liquibase实例,则会发生冲突。如果多个开发人员使用相同的数据库实例,或者集群中有多个服务器在启动时自动运行 Liquibase,则可能会发生这种情况。
如果 Liquibase 未干净地退出,则锁住的行可能会保留为锁定状态。您可以通过运行UPDATE DATABASECHANGELOGLOCK SET LOCKED=0清除当前锁
总结
关于 Liquibase 还有很多知识点需要学习,本文只是简单地带大家认识一下它,不真正使用还是无法理解它的作用,所以下一篇文章我们将实操一个项目,来为大家演示 Liquibase 的功能。
参考文献
Spring Boot使用Liquibase最佳实践
LiquiBase 管理数据库变更实践
liquibase使用教程
Liquibase的基本使用说明
liquibase的changelog详解
liquibase yaml命令参考大全
数据库变更管理:Flyway & Liquibase


