7.15 SpringBoot项目实战 【学生入驻】(上):从API接口定义 到 Mybatis查询 串讲
![]()
文章目录
- 前言
- 一、service层 和 dal层
-
- 方式一、Example方式
- 方式二、Mybatis XML方式
- 方式三、Mybatis 注解方式
- 二、web层 StudentController
- 最后
前言
接下来我们实战【学生入驻】,对于C端学生端,一切交互开始于知道 当前学生是否入驻、是否有借阅资格,所以SpringBoot后端需要提供给vue前端的第一个API是:当前登录的学生信息(是否入驻、是否有借阅资格)!
所以,本文将使用SpringBoot实现C端学生端第一个接口:查询学生信息和借阅资格!复习一下SpringBoot接口API的定义 以及Mybatis三种基础查询方式的使用,当然会做一点补充!一期已经过了一大半,继续加油,Let’s Go!
一、service层 和 dal层
首先创建service层接口StudentService,根据需求,我们是需要根据用户id查询学生信息, 所以定义如下:
public interface StudentService {
    StudentBO getStudent(Integer userId);
}
对于使用Mybatis查询学生信息的实现,根据前面的积累,我们至少有三种方式:
方式一: 使用Mybatis官方代码生成器Mybatis Generator (MBG)自动生成的Example方式
详见:5.6 Mybatis代码生成器Mybatis Generator (MBG)实战详解
方式二: 使用Mybatis XML方式,需要自定义StudentMapperExt和StudentMapperExt.xml
详见:5.3 Mybatis映射文件 - 零基础入门,轻松学会查询的select标签和resultMap标签
方式三: 使用Mybatis 注解方式
详见:5.2 Mybatis快速入门,轻松学会常用12种注解开发
都是基础,所以接下来,我将把三种方式逐一实现:
定义实现类 StudentServiceImpl:
@Service
public class StudentServiceImpl implements StudentService {

    @Override
    public StudentBO getStudent(Integer userId) {
        return null;
    }
}
方式一、Example方式
StudentServiceImpl中注入Mybatis mapper
@Autowired
private StudentMapper studentMapper;
按userId查询学生
StudentExample example = new StudentExample();
example.createCriteria().andUserIdEqualTo(userId);
List<Student> studentList = studentMapper.selectByExample(example);
最后使用拷贝工具类,将PO转为BO:
CopyUtils.copy(studentList.get(0), StudentBO::new);
完整的实现代码:
@Service
public class StudentServiceImpl implements StudentService {

    @Autowired
    private StudentMapper studentMapper;

    @Override
    public StudentBO getStudent(Integer userId) {
        // 方式一:Example方式
        // 如果userId=1,相当于SQL: select * from student where user_id=1
        StudentExample example = new StudentExample();
        example.createCriteria().andUserIdEqualTo(userId);
        List<Student> studentList = studentMapper.selectByExample(example);
        if (CollectionUtils.isEmpty(studentList)) {
            return null;
        }
        return CopyUtils.copy(studentList.get(0), StudentBO::new);
    }
}
方式二、Mybatis XML方式
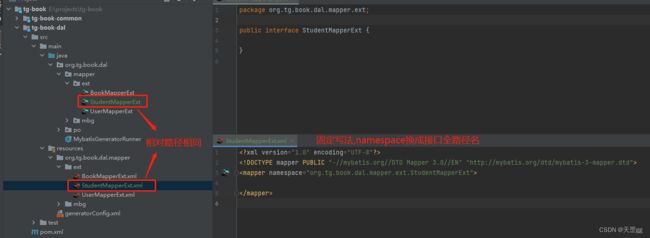
第一步:在dal层创建接口:StudentMapperExt,及对应的xml文件:StudentMapperExt.xml,如下:
第二步:定义查询方法,通过MybatisX插件自动生成select标签
Student selectByUserId(@Param("userId") Integer userId);
点击MybatisX插件的Generate statement,
自动在StudentMapperExt.xml中生成select标签:
第三步,写查询SQL:
<select id="selectByUserId" resultMap="org.tg.book.dal.mapper.mbg.StudentMapper.BaseResultMap">
    select
    <include refid="org.tg.book.dal.mapper.mbg.StudentMapper.Base_Column_List" />
    from student
    where user_id = #{userId}
select>
这里用到了refid引入的是select等标签通过Base_Column_List对应的是sql语句的查询列sql:
另外,我用
resultMap替换了自动生成的resultType属性,因为resultMap标签更强大,推荐使用!
然后就可以在StudentServiceImpl中注入Mybatis mapper及使用:
@Autowired
private StudentMapperExt studentMapperExt;

 @Override
public StudentBO getStudent(Integer userId) {
    // 方式二:XML方式
    Student student = studentMapperExt.selectByUserId(userId);
    return CopyUtils.copy(student, StudentBO::new);
}
方式二,我推荐的方式,从单一职责原则来看,dal层和service层各司其责:service层更专注于业务逻辑,dal层更专注于数据访问!
方式三、Mybatis 注解方式
在方式二创建的StudentMapperExt中创建一个新的查询方法:
@Select("select * from student where user_id =#{userId}")
Student selectByUserId3(@Param("userId") Integer userId);
同样可以使用
@Results定义结果映射,具体实现参考【5.2】,我这里就省略了~
StudentServiceImpl 中调用与方式二相同:
@Autowired
private StudentMapperExt studentMapperExt;

@Override
public StudentBO getStudent(Integer userId) {
    // 方式三:注解方式
    Student student = studentMapperExt.selectByUserId3(userId);
    return CopyUtils.copy(student, StudentBO::new);
}
二、web层 StudentController
service层实现以后,我们通过创建StudentController对外提供restful API,代码如下:
@RestController
@RequestMapping("/student")
@Validated
public class StudentController {

    @Autowired
    private StudentService studentService;

    @GetMapping
    public TgResult<StudentBO> getStudent() {
        Integer userId = AuthContextInfo.getAuthInfo().loginUserId();
        StudentBO studentBO = studentService.getStudent(userId);
        return TgResult.ok(studentBO);
    }
}
对于StudentController上的三个注解,复习一下:
- @RestController 等同于@Controller + @ResponseBody,用于定义SpringBoot项目的控制器类
- @RequestMapping 用于处理
请求映射,定义请求路径,也就是这个类中的接口前缀均为/student开头 - @Validated 这是利用Spring Validation做参数校验的注解(当前API用不上,一般习惯先定义上)
对于GET请求,使用@GetMapping注解,这里没加子路径,大部分情况是需要加的,例如:@GetMapping("/test")
代码具体实现讲解:
- 通过
AuthContextInfo.getAuthInfo().loginUserId()获取当前登录的userId - 通过
studentService.getStudent(userId)获取userId对应的学生信息 - 通过
TgResult.ok(studentBO)返回封装的通用请求结果
最后
看到这,觉得有帮助的,刷波666,感谢大家的支持~
想要看更多实战好文章,还是给大家推荐我的实战专栏–>《基于SpringBoot+SpringCloud+Vue前后端分离项目实战》,由我和 前端狗哥 合力打造的一款专栏,可以让你从0到1快速拥有企业级规范的项目实战经验!
具体的优势、规划、技术选型都可以在《开篇》试读!
订阅专栏后可以添加我的微信,我会为每一位用户进行针对性指导!
另外,别忘了关注我:天罡gg ,怕你找不到我,发布新文不容易错过: https://blog.csdn.net/scm_2008


