点云感知(一):基于深度图的聚类算法与源码解析
前言
原理文字介绍略微简介,但是在代码注释中非常详细。我相信在代码中学习原理才能理解更加通透。
参考:
gitcode
https://blog.csdn.net/weixin_43885544/article/details/111193386
一、算法原理
二、源码解析
流程为:预处理->深度图投影->深度图分割->有效类提取
预处理:PreProcess函数
/**
 * 预处理: 点云行方向重排序和补偿
 * @param cloudIn
 * @param cloudOut
 */
void PreProcess(const pcl::PointCloud& cloudIn, pcl::PointCloud& cloudOut)
这里用的是32线雷达,本人没有用过,也不了解其线束分布。根据代码猜测:考虑某一列,将行数为: 1 15 2 16 3 17… 改为 1 2 3 … 15 16 17 …。然后点云就完全变成了一个按水平角度和垂直角度分布的大矩阵,方便之后的遍历。详情见代码和注释:
行方向重排序
    // 目测是将行数为: 1 15 2 16 3 17...  改为 1 2 3 ... 15 16 17 ...
	for (int j = 0; j < total_frame; ++j) {
		int num_odd = 16;                //基数从16位开始排
		int num_even = 0;                //偶数从头

		for (int i = 0; i < 32; ++i) {
			if (float(i % 2) == 0.0) {
				cloudOut.points[j * 32 + num_even].x = cloudIn.points[j * 32 + i].x ;
				cloudOut.points[j * 32 + num_even].y = cloudIn.points[j * 32 + i].y ;
				cloudOut.points[j * 32 + num_even].z = cloudIn.points[j * 32 + i].z ;
				cloudOut.points[j * 32 + num_even].ring =num_even;
				cloudOut.points[j * 32 + num_even].pcaketnum =j;
				cloudOut.points[j * 32 + num_even].range =cloudIn.points[j * 32 + i].intensity;

				pcl::PointXYZRGB p;
				p.x = cloudIn.points[j * 32 + i].x;
				p.y = cloudIn.points[j * 32 + i].y;
				p.z = cloudIn.points[j * 32 + i].z;
				p.r = 100;
				p.g = 100;
				p.b = 100;
				colorcloud->points.push_back(p);
				num_even++;

			} else {
				cloudOut.points[j * 32 + num_odd].x  = cloudIn.points[j * 32 + i].x;
				cloudOut.points[j * 32 + num_odd].y = cloudIn.points[j * 32 + i].y ;
				cloudOut.points[j * 32 + num_odd].z = cloudIn.points[j * 32 + i].z ;
				cloudOut.points[j * 32 + num_odd].ring =num_odd;
				cloudOut.points[j * 32 + num_odd].pcaketnum =j;
				cloudOut.points[j * 32 + num_odd].range =cloudIn.points[j * 32 + i].intensity;

				pcl::PointXYZRGB p;
				p.x = cloudIn.points[j * 32 + i].x;
				p.y = cloudIn.points[j * 32 + i].y;
				p.z = cloudIn.points[j * 32 + i].z;
				p.r = 100;
				p.g = 100;
				p.b = 100;
				colorcloud->points.push_back(p);
				num_odd++;
			}
		} //按索引顺序排列
        }
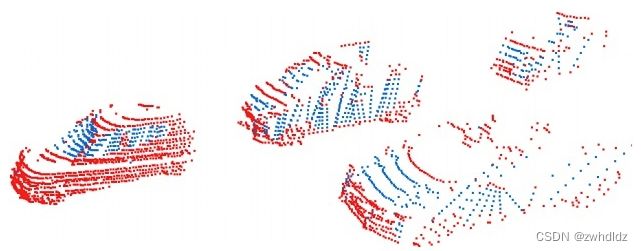
无效点补偿
激光雷达的基本原理就是利用传感器发射的激光束反射的时间差来实现对周围物体的精准测距,但激光有可能打在某些反射率较低的物体时,激光束无法返回传感器,就造成该扫描线在那一时刻变成无效值,从整体点云看就是有该物体有部分点云缺失,比较典型的情况就是激光打在玻璃上或是打在黑色车辆上。
考虑某一列,从0向31行遍历,如果点距离小于0.1,则为无效点,寻找上下行邻域的有效点,进行差值补偿。详情见代码和注释:
	for(int j = 0; j < total_frame; ++j) {
	    /*
	     * 下面.range为深度,深度小的点为无效点
	     * 例子p1-1 p1 ... p2 p2+1  记录无效点对(p1,p2),p1-1和p2+1为有效点p1-1 p1 ... p2 p2+1  记录无效点对(p1,p2),p1-1和p2+1为有效点
	     */
		bool flag = false;
		std::pair p;// 记录无效点对(p1,p2)
		std::vector> vt;
		// 遍历中间的行
		for (int i = 1; i < 31; ++i) {
            // 点深度小,则认为是无效点
			if(!flag && cloudOut.points[j * 32 + i].range<=0.1){
				flag = true;
				p.first = i;
			}
			// 找无效点下面最近的有效点
			if(flag && cloudOut.points[j * 32 + i + 1].range > 0.1){
				p.second = i;
				flag = false;
				vt.push_back(p);
			}
		}

		for(int i=0; ipoints.push_back(p);
				}
			}
		}
	}
如图所示,测试车辆左侧的红色车辆就造成了点云缺失,蓝色点为补偿点:

深度图投影:toRangeImage函数
/**
 * 地面分割->非地面点投影到深度图 存储至哈希表
 * @param cloudIn 输入点云
 * @param cloudObstacle 非地面点云
 * @param cloudGround 地面点云
 * @param unordered_map_out 非地面点云哈希表
 */
void toRangeImage(const pcl::PointCloud& cloudIn, pcl::PointCloud& cloudObstacle, pcl::PointCloud& cloudGround, std::unordered_map &unordered_map_out)
去地面
参考自博客:Adam
方法是根据种子地面点云计算法向量,在根据平面方程ax+by+cz=-d+threshold判别其他点的属性(理解方式不唯一,推导到最后的结果一致),本代码增加多线程方法,将点云划分为多块分别进行地面去除,一定程度上减少了坡度的影响.
	GroundRemove ground_remove(3, 20, 1.0, 0.15);
	ground_remove.RemoveGround(*cloud_filtered, cloudGround, cloudObstacle);
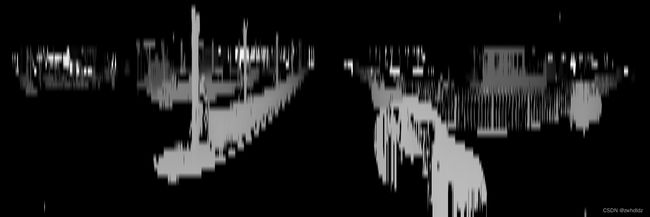
非地面点深度图投影
将非地面点云的位置映射为哈希表索引:index = row * 总列数 + col
  	// 将非地面点云投影到cv::Mat用于可视化,投影到哈希表方便索引
	for(int i = 0; i < cloudObstacle.points.size(); ++i){
		int col = cloudObstacle.points[i].pcaketnum;
		int row = 31 - cloudObstacle.points[i].ring;
		int imageindex = row * total_frame + col;
		if(!unordered_map_out.count(imageindex)){
			Range r;
			r.col = col;
			r.row = row;
			r.index = i;
			r.range = cloudObstacle.points[i].range;
			r.z = cloudObstacle.points[i].z;
			r.planerange = CalculateRangeXY(cloudObstacle.points[i]);
			unordered_map_out[imageindex] = r;
    			int color = scale - ((r.range - min_dis) / (max_dis - min_dis))*scale;
			image.at(row,col) = cv::Vec3b(color,color,color);

		} else{
		    std::cout<<"不可能打印"<(row,col) = cv::Vec3b(0,0,255);
	}*/
}
映射过程如下:
点云深度图投影
深度图分割:RangeSeg函数
利用宽度优先搜索(BFS)对非地面点的深度图进行遍历。因为点云水平稠密,垂直稀疏,所以邻域范围为左右2个单位,上下1个单位。
/**
 *
 * @param cloudIn 非地面点
 * @param cloudbreak 目测没用上
 * @param unordered_map_out [点在图像中顺序,点的range信息]
 * @return 非地面点的类索引
 */
std::vector RangeSeg(const pcl::PointCloud& cloudIn,
        pcl::PointCloud& cloudbreak,
        std::unordered_map &unordered_map_out){

	int direction[6][2] = {{0,1},{0,2},{0,-1},{0,-2},{-1,0},{1,0}};// 邻域方向:列方向两个单位邻域,行方向一个单位邻域

	int size = cloudIn.points.size();
	std::vector cluster_indices(size, -1);// 初始化所有非地面点类别-1

	float horizon_angle_resolution = 0.16 * PI / 180;
	float vertical_angle_resolution = 1.33 * PI / 180;

	int current_cluster = 0;// 标记当前类id

	int for_num = 0;
	float theta_thresh = 0.3 * PI / 180;
	float theta_thresh2 = 20 * PI / 180;
	int count = 0;

	for(int i =0 ; i< (total_frame * 32); ++i){

		if(!unordered_map_out.count(i))//该索引是地面点则跳过 为什么不直接遍历unordered_map_out或者cloudIn???
			continue;

		count++;

		int col = unordered_map_out[i].col;
		int row = unordered_map_out[i].row;
		if (cluster_indices[unordered_map_out[i].index] != -1)// 若该点已被标记,则跳过
			continue;

		/** 对未标记点,先考虑是否和邻域合并,确认无法合并则作为新类累加current_cluster (BFS)
		 * 如果是DFS则未标记点一定是新类
        **/

		float dorigin = unordered_map_out[i].range;

		int aaa = cluster_indices[unordered_map_out[i].index];
		for(int k = 0; k<4; ++k){
			int neighbor = (row + direction[k][0]) * total_frame + (col + direction[k][1]);
			if(!unordered_map_out.count(neighbor))//检查是否是非地面点
				continue;

			float dnei = unordered_map_out[neighbor].range;
            float dmax = (dorigin) * sin(360/(float)total_frame*PI/180)/sin(20*PI/180 -360/(float)total_frame*PI/180) + 3*0.15;

			if(fabs(dorigin - dnei) < dmax) {
				int oc = cluster_indices[unordered_map_out[i].index]; // original point's cluster
				int nc = cluster_indices[unordered_map_out[neighbor].index]; // neighbor point's cluster
				/**
				 * oc nc
				 * -1 -1 都未被标记
				 * -1 >0 中间未被标记,邻域被标记
				 * >0 -1 中间被标记,邻域未被标记
				 * >0 >0 都被标记
				 * 第一次邻域遍历oc一定等-1,则第一次要么是情况1要么是情况2;如果自己和6个邻域都是未标记,则新建类
				 */
				if (oc != -1 && nc != -1) //情况4
				{
					if (oc != nc)
						mergeClusters(cluster_indices, oc, nc);
				}
				else {
					if (nc != -1) //情况2,则被同化(注意之后自己就被标记了)
					{
						cluster_indices[unordered_map_out[i].index] = nc;
					}
					else if (oc != -1) //情况3,则同化邻域
					{
						cluster_indices[unordered_map_out[neighbor].index] = oc;
					}
				}
			}
		}

		for(int k = 4; k<6; ++k){
			int neighbor = (row + direction[k][0]) * total_frame + (col + direction[k][1]);
			if(!unordered_map_out.count(neighbor))
				continue;
			float dnei = unordered_map_out[neighbor].range;

                        float dmax = (dorigin) * sin(1.33*PI/180)/sin(40*PI/180 -1.33*PI/180) + 0.5;
			if(fabs(dnei-dorigin)
有效类提取:most_frequent_value函数
统计每一个类的点数量,数量足够多才认为该类有效。
/**
 *
 * @param values 分割结果:地面点云对应的类数组,位置为非地面索引,内容为类id
 * @param cluster_index 存在有效的类id
 * @return
 */
bool most_frequent_value(std::vector values, std::vector &cluster_index) {
	std::unordered_map histcounts;
	// 统计各类id的点数量
	for (int i = 0; i < values.size(); i++) {
		if (histcounts.find(values[i]) == histcounts.end()) {
			histcounts[values[i]] = 1;
		} else {
			histcounts[values[i]] += 1;
		}
	}

	int max = 0, maxi;
	std::vector> tr(histcounts.begin(), histcounts.end());//map2vector
	sort(tr.begin(), tr.end(), compare_cluster);//根据类数量升序
	// 保留数量的类
	for (int i = 0; i < tr.size(); ++i) {
		if (tr[i].second > 10) {
			cluster_index.push_back(tr[i].first);
		}
	}

	return true;
}
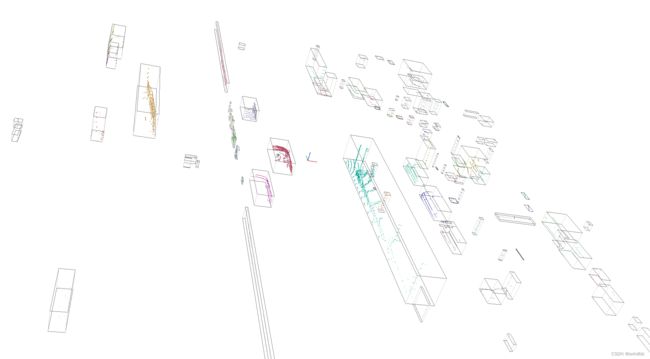
三、实验结果
四、注意事项
pcl::PointCloudpcl::PointXYZI::Ptr cloud(new pcl::PointCloudpcl::PointXYZI)
注意分配内存 即括号内的内容,否则运行时报野指针错误。智能指针的理解和实现方法可以参考共享指针。


