读源码(一)—— Android handler机制详解
文章目录
- 预备知识
- 导入
-
- Step1、从Looper.prepare()开始
- Step2、new Handler()
- Step3、Looper.loop()
-
- 一、从loop方法入口看大流程
- 二、最核心的MessageQueue的next方法
- 三、无限循环中阻塞的细节
- 四、补充问题
- Step4、handler.sendMessage()
- Step5、Looper.quit()
- Step Extra、MessageQueue postSyncBarrier
- 总结
预备知识
- Java的ThreadLocal,保存线程的“私有”数据,这个不贴参考链接了,比较easy;
- Linux的epoll机制,底层真正的消息处理机制,没有消息的时候阻塞不消耗cpu资源,非常复杂但是也非常有趣,参考:https://blog.csdn.net/shenya1314/article/details/73691088;
- 享元模式——Message复用,模板模式——hanlder的handleMessage方法;
- 单链表,队列等一些基础的数据结构,不过这里的队列本质还是个链表(Java库里的队列底层也是个链表),为什么是链表大家可以想一想。
导入
我们在子线程中使用handler的时候一般是这样的流程:
//初始化
new Thread(new Runnable() {
    Looper.prepare();
    Handler handler = new Handler() {
        @Override
        handleMessage(Message msg) {
            //do something
        }
    };
    Looper.loop();
}).start();

//发送消息
handler.sendMessage(Message.obtain());
补充一个大家都知道的就是主线程里不需要写Looper那两行代码,是因为ActivityThread的main方法里帮我们做了。具体可以去看代码,这里就不贴了。下面按照这个代码的流程来分析。重点都在代码注释里,关注中文的部分。
Step1、从Looper.prepare()开始
public static void prepare() {
    prepare(true);
}

//最终都会调用这个方法
private static void prepare(boolean quitAllowed) {
    if (sThreadLocal.get() != null) {
        throw new RuntimeException("Only one Looper may be created per thread");
    }
    //把当前线程关联的Looper丢进ThreadLocal
    sThreadLocal.set(new Looper(quitAllowed));
}

public static Looper myLooper() {
    return sThreadLocal.get();
}

public static void prepareMainLooper() {
    prepare(false);
    synchronized (Looper.class) {
        if (sMainLooper != null) {
            throw new IllegalStateException("The main Looper has already been prepared.");
        }
        sMainLooper = myLooper();
    }
}
Step2、new Handler()
//常用方式1
public Handler() {
    this(null, false);
}

public Handler(@Nullable Callback callback, boolean async) {
    ...省略

    //不传looper时默认获取当前线程的looper,所以子线程中如果不先调用Looper.prepare()就会报错
    mLooper = Looper.myLooper();
    if (mLooper == null) {
        throw new RuntimeException(
            "Can't create handler inside thread " + Thread.currentThread()
                    + " that has not called Looper.prepare()");
    }
    mQueue = mLooper.mQueue;
    mCallback = callback;
    mAsynchronous = async;
}

//常用方式2
public Handler(@NonNull Looper looper) {
    this(looper, null, false);
}

public Handler(@NonNull Looper looper, @Nullable Callback callback, boolean async) {
    mLooper = looper;
    mQueue = looper.mQueue;
    mCallback = callback;
    mAsynchronous = async;
}
Step3、Looper.loop()
一、从loop方法入口看大流程
- Looper的loop方法主要为以下三步:
- 调用MessageQueued的next方法取出一条消息,没有就阻塞,阻塞原理参考后面MessageQueue的原理;
- 有消息时取出消息中的target并回调dispatchMessage方法
- 消息处理完成后回收,Message中有个链表作为消息的缓存,防止消息大量被new浪费内存。
public static void loop() {
    final Looper me = myLooper();
    if (me == null) {
        throw new RuntimeException("No Looper; Looper.prepare() wasn't called on this thread.");
    }
    final MessageQueue queue = me.mQueue;

   	...省略

    //核心关注死循环的部分
    for (;;) {

        //最核心的代码,从MessageQueue中循环取出消息,无消息是阻塞在这里
        Message msg = queue.next(); // might block
        if (msg == null) {
            // No message indicates that the message queue is quitting.
            return;
        }

        ...省略
        try {
            //取出Message中的target对象也就是hanlder,回调其dispatchMessage方法,step4中会分析
            msg.target.dispatchMessage(msg);
            if (observer != null) {
                observer.messageDispatched(token, msg);
            }
            dispatchEnd = needEndTime ? SystemClock.uptimeMillis() : 0;
        } catch (Exception exception) {
            ...省略
        } finally {
            ...省略
        }
        ...省略

        //回收消息到链表中,具体参考Message中的源码
        msg.recycleUnchecked();
    }
}
二、最核心的MessageQueue的next方法
next方法的流程都写在注释里了,可以直接看,这里主要关心一个问题:主线程的死循环一直运行是不是特别消耗CPU资源呢? 其实不然,这里就涉及到Linux pipe/epoll机制,简单说就是在主线程的MessageQueue没有消息时,便阻塞在loop的queue.next()中的nativePollOnce()方法里,此时主线程会释放CPU资源进入休眠状态,直到下个消息到达或者有事务发生,通过往pipe管道写端写入数据来唤醒主线程工作。这里采用的epoll机制,是一种IO多路复用机制,可以同时监控多个描述符,当某个描述符就绪(读或写就绪),则立刻通知相应程序进行读或写操作,本质同步I/O,即读写是阻塞的。 所以说,主线程很多时候都是处于休眠状态,并不会消耗大量CPU资源。
Message next()

    .....//省略
    int pendingIdleHandlerCount = -1; // -1 only during first iteration
    // 1.如果nextPollTimeoutMillis=-1,一直阻塞不会超时。
    // 2.如果nextPollTimeoutMillis=0,不会阻塞,立即返回。
    // 3.如果nextPollTimeoutMillis>0,最长阻塞nextPollTimeoutMillis毫秒(超时)
    //   如果期间有程序唤醒会立即返回。
    int nextPollTimeoutMillis = 0;
    for (;;) {
        if (nextPollTimeoutMillis != 0) {
            Binder.flushPendingCommands();
        }
        //阻塞的核心方法,核心实现在native层,后面会讲
        nativePollOnce(ptr, nextPollTimeoutMillis);
        synchronized (this) {
            //获取系统开机到现在的时间
            final long now = SystemClock.uptimeMillis();
            Message prevMsg = null;
            Message msg = mMessages; //当前链表的头结点
            //如果target==null,那么它就是屏障,需要循环遍历,一直往后找到第一个异步的消息
            if (msg != null && msg.target == null) {
            // Stalled by a barrier.  Find the next asynchronous message in the queue.
                do {
                    prevMsg = msg;
                    msg = msg.next;
                } while (msg != null && !msg.isAsynchronous());
            }
            if (msg != null) {
                //如果有消息需要处理,先判断时间有没有到,如果没到的话设置一下阻塞时间,
                //场景如常用的postDelay
                if (now < msg.when) {
                   //计算出离执行时间还有多久赋值给nextPollTimeoutMillis,
                   //表示nativePollOnce方法要等待nextPollTimeoutMillis时长后返回
                    nextPollTimeoutMillis = (int) Math.min(msg.when - now, Integer.MAX_VALUE);
                } else {
                    // 获取到消息
                    mBlocked = false;
                   //链表操作,获取msg并且删除该节点
                    if (prevMsg != null)
                        prevMsg.next = msg.next;
                    } else {
                        mMessages = msg.next;
                    }
                    msg.next = null;
                    msg.markInUse();
                    //返回拿到的消息
                    return msg;
                }
            } else {
                //没有消息,nextPollTimeoutMillis复位
                nextPollTimeoutMillis = -1;
            }
            .....//省略

}
三、无限循环中阻塞的细节
这里再简单看下nativePollOnce方法的细节
static void android_os_MessageQueue_nativePollOnce(JNIEnv* env, jobject obj,
        jlong ptr, jint timeoutMillis) {
     //将java层传进来的mPtr再转换成对应的指针
    NativeMessageQueue* nativeMessageQueue = reinterpret_cast<NativeMessageQueue*>(ptr);
    nativeMessageQueue->pollOnce(env, obj, timeoutMillis);
}
void NativeMessageQueue::pollOnce(JNIEnv* env, jobject pollObj, int timeoutMillis) {
    mPollEnv = env;
    mPollObj = pollObj;
    mLooper->pollOnce(timeoutMillis);
    mPollObj = NULL;
    mPollEnv = NULL;

    if (mExceptionObj) {
        env->Throw(mExceptionObj);
        env->DeleteLocalRef(mExceptionObj);
        mExceptionObj = NULL;
    }
}
最终会调用到native中的Looper的pollOnce方法
int Looper::pollOnce(int timeoutMillis, int* outFd, int* outEvents, void** outData) {
    int result = 0;
    for (;;) {
        while (mResponseIndex < mResponses.size()) {
            const Response& response = mResponses.itemAt(mResponseIndex++);
            int ident = response.request.ident;
            if (ident >= 0) {
                int fd = response.request.fd;
                int events = response.events;
                void* data = response.request.data;
#if DEBUG_POLL_AND_WAKE
                ALOGD("%p ~ pollOnce - returning signalled identifier %d: "
                        "fd=%d, events=0x%x, data=%p",
                        this, ident, fd, events, data);
#endif
                if (outFd != NULL) *outFd = fd;
                if (outEvents != NULL) *outEvents = events;
                if (outData != NULL) *outData = data;
                return ident;
            }
        }

        if (result != 0) {
#if DEBUG_POLL_AND_WAKE
            ALOGD("%p ~ pollOnce - returning result %d", this, result);
#endif
            if (outFd != NULL) *outFd = 0;
            if (outEvents != NULL) *outEvents = 0;
            if (outData != NULL) *outData = NULL;
            return result;
        }

        result = pollInner(timeoutMillis);
    }
}
最终来到pollInner方法,这个方法非常复杂,但阻塞的核心就一个epoll_wait方法。
pollInner分为五步:
1是计算wait时间,
2是进行wait等待,
3是对wait返回值的判断,
4也是对wait返回值的判断但是是对事件触发返回的判断,
5是处理Looper和wait的事件。
//阻塞等待事件发生
int epoll_wait ( int epfd, struct epoll_event* events, int maxevents, int timeout );
epfd:create创建的epoll描述符
events:存放事件的数组
maxevents:最大可存放的事件个数,数组events的大小
timeout:超时时间,为0时立即返回,为-1时一直阻塞,否则等待timeout时间后返回

int epoll_create ( int size );//创建一个epoll监听
//对事件进行操作
int epoll_ctl ( int epfd, int op, int fd, struct epoll_event *event );
epfd:epoll描述符,由create创建的
op:具体操作
EPOLL_CTL_ADD:往事件表中注册fd上的事件
EPOLL_CTL_MOD:修改fd上的注册事件
EPOLL_CTL_DEL:删除fd上的注册事件
fd:要注册观察的文件描述符,可以是具体的文件,socket,管道等
event:具体要检测的事件
EPOLLIN:有数据流入,即文件非空
EPOLLOUT:有数据可以写入,即文件非满
epoll是Linux内核为处理大批量文件描述符而作了改进的poll,是Linux下多路复用IO接口select/poll的增强版本,它能显著提高程序在大量并发连接中只有少量活跃的情况下的系统CPU利用率。简单点说或者说根据本文意图来解释的话就是:epoll是linux下的方法,会阻塞线程直到有事件通知。
那么这里就要简单说明一下epoll了,首先epoll会监听一些文件描述符,然后给这些文件描述添加一些事件,这样当线程访问的时候就会阻塞,然后待这些文件描述符发生添加的事件的时候就会唤醒。
更详细的可以看:https://blog.csdn.net/zip_tts/article/details/86097136
四、补充问题
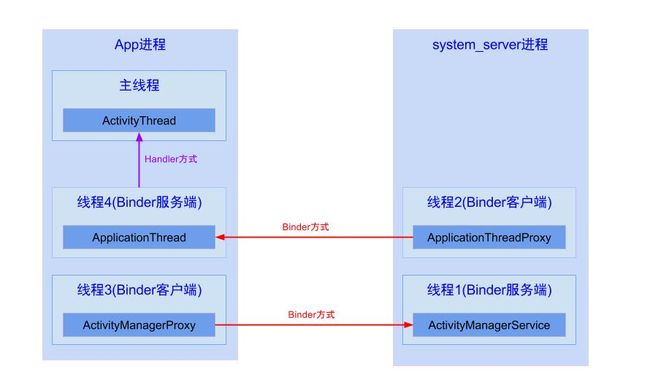
Activity的生命周期是怎么实现在死循环体外能够执行起来的?
ActivityThread的内部类H继承于Handler,通过handler消息机制,简单说Handler机制用于同一个进程的线程间通信。
Activity的生命周期都是依靠主线程的Looper.loop,当收到不同Message时则采用相应措施:
在H.handleMessage(msg)方法中,根据接收到不同的msg,执行相应的生命周期。
比如收到msg=H.LAUNCH_ACTIVITY,则调用ActivityThread.handleLaunchActivity()方法,最终会通过反射机制,创建Activity实例,然后再执行Activity.onCreate()等方法;
再比如收到msg=H.PAUSE_ACTIVITY,则调用ActivityThread.handlePauseActivity()方法,最终会执行Activity.onPause()等方法。 上述过程,我只挑核心逻辑讲,真正该过程远比这复杂。
主线程的消息又是哪来的呢?当然是App进程中的其他线程通过Handler发送给主线程,例如:
Step4、handler.sendMessage()
好了,花那么多篇幅分析Looper和MessageQueue是怎么运作的,下面handler要来真正使用这套体系了。从我们最常用的sendMessage开始,最终都会调用到enqueueMessage方法中。
public final boolean sendMessage(@NonNull Message msg) {
   return sendMessageDelayed(msg, 0);
}
public final boolean sendMessageDelayed(@NonNull Message msg, long delayMillis) {
    if (delayMillis < 0) {
        delayMillis = 0;
    }
    return sendMessageAtTime(msg, SystemClock.uptimeMillis() + delayMillis);
}
public boolean sendMessageAtTime(@NonNull Message msg, long uptimeMillis) {
    MessageQueue queue = mQueue;
    if (queue == null) {
        RuntimeException e = new RuntimeException(
                this + " sendMessageAtTime() called with no mQueue");
        Log.w("Looper", e.getMessage(), e);
        return false;
    }
    return enqueueMessage(queue, msg, uptimeMillis);
}
private boolean enqueueMessage(@NonNull MessageQueue queue, @NonNull Message msg,
        long uptimeMillis) {
    //enqueue的时候,默认给message都加上了target
    msg.target = this;
    msg.workSourceUid = ThreadLocalWorkSource.getUid();

    if (mAsynchronous) {
        msg.setAsynchronous(true);
    }
    return queue.enqueueMessage(msg, uptimeMillis);
}
boolean enqueueMessage(Message msg, long when) {
    if (msg.target == null) {
        throw new IllegalArgumentException("Message must have a target.");
    }
    if (msg.isInUse()) {
        throw new IllegalStateException(msg + " This message is already in use.");
    }

    synchronized (this) {
        if (mQuitting) {
            IllegalStateException e = new IllegalStateException(
                    msg.target + " sending message to a Handler on a dead thread");
            Log.w(TAG, e.getMessage(), e);
            msg.recycle();
            return false;
        }

        msg.markInUse();
        msg.when = when;
        Message p = mMessages;
        boolean needWake;
        if (p == null || when == 0 || when < p.when) {
            // New head, wake up the event queue if blocked.
            //此处是将msg插入到链表头,因为p == null说明当前链表为空或者当前消息的when最小
            msg.next = p;
            mMessages = msg;
            needWake = mBlocked;
        } else {
            // Inserted within the middle of the queue.  Usually we don't have to wake
            // up the event queue unless there is a barrier at the head of the queue
            // and the message is the earliest asynchronous message in the queue.
            //prev指向前一个节点,p指向后一个节点,最终把消息插入到链表尾部
            needWake = mBlocked && p.target == null && msg.isAsynchronous();
            Message prev;
            for (;;) {
                prev = p;
                p = p.next;
                if (p == null || when < p.when) {
                    break;
                }
                if (needWake && p.isAsynchronous()) {
                    needWake = false;
                }
            }
            msg.next = p; // invariant: p == prev.next
            prev.next = msg;
        }

        // We can assume mPtr != 0 because mQuitting is false.
        if (needWake) {
            nativeWake(mPtr);
        }
    }
    return true;
}
核心代码的含义都在注释里,就是一个基础的链表入队操作,出队操作在前面next方法中已经分析过了,这里不再赘述。下面看出队后的那行还没分析的代码:
msg.target.dispatchMessage(msg);
前面已经知道,target就是handler,所以hanlder里看下源码
if (msg.callback != null) {
    handleCallback(msg);
} else {
    if (mCallback != null) {
        if (mCallback.handleMessage(msg)) {
            return;
        }
    }
    handleMessage(msg);
}
这里的优先级很清晰,先看msg自己有没有callback,再看handler的mCallback有没有,都没有就回调我们最常用的复写的handler的handleMessage方法。非常明确的模板模式。
最后看下前面说的在一次Looper.loop循环的最后,Message防止浪费内存的代码:
msg.recycleUnchecked();
void recycleUnchecked() {
    // Mark the message as in use while it remains in the recycled object pool.
    // Clear out all other details.
    flags = FLAG_IN_USE;
    what = 0;
    arg1 = 0;
    arg2 = 0;
    obj = null;
    replyTo = null;
    sendingUid = UID_NONE;
    workSourceUid = UID_NONE;
    when = 0;
    target = null;
    callback = null;
    data = null;

    synchronized (sPoolSync) {
        if (sPoolSize < MAX_POOL_SIZE) {
            next = sPool;
            sPool = this;
            sPoolSize++;
        }
    }
}
把当前的msg中的数据全部reset后放到链表头上,那什么时候取的呢?
/**
 * Return a new Message instance from the global pool. Allows us to
 * avoid allocating new objects in many cases.
 */
public static Message obtain() {
    synchronized (sPoolSync) {
        if (sPool != null) {
            Message m = sPool;
            sPool = m.next;
            m.next = null;
            m.flags = 0; // clear in-use flag
            sPoolSize--;
            return m;
        }
    }
    return new Message();
}

/** Constructor (but the preferred way to get a Message is to call {@link #obtain() Message.obtain()}).
*/
public Message() {
}
看官方注释写的很清楚了,其实就是个链表的头的出队操作,所以官方不建议大家直接new Message()而是使用obtain方法。
Step5、Looper.quit()
一般只在子线程中使用handler时使用,主线程调用会直接抛异常的。
public void quit() {
    mQueue.quit(false);
}
最终还是调用messageQueue的quit方法
void quit(boolean safe) {
	//Looper.prepareMainLoop()方法这里会把mQuitAllowed设置为false,所以主线程调用quit一定会直接崩溃
    if (!mQuitAllowed) {
        throw new IllegalStateException("Main thread not allowed to quit.");
    }

    synchronized (this) {
        if (mQuitting) {
            return;
        }
        mQuitting = true;

        if (safe) {
            removeAllFutureMessagesLocked();
        } else {
            removeAllMessagesLocked();
        }

        // We can assume mPtr != 0 because mQuitting was previously false.
        nativeWake(mPtr);
    }
}
quit方法的执行一共分成5步:
第1步:判断是否允许退出,因为在构造MessageQueue对象的时候传入了一个boolean参数,来表示该MessageQueue是否允许退出。而这个boolean参数在Looper里面设置,Loooper.prepare()方法里面是true,在Looper.prepareMainLooper()是false,由此可见我们知道:主线程的MessageQueue是不能退出。其他工作线程的MessageQueue是可以退出的。
第2步:加上同步锁
第3步:主要防止重复退出,加入一个mQuitting变量表示是否退出
第4步:如果该方法的变量safe为true,则删除以当前时间为分界线,删除未来的所有消息,如果该方法的变量safe为false,则删除当前消息队列的所有消息。
第5步:调用nativeWake函数,以触发nativePollOnce函数,结束等待。
Step Extra、MessageQueue postSyncBarrier
前面的分析我们知道了,队列的顺序基本取决于when的先后,有时候某些消息需要高优处理,就要使用Barrier机制。
private int postSyncBarrier(long when) {
    // Enqueue a new sync barrier token.
    // We don't need to wake the queue because the purpose of a barrier is to stall it.
    synchronized (this) {
        final int token = mNextBarrierToken++;
        final Message msg = Message.obtain();
        msg.markInUse();
        msg.when = when;
        msg.arg1 = token;

        Message prev = null;
        Message p = mMessages;
        if (when != 0) {
            while (p != null && p.when <= when) {
                prev = p;
                p = p.next;
            }
        }
        if (prev != null) { // invariant: p == prev.next
            msg.next = p;
            prev.next = msg;
        } else {
            msg.next = p;
            mMessages = msg;
        }
        return token;
    }
}
postSyncBarrier方法就是用来插入一个屏障到消息队列的,分析如下:
1、屏障消息和普通消息的区别在于屏障没有tartget,普通消息有target是因为它需要将消息分发给对应的target,而屏障不需要被分发,它就是用来挡住普通消息来保证异步消息优先处理的。
2、屏障和普通消息一样可以根据时间来插入到消息队列中的适当位置,并且只会挡住它后面的同步消息的分发。
3、postSyncBarrier返回一个int类型的数值,通过这个数值可以撤销屏障。
4、postSyncBarrier方法是私有的,如果我们想调用它就得使用反射。
5、插入普通消息会唤醒消息队列,但是插入屏障不会。
下面看下next里对barrier消息的处理:
if (msg != null && msg.target == null) {
    // Stalled by a barrier.  Find the next asynchronous message in the queue.
    do {
        prevMsg = msg;
        msg = msg.next;
    } while (msg != null && !msg.isAsynchronous());
}
很明显,next方法中在发现屏障之后,会过滤掉屏障之后的所有同步消息,优先去处理后面的异步消息,在移除之前会一直只处理异步消息,不会处理同步消息。
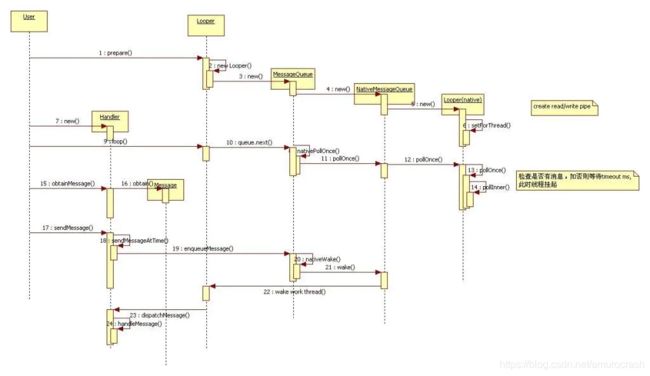
总结
贴一张时序图来结尾吧。
其实只要涉及到操作系统界面,基本都是这套玩法,比如iOS的runloop,学有余力的同学可以看看这篇:
https://blog.ibireme.com/2015/05/18/runloop/
还没学够的,再去看浏览器的eventLoop~
https://segmentfault.com/a/1190000018181334