JDBC详解及使用(含JDBCTemplate)
JDBC总结
一、概念
JDBC(Java DataBase Connectivity )
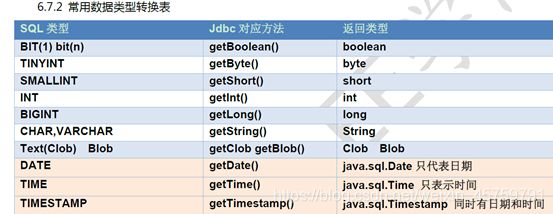
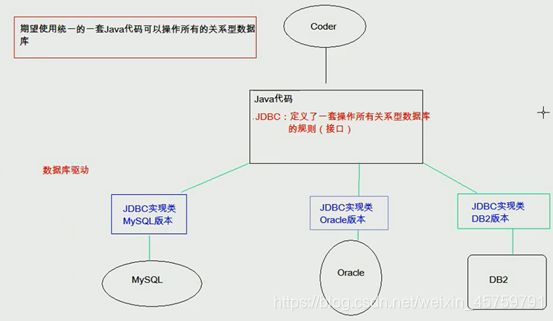
JDBC本质:其实是官方(sun公司)定义的一套操作所有关系型数据库的规则,即接口。各个数据库厂商去实现这套接口,提供数据库驱动jar包。我们可以使用这套接口(JDBC)编程,真正执行的代码是驱动jar包中的实现类。它是可以执行SQL语句的Java API
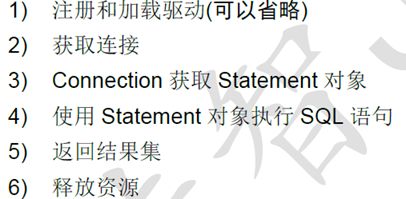
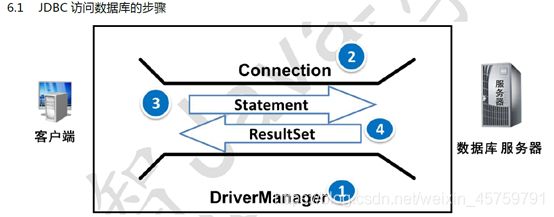
Java使用JDBC访问数据库的步骤:
- 1、得到数据库驱动程序
- 2、创建数据库连接
- 3、执行SQL语句
- 4、得到结果集
- 5、对结果集做相应的处理(增、删、改、查)
- 6、关闭资源:这里释放的是DB中的资源
一个小例子:
package cn.itcast.jdbc;

import java.sql.Connection;
import java.sql.DriverManager;
import java.sql.SQLException;
import java.sql.Statement;

public class JdbcDemo1 {
  public static void main(String[] args) throws SQLException {
    //1. 导入驱动jar包
    //2.注册驱动
    //Class.forName("com.mysql.jdbc.Driver");
//mysql5之后的驱动jar包可以省略注册驱动的步骤。

    //3.获取数据库连接对象
    Connection conn = DriverManager.getConnection("jdbc:mysql://localhost:3306/db3", "root", "root");
    //Connection conn = DriverManager.getConnection("jdbc:mysql:///db3", "root", "root");
/*如果连接的是本机mysql服务器,并且mysql服务默认端口是3306,则url可以简写为:jdbc:mysql:///数据库名称*/

    //4.定义sql语句
    String sql = "update account set balance = 2000 where id = 1";
    //5.获取执行sql的对象 Statement
    Statement stmt = conn.createStatement();
    //6.执行sql
    int count = stmt.executeUpdate(sql);
    //7.处理结果
    System.out.println(count);
    //8.释放资源
    stmt.close();
    conn.close();

  }
}
执行后 没有报错
回到SQLyog查询表account
发现变了

二、各个类详解
1、DriverManager
DriverManager:驱动管理对象
-
JDBC的DriverManager是一个工厂类,我们通过它来创建数据库连接。
-
当JDBC的Driver类被加载进来时,它会自己注册到DriverManager类里面
-
然后我们会把数据库配置信息传成DriverManager.getConnection()方法,DriverManager会使用注册到它里面的驱动来获取数据库连接,并返回给调用的程序。
* 功能:
- 注册驱动:告诉程序该使用哪一个数据库驱动jar
static void registerDriver(Driver driver) :注册与给定的驱动程序 DriverManager 。
写代码使用: Class.forName(“com.mysql.jdbc.Driver”);
通过查看源码发现:在com.mysql.jdbc.Driver类中存在静态代码块
- 注册驱动:告诉程序该使用哪一个数据库驱动jar
  static {
          try {
           java.sql.DriverManager.registerDriver(new Driver());
         } catch (SQLException E) {
           throw new RuntimeException("Can't register driver!");
         }
        }
注意:mysql5之后的驱动jar包可以省略注册驱动的步骤。
2. 获取数据库连接:
* 方法:static Connection getConnection(String url, String user, String password)
* 语法:jdbc:mysql://ip地址(域名):端口号/数据库名称
* 例子:jdbc:mysql://localhost:3306/db3
* 细节:如果连接的是本机mysql服务器,并且mysql服务默认端口是3306,则url可以简写为:jdbc:mysql:///数据库名称
2)user:用户名
3)password:密码
2、Connection
功能:
- 获取执行sql 的对象
* Statement createStatement():创建一条SQL语句对象
* PreparedStatement prepareStatement(String sql) 指定预编译的SQL语句,SQL语句中使用占位符?创建一个语句对象 - 管理事务:
* 开启事务:setAutoCommit(boolean autoCommit) :调用该方法设置参数为false,即开启事务
* 提交事务:commit()
* 回滚事务:rollback()
3、Statement
Statement:执行sql的对象
作用:代表一条语句对象,用于发送QSL语句给服务器,用于执行静态SQL语句并返回他所生成结果的对象
- boolean execute(String sql) :(了解)
可用于执行任何SQL语句,返回一个boolean值,表明执行该SQL语句是否返回了ResultSet。如果执行后第一个结果是ResultSet,则返回true,否则返回false。但它执行SQL语句时比较麻烦,通常我们没有必要使用execute方法来执行SQL语句,而是使用executeQuery或executeUpdate更适合,但如果在不清楚SQL语句的类型时则只能使用execute方法来执行该SQL语句了。我们可以通过它的getResultSet方法来获取ResultSet,或者通过getUpdateCount()方法来获取更新的记录条数。
2. int executeUpdate(String sql) :
执行DML(insert、update、delete)语句、DDL(create,alter、drop)语句
如果是DML语句,就是返回更新的次数,如果是DDl语句就返回0
-
ResultSet executeQuery(String sql) :
执行DQL(select)语句
Select语句几乎是使用最多的SQL语句,但也只能执行查询语句,执行后返回代表查询结果的ResultSet对象。
即使查询不到记录返回的ResultSet也不会为null。我们通常使用executeQuery来执行查询语句,这样的话如果传进来的是insert或者update语句的话,它会抛出错误信息为 “executeQuery method can not be used for update”的java.util.SQLException。
只有当你不确定是什么语句的时候才应该使用execute()方法,否则应该使用executeQuery或者executeUpdate方法
4、ResultSet
ResultSet:结果集对象,封装查询结果,对结果集进行遍历,取出每一行记录


getXxx(参数):获取数据
Xxx:代表数据类型 如: int getInt() , String getString()
参数:
1、int:代表列的编号,从1开始 如: getString(1)获取第一列的值
2、String:代表列名称。 如: getDouble(“balance”)获取balance这一列的值
使用步骤:
1. 游标向下移动一行
2. 判断是否有数据
3. 获取数据
例:
package cn.itcast.jdbc;

import java.sql.*;

/**
 * 执行DDL语句
 */
public class JDBCDemo7 {
    public static void main(String[] args) {
        Connection conn = null;
        Statement stmt = null;
        ResultSet rs = null;
        try {
            //1. 注册驱动
            Class.forName("com.mysql.jdbc.Driver");
            //2.获取连接对象
            conn = DriverManager.getConnection("jdbc:mysql:///db3", "root", "root");
            //3.定义sql
            String sql  = "select * from account";
            //4.获取执行sql对象
            stmt = conn.createStatement();
            //5.执行sql
            rs = stmt.executeQuery(sql);
            //6.处理结果
            //循环判断游标是否是最后一行末尾。
            while(rs.next()){

                //获取数据
                //6.2 获取数据
                int id = rs.getInt(1);
                String name = rs.getString("name");
                double balance = rs.getDouble(3);

                System.out.println(id + "---" + name + "---" + balance);
            }
        } catch (ClassNotFoundException e) {
            e.printStackTrace();
        } catch (SQLException e) {
            e.printStackTrace();
        } finally {
            //7.释放资源

            if(rs != null){
                try {
                    rs.close();
                } catch (SQLException e) {
                    e.printStackTrace();
                }
            }

            if(stmt != null){
                try {
                    stmt.close();
                } catch (SQLException e) {
                    e.printStackTrace();
                }
            }

            if(conn != null){
                try {
                    conn.close();
                } catch (SQLException e) {
                    e.printStackTrace();
                }
            }
        }
    }

}
5、PreparedStatement
PreparedStatement对象继承Statement对象,它比Statement对象更强大,使用起来更简单
- Statement对象编译SQL语句时,如果SQL语句有变量,就需要使用分隔符来隔开,如果变量非常多,就会使SQL变得非常复杂。PreparedStatement可以使用占位符,简化sql的编写
- Statement会频繁编译SQL。PreparedStatement可对SQL进行预编译,提高效率,预编译的SQL存储在PreparedStatement对象中
- PreparedStatement防止SQL注入。【Statement通过分隔符’++’,编写永等式,可以不需要密码就进入数据库】


PreparedStatement:执行sql的对象
   1. SQL注入问题:在拼接sql时,有一些sql的特殊关键字参与字符串的拼接。会造成安全性问题
      1. 输入用户随便,输入密码:a' or 'a' = 'a
      2. sql:select * from user where username = 'fhdsjkf' and password = 'a' or 'a' = 'a'

   2. 解决sql注入问题:使用PreparedStatement对象来解决
   3. 预编译的SQL:参数使用?作为占位符
   4. 步骤:
      1. 导入驱动jar包 mysql-connector-java-5.1.37-bin.jar
      2. 注册驱动
      3. 获取数据库连接对象 Connection
      4. 定义sql
         * 注意:sql的参数使用?作为占位符。 如:select * from user where username = ? and password = ?;
      5. 获取执行sql语句的对象 PreparedStatement  Connection.prepareStatement(String sql)
      6. 给?赋值:
         * 方法: setXxx(参数1,参数2)
            * 参数1:?的位置编号 从1 开始
            * 参数2:?的值
      7. 执行sql,接受返回结果,不需要传递sql语句
      8. 处理结果
      9. 释放资源

   5. 注意:后期都会使用PreparedStatement来完成增删改查的所有操作
      1. 可以防止SQL注入
      2. 效率更高
例:
package cn.itcast.jdbc;

import cn.itcast.util.JDBCUtils;

import java.sql.*;
import java.util.Scanner;

/**
 * 练习:
 *    * 需求:
 *     1. 通过键盘录入用户名和密码
 *     2. 判断用户是否登录成功
 */
public class JDBCDemo9 {

    public static void main(String[] args) {
        //1.键盘录入,接受用户名和密码
        Scanner sc = new Scanner(System.in);
        System.out.println("请输入用户名:");
        String username = sc.nextLine();
        System.out.println("请输入密码:");
        String password = sc.nextLine();
        //2.调用方法
        boolean flag = new JDBCDemo9().login2(username, password);
        //3.判断结果,输出不同语句
        if(flag){
            //登录成功
            System.out.println("登录成功!");
        }else{
            System.out.println("用户名或密码错误!");
        }


    }


    /**
     * 登录方法
     */
    public boolean login(String username ,String password){
        if(username == null || password == null){
            return false;
        }
        //连接数据库判断是否登录成功
        Connection conn = null;
        Statement stmt =  null;
        ResultSet rs = null;
        //1.获取连接
        try {
            conn =  JDBCUtils.getConnection();
            //2.定义sql
            String sql = "select * from user where username = '"+username+"' and password = '"+password+"' ";
            System.out.println(sql);
            //3.获取执行sql的对象
            stmt = conn.createStatement();
            //4.执行查询
            rs = stmt.executeQuery(sql);
            //5.判断
           /* if(rs.next()){//如果有下一行,则返回true
                return true;
            }else{
                return false;
            }*/
           return rs.next();//如果有下一行,则返回true

        } catch (SQLException e) {
            e.printStackTrace();
        }finally {
            JDBCUtils.close(rs,stmt,conn);
        }


        return false;
    }

    /**
     * 登录方法,使用PreparedStatement实现
     */
    public boolean login2(String username ,String password){
        if(username == null || password == null){
            return false;
        }
        //连接数据库判断是否登录成功
        Connection conn = null;
        PreparedStatement pstmt =  null;
        ResultSet rs = null;
        //1.获取连接
        try {
            conn =  JDBCUtils.getConnection();
            //2.定义sql
            String sql = "select * from user where username = ? and password = ?";
            //3.获取执行sql的对象
            pstmt = conn.prepareStatement(sql);
            //给?赋值
            pstmt.setString(1,username);
            pstmt.setString(2,password);
            //4.执行查询,不需要传递sql
            rs = pstmt.executeQuery();
            //5.判断
           /* if(rs.next()){//如果有下一行,则返回true
                return true;
            }else{
                return false;
            }*/
            return rs.next();//如果有下一行,则返回true
   			 } catch (SQLException e) {
           		 e.printStackTrace();
     		     }finally {
                JDBCUtils.close(rs,pstmt,conn);
        }
        return false;
    }


}
防止sql注入成功
6、批量处理sql语句
当需要向数据库发送一批SQL语句执行时,应避免向数据库一条条发送执行,采用批处理以提升执行效率
批处理有两种方式:
- Statement
- PreparedStatement
通过executeBath()方法批量处理执行SQL语句,返回一个int[]数组,该数组代表各句SQL的返回值
1)Statement方式实现
  /*
        * Statement执行批处理
        *
        * 优点:
        *       可以向数据库发送不同的SQL语句
        * 缺点:
        *       SQL没有预编译
        *       仅参数不同的SQL,需要重复写多条SQL
        * */
        Connection connection = JDBCUtils.getConnection();

        Statement statement = connection.createStatement();
        String sql1 = "UPDATE users SET name='zhongfucheng' WHERE id='3'";
        String sql2 = "INSERT INTO users (id, name, password, email, birthday)" +
                " VALUES('5','nihao','123','[email protected]','1995-12-1')";

        //将sql添加到批处理
        statement.addBatch(sql1);
        statement.addBatch(sql2);

        //执行批处理
        statement.executeBatch();

        //清空批处理的sql
        statement.clearBatch();

        JDBCUtils.release(connection, statement, null);
2)PreparedStatement方式实现
 /*
        * PreparedStatement批处理
        *   优点:
        *       SQL语句预编译了
        *       对于同一种类型的SQL语句,不用编写很多条
        *   缺点:
        *       不能发送不同类型的SQL语句
        * */
        Connection connection = JDBCUtils.getConnection();

        String sql = "INSERT INTO test(id,name) VALUES (?,?)";
        PreparedStatement preparedStatement = connection.prepareStatement(sql);

        for (int i = 1; i <= 205; i++) {
            preparedStatement.setInt(1, i);
            preparedStatement.setString(2, (i + "zhongfucheng"));

            //添加到批处理中
            preparedStatement.addBatch();

            if (i %2 ==100) {
                //执行批处理
                preparedStatement.executeBatch();
                //清空批处理【如果数据量太大,所有数据存入批处理,内存肯定溢出】
                preparedStatement.clearBatch();
            }

        }
        //不是所有的%2==100,剩下的再执行一次批处理
        preparedStatement.executeBatch();

        //再清空
        preparedStatement.clearBatch();

        JDBCUtils.release(connection, preparedStatement, null);
三、抽取JDBC工具类(JDBCUtils)
1、代码实现
jdbc.properties
url=jdbc:mysql:///db3
user=root
password=root
driver=com.mysql.jdbc.Driver
JDBCUtils
package cn.itcast.util;

import java.io.FileReader;
import java.io.IOException;
import java.net.URL;
import java.sql.*;
import java.util.Properties;

/**
 * JDBC工具类
 */
public class JDBCUtils {
    //声明静态成员变量 只要静态成员变量才能被静态代码块和静态方法访问
    private static String url;
    private static String user;
    private static String password;
    private static String driver;
    /**
     * 文件的读取,只需要读取一次即可拿到这些值。使用静态代码块(随着类的加载而加载)
     */
    static{
        //读取资源文件,获取值。

        try {
            //1. 创建Properties集合类。
            Properties pro = new Properties();

            //获取src路径下的文件的方式--->ClassLoader 类加载器
            ClassLoader classLoader = JDBCUtils.class.getClassLoader();
            URL res  = classLoader.getResource("jdbc.properties");//获得绝对路径
            String path = res.getPath();//获得字符串路径
           // System.out.println(path);///D:/IdeaProjects/itcast/out/production/day04_jdbc/jdbc.properties
            //2. 加载文件
           // pro.load(new FileReader("D:\\IdeaProjects\\itcast\\day04_jdbc\\src\\jdbc.properties"));
            pro.load(new FileReader(path));

            //3. 获取数据,赋值
            url = pro.getProperty("url");
            user = pro.getProperty("user");
            password = pro.getProperty("password");
            driver = pro.getProperty("driver");
            //4. 注册驱动
            Class.forName(driver);
        } catch (IOException e) {
            e.printStackTrace();
        } catch (ClassNotFoundException e) {
            e.printStackTrace();
        }
    }


    /**
     * 获取连接
     * @return 连接对象
     */
    public static Connection getConnection() throws SQLException {

        return DriverManager.getConnection(url, user, password);
    }

    /**
     * 释放资源
     * @param stmt
     * @param conn
     */
    public static void close(Statement stmt,Connection conn){
        //释放不能放在同一个try catch中,因为只要有一个关闭失败就会执行catch,而不会执行接下来的关闭,导致内存浪费
        if( stmt != null){
            try {
                stmt.close();
            } catch (SQLException e) {
                e.printStackTrace();
            }
        }

        if( conn != null){
            try {
                conn.close();
            } catch (SQLException e) {
                e.printStackTrace();
            }
        }
    }


    /**
     * 释放资源重载 有时会有释放ResultSet
     * @param stmt
     * @param conn
     */
    public static void close(ResultSet rs,Statement stmt, Connection conn){

        if( rs != null){
            try {
                rs.close();
            } catch (SQLException e) {
                e.printStackTrace();
            }
        }

        if( stmt != null){
            try {
                stmt.close();
            } catch (SQLException e) {
                e.printStackTrace();
            }
        }

        if( conn != null){
            try {
                conn.close();
            } catch (SQLException e) {
                e.printStackTrace();
            }
        }
    }

}
2、练习使用
需求:
通过键盘录入用户名和密码
判断用户是否登录成功
* select * from user where username = “” and password = “”;
* 如果这个sql有查询结果,则成功,反之,则失败
创建数据库表 user
CREATE TABLE USER(
id INT PRIMARY KEY AUTO_INCREMENT,
username VARCHAR(32),
PASSWORD VARCHAR(32)
);
INSERT INTO USER VALUES(NULL,‘zhangsan’,‘123’);
INSERT INTO USER VALUES(NULL,‘lisi’,‘234’);
package cn.itcast.jdbc;


import cn.itcast.utils.JDBCUtils;
import java.sql.*;
import java.util.Scanner;

public class JDBCDemo9 {
  public static void main(String[] args) {
    //1.键盘录入,接受用户名和密码
    Scanner sc = new Scanner(System.in);
    System.out.println("请输入用户名:");
    String username = sc.nextLine();
    System.out.println("请输入密码:");
    String password = sc.nextLine();
    //2.调用方法
    boolean flag = new JDBCDemo9().login2(username, password);
    //3.判断结果,输出不同语句
    if(flag){
      //登录成功
      System.out.println("登录成功!");
    }else{
      System.out.println("用户名或密码错误!");
    }
  }
  /**
   * 登录方法
   */
  public boolean login(String username ,String password){
    if(username == null || password == null){
      return false;
    }
    //连接数据库判断是否登录成功
    Connection conn = null;
    Statement stmt =  null;
    ResultSet rs = null;
    //1.获取连接
    try {
      conn =  JDBCUtils.getConnection();
      //2.定义sql
      String sql = "select * from user where username = '"+username+"' and password = '"+password+"' ";
      System.out.println(sql);
      //3.获取执行sql的对象
      stmt = conn.createStatement();
      //4.执行查询
      rs = stmt.executeQuery(sql);
      //5.判断
           /* if(rs.next()){//如果有下一行,则返回true
                return true;
            }else{
                return false;
            }*/
      return rs.next();//如果有下一行,则返回true
//直接返回rs.next()因为他本是就是true 或false

    } catch (SQLException e) {
      e.printStackTrace();
    }finally {
      JDBCUtils.close(rs,stmt,conn);
    }


    return false;
  }

  /**
   * 登录方法,使用PreparedStatement实现
   */
  public boolean login2(String username ,String password){
    if(username == null || password == null){
      return false;
    }
    //连接数据库判断是否登录成功
    Connection conn = null;
    PreparedStatement pstmt =  null;
    ResultSet rs = null;
    //1.获取连接
    try {
      conn =  JDBCUtils.getConnection();
      //2.定义sql
      String sql = "select * from user where username = ? and password = ?";
      //3.获取执行sql的对象
      pstmt = conn.prepareStatement(sql);
      //给?赋值
      pstmt.setString(1,username);
      pstmt.setString(2,password);
      //4.执行查询,不需要传递sql
      rs = pstmt.executeQuery();
      //5.判断
           /* if(rs.next()){//如果有下一行,则返回true
                return true;
            }else{
                return false;
            }*/
      return rs.next();//如果有下一行,则返回true

    } catch (SQLException e) {
      e.printStackTrace();
    }finally {
     JDBCUtils.close(rs,pstmt,conn);
    }


    return false;
  }
}
四、JDBC事务管理
1、概述
- 事务:一个包含多个步骤的业务操作。如果这个业务操作被事务管理,则这多个步骤要么同时成功,要么同时失败。
- 操作:
- 开启事务
- 提交事务
- 回滚事务
- 使用Connection对象来管理事务
- 开启事务:setAutoCommit(boolean autoCommit) :调用该方法设置参数为false,即开启事务
- 在执行sql之前开启事务
- 提交事务:commit()
- 当所有sql都执行完提交事务
- 回滚事务:rollback()
- 在catch中回滚事务
- 开启事务:setAutoCommit(boolean autoCommit) :调用该方法设置参数为false,即开启事务
2、转账案例
package cn.itcast.jdbc;

import java.sql.Connection;
import java.sql.DriverManager;
import java.sql.PreparedStatement;
import java.sql.SQLException;

/*事务操作*/
public class JDBCDemo10 {
  public static void main(String[] args) throws SQLException {
    Connection conn=null;
    PreparedStatement pstmt1=null;
    PreparedStatement pstmt2=null;


    try {
      //1、获取连接
      conn = DriverManager.getConnection("jdbc:mysql:///db3", "root", "root");
      //2. 定义sql
      //2.1张三-500
      //String sql = "update account set balance =balance-500 where id=1";
      String sql1 = "update account set balance =balance-? where id=?";
      //2.2李四+500
      String sql2 = "update account set balance =balance+? where id=?";
      //3.获取执行sql的对象 Statement
      pstmt1 = conn.prepareStatement(sql1);
      pstmt2 = conn.prepareStatement(sql2);
      //4.设置参数
      //张三-500
      pstmt1.setDouble(1,500);//第一个参数1代表我正在给第1个?赋值 第二个参数500代表?处的赋值为500(balance)
      pstmt1.setInt(2,1);//第一个参数2代表我正在给第2个?赋值 第二个参数500代表?处的赋值为1(id)
      //李四+500
      pstmt2.setDouble(1,500);
      pstmt2.setInt(2,2);
      //5、执行SQL
      pstmt1.executeUpdate();
      pstmt2.executeUpdate();
    } catch (SQLException e) {
      e.printStackTrace();
    }finally {
      pstmt1.close();
      pstmt2.close();
      conn.close();
    }


  }
}
成功修改
手动制造异常:
 pstmt1.executeUpdate();
      //手动制造异常
 int i=3/0;
 pstmt2.executeUpdate();
张三成功-500
李四没有变
解决:事务管理
package cn.itcast.jdbc;

import java.sql.Connection;
import java.sql.DriverManager;
import java.sql.PreparedStatement;
import java.sql.SQLException;

/*事务操作*/
public class JDBCDemo10 {
  public static void main(String[] args) throws SQLException {
    Connection conn=null;
    PreparedStatement pstmt1=null;
    PreparedStatement pstmt2=null;


    try {
      //1、获取连接
      conn = DriverManager.getConnection("jdbc:mysql:///db3", "root", "root");
      //开启事务
      conn.setAutoCommit(false);
      //2. 定义sql
      //2.1张三-500
      //String sql = "update account set balance =balance-500 where id=1";
      String sql1 = "update account set balance =balance-? where id=?";
      //2.2李四+500
      String sql2 = "update account set balance =balance+? where id=?";
      //3.获取执行sql的对象 Statement
      pstmt1 = conn.prepareStatement(sql1);
      pstmt2 = conn.prepareStatement(sql2);
      //4.设置参数
      //张三-500
      pstmt1.setDouble(1,500);//第一个参数1代表我正在给第1个?赋值 第二个参数500代表?处的赋值为500(balance)
      pstmt1.setInt(2,1);//第一个参数2代表我正在给第2个?赋值 第二个参数500代表?处的赋值为1(id)
      //李四+500
      pstmt2.setDouble(1,500);
      pstmt2.setInt(2,2);
      //提交事务
      conn.commit();
      //5、执行SQL
      pstmt1.executeUpdate();
      //手动制造异常
      int i=3/0;
      pstmt2.executeUpdate();
    } catch (Exception e) {//抓大一点的异常
      //事务回滚
      if(conn!=null){
        conn.rollback();
      }
      e.printStackTrace();
    }finally {
      pstmt1.close();
      pstmt2.close();
      conn.close();
    }


  }
}
有异常,如果张三李四两天数据都没有变化 说明事务管理成功
执行:控制台报错(手动制造异常处)且两条数据都没有变化
事务管理中,一旦出现异常,会回滚到开启异常,如果没有异常会提交事务
开始操作前:开启事务
操作都结束了:提交事务
一旦出现异常:catch里回滚事务
3、savapoint
我们还可以使用savepoint设置中间点。如果在某地方出错了,我们设置中间点,回滚到出错之前即可。
应用场景:现在我们要算一道数学题,算到后面发现算错数了。前面的运算都是正确的,我们不可能重头再算【直接rollback】,最好的做法就是在保证前面算对的情况下,设置一个保存点。从保存点开始重新算。
注意:savepoint不会结束当前事务,普通提交和回滚都会结束当前事务的
4、事务的隔离级别
数据库定义了4个隔离级别:
- Serializable【可避免脏读,不可重复读,虚读】
- Repeatable read【可避免脏读,不可重复读】
- Read committed【可避免脏读】
- Read uncommitted【级别最低,什么都避免不了】
分别对应Connection类中的4个常量
- TRANSACTION_READ_UNCOMMITTED
- TRANSACTION_READ_COMMITTED
- TRANSACTION_REPEATABLE_READ
- TRANSACTION_SERIALIZABLE
脏读:一个事务读取到另外一个事务未提交的数据
例子:A向B转账,A执行了转账语句,但A还没有提交事务,B读取数据,发现自己账户钱变多了!B跟A说,我已经收到钱了。A回滚事务【rollback】,等B再查看账户的钱时,发现钱并没有多。
不可重复读:一个事务读取到另外一个事务已经提交的数据,也就是说一个事务可以看到其他事务所做的修改
注:A查询数据库得到数据,B去修改数据库的数据,导致A多次查询数据库的结果都不一样【危害:A每次查询的结果都是受B的影响的,那么A查询出来的信息就没有意思了】
虚读(幻读):是指在一个事务内读取到了别的事务插入的数据,导致前后读取不一致。
注:和不可重复读类似,但虚读(幻读)会读到其他事务的插入的数据,导致前后读取不一致
简单总结:脏读是不可容忍的,不可重复读和虚读在一定的情况下是可以的【做统计的肯定就不行】。
五、数据库连接池
1、概述
为什么我们要使用数据库连接池
• 数据库的连接的建立和关闭是非常消耗资源的
• 频繁地打开、关闭连接造成系统性能低下
-
概念:其实就是一个容器(集合),存放数据库连接的容器。
当系统初始化好后,容器被创建,容器中会申请一些连接对象,当用户来访问数据库时,从容器中获取连接对象,用户访问完之后,会将连接对象归还给容器。 -
好处:
- 节约资源
- 用户访问高效
2、实现介绍
-
标准接口:DataSource javax.sql包下的
- 方法:
- 获取连接:getConnection()
- 归还连接:Connection.close()。如果连接对象Connection是从连接池中获取的,那么调用Connection.close()方法,则不会再关闭连接了。而是归还连接
- 方法:
-
一般我们不去实现它,有数据库厂商来实现
- C3P0:数据库连接池技术
- Druid:数据库连接池实现技术,由阿里巴巴提供的
3、c3p0基本使用
- 步骤:
-
导入jar包 (两个) c3p0-0.9.5.2.jar mchange-commons-java-0.2.12.jar ,
- 不要忘记导入数据库驱动jar包mysql-connector-java-5.1.37-bin.jar
-
定义配置文件:
- 名称: c3p0.properties 或者 c3p0-config.xml
- 路径:直接将文件放在src目录下即可。
-
创建核心对象 数据库连接池对象 ComboPooledDataSource
-
获取连接: getConnection
-
- 代码:
//1.创建数据库连接池对象
DataSource ds = new ComboPooledDataSource();
//2. 获取连接对象
Connection conn = ds.getConnection();
<c3p0-config>

  <default-config>

    <property name="driverClass">com.mysql.jdbc.Driverproperty>
    <property name="jdbcUrl">jdbc:mysql://localhost:3306/db4property>
    <property name="user">rootproperty>
    <property name="password">rootproperty>


    <property name="initialPoolSize">5property>
    <property name="maxPoolSize">10property>
    <property name="checkoutTimeout">3000property>
  default-config>

  <named-config name="otherc3p0">

    <property name="driverClass">com.mysql.jdbc.Driverproperty>
    <property name="jdbcUrl">jdbc:mysql://localhost:3306/day25property>
    <property name="user">rootproperty>
    <property name="password">rootproperty>


    <property name="initialPoolSize">5property>
    <property name="maxPoolSize">8property>
    <property name="checkoutTimeout">1000property>
  named-config>
c3p0-config>
package cn.itcast.datasource.c3p0;

import com.mchange.v2.c3p0.ComboPooledDataSource;

import javax.sql.DataSource;
import java.sql.Connection;
import java.sql.SQLException;

public class C3P0Demo1 {
  public static void main(String[] args) throws SQLException {
    //1.创建数据库连接池对象
    DataSource ds  = new ComboPooledDataSource();
    //2. 获取连接对象
    Connection conn = ds.getConnection();

    //3. 打印
    System.out.println(conn);

  }
}
验证最大连接数
<property name="maxPoolSize">10property>
最大连接数为10
package cn.itcast.datasource.c3p0;
import com.mchange.v2.c3p0.ComboPooledDataSource;
import javax.sql.DataSource;
import java.sql.Connection;
import java.sql.SQLException;
/**
* c3p0演示
*/
public class C3P0Demo2 {
public static void main(String[] args) throws SQLException {
/* //1. 获取DataSource,使用默认配置即c3p0-config.xml中的
//c3p0-config.xml中有两个和
// 的超时时间是8s,最大个数是8
DataSource ds = new ComboPooledDataSource();
//2.获取连接
for (int i = 1; i <= 11 ; i++) {
//10的时候能全部打印出,改成11后打印完十个后报错
Connection conn = ds.getConnection();
System.out.println(i+":"+conn);
if(i == 5){
conn.close();//归还连接到连接池中
}
}*/
//用到第五个的时候,把他归还到线程池中,这是可以打印出11个
//并且从打印出的最后的哈希值可以看出第五个和第六个是同一个
//testNamedConfig();
}
public static void testNamedConfig() throws SQLException {
// 1.1 获取DataSource,使用指定名称配置
DataSource ds = new ComboPooledDataSource("otherc3p0");
//使用c3p0-config.xml中的第二段配置中的最大个数是8,所以打印完8个后报错
for (int i = 1; i <= 10 ; i++) {
Connection conn = ds.getConnection();
System.out.println(i+":"+conn);
}
}
}
4、druid基本使用
- 步骤:
- 导入jar包 druid-1.0.9.jar
- 定义配置文件:
- 是properties形式的
- 可以叫任意名称,可以放在任意目录下
- 加载配置文件。Properties
- 获取数据库连接池对象:通过工厂来来获取 DruidDataSourceFactory
- 获取连接:getConnection
- 代码:
//3.加载配置文件
Properties pro = new Properties();
InputStream is = DruidDemo.class.getClassLoader().getResourceAsStream(“druid.properties”);
pro.load(is);
//4.获取连接池对象
DataSource ds = DruidDataSourceFactory.createDataSource(pro);
//5.获取连接
Connection conn = ds.getConnection();
解释:
JDBCUtilsConfig.class是获得当前对象所属的class对象
getClassLoader()是取得该Class对象的类装载器
getResourceAsStream(“database.properties”) 调用类加载器的方法加载 资源,返回的是字节流
使用Properties类是为了可以从.properties属性文件对应的文件输入流中,加载属性列表到Properties类对象,然后通过getProperty方法用指定的键在此属性列表中搜索属性
- 定义工具类
-
定义一个类 JDBCUtils
-
提供静态代码块加载配置文件,初始化连接池对象
-
提供方法
-
获取连接方法:通过数据库连接池获取连接
-
释放资源
-
获取连接池的方法
代码实现:
-
-
druid.properties
driverClassName=com.mysql.jdbc.Driver
url=jdbc:mysql://127.0.0.1:3306/db3
username=root
password=root
initialSize=5
maxActive=10
maxWait=3000
package cn.itcast.datasource.c3p0.druid;

import com.alibaba.druid.pool.DruidDataSourceFactory;

import javax.sql.DataSource;
import java.io.InputStream;
import java.sql.Connection;
import java.util.Properties;

public class DruidDemo {
  public static void main(String[] args) throws Exception {
    //1.导入jar包 将druid-1.0.9.jar复制到libs文件夹下  添加为库
    //2.定义配置文件 将druid.properties复制到src文件下
    //3.加载配置文件
    Properties pro = new Properties();
    InputStream is = DruidDemo.class.getClassLoader().getResourceAsStream("druid.properties");
    pro.load(is);
    //4.获取连接池对象
    DataSource ds = DruidDataSourceFactory.createDataSource(pro);
    //5.获取连接
    Connection conn = ds.getConnection();
    System.out.println(conn);

  }
}
5、druid工具类
-
定义一个类 JDBCUtils
-
提供静态代码块加载配置文件,初始化连接池对象
-
提供方法
-
获取连接方法:通过数据库连接池获取连接
-
释放资源
-
获取连接池的方法
工具类实现:
-
package cn.itcast.utils;

import com.alibaba.druid.pool.DruidDataSourceFactory;

import javax.sql.DataSource;
import java.io.IOException;
import java.sql.Connection;
import java.sql.ResultSet;
import java.sql.SQLException;
import java.sql.Statement;
import java.util.Properties;

/**
 * Druid连接池的工具类
 */
public class JDBCUtils02 {
  //1.定义成员变量 DataSource
  private static DataSource ds ;

  static{
    try {
      //1.加载配置文件
      Properties pro = new Properties();
      pro.load(JDBCUtils.class.getClassLoader().getResourceAsStream("druid.properties"));
      //2.获取DataSource
      ds = DruidDataSourceFactory.createDataSource(pro);
    } catch (IOException e) {
      e.printStackTrace();
    } catch (Exception e) {
      e.printStackTrace();
    }
  }

  /**
   * 获取连接
   */
  public static Connection getConnection() throws SQLException {
    return ds.getConnection();
  }

  /**
   * 释放资源
   */
  public static void close(Statement stmt, Connection conn){
       /* if(stmt != null){
            try {
                stmt.close();
            } catch (SQLException e) {
                e.printStackTrace();
            }
        }

        if(conn != null){
            try {
                conn.close();//归还连接
            } catch (SQLException e) {
                e.printStackTrace();
            }
        }*/

    close(null,stmt,conn);
  }


  public static void close(ResultSet rs , Statement stmt, Connection conn){


    if(rs != null){
      try {
        rs.close();
      } catch (SQLException e) {
        e.printStackTrace();
      }
    }


    if(stmt != null){
      try {
        stmt.close();
      } catch (SQLException e) {
        e.printStackTrace();
      }
    }

    if(conn != null){
      try {
        conn.close();//归还连接
      } catch (SQLException e) {
        e.printStackTrace();
      }
    }
  }

  /**
   * 获取连接池方法
   */

  public static DataSource getDataSource(){
    return  ds;
  }
}
工具类测试使用
druid.properties
driverClassName=com.mysql.jdbc.Driver
url=jdbc:mysql://127.0.0.1:3306/db3
username=root
password=root
#初始化的连接数量
initialSize=5
maxActive=10
#最大等待时间
maxWait=3000
package cn.itcast.datasource.c3p0.druid;


import cn.itcast.utils.JDBCUtils02;

import java.sql.Connection;
import java.sql.PreparedStatement;
import java.sql.SQLException;

public class druiddemo2 {
  public static void main(String[] args) {
    /*
     * 完成添加操作:给account表添加一条记录
     */
    Connection conn = null;
    PreparedStatement pstmt = null;
    try {
      //1.获取连接
      conn = JDBCUtils02.getConnection();
      //2.定义sql
      String sql = "insert into account values(null,?,?)";
      //3.获取pstmt对象
      pstmt = conn.prepareStatement(sql);
      //4.给?赋值
      pstmt.setString(1,"王五");
      pstmt.setDouble(2,3000);
      //5.执行sql
      int count = pstmt.executeUpdate();
      System.out.println(count);
    } catch (SQLException e) {
      e.printStackTrace();
    }finally {
      //6. 释放资源
      JDBCUtils02.close(pstmt,conn);
    }
  }

}
六、Jdbc Template
Spring框架对JDBC的简单封装。提供了一个JDBCTemplate对象简化JDBC的开发
JdbcTemplate主要提供以下四类方法:
- execute方法:可以用于执行任何SQL语句,一般用于执行DDL语句;
- update方法及batchUpdate方法:update方法用于执行新增、修改、删除等语句;batchUpdate方法用于执行批处理相关语句;
- query方法及queryForXXX方法:用于执行查询相关语句;
- call方法:用于执行存储过程、函数相关语句
1、基本使用
Account
package com.itheima.domain;

import java.io.Serializable;

/**
 * 账户的实体类
 */
public class Account implements Serializable {
//继承Serializable是为了序列化
//什么是序列化:简单说就是为了保存在内存中的各种对象的状态,并且可以把保存的对象状态再读出来
//什么时候需要序列化
/*
a)当你想把的内存中的对象保存到一个文件中或者数据库中时候;
b)当你想用套接字在网络上传送对象的时候;
c)当你想通过RMI传输对象的时候;*/
  private Integer id;
  private String name;
  private Float money;

  public Integer getId() {
    return id;
  }

  public void setId(Integer id) {
    this.id = id;
  }

  public String getName() {
    return name;
  }

  public void setName(String name) {
    this.name = name;
  }

  public Float getMoney() {
    return money;
  }

  public void setMoney(Float money) {
    this.money = money;
  }

  @Override
  public String toString() {
    return "Account{" +
      "id=" + id +
      ", name='" + name + '\'' +
      ", money=" + money +
      '}';
  }
}
JdbcTemplateDemo1
package com.itheima.jdbctemplate;

import org.springframework.jdbc.core.JdbcTemplate;
import org.springframework.jdbc.datasource.DriverManagerDataSource;

/**
 * JdbcTemplate的最基本用法
 */
public class JdbcTemplateDemo1 {

  public static void main(String[] args) {
    //准备数据源:spring的内置数据源
    DriverManagerDataSource ds = new DriverManagerDataSource();
    ds.setDriverClassName("com.mysql.jdbc.Driver");
    ds.setUrl("jdbc:mysql://localhost:3306/eesy");
    ds.setUsername("root");
    ds.setPassword("root");

    //1.创建JdbcTemplate对象
    JdbcTemplate jt = new JdbcTemplate();
    //给jt设置数据源
    jt.setDataSource(ds);
    //2.执行操作
    jt.execute("insert into account(name,money)values('ccc',1000)");
  }
}
执行 数据库中成功添加数据
但里面的内容都写死了
2、改进
JdbcTemplate在Spring的IoC中的使用
将其注入Spring容器中,而不是 使用new
bean.xml
<beans xmlns="http://www.springframework.org/schema/beans"
       xmlns:xsi="http://www.w3.org/2001/XMLSchema-instance"
       xsi:schemaLocation="http://www.springframework.org/schema/beans
        http://www.springframework.org/schema/beans/spring-beans.xsd">


   <bean id="jdbcTemplate" class="org.springframework.jdbc.core.JdbcTemplate">
       <property name="dataSource" ref="dataSource">property>
   bean>


    <bean id="dataSource" class="org.springframework.jdbc.datasource.DriverManagerDataSource">
        <property name="driverClassName" value="com.mysql.jdbc.Driver">property>
        <property name="url" value="jdbc:mysql://localhost:3306/eesy">property>
        <property name="username" value="root">property>
        <property name="password" value="1234">property>
    bean>
beans>
JdbcTemplateDemo2
import org.springframework.context.ApplicationContext;
import org.springframework.context.support.ClassPathXmlApplicationContext;
import org.springframework.jdbc.core.JdbcTemplate;

/**
 * JdbcTemplate的最基本用法
 */
public class JdbcTemplateDemo2 {

  public static void main(String[] args) {
    //1.获取容器
    ApplicationContext ac = new ClassPathXmlApplicationContext("bean.xml");
    //2.获取对象
    JdbcTemplate jt = ac.getBean("jdbcTemplate",JdbcTemplate.class);
    //3.执行操作
    jt.execute("insert into account(name,money)values('ddd',2222)");


     /*   //准备数据源:spring的内置数据源
        DriverManagerDataSource ds = new DriverManagerDataSource();
        ds.setDriverClassName("com.mysql.jdbc.Driver");
        ds.setUrl("jdbc:mysql://localhost:3306/eesy");
        ds.setUsername("root");
        ds.setPassword("1234");

        //1.创建JdbcTemplate对象
        JdbcTemplate jt = new JdbcTemplate();
        //给jt设置数据源
        jt.setDataSource(ds);
        //2.执行操作
        jt.execute("insert into account(name,money)values('ccc',1000)");*/
  }
}
JdbcTemplateDemo3
package com.itheima.jdbctemplate;

import com.itheima.domain.Account;
import org.springframework.context.ApplicationContext;
import org.springframework.context.support.ClassPathXmlApplicationContext;
import org.springframework.jdbc.core.JdbcTemplate;
import org.springframework.jdbc.core.RowMapper;

import java.sql.ResultSet;
import java.sql.SQLException;

/**
 * JdbcTemplate的CRUD操作
 */
public class JdbcTemplateDemo3 {

  public static void main(String[] args) {
    //1.获取容器
    ApplicationContext ac = new ClassPathXmlApplicationContext("bean.xml");
    //2.获取对象
    JdbcTemplate jt = ac.getBean("jdbcTemplate",JdbcTemplate.class);
    //3.执行操作
    //保存
//        jt.update("insert into account(name,money)values(?,?)","eee",3333f);
    //更新
//        jt.update("update account set name=?,money=? where id=?","test",4567,7);
    //删除
//        jt.update("delete from account where id=?",8);
    //查询所有
//        List accounts = jt.query("select * from account where money > ?",new AccountRowMapper(),1000f);
//        List accounts = jt.query("select * from account where money > ?",new BeanPropertyRowMapper(Account.class),1000f);//用spring提供的,不用上一句那样自己创造AccountRowMapper
//        for(Account account : accounts){
//            System.out.println(account);
//        }
    //查询一个
//        List accounts = jt.query("select * from account where id = ?",new BeanPropertyRowMapper(Account.class),1);
//        System.out.println(accounts.isEmpty()?"没有内容":accounts.get(0));

    //查询返回一行一列(使用聚合函数,但不加group by子句)
    Long count = jt.queryForObject("select count(*) from account where money > ?",Long.class,1000f);//第二个参数是返回值类型,第三个参数是传入的参数
    System.out.println(count);//打印money>1000的记录条数


  }
}

/**
 * 定义Account的封装策略
 */
class AccountRowMapper implements RowMapper<Account>{
  /**
   * 把结果集中的数据封装到Account中,然后由spring把每个Account加到集合中
   * @param rs
   * @param rowNum
   * @return
   * @throws SQLException
   */
  @Override
  public Account mapRow(ResultSet rs, int rowNum) throws SQLException {
    Account account = new Account();
    account.setId(rs.getInt("id"));
    account.setName(rs.getString("name"));
    account.setMoney(rs.getFloat("money"));
    return account;
  }
}
3、Dao操作数据库
AccountDaoImpl
query()进行查询的时候,必须自行对结果集进行取出并封装。
优点是:数据更加灵活,如果你想在结果集中加上一个固定值作为标记,甚至自己自定义key的值,对value的值进行计算等等,都可以,非常灵活。
缺点是:需要进行封装数据。
package com.itheima.dao.impl;

import com.itheima.dao.IAccountDao;
import com.itheima.domain.Account;
import org.springframework.jdbc.core.BeanPropertyRowMapper;
import org.springframework.jdbc.core.JdbcTemplate;

import java.util.List;

/**
 * 账户的持久层实现类
 */

public class AccountDaoImpl implements IAccountDao {

  private JdbcTemplate jdbcTemplate;

  public void setJdbcTemplate(JdbcTemplate jdbcTemplate) {
    this.jdbcTemplate = jdbcTemplate;
  }

  @Override
  public Account findAccountById(Integer accountId) {
    List<Account> accounts = jdbcTemplate.query("select * from account where id = ?",new BeanPropertyRowMapper<Account>(Account.class),accountId);
    return accounts.isEmpty()?null:accounts.get(0);
  }

  @Override
  public Account findAccountByName(String accountName) {
    List<Account> accounts = jdbcTemplate.query("select * from account where name = ?",new BeanPropertyRowMapper<Account>(Account.class),accountName);
    if(accounts.isEmpty()){
      return null;
    }
    if(accounts.size()>1){
      throw new RuntimeException("结果集不唯一");
    }
    return accounts.get(0);
  }

  @Override
  public void updateAccount(Account account) {
    jdbcTemplate.update("update account set name=?,money=? where id=?",account.getName(),account.getMoney(),account.getId());
  }
}
bean
<?xml version="1.0" encoding="UTF-8"?>
<beans xmlns="http://www.springframework.org/schema/beans"
       xmlns:xsi="http://www.w3.org/2001/XMLSchema-instance"
       xsi:schemaLocation="http://www.springframework.org/schema/beans
        http://www.springframework.org/schema/beans/spring-beans.xsd">


    <!-- 配置账户的持久层-->
    <bean id="accountDao" class="com.itheima.dao.impl.AccountDaoImpl">
        <property name="jdbcTemplate" ref="jdbcTemplate"></property>
    </bean>

    <!--配置JdbcTemplate-->
   <bean id="jdbcTemplate" class="org.springframework.jdbc.core.JdbcTemplate">
       <property name="dataSource" ref="dataSource"></property>
   </bean>

    <!-- 配置数据源-->
    <bean id="dataSource" class="org.springframework.jdbc.datasource.DriverManagerDataSource">
        <property name="driverClassName" value="com.mysql.jdbc.Driver"></property>
        <property name="url" value="jdbc:mysql://localhost:3306/eesy"></property>
        <property name="username" value="root"></property>
        <property name="password" value="root"></property>
    </bean>
</beans>
JdbcTemplateDemo4
package com.itheima.jdbctemplate;

import com.itheima.dao.IAccountDao;
import com.itheima.domain.Account;
import org.springframework.context.ApplicationContext;
import org.springframework.context.support.ClassPathXmlApplicationContext;

/**
 * JdbcTemplate的最基本用法
 */
public class JdbcTemplateDemo4 {

  public static void main(String[] args) {
    //1.获取容器
    ApplicationContext ac = new ClassPathXmlApplicationContext("bean.xml");
    //2.获取对象
    IAccountDao accountDao = ac.getBean("accountDao",IAccountDao.class);

    Account account = accountDao.findAccountById(1);
    System.out.println(account);

    account.setMoney(30000f);//将1记录的money改为3000
    accountDao.updateAccount(account);
  }
}
4、抽取重复性代码1
创建父类
JdbcDaoSupport
package com.itheima.dao.impl;

import org.springframework.jdbc.core.JdbcTemplate;

import javax.sql.DataSource;

/**
 * 此类用于抽取dao中的重复代码
 */
 public class JdbcDaoSupport {

 private JdbcTemplate jdbcTemplate;

 public void setJdbcTemplate(JdbcTemplate jdbcTemplate) {
 this.jdbcTemplate = jdbcTemplate;
 }

 public JdbcTemplate getJdbcTemplate() {
 return jdbcTemplate;
 }


 public void setDataSource(DataSource dataSource) {
 if(jdbcTemplate == null){
 jdbcTemplate = createJdbcTemplate(dataSource);
 }
 }

 private JdbcTemplate createJdbcTemplate(DataSource dataSource){
 return new JdbcTemplate(dataSource);//new JdbcTemplate(dataSource);为用了JdbcTemplate类的构造函数
 }
 }
不管是传jdbcTemplate还是dataSource都能创建jdbcTemplate
如果是传jdbcTemplate则触发setJdbcTemplate方法,如果是传dataSource则触发createJdbcTemplate和setDataSource来创建jdbcTemplate
AccountDaoImpl2
继承父类JdbcDaoSupport,且利用super使用父类的方法
package com.itheima.dao.impl;

import com.itheima.dao.IAccountDao;
import com.itheima.domain.Account;
import org.springframework.jdbc.core.BeanPropertyRowMapper;

import java.util.List;

/**
 * 账户的持久层实现类
 */
//@Repository
public class AccountDaoImpl2 extends JdbcDaoSupport implements IAccountDao {

//  private JdbcTemplate jdbcTemplate;
//
//  public void setJdbcTemplate(JdbcTemplate jdbcTemplate) {
//    this.jdbcTemplate = jdbcTemplate;
//  }

  @Override
  public Account findAccountById(Integer accountId) {
    List<Account> accounts = super.getJdbcTemplate().query("select * from account where id = ?",new BeanPropertyRowMapper<Account>(Account.class),accountId);
    //super表示使用父类
    return accounts.isEmpty()?null:accounts.get(0);
  }

  @Override
  public Account findAccountByName(String accountName) {
    List<Account> accounts = super.getJdbcTemplate().query("select * from account where name = ?",new BeanPropertyRowMapper<Account>(Account.class),accountName);
    if(accounts.isEmpty()){
      return null;
    }
    if(accounts.size()>1){
      throw new RuntimeException("结果集不唯一");
    }
    return accounts.get(0);
  }

  @Override
  public void updateAccount(Account account) {
    super.getJdbcTemplate().update("update account set name=?,money=? where id=?",account.getName(),account.getMoney(),account.getId());
  }
}
Bean
因此我们不再需要配置JdbcTemplate 直接传DataSource也可以创建
<beans xmlns="http://www.springframework.org/schema/beans"
       xmlns:xsi="http://www.w3.org/2001/XMLSchema-instance"
       xsi:schemaLocation="http://www.springframework.org/schema/beans
        http://www.springframework.org/schema/beans/spring-beans.xsd">


    <bean id="accountDao" class="com.itheima.dao.impl.AccountDaoImpl2">

        <property name="dataSource" ref="dataSource">property>
    bean>


    <bean id="dataSource" class="org.springframework.jdbc.datasource.DriverManagerDataSource">
        <property name="driverClassName" value="com.mysql.jdbc.Driver">property>
        <property name="url" value="jdbc:mysql://localhost:3306/eesy">property>
        <property name="username" value="root">property>
        <property name="password" value="root">property>
    bean>
beans>
执行JdbcTemplateDemo4依然可以使用
5、重复性代码抽取2
Spring直接可以实现
Spring自带JdbcDaoSupport这个类
删除我们自己创建JdbcDaoSupport类,不会报错
AccountDaoImpl2中既然继承这个父类,会自动导入这个自带父类
import org.springframework.jdbc.core.support.JdbcDaoSupport;
但两者有区别:
AccountDaoImpl2使用了父类继承,不能再加注解,只适用于xml配置
而AccountDaoImpl可以使用注解配置
AccountDaoImpl
package com.itheima.dao.impl;

import com.itheima.dao.IAccountDao;
import com.itheima.domain.Account;
import org.springframework.beans.factory.annotation.Autowired;
import org.springframework.jdbc.core.BeanPropertyRowMapper;
import org.springframework.jdbc.core.JdbcTemplate;
import org.springframework.stereotype.Repository;

import java.util.List;

/**
 * 账户的持久层实现类
 */
@Repository
public class AccountDaoImpl implements IAccountDao {

  @Autowired
  private JdbcTemplate jdbcTemplate;


  @Override
  public Account findAccountById(Integer accountId) {
    List accounts = jdbcTemplate.query("select * from account where id = ?",new BeanPropertyRowMapper(Account.class),accountId);
    return accounts.isEmpty()?null:accounts.get(0);
  }

  @Override
  public Account findAccountByName(String accountName) {
    List accounts = jdbcTemplate.query("select * from account where name = ?",new BeanPropertyRowMapper(Account.class),accountName);
    if(accounts.isEmpty()){
      return null;
    }
    if(accounts.size()>1){
      throw new RuntimeException("结果集不唯一");
    }
    return accounts.get(0);
  }

  @Override
  public void updateAccount(Account account) {
    jdbcTemplate.update("update account set name=?,money=? where id=?",account.getName(),account.getMoney(),account.getId());
  }
}


