2020版cloud,nacos,sentinel dashboard,gateway,sleuth+zipkin, feign restTemplate
1. 2020版本教程0:springcloud 2020版本概述
Spring cloud赶在2020年最后几天发布了新版本,版本号取名为2020.0.0,取消了英国地铁的命名方式。从H版本之后,全新的命名为2020.x.x。马上快2021年了,为毛不取名为2021 ,哈哈。
从maven仓库可知,当前版本为2020.0.2,

版本关系
| Release Train | Boot Version | spring cloud alibaba version |
|---|---|---|
| 2020.0.x aka Ilford | 2.4.x | 2021.1 |
| Hoxton | 2.2.x, 2.3.x (Starting with SR5) | 2.2.x |
| Greenwich | 2.1.x | 2.1.x |
| Finchley | 2.0.x | 2.0.x |
| Edgware | 1.5.x | 1.5.x |
| Dalston | 1.5.x | 1.5.x |
产品变化
spring cloud最大的变化就是移除了spring cloud netflix模块,仅仅包括了eureka模块。
As announced, the following modules have been removed from spring-cloud-netflix:
- spring-cloud-netflix-archaius
- spring-cloud-netflix-concurrency-limits
- spring-cloud-netflix-core
- spring-cloud-netflix-dependencies
- spring-cloud-netflix-hystrix
- spring-cloud-netflix-hystrix-contract
- spring-cloud-netflix-hystrix-dashboard
- spring-cloud-netflix-hystrix-stream
- spring-cloud-netflix-ribbon
- spring-cloud-netflix-sidecar
- spring-cloud-netflix-turbine
- spring-cloud-netflix-turbine-stream
- spring-cloud-netflix-zuul
- spring-cloud-starter-netflix-archaius
- spring-cloud-starter-netflix-hystrix
- spring-cloud-starter-netflix-hystrix-dashboard
- spring-cloud-starter-netflix-ribbon
- spring-cloud-starter-netflix-turbine
- spring-cloud-starter-netflix-turbine-stream
- spring-cloud-starter-netflix-zuul
既然把Netflix组件remove掉了,那么需要有替代方案,Spring Cloud团队给我们推荐了用于替代的产品:
| Netflix | 推荐替代品 | 说明 |
|---|---|---|
| Hystrix | Resilience4j 、sentinel | 建议使用sentinel |
| Hystrix Dashboard / Turbine | Micrometer + Monitoring System\sentinel dashboard | |
| Ribbon | Spring Cloud Loadbalancer | 建议使用sentienl dashboard spring 自己的产品 |
| Zuul 1 | Spring Cloud Gateway | spring自己的产品 |
| Archaius 1 | Spring Boot外部化配置 + Spring Cloud配置 | 比Netflix实现的更好、更强大 |
其他变化
sentinel
英 /ˈsentɪnl/  美 /ˈsentɪnl/  全球(美国)
简明 牛津 新牛津  韦氏  柯林斯 例句  百科
n. 哨兵
vt. 守卫,放哨
Sentinel 是面向分布式服务架构的高可用流量防护组件,主要以流量为切入点,从
- 限流、流量整形、熔断降级、
- 系统负载保护、热点防护
- 等多个维度来帮助开发者保障微服务的稳定
其他变化
默认情况下,不再启用spring-cloud-commons提供的Bootstrap。 如果您的项目需要它,则可以通过属性或新的启动器重新启用它。
要通过属性重新启用,请设置spring.cloud.bootstrap.enabled = true或spring.config.use-legacy-processing = true。
另一个选择是包括新的spring-cloud-starter-bootstrap。 已为Config Server,Consul,Zookeeper和Vault添加了对新的Spring Boot spring.config.import语法的支持。 仍支持配置不同服务的现有属性,但需要将它们放在application.properties或application.yml中。
- spring.config.import=configserver:
- spring.config.import=consul:
- spring.config.import=zookeeper:
- spring.config.import=vault:
之前若要禁用Spring Cloud Config Client端的健康指示用的是health.config.enabled=false,现改为management.health.config.enabled=false。保持了和Spring Boot控制端点风格一致 带有无效字符(破折号)的端点id已经改为符合标准的了,自此启动时再也没有讨厌的警告了,拯救洁癖者。
- bus-env -> busenv
- bus-refresh -> busrefresh
- service-registry -> serviceregistry
总结
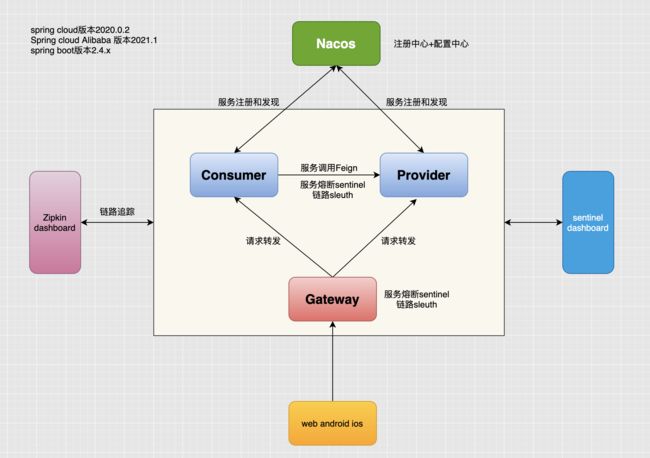
此次2020年版本的spring cloud 最大的变化是移除了netflix组件,只保留了eureka组件。很多网友吐槽,刚学会spring cloud netflix还没有上生产,现在又要升级了。技术迭代确实比较快,但技术都是相通的,需要花点时间梳理下。本次我将为大家带来一个全新的Springcloud 2020版本的教程。先上一下教程的总体架构图。
参考资料
本文链接:https://www.fangzhipeng.com/springcloud/2021/04/01/sc-2020-gs.html
本文出自方志朋的博客
2. 使用nacos作为注册中心和配置中心
本次教程旨在为读者提供2020版本的最佳实践方案,使用我认为最容易学习的组件,可能很多组件有很多替代方案,在这里不依依讲述。本次教程使用的组件如下:
微服务 替代方案
-
注册中心:nacos,
- 替代方案eureka、consul、zookeeper
-
配置中心: nacos ,
- 替代方案sc config、consul config
-
服务调用:feign,替代方案:resttempate
-
熔断:sentinel,
- 替代方案:Resilience4j
-
熔断监控:sentinel dashboard
-
负载均衡:sc loadbalancer
-
网关:spring cloud gateway
-
链路:spring cloud sleuth+zipkin,替代方案:skywalking等。
本次教程总体架构如下:
nacos基本介绍
Nacos是SpringCloudAlibaba架构中最重要的组件。
Nacos 是一个更易于帮助构建云原生应用的动态 服务发现、配置 和 服务管理平台,
- 提供注册中心、配置中心和动态 DNS 服务三大功能。
- 能够无缝对接Springcloud、Spring、Dubbo等流行框架。
Nacos 致力于帮助您发现、配置和管理微服务。Nacos 提供了一组简单易用的特性集,帮助您快速实现
- 动态服务发现、服务配置、服务元数据及流量管理。
- 是Spring Cloud A 中的服务注册发现组件,类似于Consul、Eureka,
- 同时它又提供了分布式配置中心的功能,这点和Consul的config类似,支持热加载。
Nacos 的关键特性包括:
- 服务发现和服务健康监测
- 动态配置服务,带管理界面,支持丰富的配置维度。
- 动态 DNS 服务
- 服务及其元数据管理
nacos和eureka
nacos和eureka功能对比
功能模块	nacos	eureka	功能说明
注册中心	√	√	服务治理,服务中心化注册
配置中心	√	×	eureka需要配合springcloud config实现
配置动态刷新	√	×	nacos通过netty保持tcp长链接进行推送,eureka需要配合mq实现配置动态刷新
可用区az	√	√	对服务集群划分不同区域,实现区域隔离,并提供灾难级自动切换
分组	√	×	nacos根据不同的业务、环境进行分组管理(namespace,group
元数据	√	√	提供服务标签数据(环境、服务标识)
权重	√	×	nacos提供权重设置,调整承载流量压力
健康检查	√	√	nacos提供服务端或者客户端发起的健康监测,eureka是有客户端发起心跳
负载均衡	√	√	均提供负载均衡策略,eureka采用ribbon
- nacos支持a(高可用)p(分区容错)和c(一致性)p的切换
- 默认为ap,
- eureka仅支持ap,
- zookeeper仅支持cp
sentinel
Sentinel 是面向分布式服务架构的高可用流量防护组件,主要以流量为切入点,
- 从限流、流量整形、熔断降级、系统负载保护、热点防护
- 等多个维度来帮助开发者保障微服务的稳定
总体架构
本次教程总体架构如下:
[外链图片转存失败,源站可能有防盗链机制,建议将图片保存下来直接上传(img-6zgxuVfQ-1652537185609)(https://static.javajike.com/img/2021/4/12/sc2020jgt.png)]
使用nacos作为注册中心
下载nacos,并启动
Nacos 致力于帮助您发现、配置和管理微服务。Nacos 提供了一组简单易用的特性集,帮助您快速实现动态服务发现、服务配置、服务元数据及流量管理。下载地址https://github.com/alibaba/nacos/releases,下载最新版的2.0版本。
下载完成后,解压,在解压后的文件的/bin目录下,windows系统点击startup.cmd就可以启动nacos。linux或mac执行以下命令启动nacos。
sh startup.sh -m standalone
登陆页面:http://localhost:8848/nacos/,登陆用户nacos,登陆密码为nacos。
工程案例
本小节工单案例包括2个,一个服务提供者provider 、服务消费者consumer。
[外链图片转存失败,源站可能有防盗链机制,建议将图片保存下来直接上传(img-sryNPX0G-1652537185609)(https://static.javajike.com/img/2021/4/12/sc2020-02.png)]
在父pom文件引入相关的依赖,如下:
父pom
<project xmlns="http://maven.apache.org/POM/4.0.0" xmlns:xsi="http://www.w3.org/2001/XMLSchema-instance"
         xsi:schemaLocation="http://maven.apache.org/POM/4.0.0 https://maven.apache.org/xsd/maven-4.0.0.xsd">
    <modelVersion>4.0.0modelVersion>

    <groupId>io.github.forezpgroupId>
    <artifactId>sc-2020-chapter1artifactId>
    <version>1.0version>

    //gav ndp
    <name>sc-2020-chapter1name>
    <description>Demo project for Spring Bootdescription>
    <packaging>pompackaging>

    <properties>
        <java.version>1.8java.version>
        <spring-boot.version>2.4.4spring-boot.version>
        <spring-cloud.version>2020.0.2spring-cloud.version>
        <spring-cloud-alibaba.version>2020.0.RC1spring-cloud-alibaba.version>
        //java boot cloud alibaba
    properties>

    <modules>
        <module>providermodule>
        <module>consumermodule>
        <module>gatewaymodule>
    modules>

    <dependencyManagement>
        <dependencies>

            <dependency>
                <groupId>org.springframework.bootgroupId>
                <artifactId>spring-boot-dependenciesartifactId>
                <version>${spring-boot.version}version>
                <type>pomtype>
                <scope>importscope>
            dependency>


            <dependency>
                <groupId>org.springframework.cloudgroupId>
                <artifactId>spring-cloud-dependenciesartifactId>
                <version>${spring-cloud.version}version>
                <type>pomtype>
                <scope>importscope>
            dependency>


            <dependency>
                <groupId>com.alibaba.cloudgroupId>
                <artifactId>spring-cloud-alibaba-dependenciesartifactId>
                <version>${spring-cloud-alibaba.version}version>
                <type>pomtype>
                <scope>importscope>
            dependency>

        dependencies>
    dependencyManagement>


    <build>
        <plugins>
            <plugin>
                <groupId>org.springframework.bootgroupId>
                <artifactId>spring-boot-maven-pluginartifactId>
            plugin>
        plugins>
    build>

project>
服务提供者provider
pom依赖
在provider的pom文件引入依赖:
    <parent>
        <groupId>io.github.forezpgroupId>
        <artifactId>sc-2020-chapter1artifactId>
        <version>1.0version>
    parent>

    <version>${parent.version}version>

		<dependency>
            <groupId>org.springframework.bootgroupId>
            <artifactId>spring-boot-starter-webartifactId>
        dependency>

        <dependency>
            <groupId>com.alibaba.cloudgroupId>
            <artifactId>spring-cloud-starter-alibaba-nacos-discoveryartifactId>
        dependency>

        <dependency>
            <groupId>org.springframework.bootgroupId>
            <artifactId>spring-boot-starter-testartifactId>
            <scope>testscope>
        dependency>

    <build>
        <plugins>
            <plugin>
                <groupId>org.springframework.bootgroupId>
                <artifactId>spring-boot-maven-pluginartifactId>
                <configuration>
                    <mainClass> //主类
                        io.github.forezp.provider.ProviderApplication
                    mainClass>
                configuration>
            plugin>
        plugins>
    build>
application.yml
配置文件application.yml:
server:
  port: 8762

spring:
  application:
    name: provider

  cloud:
    nacos:
      discovery:
        server-addr: 127.0.0.1:8848
写一个接口:
@SpringBootApplication
@RestController
@EnableDiscoveryClient
public class ProviderApplication {

    public static void main(String[] args) {
        SpringApplication.run(ProviderApplication.class, args);
    }


    @Value("${server.port}")
    String port;

    @GetMapping("/hi")
    public String hi(@RequestParam(value = "name", defaultValue = "forezp",required = false) String name) {
        return "hello " + name + ", i'm provider ,my port:" + port;

    }
}
服务消费者consumer
导入pom
在pom文件引入以下依赖:
            <artifactId>spring-boot-starter-webartifactId>

            <artifactId>spring-cloud-starter-alibaba-nacos-discoveryartifactId>

        <dependency>
            <groupId>org.springframework.cloudgroupId>
            <artifactId>spring-cloud-starter-openfeignartifactId>
        dependency>


        <dependency>
            <groupId>org.springframework.cloudgroupId>
            <artifactId>spring-cloud-starter-loadbalancerartifactId>
        dependency>

    <build>
        <plugins>
            <plugin>
                <groupId>org.springframework.bootgroupId>
                <artifactId>spring-boot-maven-pluginartifactId>
            plugin>
            <plugin>
                <groupId>org.apache.maven.pluginsgroupId>
                <artifactId>maven-compiler-pluginartifactId>
                <configuration>
                    <source>8source>
                    <target>8target>
                configuration>
            plugin>
        plugins>
    build>
需要注意的是引入openfeign,必须要引入loadbalancer,否则无法启动。
配置文件:
server:
  port: 8763

spring:
  application:
    name: consumer

  cloud:
    nacos:
      discovery:
        server-addr: 127.0.0.1:8848
feign的使用
在工程的启动文件开启FeignClient的功能:
@SpringBootApplication
@EnableDiscoveryClient
@EnableFeignClients
public class ConsumerApplication {


    public static void main(String[] args) {
        SpringApplication.run(ConsumerApplication.class, args);
    }

}
写一个FeignClient,去调用provider服务的接口:
@FeignClient(value = "provider" )
public interface ProviderClient {

    @GetMapping("/hi")
    String hi(@RequestParam(value = "name", defaultValue = "forezp", required = false) String name);
}
写一个接口,让consumer去调用provider服务的接口:
@RestController
public class ConsumerController {

    @Autowired
    ProviderClient providerClient;

    @GetMapping("/hi-feign")
    public String hiFeign(){
        return providerClient.hi("feign");
    }
}
服务调用 测试
启动两个工程,在nacos页面查看,可见2个服务都已经注册成功:

在浏览器上输入http://localhost:8763/hi-feign,浏览器返回响应:
hello feign, i'm provider ,my port:8762
可见浏览器的请求成功调用了consumer服务的接口,consumer服务也成功地通过feign成功的调用了provider服务的接口。
- 使用sc loadbanlancer作为负载均衡
其实feign使用了spring cloud loadbanlancer作为负载均衡器。 可以通过修改provider的端口,再在本地启动一个新的provider服务,那么本地有2个provider 服务,端口分别为8761 和8762。在浏览器上多次调用http://localhost:8763/hi-feign,浏览器会交替显示:
hello feign, i'm provider ,my port:8762

hello feign, i'm provider ,my port:8761
- 使用nacos作为配置中心
在此教程中不讲述,请参考:https://www.fangzhipeng.com/springcloud/2019/05/30/sc-nacos-discovery.html
- 源码下载
https://github.com/forezp/SpringCloudLearning/tree/master/sc-2020-chapter1
使用RestTemplate消费服务
nacos作为服务注册和发现组件时,在进行服务消费,可以选择RestTemplate和Feign等方式。这和使用Eureka和Consul作为服务注册和发现的组件是一样的,没有什么区别。
- 这是因为spring-cloud-starter-alibaba-nacos-discovery依赖
- 实现了Spring Cloud服务注册和发现的相关接口,可以和其他服务注册发现组件无缝切换。
在这里使用2种方式消费服务,一种是RestTemplate,一种是Feign。
导入pom 和 配置
RestTemplate可以使用Ribbon作为负载均衡组件,在nacos-consumer工程中引入ribbon的依赖:
<dependency>
    //feign中包含 ribbon,引用feign也可以
	<groupId>org.springframework.cloudgroupId>
	<artifactId>spring-cloud-starter-ribbonartifactId>
dependency>
在NacosConsumerApplication启动文件注入RestTemplate的Bean,代码如下:
	@LoadBalanced
	@Bean
	public RestTemplate restTemplate(){
		return new RestTemplate();
	}
加上@LoadBalanced注解即可在RestTemplate上开启LoadBalanced负载均衡的功能。
写一个消费服务的ConsumerController,代码如下:
@RestController
public class ConsumerController {

    @Autowired
    RestTemplate restTemplate;

 @GetMapping("/hi-resttemplate")
    public String hiResttemplate(){
        return restTemplate.getForObject("http://nacos-provider/hi?name=resttemplate",String.class);

    }
}
重启工程,在浏览器上访问http://localhost:8763/hi-resttemplate,可以在浏览器上展示正确的响应,这时nacos-consumer调用nacos-provider服务成功。
3.nacos作为配置中心
Nacos除了可以作为服务注册中心,它还有服务配置中心的功能。类似于consul config,Nacos 是支持热加载的。本篇文章将讲述如何使用Nacos作为配置中心。
本案例是在上一篇文章(Nacos作为服务注册与发现)的nacos-provider工程上改造的,在工程的pom文件引入nacos-config的Spring cloud依赖,版本为0.9.0. RELEASE,代码如下:
导入pom
<dependency>
	<groupId>org.springframework.cloudgroupId>
	<artifactId>spring-cloud-alibaba-nacos-configartifactId>
	<version>0.9.0.RELEASEversion>
dependency>
<dependency>
    <groupId>org.springframework.cloudgroupId>
    <artifactId>spring-cloud-starter-bootstrapartifactId>
dependency> //真实的版本为 3.0.2
————————————————
spring-cloud-dependencies 2020.0.0 版本不在默认加载bootstrap 文件,如果需要加载bootstrap 文件需要手动添加依赖。否则程序无法运行
bootstrap.yml
在bootstrap.yml(一定是bootstrap.yml文件,不是application.yml文件)文件配置以下内容:
spring:
  application:
    name: nacos-provider
  cloud:
    nacos:
      config:
        server-addr: 127.0.0.1:8848
        file-extension: yaml
        prefix: nacos-provider
  profiles:
    active: dev
nacos具体配置
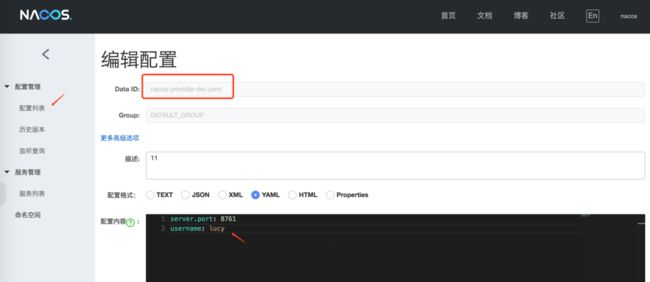
在上面的配置中,配置了nacos config server的地址,配置的扩展名是ymal(目前仅支持ymal和properties)。注意是没有配置server.port的,sever.port的属性在nacos中配置。上面的配置是和Nacos中的dataId 的格式是对应的,nacos的完整格式如下:
${prefix}-${spring.profile.active}.${file-extension}
prefix默认为spring.application.name的值,也可以通过配置项spring.cloud.nacos.config.prefix来配置。spring.profile.active即为当前环境对应的 profile,详情可以参考 Spring Boot文档。 注意:当spring.profile.active为空时,对应的连接符-也将不存在,dataId 的拼接格式变成${prefix}.${file-extension}file-exetension为配置内容的数据格式,可以通过配置项spring.cloud.nacos.config.file-extension来配置。目前只支持properties和yaml类型。
启动nacos,登陆localhost:8848/nacos,创建一个data id ,完整的配置如图所示:
nacos-provider-dev.yaml
server.prot: 8761
username: lucy
写一个RestController,在Controller上添加 @RefreshScope 实现配置的热加载。代码如下:
@RestController
@RefreshScope
public class ConfigController {

    @Value("${username:lily}")
    private String username;

    @RequestMapping("/username")
    public String get() {
        return username;
    }
}
启动工程nacos-provider,在浏览器上访问localhost:8761/username,可以返回在nacos控制台上配置的username。在nacos 网页上更改username的配置,在不重启nacos-provider工程的情况下,重新访问localhost:8761/username,返回的事修改后的值,可见nacos作为配置中心实现了热加载功能。
- 注意server.port是不可以 热加载的
本文为原创文章,转载请标明出处。
本文链接:https://www.fangzhipeng.com/springcloud/2019/06/01/sc-nacos-config.html
4. gateway作为服务网关
Spring Cloud Gateway是Spring Cloud官方推出的第二代网关框架,取代Zuul网关。网关作为流量的,在微服务系统中有着非常作用,网关常见的功能有路由转发、权限校验、限流控制等作用。
在上一节的案例中,我们讲述了如何使用nacos作为服务注册中心和配置中心,使用feign和sc loadbalancer作为服务调用。本小节将讲述如何使用spring cloud gateway作为服务网关。
工程构建
新建一个gateway的工程,工程目录如下:
[外链图片转存失败,源站可能有防盗链机制,建议将图片保存下来直接上传(img-8ZHjeT7D-1652537185612)(https://static.javajike.com/img/2021/4/12/sc2020-05.png)]
gateway需要注册到nacos中去,需要引入以下的依赖:
引入依赖
		<dependency>
            <groupId>com.alibaba.cloudgroupId>
            <artifactId>spring-cloud-starter-alibaba-nacos-discoveryartifactId>
        dependency> //discovery
        <dependency>
            <groupId>org.springframework.cloudgroupId>
            <artifactId>spring-cloud-starter-gatewayartifactId>
        dependency> //gateway

        <dependency>
            <groupId>org.springframework.bootgroupId>
            <artifactId>spring-boot-starter-webfluxartifactId>
        dependency> //webflux

        <dependency>
            <groupId>org.springframework.cloudgroupId>
            <artifactId>spring-cloud-starter-loadbalancerartifactId>
        dependency> //loadbalancer
网关规则配置
在配置文件application.pom文件:
server:
  port: 5000

spring:
  application:
    name: gateway
  cloud:
    nacos:
      discovery:
        server-addr: 127.0.0.1:8848
    gateway:
      discovery:
        locator:
          enabled: false
          lowerCaseServiceId: true #小写 服务ID
      routes:
        - id: provider
          uri: lb://provider
          predicates:
            - Path=/provider/** #所有的 提供者请求,都转发的 provider项目
          filters:
            - StripPrefix=1 #加条纹的 前缀为1
            #原文没有此空格
        - id: consumer
          uri: lb://consumer
          predicates:
            - Path=/consumer/**
          filters:
            - StripPrefix=1
配置的解释请阅读文末的相关教程,在这里不再重复。
在工程的启动文件加上相关注解:
@SpringBootApplication
@EnableDiscoveryClient
public class GatewayApplication {

    public static void main(String[] args) {
        SpringApplication.run(GatewayApplication.class, args);
    }

}
依次启动gateway\consumer\provider三个工程,在nacos中已经成功注册:
[外链图片转存失败,源站可能有防盗链机制,建议将图片保存下来直接上传(img-PAPjNEDT-1652537185612)(https://static.javajike.com/img/2021/4/12/sc2020-06.png)]
在浏览器上输入http://localhost:5000/consumer/hi-feign,浏览器返回响应:
hello feign, i'm provider ,my port:8762
gateway还有其他很多强大的功能在这里就不再讲述。
相关教程
- Spring Cloud Gateway 初体验:https://www.fangzhipeng.com/springcloud/2018/11/06/sc-f-gateway1.html
- Spring Cloud Gateway 之Predict篇:https://www.fangzhipeng.com/springcloud/2018/12/05/sc-f-gateway2.html
- spring cloud gateway之filter篇:https://www.fangzhipeng.com/springcloud/2018/12/21/sc-f-gatway3.html
- spring cloud gateway 之限流篇:https://www.fangzhipeng.com/springcloud/2018/12/22/sc-f-gatway4.html
- spring cloud gateway之服务注册与发现:https://www.fangzhipeng.com/springcloud/2018/12/23/sc-f-gateway5.html
源码下载
https://github.com/forezp/SpringCloudLearning/tree/master/sc-2020-chapter2
5. 使用sentinel作为熔断器
Sentinel,中文翻译为哨兵,是为微服务提供流量控制、熔断降级的功能,
- 它和Hystrix提供的功能一样,可以有效的解决微服务调用产生的“雪崩”效应,
- 为微服务系统提供了稳定性的解决方案。
随着Hytrxi进入了维护期,不再提供新功能,Sentinel是一个不错的替代方案。
- 通常情况,Hystrix采用线程池对服务的调用进行隔离,
- Sentinel才用了用户线程对接口进行隔离,
- 二者相比,
- Hystrxi是服务级别的隔离,
- Sentinel提供了接口级别的隔离,Sentinel隔离级别更加精细,
- 另外Sentinel直接使用用户线程进行限制,相比Hystrix的线程池隔离,减少了线程切换的开销。
- 另外Sentinel的DashBoard提供了在线更改限流规则的配置,也更加的优化。
从官方文档的介绍,Sentinel 具有以下特征:
- 丰富的应用场景: Sentinel 承接了阿里巴巴近 10 年的双十一大促流量的核心场景,
- 例如秒杀(即突发流量控制 在系统容量 可以承受的范围)、
- 消息削峰填谷、
- 实时熔断下游不可用应用等。
- 完备的实时监控: Sentinel 同时提供实时的监控功能。您可以在控制台中看到接入应用的
- 单台机器秒级数据,甚至 500 台以下规模的集群的汇总运行情况。
- 广泛的开源生态: Sentinel 提供 开箱即用 的与其它开源框架/库的整合模块,
- 例如与 Spring Cloud、Dubbo、gRPC 的整合。
- 您只需要引入相应的依赖并进行简单的配置即可快速地接入 Sentinel。
- 完善的 SPI 扩展点: Sentinel 提供简单易用、完善的 SPI 扩展点。您可以通过实现扩展点,快速的定制逻辑。例如定制规则管理、适配数据源等。
- SPI是串行外设接口(Serial Peripheral Interface)的缩写
下载sentinel dashboard
Sentinel dashboard提供一个轻量级的控制台,它
- 提供 机器发现、
- 单机资源 实时监控、
- 集群 资源汇总,
- 以及规则管理的功能。
- 您只需要对应用进行简单的配置,就可以使用这些功能。
注意: 集群资源汇总仅支持 500 台以下的应用集群,有大概 1 - 2 秒的延时。
下载最新的sentinel dashboard,下载地址为https://github.com/alibaba/Sentinel/releases
下载完启动,启动端口为8748,启动命令如下:
java -Dserver.port=8748 -Dcsp.sentinel.dashboard.server=localhost:8748 -Dproject.name=sentinel-dashboard -jar sentinel-dashboard-1.8.1.jar

java
-Dserver.port=8748
-Dcsp.sentinel.dashboard.server=localhost:8748
-Dproject.name=sentinel-dashboard
-jar sentinel-dashboard-1.8.1.jar
改造consumer
本次教程的例子在上一节的例子的基础上进行改造。
引入pom
在consumer的pom文件加上spring cloud sentinel的依赖,如下:
      <dependency>
            <groupId>com.alibaba.cloudgroupId>
            <artifactId>spring-cloud-starter-alibaba-sentinelartifactId>
        dependency>
配置文件application.yml加上如下的配置:
配置sentinel
server:
  port: 8763

spring:
  application:
    name: consumer

  cloud:
    nacos:
      discovery:
        server-addr: 127.0.0.1:8848
    sentinel:
      transport:
        port: 18763
        dashboard: localhost:8748

feign:
  sentinel:
    enabled: true
- 通过feign.sentinel.enable开启 Feign和sentinel的自动适配。
- 配置sentinel的dashboard的地址。
消费者 限流测试
通过这样简单的配置,Feign和sentinel就配置好了。
- 再启动三个工程provider\consumer\gateway。
- 在浏览器上多次访问http://localhost:5000/consumer/hi-feign
- 不要着急,先请求,然后慢慢等
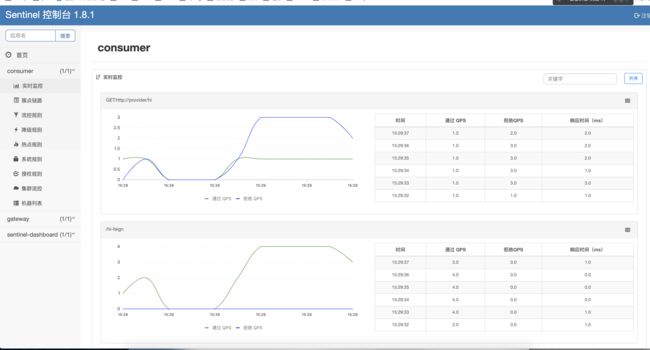
在浏览器上访问localhost:8748,登陆sentinel的控制台,登陆用户为sentinel,密码为sentinel。
consumer服务的/hi-feign接口,增加一个流控规则:
- 接口调用的feign,具体为:GET:http://provider/hi
[外链图片转存失败,源站可能有防盗链机制,建议将图片保存下来直接上传(img-YnTD6Iof-1652537185613)(https://static.javajike.com/img/2021/4/12/sc2020-08.png)]
qps为1,快速访问http://localhost:5000/consumer/hi-feign,会有失败的情况。
QPS一般指每秒查询率。
- 每秒查询率(QPS,Queries-per-second)
- 是对一个特定的查询服务器在规定时间内所处理流量多少的衡量标准。
在Spring cloud gateway上使用sentinel
Spring cloud gateway已经适配了sentinel,在gatewayg工程的pom文件加上相关依赖:
引入pom
		<dependency>
            <groupId>com.alibaba.cloudgroupId>
            <artifactId>spring-cloud-starter-alibaba-sentinelartifactId>
        dependency>

        <dependency>
            <groupId>com.alibaba.cloudgroupId>
            <artifactId>spring-cloud-alibaba-sentinel-gatewayartifactId>
        dependency>

        <dependency> gateway依然需要加入
            <groupId>org.springframework.cloudgroupId>
            <artifactId>spring-cloud-starter-gatewayartifactId>
        dependency>
配置文件配置
在配置文件application.yml上加上sentinel dashboard的配置:
 spring:
   cloud:
     sentinel:
      transport:
        port: 15000
        dashboard: localhost:8748
spring:
  main:
    allow-bean-definition-overriding: true
创建一个网关分组和网关的限流规则,代码如下,参考https://github.com/alibaba/Sentinel/wiki/%E7%BD%91%E5%85%B3%E9%99%90%E6%B5%81
@Configuration
public class GatewayConfiguration {
    //视图 分解器
    private final List<ViewResolver> viewResolvers;
    //服务器 code配置
    private final ServerCodecConfigurer serverCodecConfigurer;

    //注入 视图分解器 和 服务器配置
    public GatewayConfiguration(ObjectProvider<List<ViewResolver>> viewResolversProvider,
                                ServerCodecConfigurer serverCodecConfigurer) {
        //视图分解器 为空
        this.viewResolvers = viewResolversProvider.getIfAvailable(Collections::emptyList);
        this.serverCodecConfigurer = serverCodecConfigurer;
    }

    //最先加载
    @Bean
    @Order(Ordered.HIGHEST_PRECEDENCE)
    public SentinelGatewayBlockExceptionHandler sentinelGatewayBlockExceptionHandler() {
        // Register the block exception handler for Spring Cloud Gateway.
        return new SentinelGatewayBlockExceptionHandler(viewResolvers, serverCodecConfigurer);
    }

    //-1 加载
    @Bean
    @Order(-1)
    public GlobalFilter sentinelGatewayFilter() {
        return new SentinelGatewayFilter();
    }

    @PostConstruct
    public void doInit() {
        //初始化 apis 和 网关规则
        initCustomizedApis();
        initGatewayRules();
    }

    private void initCustomizedApis() {
        Set<ApiDefinition> definitions = new HashSet<>();
        ApiDefinition api1 = new ApiDefinition("consumer")
                .setPredicateItems(new HashSet<ApiPredicateItem>() {{

                    add(new ApiPathPredicateItem().setPattern("/consumer/**")
                            .setMatchStrategy(SentinelGatewayConstants.URL_MATCH_STRATEGY_PREFIX));
                }});
        ApiDefinition api2 = new ApiDefinition("provider")
                .setPredicateItems(new HashSet<ApiPredicateItem>() {{
                    add(new ApiPathPredicateItem().setPattern("/provider/**")
                            .setMatchStrategy(SentinelGatewayConstants.URL_MATCH_STRATEGY_PREFIX));
                }});
        definitions.add(api1);
        definitions.add(api2);
        GatewayApiDefinitionManager.loadApiDefinitions(definitions);
    }

    private void initGatewayRules() {
        Set<GatewayFlowRule> rules = new HashSet<>();
        rules.add(new GatewayFlowRule("consumer")
                .setCount(10)
                .setIntervalSec(1)
        );
        rules.add(new GatewayFlowRule("consumer")
                .setCount(2)
                .setIntervalSec(2)
                .setBurst(2)
                .setParamItem(new GatewayParamFlowItem()
                        .setParseStrategy(SentinelGatewayConstants.PARAM_PARSE_STRATEGY_CLIENT_IP)
                )
        );
        rules.add(new GatewayFlowRule("provider")
                .setCount(10)
                .setIntervalSec(1)
                .setControlBehavior(RuleConstant.CONTROL_BEHAVIOR_RATE_LIMITER)
                .setMaxQueueingTimeoutMs(600)
                .setParamItem(new GatewayParamFlowItem()
                        .setParseStrategy(SentinelGatewayConstants.PARAM_PARSE_STRATEGY_HEADER)
                        .setFieldName("X-Sentinel-Flag")
                )
        );
        rules.add(new GatewayFlowRule("provider")
                .setCount(1)
                .setIntervalSec(1)
                .setParamItem(new GatewayParamFlowItem()
                        .setParseStrategy(SentinelGatewayConstants.PARAM_PARSE_STRATEGY_URL_PARAM)
                        .setFieldName("pa")
                )
        );
        rules.add(new GatewayFlowRule("provider")
                .setCount(2)
                .setIntervalSec(30)
                .setParamItem(new GatewayParamFlowItem()
                        .setParseStrategy(SentinelGatewayConstants.PARAM_PARSE_STRATEGY_URL_PARAM)
                        .setFieldName("type")
                        .setPattern("warn")
                        .setMatchStrategy(SentinelGatewayConstants.PARAM_MATCH_STRATEGY_CONTAINS)
                )
        );

        rules.add(new GatewayFlowRule("provider")
                .setResourceMode(SentinelGatewayConstants.RESOURCE_MODE_CUSTOM_API_NAME)
                .setCount(5)
                .setIntervalSec(1)
                .setParamItem(new GatewayParamFlowItem()
                        .setParseStrategy(SentinelGatewayConstants.PARAM_PARSE_STRATEGY_URL_PARAM)
                        .setFieldName("pn")
                )
        );
        GatewayRuleManager.loadRules(rules);
    }
}
在sentinel 控制台为gateway创建一个限流规则,如下:
流控规则为qps=1,快速访问http://localhost:5000/consumer/hi-feign,在qps>1的情况下,会报以下的错误:
Blocked by Sentinel: FlowException
可见sentinel的配置已经生效,更多sentinel教程,请关注fangzhipeng.com网站。
- 参考文档
https://www.fangzhipeng.com/springcloud/2019/06/02/sc-sentinel.html
https://github.com/alibaba/Sentinel/releases
https://github.com/alibaba/Sentinel/tree/master/sentinel-dashboard
https://github.com/spring-cloud-incubator/spring-cloud-alibaba/wiki/Sentinel
https://github.com/alibaba/Sentinel/wiki/%E6%8E%A7%E5%88%B6%E5%8F%B0
- 源码下载
https://github.com/forezp/SpringCloudLearning/tree/master/sc-2020-chapter3
6. sleuth+zipkin实现链路追踪
Spring Cloud Sleuth 主要功能就是在分布式系统中提供追踪解决方案,并且兼容支持了 zipkin,你只需要在pom文件中引入相应的依赖即可。
微服务架构上通过业务来划分服务的,通过REST调用,对外暴露的一个接口,可能需要很多个服务协同才能完成这个接口功能,如果链路上任何一个服务出现问题或者网络超时,都会形成导致接口调用失败。随着业务的不断扩张,服务之间互相调用会越来越复杂。

本小节教程将讲述如何使用sleuth和zipkin来构建微服务的链路追踪。
下载zipkin server并启动
下载地址如下,并启动:
curl -sSL https://zipkin.io/quickstart.sh | bash -s
java -jar zipkin.jar
访问zipkin的ui 界面,地址为localhost:9411
改造工程
引入pom
在三个工程provider\consumer\gateway的pom文件加上以下的依赖:
         <dependency>
            <groupId>org.springframework.cloudgroupId>
            <artifactId>spring-cloud-starter-sleuthartifactId>
        dependency>

        <dependency>
            <groupId>org.springframework.cloudgroupId>
            <artifactId>spring-cloud-sleuth-zipkinartifactId>
        dependency>
zipkin配置
三个工程的配置文件application.yml加上以下的配置:
feign:
  sentinel:
    enabled: true

spring.zipkin.sender.type: web
#设置采样率默认为 0.1 注意之前的版本是percentage 新版本中更换为 probability
spring.sleuth.sampler.probability: 1
spring.zipkin.base-url: http://localhost:9411/
spring.zipkin.service.name: consumer
spring:
  sleuth:
    web:
      client:
        enabled: true
    sampler:
      probability: 1.0 # 将采样比例设置为 1.0,也就是全部都需要。默认是 0.1
  zipkin:
    base-url: http://localhost:9411/ # 指定了 Zipkin 服务器的地址
进行测试
zipkin server支持mq方式收集链路信息,同时支持多种数据存储方式,比如es\mysql等,更多收集数据和存储方式见:https://github.com/openzipkin/zipkin/tree/master/zipkin-server
启动三个工程,在浏览器上访问:http://localhost:5000/consumer/hi-feign
访问zipkin server的api ,可以看到服务依赖,如下:
[外链图片转存失败,源站可能有防盗链机制,建议将图片保存下来直接上传(img-BeJ1SvPg-1652537185616)(https://static.javajike.com/img/2021/4/12/sc2020-13.png)]
可以看到请求的具体耗时:
[外链图片转存失败,源站可能有防盗链机制,建议将图片保存下来直接上传(img-z6tCJmmK-1652537185616)(https://static.javajike.com/img/2021/4/12/sc2020-14.png)]
参考文档
https://zipkin.io/pages/quickstart.html
https://www.fangzhipeng.com/springcloud/2018/08/09/sc-f9-sleuth.html
源码下载
https://github.com/forezp/SpringCloudLearning/tree/master/sc-2020-chapter4
7. Sentinel 教程2
Sentinel作为Spring Cloud Alibaba的组件之一,在Spring Cloud项目中使用它非常的简单。现在以案例的形式来讲解如何在Spring Cloud项目中使用Sentinel。本项目是在之前nacos教程的案例基础上进行改造。在工程的pom文件加上sentinel的Spring Cloud起步依赖,代码如下:
引入pom
<dependency> //上面教程用的是 阿里公司的 不用设置版本号。两个都行
     <groupId>org.springframework.cloudgroupId>
     <artifactId>spring-cloud-starter-alibaba-sentinelartifactId>
     <version>0.9.0.RELEASEversion>
dependency>
配置文件 配置dashboard
在工程的配置文件application.yml文件中配置,需要新增2个配置:
- spring.cloud.sentinel.transport.port: 8719 ,
- 这个端口配置会在应用对应的机器上启动一个 Http Server,该 Server 会与 Sentinel 控制台做交互。
- 比如 Sentinel 控制台添加了1个限流规则,
- 会把规则数据 push 给这个 Http Server 接收,Http Server 再将规则注册到 Sentinel 中。
- 这个端口配置会在应用对应的机器上启动一个 Http Server,该 Server 会与 Sentinel 控制台做交互。
- spring.cloud.sentinel.transport.dashboard: 8080,这个是Sentinel DashBoard的地址。
server:
  port: 8762
spring:
  application:
    name: nacos-provider

  cloud:
    nacos:
      discovery:
        server-addr: 127.0.0.1:8848  #nacos的地址
    sentinel:
      transport:
        port: 8719 #可以任意指定,如18763
        dashboard: localhost:8080 #sentinel-dashboard-1.8.1.jar的端口
编写controller
写一个RestController,在接口上加上SentinelResource注解就可以了。
@RestController
public class ProviderController {

    @GetMapping("/hi")
    @SentinelResource(value="hi")
    public String hi(@RequestParam(value = "name",defaultValue = "forezp",required = false)String name){

        return "hi "+name;
    }

}
关于@SentinelResource 注解,有以下的属性:
-
value:资源名称,必需项(不能为空)
-
entryType:entry 类型,可选项(默认为 EntryType.OUT)
-
blockHandler / blockHandlerClass:
- blockHandler 对应处理 BlockException 的函数名称,可选项
-
fallback:fallback 函数名称,可选项,用于在抛出异常的时候提供 fallback 处理逻辑。
启动Nacos,并启动nacos-provider项目。文末有源码下载链接。
启动 sentinel-dashboard
java -jar sentinel-dashboard-1.6.1.jar
默认启动端口为8080,可以-Dserver.port=8081的形式改变默认端口。启动成功后,在浏览器上访问localhost:8080,就可以显示Sentinel的登陆界面,登陆名为sentinel,密码为sentinel。
登陆sentinel dashboard成功后,并多次访问nacos-provider的localhost:8080/hi接口,在nacos访问信息如下:
[外链图片转存失败,源站可能有防盗链机制,建议将图片保存下来直接上传(img-CjGvSq0o-1652537185617)(https://www.fangzhipeng.com/img/jianshu/2279594-51bbd0f299471d4d.png)]
sentinel dashboard显示了nacos-provider的接口资源信息。
- 不要着急,先请求,然后慢慢等
[外链图片转存失败,源站可能有防盗链机制,建议将图片保存下来直接上传(img-R145vpPX-1652537185617)(https://www.fangzhipeng.com/img/jianshu/2279594-0ceba359c2e1daff.png)]
在/hi资源处设置接口的限流功能,在“+流控”按钮点击开设置界面如下,设置阈值类型为 qps,单机阈值为2。
[外链图片转存失败,源站可能有防盗链机制,建议将图片保存下来直接上传(img-SWq1Iqe8-1652537185618)(https://www.fangzhipeng.com/img/jianshu/2279594-ac4e0be06515ec9a.png)]
设置成功后可以在流控规则这一栏进行查看,如图所示:

测试
多次快速访问nacos-provider的接口资源http://localhost:8762/hi,可以发现偶尔出现以下的信息:
Blocked by Sentinel (flow limiting)
正常的返回逻辑为
hi forezp
由以上可只,接口资源/hi的限流规则起到了作用。
在FeignClient中使用Sentinel
Hystrix默认集成在Spring Cloud 的Feign Client组件中,Sentinel也可以提供这样的功能。现以案例的形式来讲解如何在FeignClient中使用Sentinel,z本案例是在之前的nacos教程案例的nacos-consumer工程上进行改造,
- 除了引入spring-cloud-starter-alibaba-sentinel,
- 还需要引入spring-cloud-starter-openfeign,
server:
  port: 8763
spring:
  application:
    name: nacos-consumer
  cloud:
    nacos:
      discovery:
        server-addr: 127.0.0.1:8848
    sentinel:
      transport:
        port: 8719
        dashboard: localhost:8080

feign.sentinel.enabled: true
写一个FeignClient,调用nacos-provider的/hi接口:
@FeignClient("nacos-provider")
public interface ProviderClient {

    @GetMapping("/hi")
    String hi(@RequestParam(value = "name", defaultValue = "forezp", required = false) String name);
}
写一个RestController调用ProviderClient,代码如下:
@RestController
public class ConsumerController {

    @Autowired
    ProviderClient providerClient;

    @GetMapping("/hi-feign")
    public String hiFeign(){
       return providerClient.hi("feign");
    }
}
在FeignClient中,Sentinel为Feign调用生成了资源名策略定义,定义规则为httpmethod:protocol://requesturl。启动nacos-consumer工程,在Sentinel DashBoard生成了如下的资源信息:
- GET:http://nacos-provider/hi
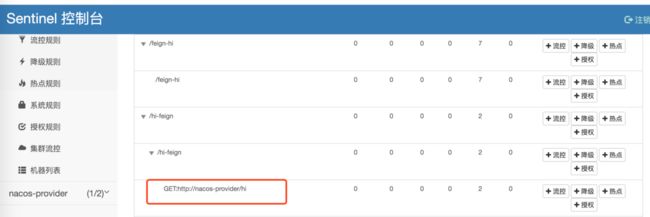
添加流控,QPS为2,在浏览器上快速多次点击访问http://localhost:8763/hi-feign,浏览器在正常情况下是能够正常返回如下的信息:
hi feign
在被限流的时候返回错误信息。
需要注意的是,被限流的时候FeignClient并不会调用nacos-provider的接口,而是在nacos-consumer工程里直接报错。
- 源码下载
https://github.com/forezp/SpringCloudLearning/tree/master/springcloud-alibaba/nacos-discovery-sentinel