基于YOLO算法与intel深度相机三维测量(工件尺寸和物体尺寸)
目录
1.简介
1.1 intel D4系列深度相机 (D455)
1.2 yolo算法
2.功能实现
2.1构思:
2.2 主代码
这篇文章还是接着前面的几篇文章的项目延申,这个是最初的方案,因为太贵被否了。
1.简介
1.1 intel D4系列深度相机 (D455)
Intel RealSense D435、D455等D4系列:
Intel D4系列深度相机是由英特尔(Intel)公司推出的一款深度感知摄像头,专为实现计算机视觉和深度学习应用而设计。这款相机使用了英特尔的深度感知技术,结合了摄像头和红外(IR)传感器,可以提供高质量的深度图像和 RGB 彩色图像,为开发者提供了丰富的数据源,用于各种应用,包括虚拟现实(VR)、增强现实(AR)、手势识别、人脸识别、姿势识别、3D 扫描等。
以下是Intel D4系列深度相机的一些主要特点和优势:
1. 深度感知技术:
D4系列相机具备高质量的深度感知功能,能够获取场景中各个物体的精确距离信息,而不仅仅是RGB图像。
2. 多模式操作:
相机支持多种操作模式,包括手势识别、人脸识别、物体追踪等。这使得它非常适合于需要人机交互的应用领域。
3. 低光环境适应:
D4系列深度相机在低光环境下也能够提供准确的深度信息,这使得它在各种不同的环境中都能够稳定工作。
4. 易于集成:
相机提供了丰富的软件开发工具,开发者可以方便地将其集成到自己的应用中,快速开发深度感知应用。
5. 多平台支持:
D4系列深度相机支持多种操作系统,包括Windows、Linux等,也提供了各种开发语言的API,方便开发者在不同平台上使用。
6. 精准度和稳定性:
相机具有高精度和稳定性,能够在不同距离范围内提供准确的深度信息,这对于需要精确度的应用非常重要。
1.2 yolo算法
YOLO(You Only Look Once)是一种实时目标检测算法,它的主要思想是将目标检测问题转化为一个回归问题。相较于传统的目标检测算法,YOLO具有更快的处理速度和较高的准确性。
YOLO算法的基本原理如下:
将输入图像划分为一个固定大小的网格。每个网格负责预测该网格中是否包含目标以及目标的边界框。
每个网格预测多个边界框(一般为5个)以适应不同形状的目标。
每个边界框预测目标类别的概率。
对每个边界框的位置和类别进行综合预测。
使用非极大值抑制(NMS)处理重叠的边界框,以获取最终的目标检测结果。
YOLO算法相较于其他目标检测算法的优势在于其端到端的设计,能够实现实时目标检测,并且减少了检测过程中的多次重复计算。然而,由于YOLO将图像划分为网格,对于小尺寸目标和密集目标的检测效果可能会稍差。
此外,YOLO还有不同版本的改进,如YOLOv2、YOLOv3和YOLOv4等,这些改进版本在准确性和速度方面有所提升,同时也引入了一些新的技术和网络结构,如多尺度预测、锚框、Darknet-19等。
2.功能实现
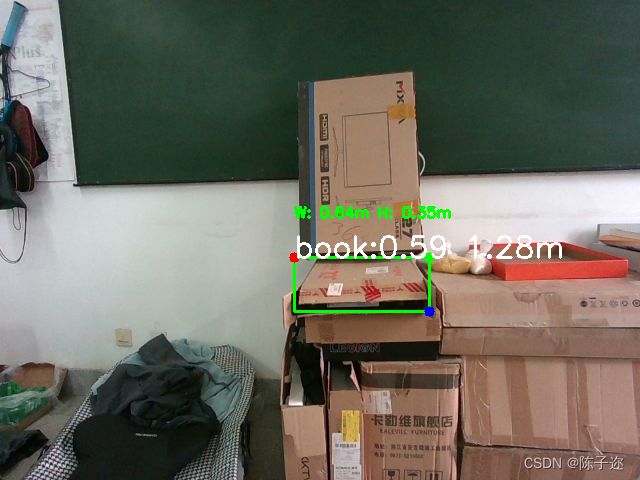
这是实验室的一个项目,用于未来试智能立体停车场的视觉部分,需要检测车俩位置信息和尺寸信息,摄像头在库的顶上,俯拍视角,图如下:
2.1构思:
因为是俯拍,所以这里就考虑了用2D框实现的可行性,通过yolo拿到粗定位框,将框手动扩大一点,确保物体完全包裹,对框内区域提取轮廓在进行多边形拟合,使用拟合后数据重新画框,拿到角点坐标,进行坐标变换,将像素坐标转为真实坐标,求出距离。(仅限俯拍情况,如果是其他场景,框的坐标和现实坐标不在一个面上,这样就需要用三维目标检测算法画框)

2.2 主代码
这里就不完全开源了,因为这个项目还在做,不过有底子的道友,可以参考我前面有一篇opencv里dnn推理yolov5的代码,结合一下下面这个代码就可以用了。
import pyrealsense2 as rs
# import numpy as np
# import cv2
import random
# import torch
from ours import *
import time

# model = torch.hub.load('ultralytics/yolov5', 'yolov5s')
#
# model = torch.hub.load('ultralytics/yolov5', 'yolov5l6')
# model.conf = 0.5
def get_mid_pos(frame,box,depth_data,randnum):
    distance_list = []
    mid_pos = [(box[0] + box[2])//2, (box[1] + box[3])//2] #确定索引深度的中心像素位置
    min_val = min(abs(box[2] - box[0]), abs(box[3] - box[1])) #确定深度搜索范围
    #print(box,)
    for i in range(randnum):
        bias = random.randint(-min_val//4, min_val//4)
        dist = depth_data[int(mid_pos[1] + bias), int(mid_pos[0] + bias)]
        cv2.circle(frame, (int(mid_pos[0] + bias), int(mid_pos[1] + bias)), 4, (255,0,0), -1)

        #print(int(mid_pos[1] + bias), int(mid_pos[0] + bias))
        if dist:
            distance_list.append(dist)
    distance_list = np.array(distance_list)
    distance_list = np.sort(distance_list)[randnum//2-randnum//4:randnum//2+randnum//4] #冒泡排序+中值滤波
    cv2.imshow('1', frame)


    return np.mean(distance_list)
def dectshow(org_img, boxs,depth_data):
    img = org_img.copy()
    for box in boxs:
        cv2.rectangle(img, (int(box[0]), int(box[1])), (int(box[2]), int(box[3])), (0, 255, 0), 2)
        intrinsics = depth_frame.profile.as_video_stream_profile().intrinsics
        #
        # x1, y1 = (box[0] ,box[1])
        # print((x1,y1))
        # x1, y2 = (box[1] ,box[1])
        # x2, y1 = (box[0] ,box[1])
        # x2, y2 = (box[0] ,box[1])

        x1 = box[0]
        y1 = box[1]
        x2 = box[2]
        y2 = box[3]

        cv2.circle(img, (x1, y1), 5, (0, 0, 255), -1)  # 红色圆点
        cv2.circle(img, (x2, y1), 5, (0, 255, 0), -1)  # 绿色圆点
        cv2.circle(img, (x2, y2), 5, (255, 0, 0), -1)  # 蓝色圆点

        depth1 = depth_frame.get_distance(x1, y1)  # 获取第一个点的深度值
        depth2 = depth_frame.get_distance(x2, y1)  # 获取第二个点的深度值
        depth3 = depth_frame.get_distance(x2, y2)  # 获取第三个点的深度值

        point1 = rs.rs2_deproject_pixel_to_point(intrinsics, [x1, y1], depth1)
        point2 = rs.rs2_deproject_pixel_to_point(intrinsics, [x2, y1], depth2)
        point3 = rs.rs2_deproject_pixel_to_point(intrinsics, [x2, y2], depth3)

        cv2.imshow('1', img)

        # 计算两点之间的距离
        width = np.linalg.norm(np.array(point2) - np.array(point1))
        height = np.linalg.norm(np.array(point3) - np.array(point2))
        print("宽 is:", width, "m")
        print("长 is:", height, "m")

        cv2.putText(img, f'W: {str(width)[:4] }m H: {str(height)[:4]}m', (int(box[0]), int(box[1]) - 40), cv2.FONT_HERSHEY_SIMPLEX, 0.5,
                    (0, 255, 0), 2)
        # if not depth_frame.is_depth_frame():
        #     continue
        #
        # # 确定坐标值是否在depth_image的范围之内
        # if x1 >= 0 and x1 < depth_image.shape[1] and y1 >= 0 and y1 < depth_image.shape[0]:
        #     depth1 = depth_frame.get_distance(x1, y1)  # 获取第一个点的深度值
        #     continue
        # else:
        #     depth1 = None
        #
        #
        # # 确定坐标值是否在depth_image的范围之内
        # if x2 >= 0 and x2 < depth_image.shape[1] and y1 >= 0 and y1 < depth_image.shape[0]:
        #     depth2 = depth_frame.get_distance(x2, y1)  # 获取第二个点的深度值
        #     continue
        # else:
        #     depth2 = None
        #
        # # 确定坐标值是否在depth_image的范围之内
        # if x2 >= 0 and x2 < depth_image.shape[1] and y2 >= 0 and y2 < depth_image.shape[0]:
        #     depth3 = depth_frame.get_distance(x2, y2)  # 获取第三个点的深度值
        #     continue
        # else:
        #     depth3 = None

        # if x1 < 0 or x1 >= depth_image.shape[1] or y1 < 0 or y1 >= depth_image.shape[0]:
        #     # 处理超出范围的情况
        #     continue  # 跳过该点的处理
        # if x2 < 0 or x2 >= depth_image.shape[1] or y2 < 0 or y2 >= depth_image.shape[0]:
        #     # 处理超出范围的情况
        #     continue  # 跳过该点的处理


        dist = get_mid_pos(org_img, box, depth_data, 24)
        cv2.putText(img, box[4] + ' ' + str(dist / 1000)[:4] + 'm' ,
                    (int(box[0]), int(box[1])), cv2.FONT_HERSHEY_SIMPLEX, 1, (255, 255, 255), 2)
        # if not depth_frame.is_depth_frame():
        #     continue
        #
        # # 确定坐标值是否在depth_image的范围之内
        # if x1 >= 0 and x1 < depth_image.shape[1] and y1 >= 0 and y1 < depth_image.shape[0]:
        #     depth1 = depth_frame.get_distance(x1, y1)  # 获取第一个点的深度值
        #     continue
        # else:
        #     depth1 = None
        #
        #
        # # 确定坐标值是否在depth_image的范围之内
        # if x2 >= 0 and x2 < depth_image.shape[1] and y1 >= 0 and y1 < depth_image.shape[0]:
        #     depth2 = depth_frame.get_distance(x2, y1)  # 获取第二个点的深度值
        #     continue
        # else:
        #     depth2 = None
        #
        # # 确定坐标值是否在depth_image的范围之内
        # if x2 >= 0 and x2 < depth_image.shape[1] and y2 >= 0 and y2 < depth_image.shape[0]:
        #     depth3 = depth_frame.get_distance(x2, y2)  # 获取第三个点的深度值
        #     continue
        # else:
        #     depth3 = None
        if x1 < 0 or x1 >= depth_image.shape[1] or y1 < 0 or y1 >= depth_image.shape[0]:
            # 处理超出范围的情况
            continue  # 跳过该点的处理
        if x2 < 0 or x2 >= depth_image.shape[1] or y2 < 0 or y2 >= depth_image.shape[0]:
            # 处理超出范围的情况
            continue  # 跳过该点的处理
    cv2.imshow('dec_img', img)


if __name__ == "__main__":
    # Configure depth and color streams
    onnx_path = 'yolov5s.onnx'
    model = Yolov5ONNX(onnx_path)
    pipeline = rs.pipeline()
    config = rs.config()
    config.enable_stream(rs.stream.depth, 640, 480, rs.format.z16, 60)
    config.enable_stream(rs.stream.color, 640, 480, rs.format.bgr8, 60)
    # Start streaming
    pipeline.start(config)
    pTime = 0
    try:
        while True:
            # Wait for a coherent pair of frames: depth and color
            frames = pipeline.wait_for_frames()
            depth_frame = frames.get_depth_frame()
            color_frame = frames.get_color_frame()
            depth_intrinsics = depth_frame.profile.as_video_stream_profile().intrinsics
            if not depth_frame or not color_frame:
                continue
            # Convert images to numpy arrays

            depth_image = np.asanyarray(depth_frame.get_data())

            color_image = np.asanyarray(color_frame.get_data())

            im = color_image.copy()    # 备份原图


            cTime = time.time()
            fps = 1 / (cTime - pTime)
            pTime = cTime
            cv2.putText(color_image, str(int(fps)), (10, 70), cv2.FONT_HERSHEY_PLAIN, 3,
                        (255, 0, 255), 3)


            results , boxs = model.detect(color_image)

            dectshow(im, boxs, depth_image)

            # Apply colormap on depth image (image must be converted to 8-bit per pixel first)
            depth_colormap = cv2.applyColorMap(cv2.convertScaleAbs(depth_image, alpha=0.03), cv2.COLORMAP_JET)
            # Stack both images horizontally
            images = np.hstack((color_image, depth_colormap))
            # Show images
            cv2.namedWindow('RealSense', cv2.WINDOW_AUTOSIZE)
            cv2.imshow('RealSense', images)
            key = cv2.waitKey(1)
            # Press esc or 'q' to close the image window
            if key & 0xFF == ord('q') or key == 27:
                cv2.destroyAllWindows()
                break
    finally:
        # Stop streaming
        pipeline.stop()
请忽略yolo这个笨蛋把他识别错了,但是效果还是可以的,精度也没问题,关键是很省事,就是相机费钱。这个方案被否了。