C语言进阶第六课-----------字符分类函数和内存的开辟

作者前言

✨✨✨✨✨✨
​ 作者介绍:

作者id:老秦包你会,
简单介绍:
喜欢学习C语言和python等编程语言,是一位爱分享的博主,有兴趣的小可爱可以来互讨
个人主页::小小页面
gitee页面:秦大大

一个爱分享的小博主 欢迎小可爱们前来借鉴


字符和内存

  • **作者前言**
  • 字符分类函数
    • iscntrl
    • isspace
    • isdigit
    • isxdigit
    • islower
    • isupper
    • isalpha
    • isalnum
    • ispunct
    • isgraph
    • isprint
  • 字符转换
    • toupper
    • tolower
  • 内存相关函数
    • memcpy
    • memove
    • memset
    • memcmp
  • 总结

字符分类函数

iscntrl

在这里插入图片描述
判断对应的ASCII值所对应的字符是否为控制字符
在ASCII码中,第0~31号及第127号(共33个)是控制字符或通讯专用字符,
如果 c 确实是控制字符,则与零(即 true)不同的值。否则为零(即假)。(是控制字符返回非0,不是就返回0)

#include
#include
#include
int main()
{
	int i = 0; 
	for (i = 0; i < 50; i++)
	{
		if (iscntrl(i))
			printf(" %d %c:是控制字符\n", i, i + 1);
		else
			printf("%d %c:不是控制字符\n", i, i + 1);
		
	}


	return 0;
}

isspace

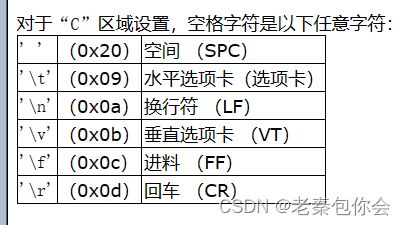
判断是否为空白字符
空白字符:空格‘ ’,换页‘\f’,换行’\n’,回车‘\r’,制表符’\t’或者垂直制表符’\v’
在这里插入图片描述
如果 c 确实是一个空格字符。返回非0(true), 否则为零(即假)。
C语言进阶第六课-----------字符分类函数和内存的开辟_第1张图片

#include
#include
#include
int main()
{
	int i = 9;
	printf("%d", isspace(i));
	return 0;
}

isdigit

判断字符是否是0-9

#include
#include
#include
int main()
{
	int ch;
	ch = getchar();
	if (isdigit(ch))
	{
		printf("%c是数字", ch);
	}
	else
	{
		printf("NO");
	}

	return 0;
}

在这里插入图片描述
十进制数字是以下任意一种: 0 1 2 3 4 5 6 7 8 9 有

isxdigit

判断字符是否为十六进制的字母(包含大小写)和数字
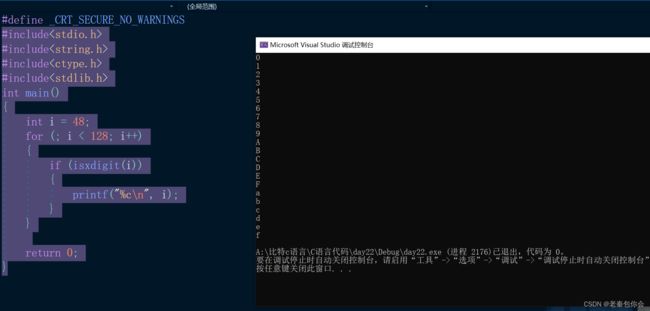
十六进制数字是以下任意一种: 0 1 2 3 4 5 6 7 8 9 a b c d e f A B C D E F
在这里插入图片描述
是十六进制数就返回非0的数字,否则就返回0;

#include
#include
#include
#include
int main()
{
	int i = 48;
	for (; i < 128; i++)
	{
		if (isxdigit(i))
		{
			printf("%c\n", i);
		}
	}
	
	return 0;
}

C语言进阶第六课-----------字符分类函数和内存的开辟_第2张图片

islower

在这里插入图片描述
小写字母是以下任意字母:a b c d e f g h i j k l m n o p q r s t u v w x y z。
如果是小写字母就返回非0的数字,否则就返回0

#include
#include
#include
#include
int main()
{
	int i = 97;
	for (; i <= 122; i++)
	{
		if (islower(i))
		{
			printf("%c\n", i);
		}
	}
	return 0;
}

isupper

判断字符是否是大写字母
在这里插入图片描述
大写字母为以下任意字母:A B C D E F G H I J K L M N O P Q R S T U V W X Y Z。
如果是大写字母就返回非0的数字,否则就返回0

#include
#include
#include
#include
int main()
{
	int i = 65;
	for (; i <= 95; i++)
	{
		if (isupper(i))
		{
			printf("%c\n", i);
		}
	}
	return 0;
}

isalpha

判断字符是否为字母(包含大小写)
在这里插入图片描述
如果是字母就返回非0的数字,否则就返回0

#include
#include
#include
#include
int main()
{
	int i = 65;
	for (; i <= 122; i++)
	{
		if (isalpha(i))
		{
			printf("%c\n", i);
		}
	}
	return 0;
}

isalnum

判断字符是否是字母或者数字
如果是字母或者是数字就返回非0的数字,否则就返回0
在这里插入图片描述

#include
#include
#include
#include
int main()
{
	int i = 48;
	for (; i <= 122; i++)
	{
		if (isalnum(i))
		{
			printf("%c\n", i);
		}
	}
	return 0;
}

ispunct

在这里插入图片描述
检查字符是否为标点字符
如果是标点字符就返回非0的数字,否则就返回0
C语言进阶第六课-----------字符分类函数和内存的开辟_第3张图片

#include
#include
#include
#include
int main()
{
	printf("%d", ispunct('"'));
	return 0;
}

isgraph

在这里插入图片描述
判断字符是否具有图形表示
具有图形表示的字符是除空格字符 (’ ') 之外的所有可以打印的字符(由 isprint 确定)。

#include
#include
#include
#include
int main()
{
	char arr[] = "abcdefg k";
	char* pa = arr;
	while (*pa)
	{
		if (isgraph(*pa))
		{
			printf("%c", *pa);
		}
		pa++;
	}
	return 0;
}

isprint

在这里插入图片描述
检查 c 是否为可打印字符
可打印字符是在显示器上占据打印位置的字符(这与控制字符相反,使用 iscntrl 检查)。

#include
#include
#include
#include
int main()
{
	char arr[] = "abcdefg k";
	char* pa = arr;
	while (*pa)
	{
		if (isprint(*pa))
		{
			printf("%c", *pa);
		}
		pa++;
	}
	return 0;
}

注意这里空格也是符合条件的

字符转换

前面我们只是理解了判断字符,如果要转换字符也有对应的库函数

toupper

在这里插入图片描述
小写字母是以下任意字母:a b c d e f g h i j k l m n o p q r s t u v w x y z,分别翻译为:A B C D E F G H I J K L M N O P Q R S T U V W X Y Z。

#include
#include
#include
#include
int main()
{
	int i = 97;
	for (; i <= 122; i++)
	{
		printf("%c\n", toupper(i));
	}
	return 0;
}

如果是小写就转换,不是就不转换

tolower

同理这个函数就是把大写转换成小写

#include
#include
#include
#include
int main()
{
	int i = 65;
	for (; i <= 90; i++)
	{
		printf("%c\n", tolower(i));
	}
	printf("%c\n", tolower('a'));
	return 0;
}

如果是大写就转换,不是就不转换

内存相关函数

memcpy

前面我们已经学习过了strcpy,这个函数只适合于字符串拷贝,如果要拷贝整数数组,浮点型数组就会没办法,但是memcpy就可以解决

在这里插入图片描述
这个函数有三个参数,一个是目标空间,一个是起始地址,以及要拷贝的字节总大小
如果看过我模拟出来的qsrot函数就会明白,这里为啥要拷贝字节总大小,我们只把对应的字节大小进行拷贝过去

include<stdio.h>

int main()
{
	int arr[20] = { 1,2,3,4,5,6,7,8,9 };
	int arr1[10] = { 0 };
	memcpy(arr1, arr, sizeof(int) * 9);
	int i = 0;
	for (i = 0; i < 10; i++)
	{
		printf("%d ", arr[i]);
	}
	return 0;
}

如果我们要模拟实现出来

#include
#include
#include
#include
#include

void* my_memcpy(void* destintion, const void* soured, size_t num)
{
	//不为空
	assert(destintion && soured);
	//一个一个字节进行拷贝,要使用char*, 加1访问一个字节
	 const char* su = soured;
	 char* de = destintion;
	 while (num)
	 {
		 *de++ = *su++;
		 num--;
		
	 }
	 return destintion;
}


int main()
{
	char arr[20] = "abcd\0f";
	char arr1[10] = { 0 };
	my_memcpy(arr1, arr, sizeof(arr[0]) * 10);
	int i = 0;
	for (i = 0; i < 10; i++)
	{
		printf("%c ", arr1[i]);
	}

	return 0;
}

如果当我们使用这个模拟函数进行自身部分的拷贝就会发现,和库函数memcpy有差异

#include
#include
#include
#include
#include
int main()
{
	int arr[20] = {1,2,3,4,5,6,7,8,9};
	
	memcpy( arr + 2, arr, sizeof(arr[0]) * 5);
	int i = 0;
	for (i = 0; i < 10; i++)
	{
		printf("%d ", arr[i]);
	}

	return 0;
}

库函数的结果
在这里插入图片描述
我们模拟函数的结果:
在这里插入图片描述
可以看出两者的差异
看到这里就会有疑问,是不是模拟错了?
其实标准值规定,memcpy来实现不重叠的内存拷贝,而重叠的内存拷贝一般不使用memcpy而是使用memmove,就好比我们考试只需考60分,90分就要其他人去考吧,而我们却发现memcpy连重叠的拷贝也能做到,这就是超预期了,而我们模拟出来的函数只是具备了拷贝不重叠的内存拷贝功能,vs的库函数memcpy两者具备,但是在一些编译器里就会不一定两种功能都有。

memove

在这里插入图片描述
从这里可以看出memmove函数的参数和memcpy是一样的,所以memove函数具备了memcpy的所有功能

#include
#include
#include
#include
#include
int main()
{
	int arr[] = { 1,2,3,4,5,6,7,8,9 };
	int arr1[10] = { 0 };
	memmove(arr1, arr, sizeof(arr[0]) * 9);
	return 0;
}

我们来模拟一下
C语言进阶第六课-----------字符分类函数和内存的开辟_第4张图片
如果模拟这个函数很容易就会把memcpy的功能加上重叠的功能,重叠的方法很多人就会想到我要重新开辟一块临时空间存放和arr一样的,然后进行一一的拷贝,然后再覆盖原来的arr,这个方法是可行的,但是这样很麻烦,那有没有在一个数组内就可以进行拷贝呢?答案是有的
如上图
如果我们要3-7拷贝到1-5的位置上去,我们可以先把3拷贝到1然后依次往下,就可以解决原来数字被覆盖的问题,
如果我们要把1-5拷贝到5-9的位置我们就先拷贝5到9的位置上去,往后依次往前

#include
void* my_memmove(void* arr1, const void* arr, size_t num)
{
	char* pa1 = arr1;
	const char* pa = arr;
	// 后往前拷贝
	if (pa1 > pa)
	{
		pa1 += num - 1;
		pa += num - 1;
		while (num)
		{
			*pa1 = *pa;
			pa1--;
			pa--;
			num--;
		}
	}
	else
	{
		//前往后拷贝
		while (num)
		{
			*pa1 = *pa;
			pa1++;
			pa++;
			num--;
		}
	}
	return arr1;
}


int main()
{
	int arr[] = { 1,2,3,4,5,6,7,8,9 };
	int arr1[10] = { 0 };
	my_memmove(arr, arr + 2, sizeof(arr[0]) * 5);
	return 0;
}

这里我们要注意一下数组arr的第n个元素的地址是arr+(n - 1)

memset

在这里插入图片描述
填充内存块
把从ptr开始的num个字节填充为value

#include
#include
int main()
{
	char arr[] = "abcdefg";
	memset(arr, 't', 5);
	printf("%s", arr);
	return 0;
}

结果为:
在这里插入图片描述
所以我们可以认为memset是以字节为单位的进行设置的,如果不相信,下面为例

#include
#include
int main()
{
	int arr[10] = { 0 };
	memset(arr, 1, 40);
	int i = 0;
	for (i = 0; i < 10; i++)
	{
		printf("%d ", arr[i]);

	}
	return 0;
}

结果为:
在这里插入图片描述
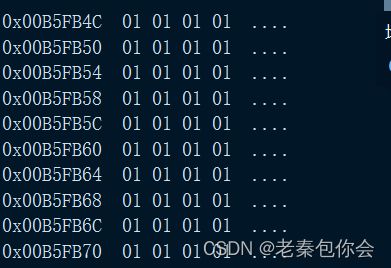
C语言进阶第六课-----------字符分类函数和内存的开辟_第5张图片
这里就是arr里面 存储的内存,我们的想法是把arr每个元素设置成1,而结果却不对,memset是以字节为单位进行设置的,需要注意一下,在vs是小端存储(高阶数存放在低地址) 结果为01010101
如果我们要模拟实现就是

memcmp

在这里插入图片描述
比较两个内存块的内容

#include
#include
int main()
{
	int arr1[] = { 1,2,3,4,5,6,7,8,9 };
	// 数组的存储方式:01 00 00 00 02 00 00 00 03 00 00 00 04 00 00 00 05 00 00 00 06 00 00 00 07 00 00 00 08 00 00 00 09 00 00 00
	int arr[] = { 1,2,3,6 };
	// 数组的存储方式:01 00 00 00 02 00 00 00 03 00 00 00 06 00 00 00
	printf("%d", memcmp(arr, arr1, 16));
	return 0;
}

在这里插入图片描述
简单的理解,和strcmp的比较方式是一样的,一旦匹配到不相等的内存就会返回
如果不相信还有一个例子

#include
#include
int main()
{
	int arr1[] = { 1,2,3,4,5,6,7,8,9 };
	// 数组的存储方式:01 00 00 00 02 00 00 00 03 00 00 00 04 00 00 00 05 00 00 00 06 00 00 00 07 00 00 00 08 00 00 00 09 00 00 00
	int arr[] = { 1,2,3,0x11223301};
	// 数组的存储方式:01 00 00 00 02 00 00 00 03 00 00 00 01 33 22 11
	printf("%d", memcmp(arr, arr1, 16));
	return 0;
}

总结

到这里字符串相关的函数就学习完了,有不懂的可以私聊我

你可能感兴趣的:(c语言,开发语言)