RabbitMQ 安装和使用Demo
同步是阻塞
MQ:消息队列,基础数据结构中"先进先出"的数据结构。用来解决应用解耦,异步消息,流量消峰等问题。
RabbitMQ、RocketMQ、Kafka
RocketMQ 是阿里的
应用层开发使用RabbitMQ
大数据开发Kafka
MQ是不是微服务都可以用
RabbitMQ
是什么?
RabbitMQ是实现了高级消息协议(AMQP)的开源消息代理软件,是MQ的产品之一,目前最火的MQ中间件之一。用Erlang语言编写的。
依赖
配置
spring:
  rabbitmq:
    host: 121.36.5.100
    port: 5672
    username: guest
    password: guest
docker安装
执行命令,先查看是否有Docker
docker --version

如果想要删除:yum -y remove docker-ce
如果没有需要安装:
1.执行命令,实现Docker安装
yum install -y yum-utils
yum-config-manager --add-repo http://mirrors.aliyun.com/docker-ce/linux/centos/docker-ce.repo
yum makecache fast
启动:systemctl start docker
停止:systemctl stop docker
查看状态:systemctl status docker
重启:systemctl restart docker
0.安装
采⽤Docker安装RabbitMQ
0.执⾏命令
docker run -d --name rabbitmq5672 -p 15672:15672 -p 5672:5672 rabbitmq:management

1.查看正在运行容器
docker ps

2.进入容器内部
docker exec -it ae2804d96c53 /bin/bash
3.运行rabbitmq
rabbitmq-plugins enable rabbitmq_management
依赖jar包
            org.springframework.boot
            spring-boot-starter-amqp
实现配置:
spring:
  rabbitmq:
    host: XXXXX
    port: 5672
    username: guest
    password: guest
1.创建队列:
注意导入的包
package com.yd.rabbitmq01.config;

import org.springframework.amqp.core.Queue;
import org.springframework.context.annotation.Bean;
import org.springframework.context.annotation.Configuration;

@Configuration //配置 类似 beans 标签
public class RabbitMQConfig {

    //创建队列
    @Bean // IOC bean标签
    public Queue createQ1() {
        return new Queue("j2310-yd");
    }
}

template.convertAndSend(“”,“j2310-yd”,msg);
补充:第一个校验器,第二个队列名
2.发消息
@RestController
public class MqSendController {
    @Resource
    private RabbitTemplate template;

    @GetMapping("send1")
    public String send(String msg) {
        //发送消息
        template.convertAndSend("","j2310-yd",msg);
        return "ok";
    }
}
3.消费消息
监听器listener,监听队列中的消息变化
接收消息
@Slf4j
@Component // IOC
public class MsgListener {

    @RabbitListener(queues = "j2310-yd")
    public void hander(String msg) {
        log.info("消费者获取消息{}",msg);
    }
}
二、RubbitMq核心:
*一个单词
#任意一个
2.1消息模式-简单消息
特点:一个队列对应一个消费者,一个消息只能被消费1次

示例:
1.定义队列
2.发送消息—到—队列中
3.监听消息—从—队列中
代码:
package com.yd.rabbitmq01.config;
@Configuration //配置 类似 beans 标签
public class RabbitMQConfig {
    //简单消息
    @Bean // IOC bean标签
    public Queue createQ2() {
        return new Queue("yd-p2p-1");
    }
}
package com.yd.rabbitmq01.controller;
package com.yd.rabbitmq01.controller;

import org.springframework.amqp.rabbit.core.RabbitTemplate;
import org.springframework.web.bind.annotation.GetMapping;
import org.springframework.web.bind.annotation.RestController;

import javax.annotation.Resource;

/**
 * @author MaoXiqi
 * @organization: Lucky
 * @create 2023-10-13 12:54:02
 * @description MqSendControllerApi
 */
@RestController
public class MqSendController {
    @Resource
    private RabbitTemplate template;

    //简单消息
    @GetMapping("send2")
    public String send2(String msg) {
        //发送消息
        template.convertAndSend("","yd-p2p-1",msg);
        return "ok";
    }
}
package com.yd.rabbitmq01.listener;
package com.yd.rabbitmq01.listener;

import lombok.extern.slf4j.Slf4j;
import org.springframework.amqp.rabbit.annotation.RabbitListener;
import org.springframework.stereotype.Component;

/**
 * @author MaoXiqi
 * @organization: Lucky
 * @create 2023-10-13 12:56:32
 * @description MsgListenerApi
 */
@Slf4j
@Component // IOC
public class MsgListener {
    //简单消息
    @RabbitListener(queues = "yd-p2p-1")
    public void hander2(String msg) {
        log.info("普通消息,消费者,获取消息,{}",msg);
    }
}
2.2 消息模式-Work消息
Work消息:一个队列可以有多个消费端,1个消息只能消费1次,多个消费者是按照轮询的形式轮流获取消息
可以解决:消息堆积(发的快,消费的慢)
MQ消息单表可扛1万
发送快,消费慢(要处理业务逻辑),导致消息堆积,队列先进先出,会把老的消息弄丢失。
消息堆积,解决方案:
1.加机器(成本高)
2.想办法优化消费的性能(不好搞定)
3.work消息,多来几个消费者,消费者之间什么关系?
Work消息:一个队列可以有多个消费者,1个消息只能消费1次
可以解决:消息堆积(发得快,消费的慢)
注意:对发送端没有影响。
轮训发送
补充:
1.redis解决存储上限的问题?
2.哨兵是解决什么问题?
哨兵是用来监听主库的,主库掉了,从库中选择一个上位
主从复制,主库没了,从库中选择一个

示例:
1.声明队列
	//Work消息
    @Bean // IOC bean标签
    public Queue createQ3() {
        return new Queue("yd-work-1");
    }
2.发送消息
//Work消息
    @GetMapping("send3")
    public String send3(String msg) {
        //发送消息 交换器,路由
        template.convertAndSend("","yd-work-1",msg);
        return "ok";
    }
3.监听消息
//Work消息
    @RabbitListener(queues = "yd-work-1")
    public void hander3(String msg) {
        log.info("work消息,work消费者01,获取消息,{}",msg);
    }
    //Work消息
    @RabbitListener(queues = "yd-work-1")
    public void hander4(String msg) {
        log.info("work消息,work消费者02,获取消息,{}",msg);
    }
2.3-消息模式-发布订阅
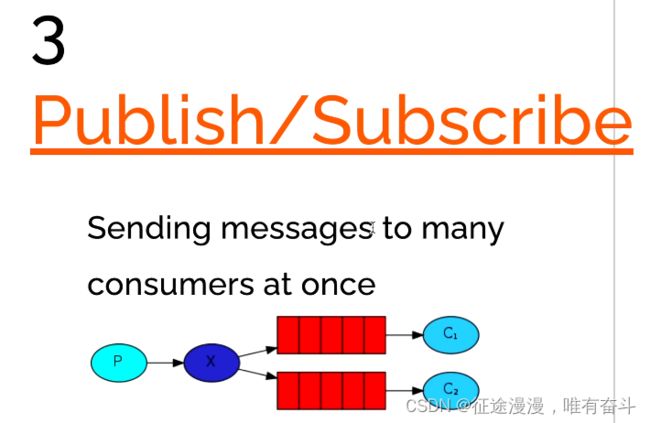
发布订阅:就是消息发送到Exchange(交换器),交换器再把消息发送到交换器绑定的队列上(绑定一个发送一个队列,绑定十个发送十个队列),1个消息可以给多个消费者(多个队列中)获取
Exchange:交换器,是RabbitMQ一个组成,可以接受消息。然后根据交换器的类型,选择对应的匹配模式,把匹配的消息转发到对应的队列中。
交换器的类型:
1.fanout:直接转发,不对消息做匹配处理
2.direct路由匹配,发送指定Routingkey(精准)匹配,发送的消息会指定,交换器绑定队列的时候也需要指定RountingKey
3.tipic路由匹配,发送消息指定 RoutingKey(模糊,支持 * #),交换器绑定队列的时候,也需要指定RoutingKey, *一个单词 #任意个单词
4.header:消息头匹配模式,发送消息的时候指定消息的请求消息头,交换器绑定队列的时候,也需要指定对应的请求消息头,any任意一个 all所有
示例:
1.创建队列
2.创建交换器
3.创建交换器和队列的绑定
4.发送消息
5.监听消息
package com.yd.rabbitmq01.config;

import org.springframework.amqp.core.Binding;
import org.springframework.amqp.core.BindingBuilder;
import org.springframework.amqp.core.FanoutExchange;
import org.springframework.amqp.core.Queue;
import org.springframework.context.annotation.Bean;
import org.springframework.context.annotation.Configuration;

/**
 * 消息模式-发布订阅
 * @author MaoXiqi
 * @organization: Lucky
 * @create 2023-10-13 15:22:35
 * @description FanoutConfigApi
 */
@Configuration
public class FanoutConfig {

    //1.创建队列
    @Bean
    public Queue createQfang1() {
        return new Queue("q-fanout-01");
    }

    @Bean
    public Queue createQfang2() {
        return new Queue("q-fanout-02");
    }

    //2.创建交换器
    @Bean
    public FanoutExchange createFe() {
        return new FanoutExchange("ex-fanout-yd");
    }

    //3.实现绑定
    @Bean
    public Binding createBf1(FanoutExchange fe) {
        return BindingBuilder.bind(createQfang1()).to(fe);
    }
    @Bean
    public Binding createBf2(FanoutExchange fe) {
        return BindingBuilder.bind(createQfang2()).to(fe);
    }

}
4.发送消息
package com.yd.rabbitmq01.controller;

import org.springframework.amqp.rabbit.core.RabbitTemplate;
import org.springframework.web.bind.annotation.GetMapping;
import org.springframework.web.bind.annotation.RestController;

import javax.annotation.Resource;

/**
 * @author MaoXiqi
 * @organization: Lucky
 * @create 2023-10-13 15:31:59
 * @description FanoutControllerApi
 */
@RestController
public class FanoutController {
    @Resource
    private RabbitTemplate template;

    /**
     * 消息模式-发布订阅
     * @param msg
     * @return
     */
    @GetMapping("fanout1")
    public String f1(String msg) {
    	// 第一个交换器,routingKey,msg
        template.convertAndSend("ex-fanout-yd","",msg);
        return "ok";
    }

    @GetMapping("direct1")
    public String d1(String msg, String type) {
        template.convertAndSend("ex-direct-yd",type,msg);
        return "ok";
    }
}
5.监听消息
package com.yd.rabbitmq01.listener;

import lombok.extern.slf4j.Slf4j;
import org.springframework.amqp.rabbit.annotation.RabbitListener;
import org.springframework.stereotype.Component;

/**
 * @author MaoXiqi
 * @organization: Lucky
 * @create 2023-10-13 12:56:32
 * @description MsgListenerApi
 */
@Slf4j
@Component // IOC
public class MsgListener {
    //消息模式-发布订阅
    @RabbitListener(queues = "q-fanout-01")
    public void hander5(String msg) {
        log.info("fanout消息,01队列,消费者,获取消息01,{}",msg);
    }
    //消息模式-发布订阅
    @RabbitListener(queues = "q-fanout-02")
    public void hander6(String msg) {
        log.info("fanout消息,02队列,消费者,获取消息02,{}",msg);
    }
}
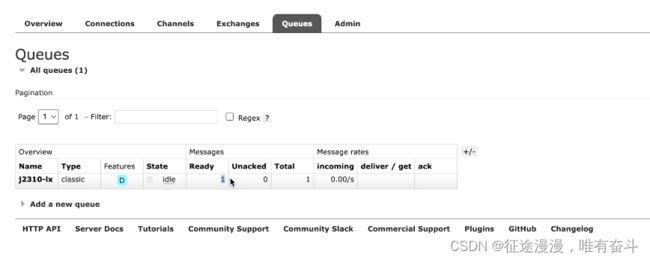
D:所代表的意思是持久化

补充:
交换器怎么设计的:功能单一原则,方便解耦
2.4 消息模式-路由匹配
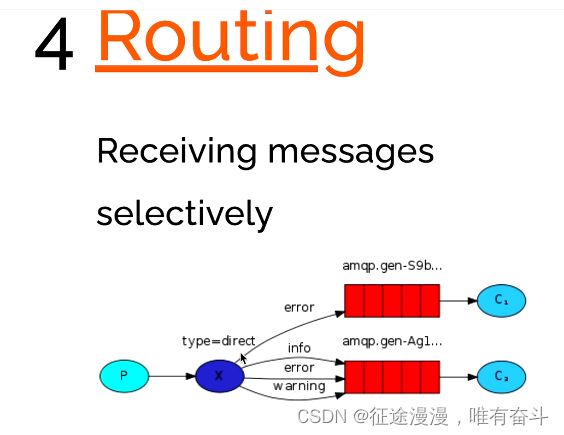
路由消息:消息被发送到交换器,交换器的类型为direct,可以根据消息的路由关键字进行匹配,转发到匹配的所有的队列
RoutingKey:路由关键字,只支持精确的值

示例:
1、创建队列
2、创建交换器 direct
3、创建交换器和队列的绑定 指定RK
4、发送消息 指定RK
5、监听消息
1、创建队列
package com.yd.rabbitmq01.config;

import org.springframework.amqp.core.Binding;
import org.springframework.amqp.core.BindingBuilder;
import org.springframework.amqp.core.DirectExchange;
import org.springframework.amqp.core.Queue;
import org.springframework.context.annotation.Bean;
import org.springframework.context.annotation.Configuration;

/**
 * 消息模式,路由匹配
 *
 * @author MaoXiqi
 * @organization: Lucky
 * @create 2023-10-13 19:17:19
 * @description DirectConfigApi
 */
@Configuration
public class DirectConfig {
    // 1.创建队列
    @Bean
    public Queue createQdirect1() {
        return new Queue("q-direct-01");
    }
    @Bean
    public Queue createQdirect2() {
        return new Queue("q-direct-02");
    }
    @Bean
    public Queue createQdirect3() {
        return new Queue("q-direct-03");
    }
    //2.创建交换器
    @Bean
    public DirectExchange createDe() {
        return new DirectExchange("ex-direct-yd");
    }
    //3.实现绑定
    @Bean
    public Binding createBd1(DirectExchange fe){
        return BindingBuilder.bind(createQdirect1()).to(fe).with("error");
    }
    @Bean
    public Binding createBd2(DirectExchange fe){
        return BindingBuilder.bind(createQdirect2()).to(fe).with("info");
    }
    @Bean
    public Binding createBd3(DirectExchange fe){
        return BindingBuilder.bind(createQdirect3()).to(fe).with("info");
    }
}
4、发送消息 指定RK
package com.yd.rabbitmq01.controller;

import org.springframework.amqp.rabbit.core.RabbitTemplate;
import org.springframework.web.bind.annotation.GetMapping;
import org.springframework.web.bind.annotation.RestController;

import javax.annotation.Resource;

/**
 * @author MaoXiqi
 * @organization: Lucky
 * @create 2023-10-13 15:31:59
 * @description FanoutControllerApi
 */
@RestController
public class FanoutController {
    @Resource
    private RabbitTemplate template;

    /**
     * 消息模式,路由匹配
     * @param msg
     * @param type
     * @return
     */
    @GetMapping("direct1")
    public String d1(String msg, String type) {
        template.convertAndSend("ex-direct-yd",type,msg);
        return "ok";
    }
}
2.5 消息模式-主题消息
主题消息,就是交换器的类型为Topic,跟路由模式的消息一样,都是通过RoutingKey匹配队列
区别:
主题消息 的RK支持模糊
特殊符号:区分单词是通过 . 区分的
* 一个单词,单词内容任意
# 任意个单词,单词内容任意

示例:
1.创建队列
2.创建交换器 topic
3.创建交换和队列的绑定 指定RK(支持模糊)
4.发送消息 指定RK
5.监听消息
1.创建队列
package com.yd.rabbitmq01.config;

import org.springframework.amqp.core.Binding;
import org.springframework.amqp.core.BindingBuilder;
import org.springframework.amqp.core.Queue;
import org.springframework.amqp.core.TopicExchange;
import org.springframework.context.annotation.Bean;
import org.springframework.context.annotation.Configuration;

/**
 * 消息模式-主题消息
 * @author MaoXiqi
 * @organization: Lucky
 * @create 2023-10-13 19:58:35
 * @description TopicconfigApi
 */
@Configuration
public class TopicConfig {
    //1.创建队列
    @Bean
    public Queue createQtopic1(){
        return new Queue("q-topic-01");
    }
    @Bean
    public Queue createQtopic2(){
        return new Queue("q-topic-02");
    }
    //2.创建交换器
    @Bean
    public TopicExchange createTe(){
        return new TopicExchange("ex-topic-yd");
    }
    //3.实现绑定
    @Bean
    public Binding createBt1(TopicExchange fe) {
        //*一个单词
        return BindingBuilder.bind(createQtopic1()).to(fe).with("error.*");
    }
    //3.实现绑定
    @Bean
    public Binding createBt2(TopicExchange fe) {
        //# 任意个单词 0-多个
        return BindingBuilder.bind(createQtopic2()).to(fe).with("info.#");
    }
}
4.发送消息 指定RK
package com.yd.rabbitmq01.controller;

import org.springframework.amqp.rabbit.core.RabbitTemplate;
import org.springframework.web.bind.annotation.GetMapping;
import org.springframework.web.bind.annotation.RestController;

import javax.annotation.Resource;

/**
 * 消息模式-主题消息
 *
 * @author MaoXiqi
 * @organization: Lucky
 * @create 2023-10-13 20:05:20
 * @description TopicControllerApi
 */
@RestController
public class TopicController {
    @Resource
    private RabbitTemplate template;

    /**
     * 消息模式-主题消息
     * @param msg
     * @param rk
     * @return
     */
    @GetMapping("topic1")
    public String f1(String msg,String rk) {
        template.convertAndSend("ex-topic-yd",rk,msg);
        return "ok";
    }
}
RabbitMQ基于死信实现延迟
RabbitMQ事务
怎么防止消息的成功?开启RabbitMQ手动应答
RabbitMQ手动应答
RabbitMQ如何保证消息的幂等性


