KNN-近邻算法 及 模型的选择与调优(facebook签到地点预测)
什么是K-近邻算法(K Nearest Neighbors)
1、K-近邻算法(KNN)
1.1 定义
如果一个样本在特征空间中的k个最相似(即特征空间中最邻近)的样本中的大多数属于某一个类别,则该样本也属于这个类别。
来源:KNN算法最早是由Cover和Hart提出的一种分类算法
1.2 距离公式
两个样本的距离可以通过如下公式计算,又叫欧式距离
- 计算距离:
- 距离公式
- 欧氏距离
- 曼哈顿距离 绝对值距离
- 明可夫斯基距离
- 距离公式
2、电影类型分析
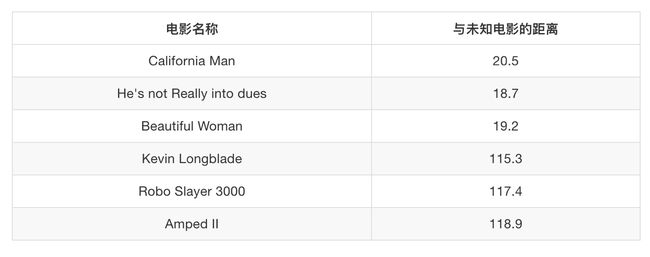
假设我们有现在几部电影

其中? 7号电影不知道类别,如何去预测?我们可以利用K近邻算法的思想
下方是根据欧氏距离计算结果:

K值是重要影响元素:
当我们看,如果k=1,假如只有第二行一个”邻居“,那么就计算的距离误差就比较大,样本量过少:

如果k=7,也就是再多一行数据,假设是“封神榜”,那么也就是说邻近的算法中,动作片的类占多数,那么我们就会将位置的那行数据预测为动作片,但是实际位置那行数据的接吻镜头是比较多的,应该是个爱情片,所以预测也是错误的!
- 总结:
- k 值取得过小,容易受到异常点的影响
- k 值取得过大,样本不均衡的影响
3、K-近邻算法API
- sklearn.neighbors.KNeighborsClassifier(n_neighbors=5,algorithm=‘auto’)
- n_neighbors:int,可选(默认= 5),k_neighbors查询默认使用的邻居数
- algorithm:{‘auto’,‘ball_tree’,‘kd_tree’,‘brute’},可选用于计算最近邻居的算法:‘ball_tree’将会使用 BallTree,‘kd_tree’将使用 KDTree。‘auto’将尝试根据传递给fit方法的值来决定最合适的算法。 (不同实现方式影响效率)
4、代码:鸢尾花案例
from sklearn.datasets import load_iris
from sklearn.model_selection import train_test_split
from sklearn.neighbors import KNeighborsClassifier
from sklearn.preprocessing import StandardScaler

"""
用KNN算法对鸢尾花进行分类
:return:
"""
# 1)获取数据
iris = load_iris()
# print(iris)
# print(iris.target_names)
# print(iris.DESCR)

# 2)划分数据集
x_train, x_test, y_train, y_test = train_test_split(iris.data, iris.target, test_size=0.3, random_state=22)

# 3)特征工程:标准化
transfer = StandardScaler()
x_train = transfer.fit_transform(x_train)
x_test = transfer.transform(x_test)

# 4)KNN算法预估器
estimator = KNeighborsClassifier(n_neighbors=3, algorithm='auto')
estimator.fit(x_train, y_train)

# 5)模型评估
# 方法1:直接比对真实值和预测值
y_predict = estimator.predict(x_test)
print("y_predict:\n", y_predict)
print("直接比对真实值和预测值:\n", y_test == y_predict)

# 方法2:计算准确率
score = estimator.score(x_test, y_test)
print("准确率为:\n", score)
那么说来说去,“邻居的数量” K 到底怎么取呢?
这就涉及到模型的选择与调优了;
5、为什么需要交叉验证
- 交叉验证目的:为了让被评估的模型更加准确可信
6、什么是交叉验证(cross validation)
- 交叉验证:将拿到的训练数据,分为训练和验证集。以下图为例:将数据分成4份,其中一份作为验证集。然后经过4次(组)的测试,每次都更换不同的验证集。即得到4组模型的结果,取平均值作为最终结果。又称4折交叉验证。
7、超参数搜索-网格搜索(Grid Search)
通常情况下,有很多参数是需要手动指定的(如k-近邻算法中的K值),这种叫超参数。但是手动过程繁杂,网格搜索帮我们实现了这个调参过程,首先需要对模型预设几种超参数组合,每组超参数都采用交叉验证来进行评估,最后选出最优参数组合建立模型。

7.1、模型选择与调优 API
- sklearn.model_selection.GridSearchCV(estimator, param_grid=None,cv=None)
- 对估计器的指定参数值进行详尽搜索
- estimator:估计器对象
- param_grid:估计器参数(dict){“n_neighbors”:[1,3,5]}
- cv:指定几折交叉验证
- fit:输入训练数据
- score:准确率
- 结果分析:
- bestscore:在交叉验证中验证的最好结果_
- bestestimator:最好的参数模型
- cvresults:每次交叉验证后的验证集准确率结果和训练集准确率结果
7.1、网格搜索与交叉验证代码
from sklearn.datasets import load_iris
from sklearn.model_selection import train_test_split, GridSearchCV
from sklearn.neighbors import KNeighborsClassifier
from sklearn.preprocessing import StandardScaler


"""
用KNN算法对鸢尾花进行分类,添加网格搜索和交叉验证
:return:
"""
# 1)获取数据
iris = load_iris()

# 2)划分数据集
x_train, x_test, y_train, y_test = train_test_split(iris.data, iris.target, test_size=0.3, random_state=22)

# 3)特征工程:标准化
transfer = StandardScaler()
x_train = transfer.fit_transform(x_train)
x_test = transfer.transform(x_test)

# 4)KNN算法预估器
estimator = KNeighborsClassifier()

# 加入网格搜索与交叉验证
# 参数准备
param_dict = {"n_neighbors": [1, 2, 3, 4, 5, 6, 7, 8, 9, 11]}
estimator = GridSearchCV(estimator, param_grid=param_dict, cv=10)
estimator.fit(x_train, y_train)

# 5)模型评估
# 方法1:直接比对真实值和预测值
y_predict = estimator.predict(x_test)
print("y_predict:\n", y_predict)
print("直接比对真实值和预测值:\n", y_test == y_predict)

# 方法2:计算准确率
score = estimator.score(x_test, y_test)
print("准确率为:\n", score)

# 最佳参数:best_params_
print("最佳参数:\n", estimator.best_params_)
# 最佳结果:best_score_
print("最佳结果:\n", estimator.best_score_)
# 最佳估计器:best_estimator_
print("最佳估计器:\n", estimator.best_estimator_)
# 交叉验证结果:cv_results_
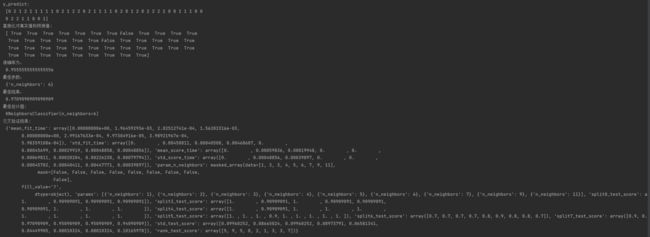
print("交叉验证结果:\n", estimator.cv_results_)
8、facebook 签到位置预测
- 数据介绍:将根据用户的位置,准确性和时间戳预测用户正在查看的业务。
- train.csv
- row_id:登记事件的ID
- xy:坐标
- 准确性:定位准确性
- 时间:时间戳
- place_id:业务的ID,这是您预测的目标
官网:https://www.kaggle.com/navoshta/grid-knn/data
8.1、流程分析
对于数据做一些基本处理(这里所做的一些处理不一定达到很好的效果,我们只是简单尝试,有些特征我们可以根据一些特征选择的方式去做处理)
1、缩小数据集范围 DataFrame.query()(选择性处理!)
2、删除没用的日期数据 DataFrame.drop(可以选择保留)
3、将签到位置少于n个用户的删除
place_count = data.groupby('place_id').count()
tf = place_count[place_count.row_id > 3].reset_index()
data = data[data['place_id'].isin(tf.place_id)]
4、分割数据集
5、标准化处理
6、k-近邻预测
8.2、代码
import pandas as pd
# 1、获取数据
data = pd.read_csv("train.csv")
data.head()
# 1)处理时间特征
time_value = pd.to_datetime(data["time"], unit="s")
date = pd.DatetimeIndex(time_value)
data["day"] = date.day
data["weekday"] = date.weekday
data["hour"] = date.hour
data.head()
# 2)过滤签到次数少的地点
place_count = data.groupby("place_id").count()["row_id"]
data_final = data[data["place_id"].isin(place_count[place_count > 3].index.values)]
data_final.head()
# 筛选特征值和目标值
x = data_final[["x", "y", "accuracy", "day", "weekday", "hour"]]
y = data_final["place_id"]
# 数据集划分
from sklearn.model_selection import train_test_split
x_train, x_test, y_train, y_test = train_test_split(x, y)
from sklearn.preprocessing import StandardScaler
from sklearn.neighbors import KNeighborsClassifier
from sklearn.model_selection import GridSearchCV

# 3)特征工程:标准化
transfer = StandardScaler()
x_train = transfer.fit_transform(x_train)
x_test = transfer.transform(x_test)

# 4)KNN算法预估器
estimator = KNeighborsClassifier()

# 加入网格搜索与交叉验证
# 参数准备
param_dict = {"n_neighbors": [3, 5, 7, 9]}
estimator = GridSearchCV(estimator, param_grid=param_dict, cv=3)
estimator.fit(x_train, y_train)

# 5)模型评估
# 方法1:直接比对真实值和预测值
y_predict = estimator.predict(x_test)
print("y_predict:\n", y_predict)
print("直接比对真实值和预测值:\n", y_test == y_predict)

# 方法2:计算准确率
score = estimator.score(x_test, y_test)
print("准确率为:\n", score)

# 最佳参数:best_params_
print("最佳参数:\n", estimator.best_params_)
# 最佳结果:best_score_
print("最佳结果:\n", estimator.best_score_)
# 最佳估计器:best_estimator_
print("最佳估计器:\n", estimator.best_estimator_)
# 交叉验证结果:cv_results_
print("交叉验证结果:\n", estimator.cv_results_)
这个结果数据量比较大,毕竟两千万训练数据了,各位可自行试验及调参;


