内存优化---Bitmap优化
简述:
当我们的代码出现问题导致GC无法及时的回收相关的内存时就会导致内存泄漏。GC无法及时的回收相关内存这将导致我们的内存占用越来越多,最终的体现就是OOM。今天就来总结一下图片oom的解决问题。常见的解决方案就是对Bitmap进行压缩,而压缩分为质量压缩和尺寸压缩。
Bitmap压缩
理论基础
1. 以File的形式存在SD中先来看一下图片的存在形式:
2. 以Stream的形式内存中
3. 以Bitmap的形式存在于内存中
图片的SD卡中占用SD卡大小: File形式的图片大小:FileLength = file.length();
图片在内存中占用大小: ① Stream形式: StreamLength = stream.available();
② Bitmap形式: BitmapLength = width * height*(单位像素点占用的字节数);
总结一下上面三种形式大小关系:FileLength = StreamLength <
☆ 刚才提到了单位像素点占用字节数,现在说一下这个东东,单位像素占用的字节数由其参数BitmapFactory.Options的inPreferredConfig变量决定。inPreferredConfig为Bitmap.Config类型,Bitmap.Config类是个枚举类型,它可以为以下值
Bitmap.Config ALPHA_8 Each pixel is stored as a single translucency (alpha) channel.
This is very useful to efficiently store masks for instance. No color information is stored. With this configuration, each pixel requires 1 byte of memory.
此时图片只有alpha值,没有RGB值,一个像素占用一个字节Bitmap.Config ARGB_4444 This field is deprecated. Because of the poor quality of this configuration, it is advised to use ARGB_8888instead.
这种格式的图片,看起来质量太差,已经不推荐使用。
Each pixel is stored on 2 bytes. The three RGB color channels and the alpha channel (translucency) are stored with a 4 bits precision (16 possible values.) This configuration is mostly useful if the application needs to store translucency information but also needs to save memory. It is recommended to use ARGB_8888 instead of this configuration.
一个像素占用2个字节,alpha(A)值,Red(R)值,Green(G)值,Blue(B)值各占4个bites,共16bites,即2个字节Bitmap.Config ARGB_8888 Each pixel is stored on 4 bytes. Each channel (RGB and alpha for translucency) is stored with 8 bits of precision (256 possible values.) This configuration is very flexible and offers the best quality. It should be used whenever possible
一个像素占用4个字节,alpha(A)值,Red(R)值,Green(G)值,Blue(B)值各占8个bites,共32bites,即4个字节
这是一种高质量的图片格式,电脑上普通采用的格式。它也是Android手机上一个BitMap的默认格式。Bitmap.Config RGB_565 Each pixel is stored on 2 bytes and only the RGB channels are encoded: red is stored with 5 bits of precision (32 possible values), green is stored with 6 bits of precision (64 possible values) and blue is stored with 5 bits of precision. This configuration can produce slight visual artifacts depending on the configuration of the source. For instance, without dithering, the result might show a greenish tint. To get better results dithering should be applied. This configuration may be useful when using opaque bitmaps that do not require high color fidelity.
一个像素占用2个字节,没有alpha(A)值,即不支持透明和半透明,Red(R)值占5个bites ,Green(G)值占6个bites ,Blue(B)值占5个bites,共16bites,即2个字节.对于没有透明和半透明颜色的图片来说,该格式的图片能够达到比较的呈现效果,相对于ARGB_8888来说也能减少一半的内存开销。因此它是一个不错的选择。另外我们通过android.content.res.Resources来取得一个张图片时,它也是以该格式来构建BitMap的.
从Android4.0开始,该选项无效。即使设置为该值,系统任然会采用 ARGB_8888来构造图片注 :A RGB指的是一种色彩模式,里面A代表Alpha,R表示red,G表示green,B表示blue,其实所有的可见色都是红绿蓝组成的,所以红绿蓝又称为三原色。
图片尺寸压缩
尺寸压缩目的是解决图片由Stream形式转化为Bitmap形式内存突然增大的问题,Bitmap的内存大小是由图片的像素点(width*height)决定的, 那么尺寸压缩就是压缩图片宽度与高度像素点的多少,这样的话图片突然由Stream形式转化为Bitmap形式就会减少内存的占有量,从而一定程度上就减少OOM的机会。那么这样也会带来一些问题:图片经尺寸压缩转化为Bitmap后像素点变低从而导致图片的失真。
Bitmap尺寸压缩的API:
Bitmap在Android中指的是一张图片,可以使PNG格式也可以是JPG等常见的其他图片的格式。Android提供了四类方法加载Bitmap:decodeFile、decodeResource、decodeStream和decodeByteArray。分别用于从文件系统、资源、输入流以及字节数组中加载一个Bitmap对象,其中decideFile和decodeResource又间接调用了decodeStream方法。
Bitmap尺寸压缩举例:
高效加载Bitmap思想:采用BitmapFactory.Options来加载所需尺寸的图片。通过Bitmap.Options来缩放图片,主要使用它的inSampleSize参数,即采样率。当inSampleSize为1时,采用后的图片大小为原始图片大小;当inSampleSize的至大于1时,比如为2,那么采样后的图片的宽和高均为原来的1/2,而像素为原始的1/4,其占有的内存大小也为原来的1/4。拿一张1024*1024像素的图片来说,假定采用ARGB8888格式存储,那么它占有的内存为1024x1024x4,即4M,如果inSampleSize为2,那么采样后的图片占有内存为512x512x4,即1M。
我们来考虑一下实际问题:比如ImageView的大小是100x100像素,而原始图片的大小为200x200像素,那么只需要将采样率inSampleSize设置为2就OK了,但是如果图片大小为200x300呢?这个时候的采样率仍设置为2,这样缩放后的图片大小为100x150像素,仍然是适合ImageView的,如果采样率为3,那么缩放后的图片的大小就会小于ImageView所期望的大小,这样图片就会被拉伸从而导致模糊。
Bitmap尺寸压缩步骤:
通过采样率加载图片,主要的就是计算出合适的采样率,计算采样率的一般流程:
①将BitmapFactory.Options的inJustDecodeBounds参数设置为true并加载图片。
②从BitmapFactory.Options中取出原始图片的宽高信息。
③根据采样率的规则并结合目标View所需大小计算出采样率inSampleSize。
④将BitmapFactory.OPtions的参数设置为false并重新加载图片。
通过上面4个步骤,加载出的图片就是最终缩放的图片,当然也有可能不需要缩放。这里解释一下inJustDecodeBounds参数,当参数为true时,BitmapFactory只会解析图片的原始宽高信息,并不会真正的去加载图片。所以这个操作是轻量级的。另外需要注意的是,这个时候BitmapFactory获取的图片宽高信息和图片的位置以及程序运行的设备有关,比如同一张图片放在不同的drawable文件夹目录下或者程序运行在不同的屏幕密度的设备上,这样导致BitmapFactory获取到不同的结果。
Bitmap尺寸压缩实现:
代码如下:
public class BitmapCompressUtils {
    /**
     * 方法描述:压缩Resources类型的Bitmap
     *
     * @param resources Class for accessing an application's resources.
     * @param resId     图片资源的ID
     * @param reqWidth  Bitmap目标压缩宽度像素值
     * @param reqHeight Bitmap目标压缩高度像素值
     * @return 压缩后的Bitmap类型的图片
     */
    public static Bitmap decodeSampleBitmapFromResource(Resources resources, int resId, int reqWidth, int reqHeight) {
        //First decode with inJustDecodeBounds = true to check dimension
        BitmapFactory.Options options = new BitmapFactory.Options();
        options.inJustDecodeBounds = true;
        BitmapFactory.decodeResource(resources, resId, options);

        //Calculate inSampleSize
        options.inSampleSize = calculateInSampleSize(options, reqWidth, reqHeight);
        options.inJustDecodeBounds = false;

        return BitmapFactory.decodeResource(resources, resId, options);
    }

    /**
     * 方法描述:计算采样率inSampleSize的值
     *
     * @param options   BitmapFactory.Options实例
     * @param reqWidth  Bitmap目标压缩宽度像素值
     * @param reqHeight Bitmap目标压缩高度像素值
     * @return 采样率inSampleSize的值
     */
    private static int calculateInSampleSize(BitmapFactory.Options options, int reqWidth, int reqHeight) {

        //Raw height and width of image
        int height = options.outHeight;
        int width = options.outWidth;

        int inSampleSize = 1;
        int width_inSampleSize = width / reqWidth;
        int height_inSampleSize = height / reqHeight;

        if (width_inSampleSize > inSampleSize || height_inSampleSize > inSampleSize) {
            inSampleSize = width_inSampleSize > height_inSampleSize ? width_inSampleSize : height_inSampleSize;
        }

        return inSampleSize;
    }
}
实例验证
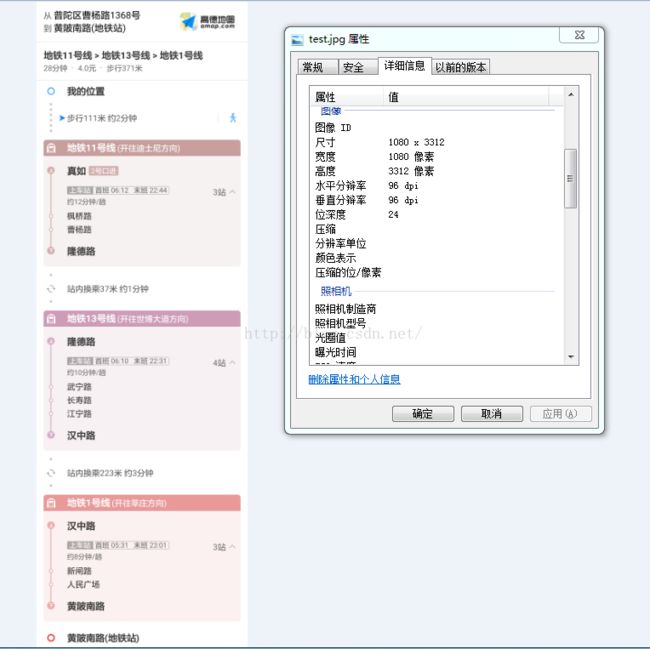
随便找一张图片,不管了,这是一张曾经的高德地图的截图,先来看看这张图的详细信息:
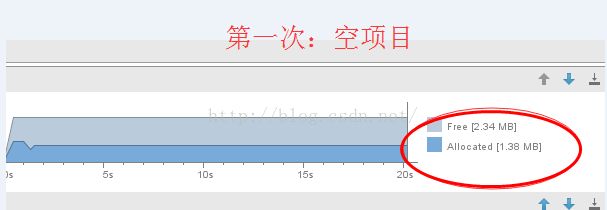
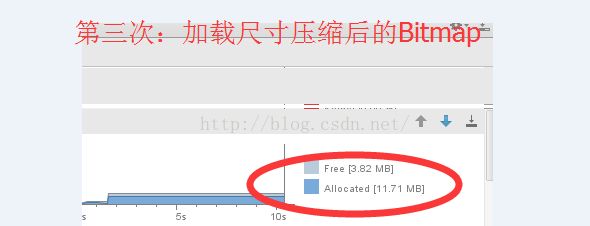
我分三次测试:第一次,什么都不加载的一个空项目;第二次,加载上面那张“高德地图的截图”;第三次,加载经过尺寸压缩(采样率为2)后的“高德地图截图”。然后对比这三次每次分配的内存总量,三次的测试结果如下:
从上面的结果可以看出,当采样率为2(简介计算得到)时内存占有量大致减少到原来的1/4,这也证明了我们上述有关尺寸压缩能够减少内存情况的结论。
二、质量压缩
首先需要说明质量压缩的特点:图片的质量压缩不会改变图片的像素点,这就意味着当图片以Bitmap形式出现在内存中时App的内存占有量不会减小。咦!?既然不会减少内存的占用情况那么质量压缩还有什么用呢?既然Android提供了这样的API那它一定又存在的意义,比如说在项目中经常会有图片上传的功能,那么如果一张5M的图片如果不经过压缩直接上传会消耗用户大量的手机流量,你懂得,在国内流量不得把人心疼死呀!
总之,它不会减少图片的像素。它是在保持像素的前提下改变图片的位深及透明度等,来达到压缩图片的目的。进过它压缩的图片文件大小会有改变,但是导入成bitmap后占得内存是不变的。显然这个方法并不适用与缩略图,其实也不适用于想通过压缩图片减少内存的适用,仅仅适用于想在保证图片质量的同时减少文件大小的情况而已。
图片质量压缩API:
boolean compress(Bitmap.CompressFormat format, int quality, OutputStream stream)
把位图的压缩信息写入到一个指定的输出流中。如果返回true,可以通过传递一个相应的输出流到BitmapFactory.decodeStream()来重构该位图。注意:并非所有的格式都直接支持位图结构,所以通过BitmapFactory返回的位图很可能有不同的位深度,或许会丢失每个象素的alpha值(例如,JPEG 只支持不透明像素)。
(译者注:色深(color depth),也称色位深度(bitdePth),是指在一定分辨率下一个像素能够接受的颜色数量范围。通常,色深用2的n次方来表示。例如,8 bit的色深包含2的8次方)
参数:
format 图像的压缩格式;
quality 图像压缩比的值,0-100。 0 意味着小尺寸压缩,100意味着高质量压缩。对于有些格式,比如无损压缩的PNG,它就会忽视quality这个参数设置。
stream 写入压缩数据的输出流
返回值:
如果成功地把压缩数据写入输出流,则返回true。
代码实现:
public class PictureUtils {

    /**
     * 方法描述:对Bitmap进行质量压缩并保存在File中
     *
     * @param image          原始图片
     * @param destBitmapSize 期望压缩后Stream或者File形式的图片大小,单位KB
     * @param file           将压缩后的图片保存在文件中以便于上传
     */
    public static void compressImageByQuality(Bitmap image, int destBitmapSize, File file) {
        ByteArrayOutputStream baos = new ByteArrayOutputStream();

        boolean compressResult = image.compress(Bitmap.CompressFormat.JPEG, 100, baos);//质量压缩方法,这里100表示不压缩,把压缩后的数据存放到baos中
        int options = 100;
        while (baos.toByteArray().length / 1024 > destBitmapSize) {  //循环判断如果压缩后图片是否大于100kb,大于继续压缩
            baos.reset();//重置baos即清空baos
            image.compress(Bitmap.CompressFormat.JPEG, options, baos);//这里压缩options%,把压缩后的数据存放到baos中
            options -= 10;//每次都减少10
        }
        try {
            FileOutputStream fos = new FileOutputStream(file);
            fos.write(baos.toByteArray());
            fos.flush();
            fos.close();
            baos.close();
        } catch (FileNotFoundException e) {
            e.printStackTrace();
        } catch (IOException e) {
            e.printStackTrace();
        }
    }

    /**
     * 方法描述:对Bitmap进行质量压缩
     *
     * @param image          原始图片
     * @param destBitmapSize 期望压缩后Stream或者File形式的图片大小,单位KB
     * @return 经质量压缩后的Bitmap
     */
    public static Bitmap compressImageByQuality(Bitmap image, int destBitmapSize) {
        ByteArrayOutputStream baos = new ByteArrayOutputStream();

        boolean compressResult = image.compress(Bitmap.CompressFormat.JPEG, 100, baos);//质量压缩方法,这里100表示不压缩,把压缩后的数据存放到baos中
        int options = 100;
        while (baos.toByteArray().length / 1024 > destBitmapSize) {  //循环判断如果压缩后图片是否大于100kb,大于继续压缩
            baos.reset();//重置baos即清空baos
            image.compress(Bitmap.CompressFormat.JPEG, options, baos);//这里压缩options%,把压缩后的数据存放到baos中
            options -= 10;//每次都减少10
        }
        ByteArrayInputStream bis = new ByteArrayInputStream(baos.toByteArray());
        return BitmapFactory.decodeStream(bis);
    }
}


