基于AidLux的自动驾驶智能预警应用方案
1. 自动驾驶感知算法及AidLux相关方案介绍
1.1自动驾驶
自动驾驶汽车,又称无人驾驶车、电脑驾驶车、无人车、自驾车,是一种需要驾驶员辅助驾驶或者完全不需要操控的车辆。作为自动化载具,自动驾驶汽车可以不需要人类操作即能感知环境及导航。

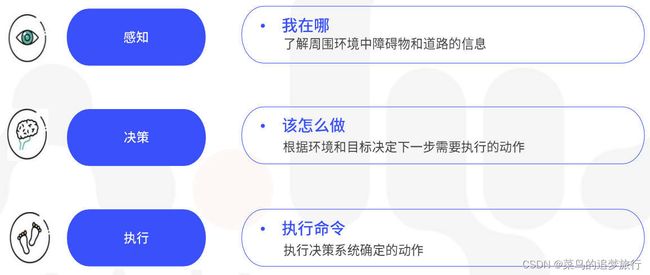
1.2 自动驾驶系统的组成部分
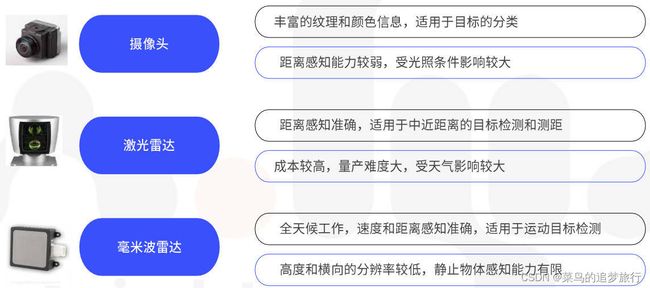
1.2.1 环境感知系统
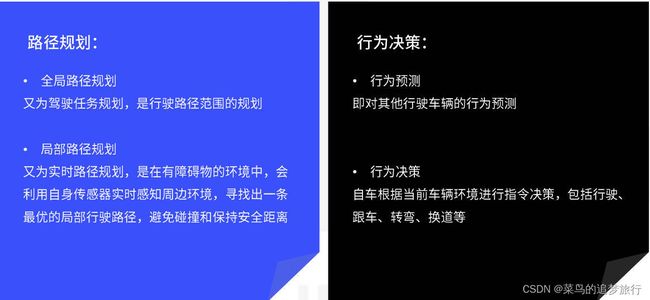
1.2.2 决策系统
1.3 安卓端部署平台AidLux
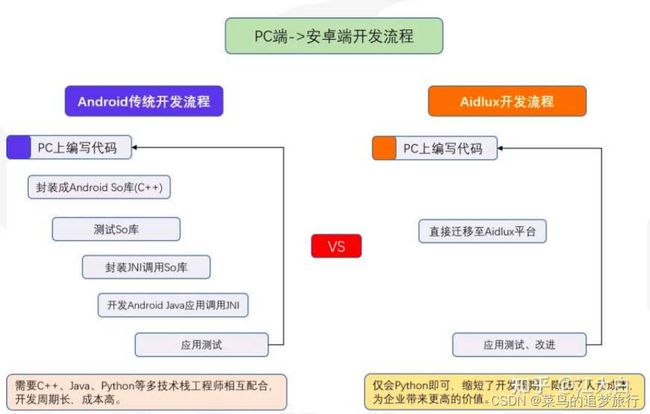
AidLux平台可快速部署在ARM64位智能设备上,手机也能变成边缘计算设备,当服务器使用、做测试、做练习。后续换设备落实实际项目,直接迁移,不需要重复开发。

2. 基于YOLOP的全景感知系统讲解与实战应用
2.1 YOLOP算法介绍
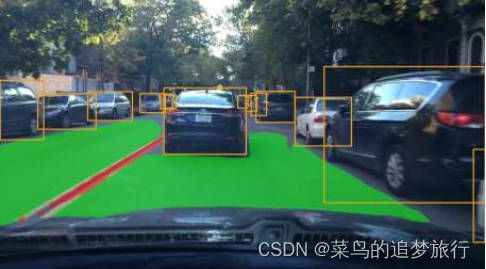
YOLOP能同时处理目标检测、可行驶区域分割、车道线检测三个感知任务,并速度优异,保持较好精度进行工作,代码开源。它是华中科技大学–王兴刚团队在全景感知方面提出的模型。
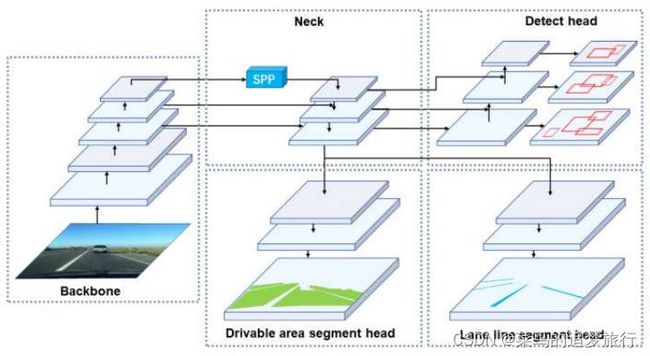
模型结构包括1个encoder+3个分离的decoder,其中encoder包括backbone和neck,3个decoder分别完成车辆检测、车道线检测、可行驶区域分割任务
encoder:主干网络(CSPDarknet),和neck结构(SPP+FPN)
decoder:1个检测头和2个分割,两个分割头都是使用FPN的最底层特征图(w/8,h/8,256)作为输入,进行3次最近邻上采样,最终输出(W, H, 2)的特征图。
2.2 AutoDL云端YOLOP模型训练
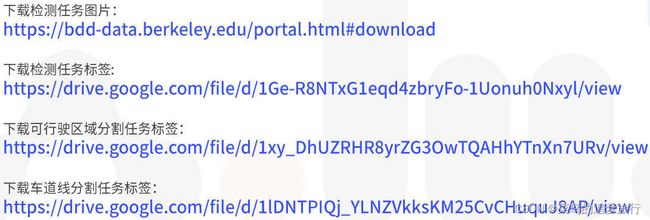
2.2.1 下载BDD100K数据集
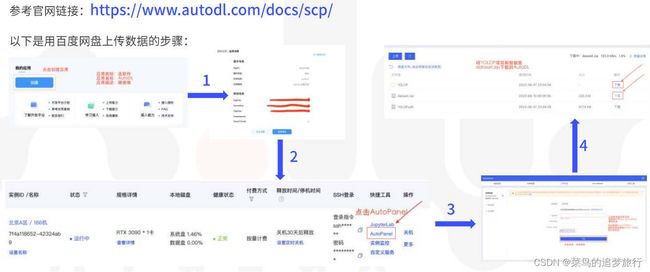
2.2.2 将项目和数据集上传到AutoDL平台
2.2.3 训练YOLOP
执行命令:pip install -r requirements.txt安装依赖包
单GPU训练:
python tools/train.py
多GPU训练:
python -m torch.distributed.launch --nproc_per_node=N tools/train.py #N:GPU数量
推理
python tools/demo.py --weights weights/End-to-end.pth --source inference/videos
3. 智能预警在AidLux平台上的部署与应用
3.1 YOLOP模型onnx转换部署
1.使用课程代码转换为onnx
执行命令:
python export_onnx.py --height 640 --width 640
执行完成后,会在weights文件夹下生成转换成功的onnx模型
onnx转换核心api:
x = torch.onnx.export(model, # 网络模型
									torch.randn(1, 3, 224, 224), # 用于确定输入大小和类型,其中的值可以是随机的。
									export_onnx_file,   # 输出onnx的名称
									verbose=False,  # 是否以字符串的形式显示计算图
									input_names=["input"],  # 输入节点的名称,可以是一个list
									output_names=["output"],  # 输出节点的名称
									opset_version=10,  # onnx支持使用的operator set
									do_constant_folding=True,  # 是否压缩变量
									# 设置动态维度, 此处指明Input节点的第0维度可变,命名为batch_size
									dynamic_axes={"input":{0: "batch_size", 2:"h", 3: "w"}, "output": {0: "batch_size"}}
									)
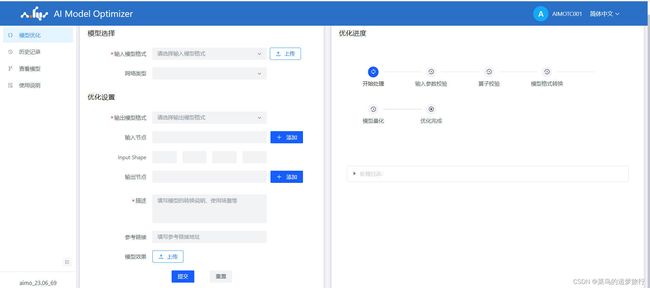
2. AidLux模型转换工具-AIMO
AI Model Optimizer–AIMO, 是一个简单、快速、精度损失小的模型转换平台。
AIMO旨在帮助用户能够在边缘端芯片上无精度损失的快速迁移、部署和运行各种机器学习模型。
平台地址:http://117.176.129.180:21115/
体验账号:AIMOTC001
账号密码:AIMOTC001
3.2 YOLOP模型在AidLux上部署和应用
3.2.1 AidLux简介
AidLux是一个构建在ARM硬件上,基于创新性跨Android/鸿蒙+Linux融合系统环境的智能物联网(AIOT应用开发和部署平台)。
AidLux软件使用非常方便,可以安装在手机、PAD、ARM开发板等边缘设备上,而且使用AidLux开发的过程中,既能支持在边缘设备的本机开发,也支持通过web浏览器访问边缘端桌面进行开发。
各大应用商城都能下载AidLux,在手机商城搜索、下载安装AidLux。
3.2.2 连接AidLux
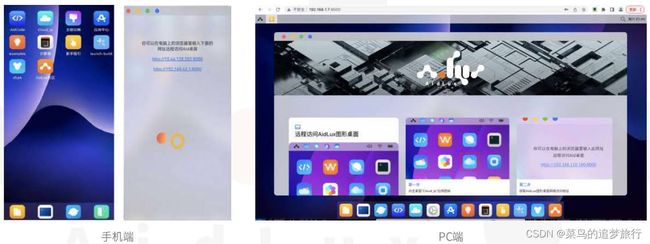
将手机的wifi网络和电脑的网络连接到一起,打开安装好的手机上的AidLux软件,点击第一排第二个Cloud_ip。手机界面上会跳出可以在电脑上登录的IP地址,在电脑的浏览器上,随便出入一个IP,
即可将手机的系统投影到电脑上,连接上后就可以利用手机的算力进行模型推理了。
3.2.3 上传项目代码到AidLux
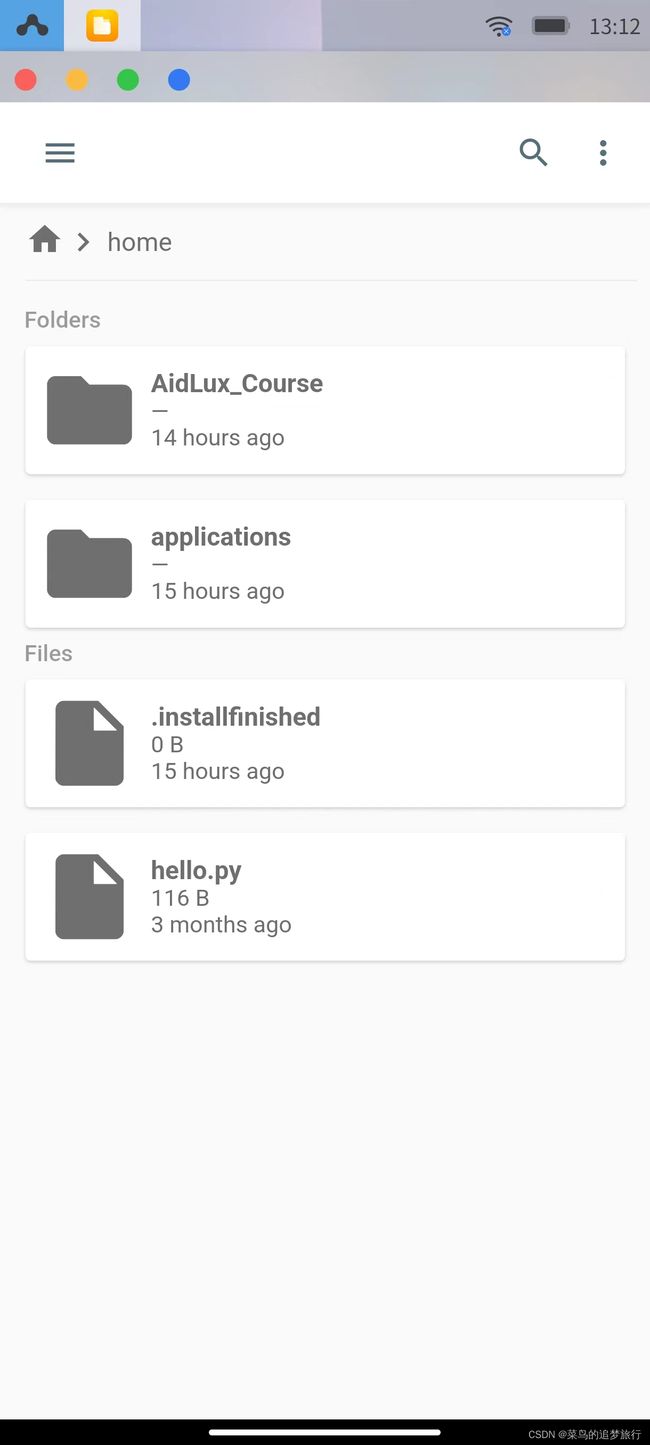
1.点击文件浏览器,打开文件管理页面
2.找到home文件夹,并双击进入此文件夹
3.点击右上角往上的箭头“upload”,再选择Folder,将前面YOLOP的文件夹上传到home文件夹内。(也可以直接将文件夹拖进目录下。)
3.2.4 安装环境
1.打开终端,切换到项目目录
2.执行命令:pip install -r requirements.txt安装依赖环境
3.安装pytorch、torchvision、onnxruntime
pip install torch == 1.8.1==0.9.0 -i https://pypi.mirrors.ustc.edu.cn/simple/
pip install onnxruntime -i https://pypi.mirrors.ustc.edu.cn.simple/
4 运行demo.py
验证推理效果,执行命令:
python tools/demo.py --source inference/images
3.3 智能预警系统代码实战
智能预警系统包含3个任务:
目标检测,可行驶区域检测,车道线检测
传感器:前视相机
目标检测任务:检测车辆
可行驶区域检测:主要是hi检测可以行驶的区域,为自动驾驶提供路径规划辅助
车道线检测:一种环境感知应用,目的是通过车载相机或激光雷达来检测车道线。
智能预警流程

1.输入
读取视频图像作为输入,图像尺寸19201080
2.预处理
2.1 将输入尺寸19201080 resize + padding到640640
2.2 归一化
2.3 6406403 --> 13640640
3. 使用onnx模型进行推理
读取模型–>准备数据–>推理
得到det_out,da_seg_out, ll_seg_out,shape分别为:(1,n,6) (1,2,640,640) (1,2,640,640)
4.后处理
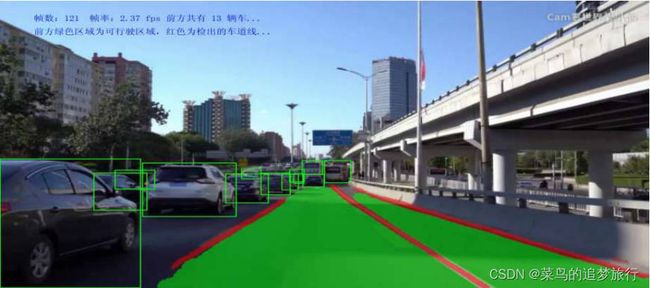
4.1 将检测结果,可行驶区域检测结果,车道线检测结果,合并到一张图像上,分别用不同的颜色标记出来
4.2 将检测的帧数,帧率,车辆数等信息显示在图像上
5.输出
获取最终融合的图像,并保存成视频,图像尺寸、帧率、编码是原视频尺寸、帧率和编码。
完整的预警代码
import cv2
import time
import torch
import numpy as np
import onnxruntime as ort
from PIL import Image, ImageDraw, ImageFont
from lib.core.general import non_max_suppression

onnx_path = "weights/yolop-640-640.onnx"


def resize_unscale(img, new_shape=(640, 640), color=114):
    shape = img.shape[:2]  # current shape [height, width]
    if isinstance(new_shape, int):
        new_shape = (new_shape, new_shape)

    canvas = np.zeros((new_shape[0], new_shape[1], 3))
    canvas.fill(color)
    # Scale ratio (new / old) new_shape(h,w)
    r = min(new_shape[0] / shape[0], new_shape[1] / shape[1])

    # Compute padding
    new_unpad = int(round(shape[1] * r)), int(round(shape[0] * r))  # w,h
    new_unpad_w = new_unpad[0]
    new_unpad_h = new_unpad[1]
    pad_w, pad_h = new_shape[1] - new_unpad_w, new_shape[0] - new_unpad_h  # wh padding

    dw = pad_w // 2  # divide padding into 2 sides
    dh = pad_h // 2

    if shape[::-1] != new_unpad:  # resize
        img = cv2.resize(img, new_unpad, interpolation=cv2.INTER_AREA)

    canvas[dh:dh + new_unpad_h, dw:dw + new_unpad_w, :] = img

    return canvas, r, dw, dh, new_unpad_w, new_unpad_h  # (dw,dh)


def cv2AddChineseText(img, text, position, textColor=(0, 0, 255), textSize=10):
    if (isinstance(img, np.ndarray)):  # 判断是否OpenCV图片类型
        img = Image.fromarray(cv2.cvtColor(img, cv2.COLOR_BGR2RGB))
    # 创建一个可以在给定图像上绘图的对象
    draw = ImageDraw.Draw(img)
    # 字体的格式
    fontStyle = ImageFont.truetype(
        "simsun.ttc", textSize, encoding="utf-8")
    # 绘制文本
    draw.text(position, text, textColor, font=fontStyle)
    # 转换回OpenCV格式
    return cv2.cvtColor(np.asarray(img), cv2.COLOR_RGB2BGR)


def infer(ori_img, img, r, dw, dh, new_unpad_w, new_unpad_h):
    ort_session = ort.InferenceSession(onnx_path)
    t0 = time.time()
    # inference: (1,n,6) (1,2,640,640) (1,2,640,640)
    det_out, da_seg_out, ll_seg_out = ort_session.run(
        ['det_out', 'drive_area_seg', 'lane_line_seg'],
        input_feed={"images": img}
    )
    seconds = time.time() - t0
    fps = "%.2f fps" %(1 / seconds)  # 帧率

    det_out = torch.from_numpy(det_out).float()
    boxes = non_max_suppression(det_out)[0]  # [n,6] [x1,y1,x2,y2,conf,cls]
    boxes = boxes.cpu().numpy().astype(np.float32)
    if boxes.shape[0] == 0:
        print("no bounding boxes detected.")
        return None

    # scale coords to original size.
    boxes[:, 0] -= dw
    boxes[:, 1] -= dh
    boxes[:, 2] -= dw
    boxes[:, 3] -= dh
    boxes[:, :4] /= r
    print(f"detect {boxes.shape[0]} bounding boxes.")

    img_det = ori_img[:, :, ::-1].copy()
    for i in range(boxes.shape[0]):
        x1, y1, x2, y2, conf, label = boxes[i]
        x1, y1, x2, y2, label = int(x1), int(y1), int(x2), int(y2), int(label)
        img_det = cv2.rectangle(img_det, (x1, y1), (x2, y2), (0, 255, 0), 2, 2)

    # select da & ll segment area.
    da_seg_out = da_seg_out[:, :, dh:dh + new_unpad_h, dw:dw + new_unpad_w]
    ll_seg_out = ll_seg_out[:, :, dh:dh + new_unpad_h, dw:dw + new_unpad_w]

    da_seg_mask = np.argmax(da_seg_out, axis=1)[0]
    ll_seg_mask = np.argmax(ll_seg_out, axis=1)[0]

    color_area = np.zeros((new_unpad_h, new_unpad_w, 3), dtype=np.uint8)
    color_area[da_seg_mask == 1] = [0, 255, 0]
    color_area[ll_seg_mask == 1] = [0, 0, 255]
    color_seg = color_area

    return img_det, boxes, color_seg, fps


def main(source, save_path):
    cap = cv2.VideoCapture(source)
    width = int(cap.get(cv2.CAP_PROP_FRAME_WIDTH))      # 获取视频的宽度
    height = int(cap.get(cv2.CAP_PROP_FRAME_HEIGHT))    # 获取视频的高度
    fps = cap.get(cv2.CAP_PROP_FPS)                     #
    fourcc = cv2.VideoWriter_fourcc(*"mp4v")
    #fourcc = int(cap.get(cv2.CAP_PROP_FOURCC))          # 视频的编码
    #定义视频对象输出
    writer = cv2.VideoWriter(save_path, fourcc, fps, (width, height))

    # 检查是否导入视频成功
    if not cap.isOpened():
        print("视频无法打开")
        exit()

    frame_id = 0
    while True:
        ret, frame = cap.read()
        if not ret:
            print("视频推理完毕...")
            break

        frame_id += 1
        # if frame_id % 3 != 0:
        #     continue
        canvas, r, dw, dh, new_unpad_w, new_unpad_h = resize_unscale(frame, (640, 640))
        img = canvas.copy().astype(np.float32)  # (3,640,640) RGB
        img /= 255.0
        img[:, :, 0] -= 0.485
        img[:, :, 1] -= 0.456
        img[:, :, 2] -= 0.406
        img[:, :, 0] /= 0.229
        img[:, :, 1] /= 0.224
        img[:, :, 2] /= 0.225
        img = img.transpose(2, 0, 1)
        img = np.expand_dims(img, 0)  # (1, 3,640,640)

        # 推理
        img_det, boxes, color_seg, fps = infer(frame, img, r, dw, dh, new_unpad_w, new_unpad_h)
        if img_det is None:
            continue

        color_mask = np.mean(color_seg, 2)
        img_merge = canvas[dh:dh + new_unpad_h, dw:dw + new_unpad_w, :]

        # merge: resize to original size
        img_merge[color_mask != 0] = \
            img_merge[color_mask != 0] * 0.5 + color_seg[color_mask != 0] * 0.5
        img_merge = img_merge.astype(np.uint8)
        img_merge = cv2.resize(img_merge, (width, height),
                            interpolation=cv2.INTER_LINEAR)

        img_merge = cv2AddChineseText(img_merge, f'帧数:{frame_id}  帧率:{fps} 前方共有 {boxes.shape[0]} 辆车...',
                                    (100, 50), textColor=(0, 0, 255), textSize=30)
        img_merge = cv2AddChineseText(img_merge, '前方绿色区域为可行驶区域,红色为检出的车道线...',
                                      (100, 100), textColor=(0, 0, 255), textSize=30)

        for i in range(boxes.shape[0]):
            x1, y1, x2, y2, conf, label = boxes[i]
            x1, y1, x2, y2, label = int(x1), int(y1), int(x2), int(y2), int(label)
            img_merge = cv2.rectangle(img_merge, (x1, y1), (x2, y2), (0, 255, 0), 2, 2)

        # cv2.imshow('img_merge', img_merge)
        # cv2.waitKey(0)
        writer.write(img_merge)

    cap.release()  # 释放摄像头
    writer.release()  # 可以实现预览
    cv2.destroyAllWindows()

if __name__=="__main__":
    source = 'inference/videos/1.mp4'
    save_path = '/home/AidLux_Course/YOLOP/inference/output/test.mp4'
    main(source, save_path)
基于AidLux的自动驾驶智能预警应用方案
4.总结
感谢成都阿加犀公司举办的训练营课程,让笔者能够学习自动驾驶的基础知识,以及自动驾驶算法在移动端的部署。
