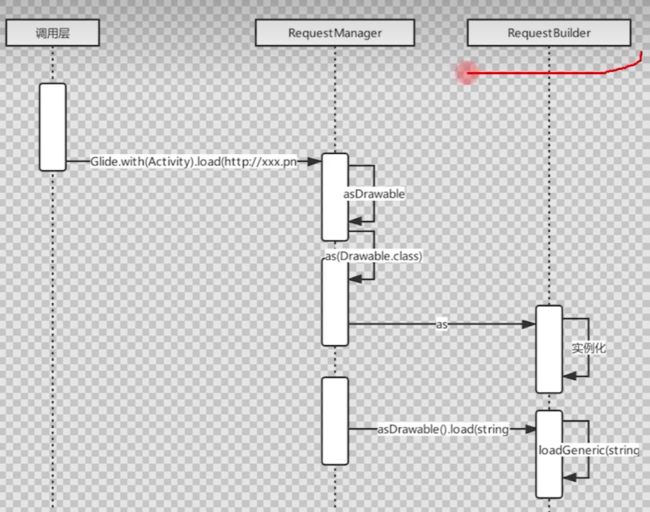
【开源框架】Glide的图片加载流程
引入依赖
以下的所有分析都是基于此版本的Glide分析
//引入第三方库glide
implementation 'com.github.bumptech.glide:glide:4.11.0'
annotationProcessor 'com.github.bumptech.glide:compiler:4.11.0'
分析
Glide的使用就是短短的一行代码
Glide.with(this).load("xxx").into(imageView);

//拆分成三步
RequestManager with = Glide.with(this);

RequestBuilder<Drawable> load = with.load("");

load.into(iv);
- 首先通过构造Glide的单例对象
- 调用with给每一个RequestManager绑定一个空白的Fragment来管理图片加载的生命周期
- 构建Request对象(真正的实现类SingleRequest)
- 请求之前先检测缓存
- 先检测活动缓存
- 在检测内存缓存
- 没有缓存就构建一个新的异步任务
- 检测有没有本地磁盘缓存
- 没有磁盘缓存,就通过网络请求,返回输入流InputStream
- 解析输入流InputStream进行采样压缩,最终拿到Bitmap对象
- 对Bitmap进行转换成Drawble
- 构建磁盘缓存DiskCache
- 构建内存缓存
- 最终回到ImageViewTarget显示图片
with(如何实现生命周期的管控)
调用with方法
public static RequestManager with(@NonNull FragmentActivity activity) {
	return getRetriever(activity).get(activity);
}
会来到RequestManagerRetriever类的get方法中,在这里区分主线程还是在子线程中使用with。
如果在子线程中,绑定的是app的生命周期,在主线程中会将图片的加载与当前activity的生命周期绑定。
这也是为什么不能在子线程中使用Glide的原因,生命周期的管理会失效。
public RequestManager get(@NonNull FragmentActivity activity) {
    if (Util.isOnBackgroundThread()) {
      return get(activity.getApplicationContext());
    } else {
      assertNotDestroyed(activity);
      FragmentManager fm = activity.getSupportFragmentManager();
      return supportFragmentGet(activity, fm, /*parentHint=*/ null, isActivityVisible(activity));
    }
  }
最终会返回一个RequestManager对象。
load
调用load最终会返回一个RequestBuilder对象
load负责做什么?

into
into创建请求
RequestBuilder
在RequestBuilder中的into方法,首先会创建一个请求,它是一个接口,真正的实现类是SingleRequest。
private <Y extends Target<TranscodeType>> Y into(
      @NonNull Y target,
      @Nullable RequestListener<TranscodeType> targetListener,
      BaseRequestOptions<?> options,
      Executor callbackExecutor) {
    ······

    //1.创建一个请求
    //这里的Request是一个接口,实际构造的对象是SingleRequest实现类
    Request request = buildRequest(target, targetListener, options, callbackExecutor);

	······
	//2.
    requestManager.clear(target);
    target.setRequest(request);
	//3.继续跟踪tarck()
    requestManager.track(target, request);

    return target;
  }
RequestTracker
一个用于跟踪、取消和重新启动正在进行的、已完成的和失败的请求的类
跟踪track方法最终调用的是runRequest方法。
其中有两个列表:
- requests:运行中的队列
- pendingRequests:等待中的队列
public void runRequest(@NonNull Request request) {
    //1.将请求加入到运行队列中
    requests.add(request);
    //2.请求没有暂停就调用SingleRequest的begin方法
    if (!isPaused) {
      request.begin();
    //3.请求暂停了就加入到等待运行的队列中
    } else {
      request.clear();
      pendingRequests.add(request);
    }
  }
SingleRequest
在SingleRequest类中begin函数是添加了synchronized,保证在多线程下的线程安全
onSizeReady方法,最终返回调用的engine.load()
@Override
  public void begin() {
    synchronized (requestLock) {
    	······
      status = Status.WAITING_FOR_SIZE;
      if (Util.isValidDimensions(overrideWidth, overrideHeight)) {
        //1.继续深入此方法
        onSizeReady(overrideWidth, overrideHeight);
      } else {
        target.getSize(this);
      }

      ······
    }
  }
Engine(活动和内存缓存)
这时已经来到了Engine类的load方法中
 public <R> LoadStatus load(
      GlideContext glideContext,
      Object model,
      Key signature,
      int width,
      int height,
      ······) {
    long startTime = VERBOSE_IS_LOGGABLE ? LogTime.getLogTime() : 0;

     //1.得到一个唯一的key,用于唯一标识图片,用于缓存读取
    EngineKey key =
        keyFactory.buildKey(
            model,
            signature,
            width,
            height,
            ······
        );

     //2.将key传入,从缓存中获取图片
    EngineResource<?> memoryResource;
    synchronized (this) {
      memoryResource = loadFromMemory(key, isMemoryCacheable, startTime);

      if (memoryResource == null) {
        //4.如果缓存中没有则加载
        return waitForExistingOrStartNewJob(
            glideContext,
            model,
            signature,
            width,
            height,
            ······
            key,
            startTime);
      }
    }
	//3.存在图片缓存,则直接将它回调出去
    cb.onResourceReady(memoryResource, DataSource.MEMORY_CACHE);
    return null;
  }
详看loadFromMemory方法
在这里存在活动缓存和内存缓存两级缓存,这两级缓存都是运行时缓存,当APP进程被杀,这这两级缓存是不再存在的。
活动缓存是:直接面向用户正在被展示的图片,是一个弱引用对象,当弱引用对象被回收之后,会把它持有的图片资源放到内存缓存中
@Nullable
  private EngineResource<?> loadFromMemory(
      EngineKey key, boolean isMemoryCacheable, long startTime) {
    ······
	//1.从活动缓存中获取
    EngineResource<?> active = loadFromActiveResources(key);
    if (active != null) {
      return active;
    }
	//2.活动缓存没有,才从内存缓存中获取
    EngineResource<?> cached = loadFromCache(key);
    if (cached != null) {
      return cached;
    }
    //3.都没有则直接退出
    return null;
  }
回过头再看waitForExistingOrStartNewJob方法,这个方法是没有检测到缓存时才会被调用。
首先会再次检测磁盘缓存中是否存在,不存在则创建异步任务
private <R> LoadStatus waitForExistingOrStartNewJob(
      GlideContext glideContext,
      Object model,
      Key signature,
      int width,
      int height,
      ······
      EngineKey key,
      long startTime) {

    //1.get磁盘缓存
    EngineJob<?> current = jobs.get(key, onlyRetrieveFromCache);
    if (current != null) {
      current.addCallback(cb, callbackExecutor);
      if (VERBOSE_IS_LOGGABLE) {
        logWithTimeAndKey("Added to existing load", startTime, key);
      }
      return new LoadStatus(cb, current);
    }
    //2.执行图片各类操作的job
    EngineJob<R> engineJob =
        engineJobFactory.build(
            key,
            isMemoryCacheable,
            useUnlimitedSourceExecutorPool,
            useAnimationPool,
            onlyRetrieveFromCache);
    //3.真正需要执行的任务,最终放入到engineJob中执行
    DecodeJob<R> decodeJob =
        decodeJobFactory.build(
            glideContext,
            model,
            key,
            ······
        );

    jobs.put(key, engineJob);

    engineJob.addCallback(cb, callbackExecutor);
    //4.将decodeJob放入engineJob开始执行
    engineJob.start(decodeJob);

    if (VERBOSE_IS_LOGGABLE) {
      logWithTimeAndKey("Started new load", startTime, key);
    }
    return new LoadStatus(cb, engineJob);
  }
由engineJob启动decodeJob的执行。最终通过线程池去执行decodeJob操作,可见decodeJob肯定是Runnable的实现类。
public synchronized void start(DecodeJob<R> decodeJob) {
    this.decodeJob = decodeJob;
    GlideExecutor executor =
        decodeJob.willDecodeFromCache() ? diskCacheExecutor : getActiveSourceExecutor();
    executor.execute(decodeJob);
  }
DecedeJob
执行的是decodeJob中的run方法
@Override
  public void run() {
    ·······
    try {
    //1.重点关注此方法
      runWrapped();
    } catch (CallbackException e) {
      throw e;
    } catch (Throwable t) {
      ·····
    } finally {
  }
runWrapped主要是对不同任务的区分。
具体执行哪一个看此篇文章:https://www.jianshu.com/p/faeeb7bb39a3
private void runWrapped() {
    switch (runReason) {
    //1.首次初始化并获取资源
      case INITIALIZE:
        stage = getNextStage(Stage.INITIALIZE);
        currentGenerator = getNextGenerator();
        runGenerators();
        break;
    //2.从磁盘缓存获取不到数据,重新获取
      case SWITCH_TO_SOURCE_SERVICE:
        runGenerators();
        break;
	//3.获取资源成功,解码数据
      case DECODE_DATA:
        decodeFromRetrievedData();
        break;
      default:
        throw new IllegalStateException("Unrecognized run reason: " + runReason);
    }
  }
不管是 INITIALIZE 初始化还是 SWITCH_TO_SOURCE_SERVICE 从磁盘缓存获取不到数据进行重试,都是要调用 runGenerators 来获取数据。我们先来看getNextGenerator,在首次初始化时会调用这个方法。可以看到这里由很多的XXXGenerator
DataFetcherGenerator的三个实现子类:
- ResourceCacheGenerator:从磁盘缓存中获取原始资源处理后的Resource资源
- DataCacheGenerator:从磁盘缓存中获取原始资源
- SourceGenerator:从数据源(例如网络)中获取资源
具体从哪一个生成器中获取资源跟用户的使用配置有关,没有配置时默认是Source
因此上面的currentGenerator是SourceGenerator
private DataFetcherGenerator getNextGenerator() {
    switch (stage) {
      case RESOURCE_CACHE:
        return new ResourceCacheGenerator(decodeHelper, this);
      case DATA_CACHE:
        return new DataCacheGenerator(decodeHelper, this);
      case SOURCE:
        return new SourceGenerator(decodeHelper, this);
      case FINISHED:
        return null;
      default:
        throw new IllegalStateException("Unrecognized stage: " + stage);
    }
  }
继续深入会发现在runGenerators方法中会调用currentGenerator的startNext方法,很明显是SourceGenenrator的startNext方法。
@Override
  public boolean startNext() {
    ······

    loadData = null;
    boolean started = false;
    while (!started && hasNextModelLoader()) {
        //1.注意getLoadData
      loadData = helper.getLoadData().get(loadDataListIndex++);
      if (loadData != null
          && (helper.getDiskCacheStrategy().isDataCacheable(loadData.fetcher.getDataSource())
              || helper.hasLoadPath(loadData.fetcher.getDataClass()))) {
        started = true;
        startNextLoad(loadData);
      }
    }
    return started;
  }
重点关注getLoadData方法,这个方法中调用了modelLoader.buildLoadData,返回一个LoadData,它是工厂接口ModelLoader中的一个内部类。不必深究这个接口为什么设计,主要知道它是返回的它的实现子类HttpGlideUrlLoader,这时在初始化Glide是动态注册的
@Override
  public LoadData<InputStream> buildLoadData(
      @NonNull GlideUrl model, int width, int height, @NonNull Options options) {
    // GlideUrls memoize parsed URLs so caching them saves a few object instantiations and time
    // spent parsing urls.
    GlideUrl url = model;
    if (modelCache != null) {
      url = modelCache.get(model, 0, 0);
      if (url == null) {
        modelCache.put(model, 0, 0, model);
        url = model;
      }
    }
    int timeout = options.get(TIMEOUT);
    return new LoadData<>(url, new HttpUrlFetcher(url, timeout));
  }
HttpGlideUrlLoader
既然如此自然而然调用的就是HttpGlideUrlLoader类中的buildLoadData方法
@Override
  public LoadData<InputStream> buildLoadData(
      @NonNull GlideUrl model, int width, int height, @NonNull Options options) {
    ······
    int timeout = options.get(TIMEOUT);
    return new LoadData<>(url, new HttpUrlFetcher(url, timeout));
  }
可以看到最终又创建了一个HttpUrlFetcher,往这个类中深入
HttpUrlFetcher
来到HttpUrlFetcher中,可算是柳暗花明,终于看到了网络请求,最终返回的是一个InputStream对象。
而网络请求的实现原理是使用Android中的HttpURLConnection,但是从Android 4.4开始,HttpURLConnection的实现确实是通过调用okhttp完成的,而具体的方法则是通过HttpHandler这个桥梁,以及在OkHttpClient, HttpEngine中增加相应的方法来实现,当然,其实还涉及一些类的增加或删除。所以想研究网络请求的实现不妨再看以下OkHttp这个网络请求框架。
private InputStream loadDataWithRedirects(
      URL url, int redirects, URL lastUrl, Map<String, String> headers) throws IOException {
    ······

	//1.网络请求
    urlConnection = connectionFactory.build(url);
    for (Map.Entry<String, String> headerEntry : headers.entrySet()) {
      urlConnection.addRequestProperty(headerEntry.getKey(), headerEntry.getValue());
    }
    urlConnection.setConnectTimeout(timeout);
    urlConnection.setReadTimeout(timeout);
    urlConnection.setUseCaches(false);
    urlConnection.setDoInput(true);
    urlConnection.setInstanceFollowRedirects(false);
    urlConnection.connect();
    stream = urlConnection.getInputStream();
    if (isCancelled) {
      return null;
    }
    final int statusCode = urlConnection.getResponseCode();
    if (isHttpOk(statusCode)) {
      return getStreamForSuccessfulRequest(urlConnection);
    } else if (isHttpRedirect(statusCode)) {
      ······
  }
DecedeJob
拿到了请求的结果,我们并不能直接显示这张图片,还需要进行采样压缩,否则很容易出现大图OOM。
多级回调最终回到了DecedeJob类中。
在runLoadPath方法中,又继续深入到了LoadPath类中执行采样压缩(这里就不再深入分析是怎么采样压缩的了,目的很明显,最终返回的就是一张被压缩优化的Bitmap图片)
private <Data, ResourceType> Resource<R> runLoadPath(
      Data data, DataSource dataSource, LoadPath<Data, ResourceType, R> path)
      throws GlideException {
    Options options = getOptionsWithHardwareConfig(dataSource);
    DataRewinder<Data> rewinder = glideContext.getRegistry().getRewinder(data);
    try {
      // ResourceType in DecodeCallback below is required for compilation to work with gradle.
      return path.load(
          rewinder, options, width, height, new DecodeCallback<ResourceType>(dataSource));
    } finally {
      rewinder.cleanup();
    }
  }
PathLoad
采样压缩的细节不再深入,最终返回的是一张优化处理后的Bitmap位图
最终将图片一系列的回调,回到了Engine类中
Engine
回调到EngineJob中,再回调到Engine中的onEngineJobComplete,顾名思义就是到是异步请求任务已经完成
@Override
public synchronized void onEngineJobComplete(
    EngineJob<?> engineJob, Key key, EngineResource<?> resource) {
    if (resource != null && resource.isMemoryCacheable()) {
        activeResources.activate(key, resource);
    }
    jobs.removeIfCurrent(key, engineJob);
}
调用activate方法将它放入到活动缓存中,注意这是一个弱引用
synchronized void activate(Key key, EngineResource<?> resource) {
    ResourceWeakReference toPut =
        new ResourceWeakReference(
            key, resource, resourceReferenceQueue, isActiveResourceRetentionAllowed);

    ResourceWeakReference removed = activeEngineResources.put(key, toPut);
    if (removed != null) {
      removed.reset();
    }
  }
SingleRequest
将图片保存到活动缓存中后,再由EngineJob回调到SingeRequest中的onResourceReady,意为资源已经准备好了
@GuardedBy("requestLock")
  private void onResourceReady(Resource<R> resource, R result, DataSource dataSource) {
    ······
    try {
      ······
      if (!anyListenerHandledUpdatingTarget) {
        //1.加载动画
        Transition<? super R> animation = animationFactory.build(dataSource, isFirstResource);
        //2.返回图片和动画
        target.onResourceReady(result, animation);
      }
    } finally {
      isCallingCallbacks = false;
    }
	//3.通知加载成功
    notifyLoadSuccess();
  }
ImageViewTarget
最终回到起点,设置图片,调用的是ImageViewTarget中的setResourceInternal方法,最终调用其中的抽象方法setResource
@Override
  public void onResourceReady(@NonNull Z resource, @Nullable Transition<? super Z> transition) {
   //1.设置图片资源
    if (transition == null || !transition.transition(resource, this)) {
      setResourceInternal(resource);
    } else {
      maybeUpdateAnimatable(resource);
    }
  }
DrawableImageViewTarget
这里的view就是一个ImageView对象,至此一张图片就显示在了屏幕上
@Override
  protected void setResource(@Nullable Drawable resource) {
    view.setImageDrawable(resource);
  }


