八大排序四大查询,哈希表,树的遍历,哈夫曼,多叉树,python+typescript版本
部分图引用于 @2021dragon 八大排序c语言实现
1. 线性结构
1.1 队列
1.2 循环队列
1.3 单链表
1.4 双链表
1.5单向循环列表
1.5.1 约瑟夫问题
1.6 栈
1.6.1 前缀表达式
1.6.2 后缀表达式
1.6.3 中缀表达式转后缀表达式
1.6.4 逆波兰计算机
2. 复杂度
2.1 时间复杂度
2.2 空间复杂度
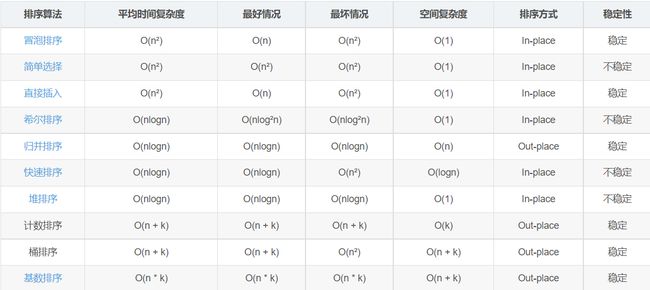
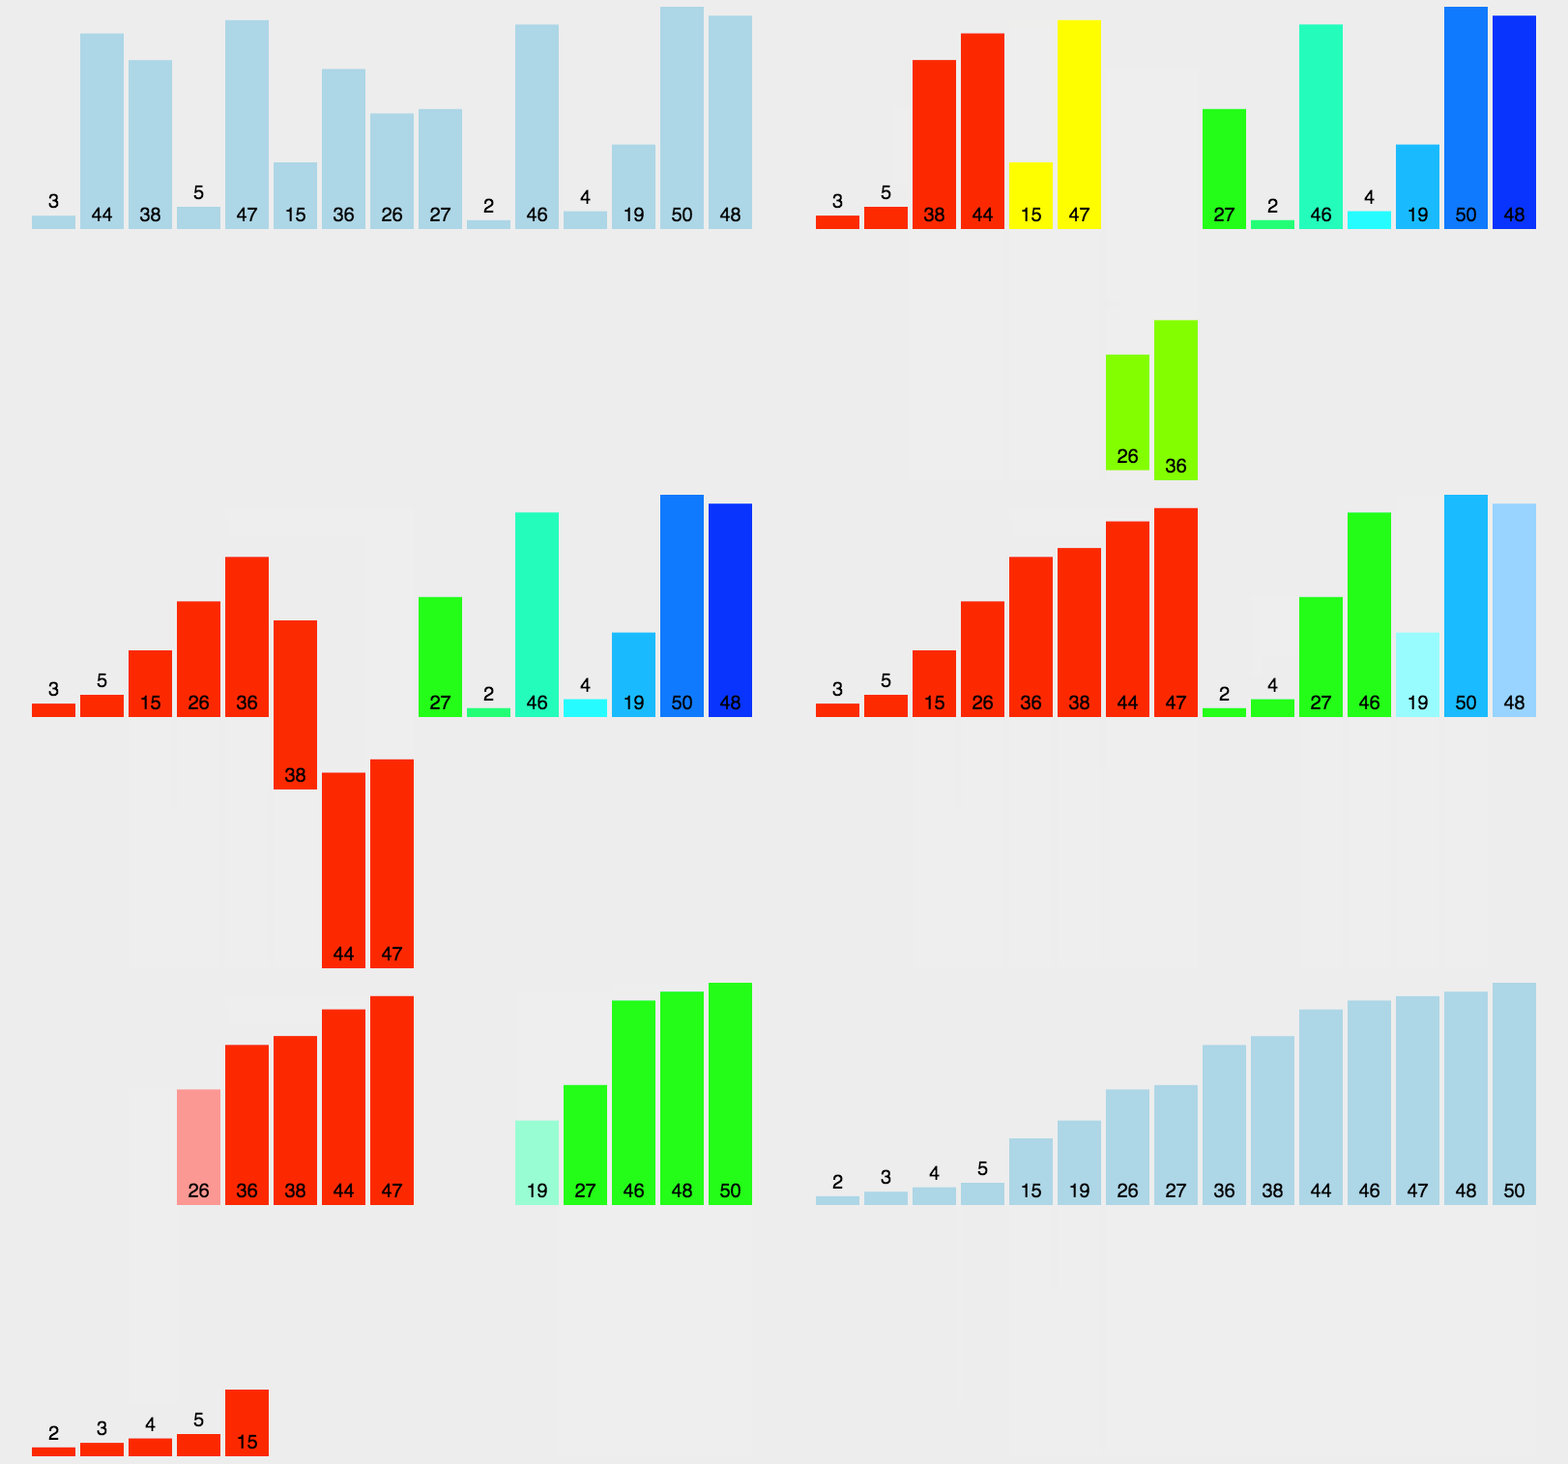
3. 八大排序
3.1 冒泡排序
import random

# 前一个与后一个比较,若大于/小于,交换二者数据

# 生成随机数函数
def newList(n, start, end):
    myList = []
    for i in range(n):
        # [start, end]的数
        randomNumber = end - int(random.random() * (end - start))
        myList.append(randomNumber)
    return myList


myList = newList(10, 500, 1000)
print(myList)
for i in range(len(myList) - 1):
    flag = False
    for j in range(len(myList) - i - 1):
        if myList[j] > myList[j + 1]:
            flag = True  # 如果此趟排序一次都没调换位置,那么不用继续排序
            temp = myList[j + 1]
            myList[j + 1] = myList[j]
            myList[j] = temp
    if not flag:
        break
    print('第%d躺排序' % (i+1), myList)
3.2 选择排序
# 找出最小的数与对应位置交换顺序,优于冒泡


import random


# 生成随机数函数
def newList(n, start, end):
    myList = []
    for i in range(n):
        # [start, end]的数
        randomNumber = end - int(random.random() * (end - start))
        myList.append(randomNumber)
    return myList


myList = newList(10, 500, 1000)
print(myList)

for i in range(len(myList)):
    # 假定第一个数为最小值
    minIndex = i
    min = myList[i]
    for j in range(i + 1, len(myList)):
        if min > myList[j]:
            minIndex = j
            min = myList[j]
    if minIndex != i:  # 如果当前值就是此次的最小值则无需交换
        myList[minIndex] = myList[i]
        myList[i] = min
print(myList)
3.3 插入排序
import random

# 把第一个数当作有序集,后面的当作无序集,依次将后面集合的第一个数插入到前面集合适当位置, 优于冒泡,差于选择

# 生成随机数函数
def newList(n, start, end):
    myList = []
    for i in range(n):
        # [start, end]的数
        randomNumber = end - int(random.random() * (end - start))
        myList.append(randomNumber)
    return myList


myList = newList(10, 500, 1000)
print(myList)

for i in range(1, len(myList)):
    # 保存待插入数和待插入数前一个数的下标
    insertValue = myList[i]
    insertIndex = i - 1
    while insertIndex >= 0 and insertValue < myList[insertIndex]:
        myList[insertIndex + 1] = myList[insertIndex]  # 前面集合的数后移
        insertIndex -= 1
    # 如果退出循环,insertIndexz正代表该插入位置的前一个数的下标
    myList[insertIndex+1] = insertValue
print(myList)
3.4 希尔排序
# 优化后的插入排序
import random

# 将列表分成(length//2)组,间隔(length//2)取数,对每一组进行插入排序
# 优于冒泡,选择,插入排序

# 生成随机数函数
def newList(n, start, end):
    myList = []
    for i in range(n):
        # [start, end]的数
        randomNumber = end - int(random.random() * (end - start))
        myList.append(randomNumber)
    return myList


myList = newList(10, 500, 1000)
print(myList)

temp = 0
step = len(myList)//2
while step > 0:
    for i in range(step, len(myList)):  # 初始值为step,因为是用第二个值开始插入
        # 对每组数据进行插入排序
        j = i
        temp = myList[j]
        while temp < myList[j - step] and (j - step) >= 0:
            myList[j] = myList[j - step]
            j -= step
        myList[j] = temp
    step //= 2
print(myList)
3.5 快速排序
import random

# 哨兵那个,找出一个基准值,把比基准值小的放在左边,反之
# 再对基准值两边的数再找基准值,再重复上步骤
# 此处采用空位法


# 生成随机数函数
def newList(n, start, end):
    myList = []
    for i in range(n):
        # [start, end]的数
        randomNumber = end - int(random.random() * (end - start))
        myList.append(randomNumber)
    return myList


myList = newList(10, 500, 1000)
print(myList)


def quickSort(myList, left, right):
    if left < right:
        L = left  # 左下标
        R = right  # 右下标
        temp = myList[L]  # 以第一个值为基准值当然也可以用其他的
        while L < R:
            while L < R and myList[R] >= temp:
                R -= 1
            if L < R:
                myList[L] = myList[R]
            while L < R and myList[L] <= temp:
                L += 1
            if L < R:
                myList[R] = myList[L]
        # 此时L == R
        myList[L] = temp
        quickSort(myList, left, R - 1)
        quickSort(myList, L + 1, right)


quickSort(myList, 0, len(myList) - 1)
print(myList)
3.6 归并排序
import random

# 递归分,每次分都进行治,并拷贝到原数组

# 生成随机数函数
def newList(n, start, end):
    myList = []
    for i in range(n):
        # [start, end]的数
        randomNumber = end - int(random.random() * (end - start))
        myList.append(randomNumber)
    return myList


myList = newList(8, 500, 1000)
print(myList)
temp = [0 for i in range(len(myList))]


# 定义分函数
def divide(myList, left, right, temp):
    if left < right:
        mid = (left + right) // 2
        # 左分
        divide(myList, left, mid, temp)
        # 右分
        divide(myList, mid + 1, right, temp)
        # 每次分都治
        manage(myList, left, mid, right, temp)


# 定义治函数
def manage(myList, left, mid, right, temp):
    i = left  # 左边第一个
    j = mid + 1  # 右边第一个
    t = 0  # 代表temp数组下标
    while i <= mid and j <= right:
        if myList[i] <= myList[j]:
            temp[t] = myList[i]
            t += 1
            i += 1
        else:
            temp[t] = myList[j]
            t += 1
            j += 1

    # while循环退出,说明有一边已经放完,接下来把另一边全部放入temp
    while i <= mid:
        temp[t] = myList[i]
        t += 1
        i += 1
    while j <= right:
        temp[t] = myList[j]
        t += 1
        j += 1

    # 将治好的数据拷贝到myList对应位置
    t = 0
    myListLeft = left
    while myListLeft <= right:
        myList[myListLeft] = temp[t]
        t += 1
        myListLeft += 1


divide(myList, 0, len(myList) - 1, temp)
print(myList)
3.7 基数排序
import random

# 将列表里的数依次按个位放入桶内,再依次取出,再按十位放入,再取出...


# 生成随机数函数
def newList(n, start, end):
    myList = []
    for i in range(n):
        # [start, end]的数
        randomNumber = end - int(random.random() * (end - start))
        myList.append(randomNumber)
    return myList


myList = newList(10, 500, 1000)
print(myList)


# 获取列表中最大数
max = 0
for i in myList:
    if i > max:
        max = i
# 获取最大数位数
maxLength = len(str(max))

# 逻辑代码
for i in range(maxLength):
    # 定义桶,二维数组
    pail = [[0 for i in range(len(myList))] for j in range(len(myList))]

    # 定义一个一维数组来才来存储每个桶中存放元素的个数
    number = [0 for i in range(10)]

    # 放入对应桶
    for j in myList:
        index = (j // (10 ** i)) % 10
        pail[index][number[index]] = j
        number[index] += 1

    # 依次从10个桶中取出放到myList
    index = 0
    for j in range(10):

        # 如果桶中有数才取
        if number[j] != 0:
            for k in range(number[j]):
                myList[index] = pail[j][k]
                index += 1
print(myList)
基数排序占用空间大,不太适用于负数,可以用于负数,但要建20个桶,或者再取出时另做判断
3.8 堆排序
- 先建立最大堆
- 交换最大值与最右边节点的值,然后抛开左右边节点,继续维护最大堆重复下去即可有序
//假设二叉树转换成了此数组
let arr = [2, 4, 3, 8, 1, 5, 6]

//处理一个节点
function adjustHeap(arr: Array<number>, i: number, length: number) {
	let temp = arr[i] //把当前节点值保留
	for (let k = i * 2 + 1; k < length; k = k * 2 + 1) {

		//判断左右节点哪个值更大
		if (k + 1 < length && arr[k] < arr[k + 1]) {
			k++
		}
		//把最大子节点与根节点交换,再把根节点变为k继续向下遍历
		if (temp < arr[k]) {
			arr[i] = arr[k]
			i = k
		} else {
			break // 因为创建最大堆是从下往上,如果当前节点就是3个里面最大的,就退出循环,因为下面已经排好了
		}
	}
	//循环结束,i指向temp该待的位置
	arr[i] = temp
}

//从下到上处理每个节点
//最后一个非叶子节点下标为
//	满二叉树,length为奇数(length - 1 - 2) / 2 或者
//	非满二叉树的完全二叉树,length为偶数 (length - 1 - 1) / 2
//综合等于length / 2 - 1
for (let i = Math.floor(arr.length / 2) - 1; i >= 0; i--) {
	adjustHeap(arr, i, arr.length)
}


//将堆转换为有序
for (let j = arr.length - 1; j > 0; j--) {
	let tem = arr[j]
	arr[j] = arr[0]
	arr[0] = tem
	//因为下面排好了已经,只需要以根节点为当前节点创建一次最大堆即可,但注意减去最后一个节点
	adjustHeap(arr, 0, j)
}
console.log(arr);
3.9 在n趋于无穷时候且数据随机没有大致规律
基数>归并>快速>希尔>选择>插入>冒泡
4. 查询算法
4.1 线性查找
import random


# 生成随机数函数
def newList(n, start, end):
    myList = []
    for i in range(n):
        # [start, end]的数
        randomNumber = end - int(random.random() * (end - start))
        myList.append(randomNumber)
    return myList


myList = newList(100, 1, 100)
print(myList)

value = 29
for i in range(len(myList)):
    if value == myList[i]:
        print('找到啦,下标为%d' % i)
        break
1
4.2 二分查找
# 适用于有序表,此处用递归实现
myList = [1, 3, 7, 12, 45, 68, 135, 135, 135,
          135, 135, 135, 135, 135, 135, 135, 268]
value = 135

temp = []  # 用来存储所有找到的数据的下标


def binary_lookup(myList, left, right, value):
    mid = (left + right) // 2
    if myList[mid] > value:
        binary_lookup(myList, left, mid - 1, value)
    elif myList[mid] < value:
        binary_lookup(myList, mid + 1, right, value)
    else:
        temp.append(mid)
        index = mid - 1
        while index >= 0 and myList[index] == value:
            temp.insert(0, index)
            index -= 1
        index = mid - 1
        while index >= 0 and myList[index] == value:
            temp.append(index)
            index += 1


binary_lookup(myList, 0, len(myList) - 1, value)
print(temp)
4.3 插值查找
# 与二分查找的区别在于他更适合用来找靠前和靠后的数据,且也同样时候找中间数据
# 适用于有序表,此处用递归实现
myList = [1, 3, 7, 12, 45, 68, 135, 135, 135,
          135, 135, 135, 135, 135, 135, 135, 268]
value = 135

temp = []  # 用来存储所有找到的数据的下标


def binary_lookup(myList, left, right, value):
    # 判断查找值是否越界
    if value < myList[0] or value > myList[-1] or left > right:
        return
    mid = left + ((value - myList[left]) * (right - left)
                  ) // (myList[right] - myList[left])
    if myList[mid] > value:
        binary_lookup(myList, left, mid - 1, value)
    elif myList[mid] < value:
        binary_lookup(myList, mid + 1, right, value)
    else:
        temp.append(mid)
        index = mid - 1
        while index >= 0 and myList[index] == value:
            temp.insert(0, index)
            index -= 1
        index = mid - 1
        while index >= 0 and myList[index] == value:
            temp.append(index)
            index += 1


binary_lookup(myList, 0, len(myList) - 1, value)
print(temp)
4.4 斐波那契查找
# 斐波那契数代表下标,所以 - 1
# 定义生成斐波那契列表函数
def fb(k):
    fblist = [1 for i in range(k)]
    for i in range(2, k):
        fblist[i] = fblist[i - 1] + fblist[i - 2]
    return fblist


myList = [1, 3, 6, 13, 24, 35, 63, 72, 135, 345, 2457,
          3425, 7658, 9090, 38485, 38486, 94838, 109283]
fbList = fb(30)

def find(myList,left,right,key):
    mid = 0
    k = 0
    # 找到大于且最邻近列表最大值的斐波那契数下标
    while fbList[k] - 1 < len(myList):
        k += 1
    # 填充myList长度与fbList[k]值相等
    for i in range(fbList[k] - 1 - len(myList)):
        myList.append(myList[right - 1])
    while left < right:
        mid = left + fbList[k - 1] - 1
        if myList[mid] > key:#向左找
            k -= 1
            right = mid - 1
        elif myList[mid] < key:#向右找
            k -= 2# 此处说明:斐波那契数往左两位的值,即是mid到最后一位斐波那契数的差,因为前两位和等于前一位嘛;而left加上此值刚好就是后面两位斐波那契数值差的黄金分割点
            left = mid + 1
        else:# 找到
            return mid

result = find(myList,0,len(myList) - 1,38485)
print(result)
5. 哈希表
- 操作无序数据
- 优秀的哈希算法可以将查找时间复杂度降到O(1)
- 因为如果通过哈希算法,每个数组元素里面只放一个元素的话,那么查找的时间复杂度就是1
- 那么为什么不直接用数组呢?
- 因为数组存储有序数据,而且当删除时不对其他数据进行操作会产生空间浪费
- 而且用数组的话就只能用下标来操作,一点不方便
- 哈希表数据为无序,对其操作不需要考虑影响其他元素,而且访问形式多变,可以通过id,name…操作
- 通过哈希算法节点放在同一数组元素里了叫做冲突,为了解决它所以每个数组元素都是一个链表
5.1 代码实现哈希表
//用存储查询修改删除用户数据来演示

// 创建用户类
class User {
	id: number
	name: string
	next: User | null
	constructor(id: number, name: string) {
		this.id = id
		this.name = name
		this.next = null
	}
}

//创建链表类
class LinkList {
	head: User

	constructor() {
		this.head = new User(0, '')
	}

	//查找方法(这里用查找用户对象,也可做成通过id等查找)
	find(user: User) {
		//空链表
		if (this.head.next == null) {
			return
		}
		//定义一个辅助指针
		let temp: User = new User(0, '')
		temp.next = this.head
		//找到链表最后一个用户
		while (true) {
			if (temp.next.next == null) {
				return
			}
			if (temp.next.next == user) {
				//返回用户节点上一个节点,方便删除操作
				return temp.next
			}
			temp.next = temp.next.next
		}
	}

	//在链表添加用户方法
	add(user: User) {
		//空链表
		if (this.head.next == null) {
			//直接把加入的第一个用户给头指针
			this.head.next = user
			return
		}

		//查询是否已经存在相同用户
		if(this.find(user)){
			console.log('此用户已经存在');
			return
		}


		//定义一个辅助指针
		let temp: User = new User(0, '')
		temp.next = this.head.next
		//找到链表最后一个用户
		while (true) {
			if (temp.next.next == null) {
				break
			}
			temp.next = temp.next.next
		}

		//循环退出,temp.next为最后一个节点
		temp.next.next = user
	}

	//遍历链表函数
	list(level?: number) {

		if (this.head.next == null) {
			console.log(`链表${level}: ` + 'NULL');
			return
		}

		//辅助指针
		let temp: User = new User(0, '')
		temp.next = this.head
		let str: string = ''

		while (temp.next.next !== null) {
			str += temp.next.next.name + '=>'
			temp.next = temp.next.next
		}

		console.log(`链表${level}: ` + str + 'null')
	}

	//删除用户
	del(user:User){
		let temp = this.find(user)

		//如果有此用户节点
		if(temp){
			temp.next = temp.next!.next
		}
	}
}

//创建哈希表类,
class HsTable {
	table: Array<LinkList>
	length: number

	constructor(length: number) {
		this.table = new Array(10)
		this.length = length

		for (let i = 0; i < length; i++) {
			this.table[i] = new LinkList()
		}
	}

	add(user: User) {
		let linkListId: number = hsfun(user)
		this.table[linkListId].add(user)
	}

	list() {
		console.log('\n哈希表遍历: \n');

		for (let i = 0; i < this.length; i++) {
			this.table[i].list(i)
		}
	}

	find(user: User) {
		let linkListId: number = hsfun(user)
		let isFind = this.table[linkListId].find(user)
		if(isFind){
			console.log('已有用户');
		}else{
			console.log('无此用户');

		}

	}

	del(user:User){
		let linkListId: number = hsfun(user)
		this.table[linkListId].del(user)
	}
}

//定义哈希函数
function hsfun(user: User) {
	let linkListId: number = user.id % 10
	return linkListId
}

let user1: User = new User(1, '王安石')
let user2: User = new User(11, '李白')
let user3: User = new User(111, '杜甫')
let user4: User = new User(1111, '辛弃疾')
let hstable = new HsTable(10)

hstable.add(user1)
hstable.add(user2)
hstable.add(user3)
hstable.add(user4)
hstable.del(user4)

hstable.list()
hstable.find(user4)
6. 树
6.1 二叉树的前中后序遍历与查找
//创建商品类
class Commodity {
	id: number
	name: string
	leftNode: Commodity | null = null
	rightNode: Commodity | null = null
	constructor(id: number, name: string) {
		this.id = id
		this.name = name
	}
	//前序遍历
	preOrder() {
		console.log(this.name)
		if (this.leftNode !== null) {
			this.leftNode.preOrder()
		}
		if (this.rightNode !== null) {
			this.rightNode.preOrder()
		}
	}
	//中序遍历
	midOrder() {
		if (this.leftNode !== null) {
			this.leftNode.midOrder()
		}
		console.log(this.name);

		if (this.rightNode !== null) {
			this.rightNode.midOrder()
		}
	}
	//后序遍历
	postOrder() {
		if (this.leftNode !== null) {
			this.leftNode.postOrder()
		}
		if (this.rightNode !== null) {
			this.rightNode.postOrder()
		}
		console.log(this.name);
	}
	//前序查找
	preFind(id:number):Commodity | undefined {
		if(this.id === id){
			return this
		}
		let tempNode:Commodity | undefined
		if (this.leftNode !== null) {
			tempNode = this.leftNode.preFind(id)
		}
		if(tempNode !== undefined){
			return tempNode
		}
		if (this.rightNode !== null) {
			tempNode = this.rightNode.preFind(id)
		}
		return tempNode
	}
	//中序查找
	midFind(id:number):Commodity | undefined {
		let tempNode:Commodity | undefined
		if (this.leftNode !== null) {
			tempNode = this.leftNode.midFind(id)
		}
		if(tempNode !== undefined){
			return tempNode
		}
		if(this.id === id){
			return this
		}
		if (this.rightNode !== null) {
			tempNode = this.rightNode.midFind(id)
		}
		return tempNode
	}
	//后序查找
	postFind(id:number):Commodity | undefined {
		let tempNode:Commodity | undefined
		if (this.leftNode !== null) {
			tempNode = this.leftNode.postFind(id)
		}
		if(tempNode !== undefined){
			return tempNode
		}
		if (this.rightNode !== null) {
			tempNode = this.rightNode.postFind(id)
		}
		if(tempNode !== undefined){
			return tempNode
		}
		if(this.id === id){
			return this
		}
	}
	//删除节点(不管子节点)
	delNode(id:number){
		//先判断左右子节点是否是要删除的节点
		if (this.leftNode !== null && this.leftNode.id === id){
			this.leftNode = null
			console.log('删除啦')
			return
		}
		if (this.rightNode !== null && this.rightNode.id === id){
			this.rightNode = null
			console.log('删除啦')
			return
		}
		//如果不是则继续递归
		if(this.leftNode !== null){
			this.leftNode.delNode(id)
		}
		if(this.rightNode !== null){
			this.rightNode.delNode(id)
		}
		else{
			console.log('没有这个商品哦');
		}
	}

}

//二叉树类
class BinaryTree {
	root: Commodity | null = null

	//设置此树以哪个节点为根节点
	setRoot(node: Commodity) {
		this.root = node
	}
	//前序遍历
	preOrder() {
		if (this.root !== null) {
			this.root.preOrder()
		}
		else {
			console.log('根节点为空');
		}
	}
	//中序遍历
	midOrder() {
		if (this.root !== null) {
			this.root.midOrder()
		}
		else {
			console.log('根节点为空');
		}
	}
	//后序遍历
	postOrder() {
		if (this.root !== null) {
			this.root.postOrder()
		}
		else {
			console.log('根节点为空');
		}
	}
	//前序查找
	preFind(id:number):Commodity | undefined{
		if(this.root !== null){
			let temp = this.root.preFind(id)
			if(temp){
				console.log('找到啦');
				return temp
			}
			else{
				console.log('无此用户');
			}
		}
	}
	//中序查找
	midFind(id:number):Commodity|undefined {
		if(this.root !== null){
			let temp = this.root.midFind(id)
			if(temp){
				console.log('找到啦');
				return temp
			}
			else{
				console.log('无此用户');
			}
		}
	}
	//后序查找
	postFind(id:number):Commodity|undefined {
		if(this.root !== null){
			let temp = this.root.postFind(id)
			if(temp){
				console.log('找到啦');
				return temp
			}
			else{
				console.log('无此用户');
			}
		}
	}
	//删除
	delNode(id:number){
		if(this.root !== null){
			if(this.root.id === id){
				this.root = null
			}
			else{
				this.root.delNode(id)
			}
		}
		else{
			console.log('空树哦')
		}
	}
}


let commodity1 = new Commodity(1,'苹果')
let commodity2 = new Commodity(2,'香蕉')
let commodity3 = new Commodity(3,'山竹')
let commodity4 = new Commodity(4,'樱桃')
commodity1.leftNode = commodity2
commodity1.rightNode = commodity3
commodity3.leftNode = commodity4

let binaryTree = new BinaryTree()
binaryTree.setRoot(commodity1)
binaryTree.preOrder()
binaryTree.postFind(4)
binaryTree.delNode(3)
binaryTree.preOrder()
以上二叉树节点删除用的最简单的连同子节点一同删除,提供其他两种删除思路
- 删除左右指针一个为空的节点:将上一个节点指针指向非空子节点
- 删除左右指针都不为空的节点:遍历待删除节点,找到一个叶子节点,用叶子节点代替待删除节点
6.2 顺序二叉树遍历
class ArrBinaryTree {

	arr: Array<number>

	constructor(arr: Array<number>) {
		this.arr = arr
	}

	//前序遍历
	preOrder(index: number) {
		if (this.arr.length === 0) {
			console.log('空数组')
			return
		}
		process.stdout.write(`${this.arr[index]} `)
		if (index * 2 + 1 < this.arr.length) {
			this.preOrder(index * 2 + 1)
		}
		if (index * 2 + 2 < this.arr.length) {
			this.preOrder(index * 2 + 2)
		}

	}
}

let arr = [1, 2, 3, 4, 5, 6, 7]
let arrBinaryTree = new ArrBinaryTree(arr)
arrBinaryTree.preOrder(0)
//输出 1 2 4 5 3 6 7
6.3 二叉排序树
- 概念:左子树所有结点都比根节点小,右子树所有结点都比根节点大
- 删除结点
- 删除叶子节点:
parentNode.leftNode/rightNode = null - 删除有一个子树结点:
parentNode.leftNode/rightNode = children.leftNode/rightNode - 删除有两个子树结点:
children的(右子树最小值/左子树最大值)结点与children结点交换
- 删除叶子节点:
//结点类
class Node {
	value: number
	leftNode: Node | null
	rightNode: Node | null
	constructor(value: number) {
		this.value = value
		this.leftNode = null
		this.rightNode = null
	}
	add(node: Node | null) {
		if (node === null) return
		if (node.value < this.value) {
			if (this.leftNode === null) {
				this.leftNode = node
			} else {
				this.leftNode.add(node)
			}
		} else {
			if (this.rightNode === null) {
				this.rightNode = node
			} else {
				this.rightNode.add(node)
			}
		}
	}
	//中序遍历,对于二叉树即为升序
	infixOrder(){
		if(this.leftNode!==null){
			this.leftNode.infixOrder()
		}
		console.log(this.value)
		if(this.rightNode!==null){
			this.rightNode.infixOrder()
		}
	}
}
//创建二叉排序树
class BinarySortTree {
	root: Node | null
	constructor(node: Node | null) {
		this.root = node
	}
	add(node: Node) {
		if (this.root === null) {
			return
		}
		this.root.add(node)
	}
	infixOrder(){
		if(this.root!==null){
			this.root.infixOrder()
		}
	}
}
let arr = [7, 3, 10, 12, 5, 1,9]
let root = new Node(arr[0])
let binarySortTree = new BinarySortTree(root)
for (let i = 1; i < arr.length; i++) {
	binarySortTree.add(new Node(arr[i]))
}
binarySortTree.infixOrder()
6.4 平衡二叉树
左右子树高度差不大于1
为了防止二叉排序树单链化
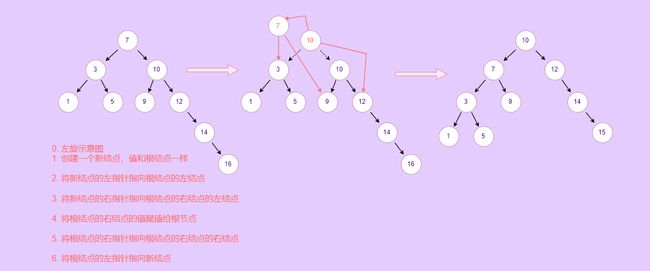
6.4.1 左旋
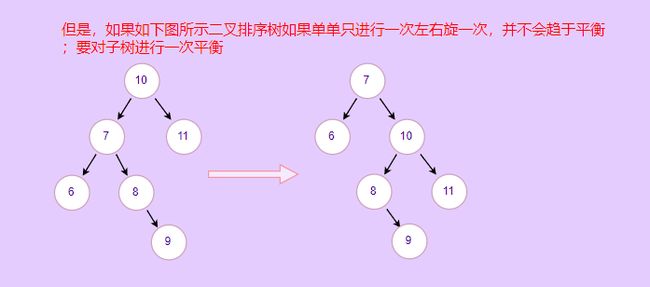
6.4.2 双旋
6.4.3 代码实现
//左子树高度与右子树高度查不超过1
//为了防止二叉排序树单链表化
{
	//结点类
	class Node {
		value: number
		leftNode: Node | null
		rightNode: Node | null
		constructor(value: number) {
			this.value = value
			this.leftNode = null
			this.rightNode = null
		}
		//获取以当前节点为根节点的树的高度
		height(): number {
			return Math.max(this.leftNode === null ? 0 : this.leftNode.height(), this.rightNode === null ? 0 : this.rightNode.height()) + 1
		}
		//获取以当前节点为根节点的左子树的高度
		leftHeight() {
			if (this.leftNode === null) {
				return 0
			}
			return this.leftNode.height()
		}
		//获取以当前节点为根节点的右子树的高度
		rightHeight() {
			if (this.rightNode === null) {
				return 0
			}
			return this.rightNode.height()
		}
		//左旋操作
		leftRotate() {
			//创建相同根结点结点
			let tempNode = new Node(this.value)
			//新结点左结点等于根结点左节点
			tempNode.leftNode = this.leftNode
			//新结点右结点等于根节点右节点的左节点
			tempNode.rightNode = this.rightNode!.leftNode
			//将根节点的右节点值作为根节点的值
			this.value = this.rightNode!.value
			//根结点的右节点指向根节点的右结点的右结点
			this.rightNode = this.rightNode!.rightNode
			//根结点左结点指向新结点
			this.leftNode = tempNode
		}
		//右旋操作
		rightRotate() {
			//创建相同根结点结点
			let tempNode = new Node(this.value)
			//新结点右结点等于根结点右节点
			tempNode.rightNode = this.rightNode
			//新结点左结点等于根节点左节点的右节点
			tempNode.leftNode = this.leftNode!.rightNode
			//将根节点的左节点值作为根节点的值
			this.value = this.leftNode!.value
			//根结点的左节点指向根节点的左结点的左结点
			this.leftNode = this.leftNode!.leftNode
			//根结点右结点指向新结点
			this.rightNode = tempNode
		}

		//添加结点
		add(node: Node | null) {
			if (node === null) return
			if (node.value < this.value) {
				if (this.leftNode === null) {
					this.leftNode = node
				} else {
					this.leftNode.add(node)
				}
			} else {
				if (this.rightNode === null) {
					this.rightNode = node
				} else {
					this.rightNode.add(node)
				}
			}
		}
		//中序遍历,对于二叉树即为升序
		infixOrder() {
			if (this.leftNode !== null) {
				this.leftNode.infixOrder()
			}
			console.log(this.value)
			if (this.rightNode !== null) {
				this.rightNode.infixOrder()
			}
		}
	}
	//创建二叉排序树
	class BinarySortTree {
		root: Node | null
		constructor(node: Node | null) {
			this.root = node
		}
		height() {
			if (this.root !== null) {
				return this.root.height()
			}
		}
		leftHeight() {
			if (this.root !== null) {
				return this.root.leftHeight()
			}
		}
		rightHeight() {
			if (this.root !== null) {
				return this.root.rightHeight()
			}
		}
		add(node: Node) {
			if (this.root === null) {
				return
			}
			this.root.add(node)
			//判断二叉排序树是否平衡,并作出响应左右旋转
			//以下细节可见图文说明
			//左旋
			if (this.root.rightHeight() - this.root.leftHeight() > 1) {
				//判断根节点右子树的左子树的高度是否大于根节点右子树的右子树的高度
				//如果满足这个条件的话,单是对根节点左旋一次并不会降低整体高度,要对根节点的右结点进行一次右旋
				if (this.root.rightNode !== null && this.root.rightNode.leftHeight() > this.root.rightNode.rightHeight()) {
					this.root.rightNode.leftRotate()
					this.root.leftRotate()
				} else {
					this.root.leftRotate()
				}
			}
			//右旋
			if (this.root.rightHeight() - this.root.leftHeight() > 1) {
				//判断根节点左子树的右子树的高度是否大于根节点左子树的左子树的高度
				//如果满足这个条件的话,单是对根节点右旋一次并不会降低整体高度,要对根节点的左结点进行一次左旋
				//例如[10, 11, 7, 6, 8, 9]
				if (this.root.leftNode !== null && this.root.leftNode.rightHeight() > this.root.leftNode.leftHeight()) {
					this.root.leftNode.rightRotate()
					this.root.rightRotate()
				} else {
					this.root.rightRotate()
				}
			}
		}
		infixOrder() {
			if (this.root !== null) {
				this.root.infixOrder()
			}
		}
	}
	let arr = [7, 3, 10, 12, 5, 1, 9, 13, 14, 15, 16, 17]
	let root = new Node(arr[0])
	let binarySortTree = new BinarySortTree(root)
	for (let i = 1; i < arr.length; i++) {
		binarySortTree.add(new Node(arr[i]))
	}
	binarySortTree.infixOrder()
	root.leftRotate()
	console.log(root.height(), root.leftHeight(), root.rightHeight());

}
6.5哈夫曼树
6.5.1 哈夫曼树创建
	type NodeType = Node | null
	//创建节点类
	class Node {
		value: number
		leftNode: NodeType = null
		rightNode: NodeType = null
		constructor(value: number) {
			this.value = value
		}
		//写个前序遍历方便验证结果
		preOrder(){
			process.stdout.write(' ' + this.value)
			if(this.leftNode !== null){
				this.leftNode.preOrder()
			}
			if(this.rightNode !== null){
				this.rightNode.preOrder()
			}

		}
	}
	//创建赫夫曼类
	class HuffManTree {
		//用数组数据创建哈夫曼树
		arr: Array<NodeType> = []
		constructor(arr: Array<number>) {
			for (let value of arr) {
				this.arr.push(new Node(value))
			}

		}
		//创建哈夫曼树方法
		createHuffManTree() {
			while (this.arr.length > 1){
				//这里可以用其他排序方法,主要演示需要排序
			this.arr.sort((a, b) => a!.value - b!.value)
			//取出最小的两个数
			let min = this.arr[0]!.value
			let smin = this.arr[1]!.value
			let tempNode = new Node(min + smin)
			tempNode.leftNode = this.arr[0]
			tempNode.rightNode = this.arr[1]
			//因为sort是冒泡排序,删除前两个后,后面的依然是有序的,所以用这种方法避免sort执行多次
			this.arr[1] = tempNode
			this.arr.shift()
			}
			return this.arr[0]
		}
		preOrder(){
			this.arr[0]!.preOrder()
		}
	}
	let arr = [3, 4, 23, 5]
	let huffManTree = new HuffManTree(arr)
	let a = huffManTree.createHuffManTree()
	a!.preOrder()
	// 35 12 5 7 3 4 23
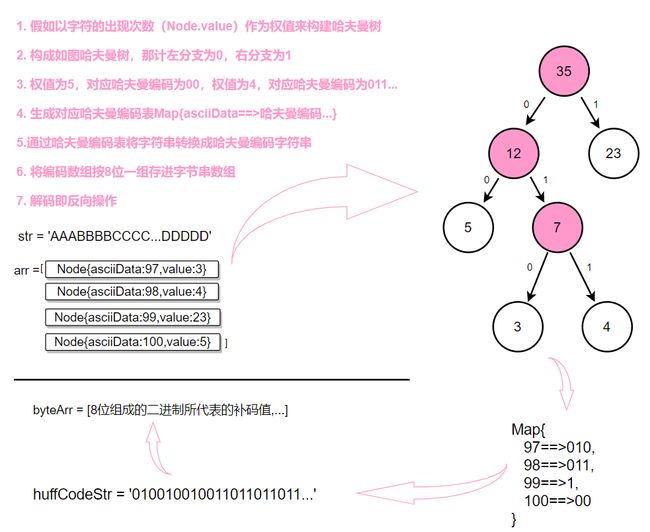
6.5.2 哈夫曼编码
//以计算字节串重复次数为权值来生成哈夫曼树
{
	//定义结点类
	class Node {
		asciiData: number | null //用于存储字符对应ASCII码
		weight: number //存储出现次数,即权值
		leftNode: Node | null = null
		rightNode: Node | null = null

		constructor(asciiDate: number | null, weight: number) {
			this.asciiData = asciiDate
			this.weight = weight
		}
		//生成对应的哈夫曼编码表
		/*
		* code代表左右编码,即0和1
		* nowCode代表现在遍历到的结点的编码
		* 当向左右递归时候,nowCode加上对应0或1
		*/
		createHuffManCodeTable(node: Node | null, code: string, nowCode: string, huffCodeTable: Map<number, string>) {
			nowCode += code
			if (node === null) {
				return
			}
			//判断是否为叶子节点
			if (node.asciiData === null) {
				node.createHuffManCodeTable(node.leftNode, '0', nowCode, huffCodeTable)
				node.createHuffManCodeTable(node.rightNode, '1', nowCode, huffCodeTable)
			} else {
				huffCodeTable.set(node.asciiData, nowCode)
			}
		}
	}
	//定义哈夫曼树
	class HuffManTree {
		strArr: Array<string>//存储字符串的单字符数组
		huffArr: Array<Node> = []//存储结点数组
		byteArr!: ArrayBuffer//存储最后压缩后的数据
		huffCodeTable: Map<number, string> = new Map()//存储哈夫曼编码表
		constructor(str: string) {
			this.strArr = str.split('')
		}
		//创建用来创建哈夫曼树的结点数组
		createHuffMan() {
			let huffMap = new Map()
			for (let value of this.strArr) {
				let temp = huffMap.get(value.charCodeAt(0))
				//判断map中是否有
				if (temp === undefined) {
					huffMap.set(value.charCodeAt(0), 1)
				} else {
					huffMap.set(value.charCodeAt(0), temp + 1)
				}
			}
			//先利用map创建数组并排序
			let arr = new Array(...huffMap)
			//创建存储哈夫曼结点的数组
			for (let v of arr) {
				this.huffArr.push(new Node(v[0], v[1]))
			}
		}

		//通过map对象创建哈夫曼树
		createHuffManTree() {
			this.createHuffMan()
			while (this.huffArr.length > 1) {
				//对数组排序
				this.huffArr.sort((a, b) => a.weight - b.weight)
				//取出出现次数最少的两个对象并创建结点
				let leftNode = this.huffArr[0]
				let rightNode = this.huffArr[1]
				let tempNode: Node = new Node(null, leftNode.weight + rightNode.weight)
				tempNode.leftNode = leftNode
				tempNode.rightNode = rightNode
				this.huffArr[1] = tempNode
				this.huffArr.shift()
			}
			//循环退出后this.huffArr[0]即为哈夫曼树根节点
		}
		//创建哈夫曼编码表
		createHuffManCodeTable() {
			if (this.huffArr[0] !== null) {
				this.huffArr[0].createHuffManCodeTable(this.huffArr[0], '', '', this.huffCodeTable)
				return this.huffCodeTable
			}

		}
		//压缩
		zip() {
			//转化为哈夫曼编码
			let str = ''
			for (let v of this.strArr) {
				str += this.huffCodeTable.get(v.charCodeAt(0))
			}
			//将哈夫曼编码以8位一组转换成整数
			let length = Math.ceil(str.length / 8) + 1
			//创建一个length字节的ArrayBuffer
			let buffer = new ArrayBuffer(length)
			// 创建一个指向buffer的int8视图,开始于字节0,直到缓冲区的末尾
			// v可操控内存中的buffer,数组方法于v都适用
			let v = new Int8Array(buffer)
			let index = 0

			for (let i = 0; i < str.length; i += 8) {

				if (i + 8 > str.length) {
					/*
					* 这里我觉得是有一个bug,如果生成的编码字符串最后不够8位且第一个是0开头,比如最后是5位且是01110
					* 那么在存储时,他会存储成01110的补码也即原码的值14
					* 但是在解码的时候,14究竟会解码成01110还是1110?
					* 我在网上寻找答案的时候,几乎找到的所有都不是以0开头的不够8位的例子,所以我认为此处是有bug的
					* 也有可能是语言差异导致的,这就说不准了,在这里我还是要解决一下这里所导致的问题
					*/
					let tempStr = str.slice(i)
					let j = 0//记录有几个0在第一个1前面
					if (tempStr[0] === '0') {
						for (j = 1; j < tempStr.length; j++) {
							if (tempStr[i] === '0') {
								j++
							} else {
								break
							}
						}
					}
					v[index] = parseInt(str.slice(i), 2)
					index++
					//这样压缩后的最终数组最后一个则表示最后一个是应当转成的二进制编码前面该有几个0
					v[index] = j
					break
				} else {
					v[index] = parseInt(str.slice(i, i + 8), 2)
					index += 1
				}

			}
			//v[0]的值为-87
			/*原因:
			* 	1. v[0] = parseInt('10101001', 2)
			*		2. v[0] = 169
			*		3. 169为原码,而计算机存储数据的补码,且这里设置v为int8的视图,有符号
			*		4. 存进内存中会将169转换为二进制,并将其补码进行存储,读取时会展示以补码为原码的十进制数
			*		5.如果是正数,补码即是原码
			*/
			this.byteArr = buffer
		}

		//解码函数byte->c
		unzip(v: Int8Array) {
			//创建压缩后的数组视图,对其进行操作
			//byte->二进制字符串
			let str = ''
			for (let i = 0; i < v.length; i++) {
				//如果是最后一位数据则不用补位,-2是因为最后一个数据存储的是倒数第二位数据转换成二进制编码前该填几个0
				if (i === v.length - 2) {
					for (let j = 0; j < v[i + 1]; j++) {
						str += '0'
					}
					str += v[i].toString(2)
					break
				}
				str += this.bufferToString(v[i])
			}

			/*二进制字符串->通过编码表还原数据*/
			//为了操作方便,降低时间复杂度,先创建一个Map存储反转的哈夫曼编码表
			let tempTable = new Map()
			for (let k of this.huffCodeTable) {
				tempTable.set(k[1], k[0])
			}
			//还原数据
			let originStr = ''
			let tempStr = ''
			for (let value of str) {
				tempStr += value
				let flag = tempTable.get(tempStr)
				if (flag) {
					originStr += String.fromCharCode(flag)
					tempStr = ''
				}

			}
			return originStr
		}
		//定义一个将单个buffer数据转换成二进制字符串
		bufferToString(byte: number) {
			//正负数转换方式不同
			if (byte >= 0) {
				let str = (byte | 256).toString(2)
				return str.slice(str.length - 8)
			} else {
				//因为byte本来就是补码所表现得数据,toString会返回补码,即补码的补码就是原来哈夫曼编码生成的字符串的八位
				let str = (byte >>> 0).toString(2)
				return str.slice(str.length - 8)
			}
		}

	}
	let str = 'Hello world!,I like typescript, thank you!'
	let huffManTree = new HuffManTree(str)
	huffManTree.createHuffManTree()
	//生成哈夫曼编码表
	let huffCodeTable = huffManTree.createHuffManCodeTable()
	console.log(huffCodeTable)
	/*
	Map(12) {
	106 => '0000',
	118 => '0001',
	108 => '001',
	32 => '01',
	111 => '1000',
	117 => '10010',
	100 => '100110',
	121 => '100111',
	105 => '101',
	97 => '110',
	107 => '1110',
	101 => '1111'
	}
	*/

	huffManTree.zip()
	//创建字节数组视图
	let v = new Int8Array(huffManTree.byteArr)
	console.log("压缩率为: " + (v.length / str.length * 100).toFixed(2) + '%' + '\n压缩后的数据: ', v);
	/*
	压缩率为: 57.14%
	压缩后的数据:  Int8Array(24) [
		5, 127, -36,  13, -113, -103,
		-100, -13, -47, 106, 102, -73,
		68, 40, -90, -15, -26, 117,
		-33, 11,  53, 124, 22, 0
	]
	*/
	let orginStr = huffManTree.unzip(v)
	console.log('原数据为:', orginStr)
	/*
	原数据为: Hello world!,I like typescript, thank you!
	*/


}
6.6 多叉树
6.6.1 B树
6.6.2 B+树
6.6.3 B*树
7. 题目
7.1迷宫回溯
print('迷宫回溯')
# 创建地图
row = 15
col = 15
map = [([0] * row) for i in range(col)]
for i in range(row):
    map[0][i] = map[-1][i] = 1  # 墙以 1 表示
    map[i][0] = map[i][-1] = 1
map[3][1] = 1
map[3][2] = 1
map[3][3] = 1
for i in range(row):
    for j in range(col):
        print(map[i][j], end=' ')
    print('')

#   定义起点/终点下标
i = 1
j = 1
iEnd = 13
jEnd = 13


#   创建找路函数
def find(map, i, j):
    #   判断是否到达终点
    if map[iEnd][jEnd] == 2:
        return True
    elif map[i][j] == 0:
        map[i][j] = 2  # 定义回溯点,
        if find(map, i + 1, j):  # 向下走
            return True
        elif find(map, i, j + 1):  # 向右走
            return True
        elif find(map, i - 1, j):  # 向上走
            return True
        elif find(map, i, j - 1):  # 向左走
            return True
        else:
            map[i][j] = 3  # 3表示走过但是走不通
            return False
    else:  # 值为1,2,3才会走到这步
        return False


find(map, i, j)
print('\n\n')
for i in range(row):
    for j in range(col):
        print(map[i][j], end=' ')
    print('')
最优解待更新
7.2八皇后问题
print('8皇后问题')
methods = []  # 所有方法集合
# 定义棋盘大小 几皇后问题
width = 8
solution = [0 for i in range(width)]  # 定义一种解法容器


def check(n):
    if n == width:  # 如果放完width个皇后,则成功
        methods.append(solution[:])
        return True
    for x in range(width):
        solution[n] = x
        if isConflict(n):
            check(n + 1)


# 定义判断第n个棋子与前面n-1个棋子是否冲突
def isConflict(n):
    for i in range(n):  # n = 0时不进入循环
        # 判断是否同列或同行
        isCol = solution[n] == solution[i]
        isSlant = abs(n - i) == abs(solution[n] - solution[i])
        if isCol or isSlant:
            return False
    return True


check(0)
for i in methods:
    print(i)
print('一共%d种解法' % len(methods))
