Kaggle - LLM Science Exam(二):Open Book QA&debertav3-large详解
文章目录
-
- 前言:优秀notebook介绍
- 一、检索增强生成 (RAG) 概述
-
- 1.1 in-context learning
- 1.2 RAG简介
- 1.3 检索步骤:从知识库中获取正确的信息
-
- 1.3.1 embeddings
- 1.3.2 为知识库创建索引
- 1.3.3 通过embeddings技术检索最相关的知识
- 1.4 生成步骤:通过额外知识生成答案
-
- 1.4.1 使用系统提示向LLM提供自定义说明
- 1.4.2 向LLM提供特定的知识来源
- 1.4.3 合并外部知识和问题
- 1.5 总结
- 二、Faiss
-
- 2.1环境配置
- 2.2 构建向量数据
-
- 2.2.1 数据ETL
- 2.2.2 使用模型将文本转换为向量
- 2.3 平面索引(FlatIndex)
-
- 2.3.1 平面索引实现
- 2.4.2 平面索引性能
- 2.4 分区索引(IVFFlat)
-
- 2.4.1实战分区索引
- 2.4.2 重建分区后的向量数据
- 2.5 基于量化的索引(IndexIVFPQ)
- 2.6 保存原始向量数据
- 2.7 总结
- 三、Open Book Q&A
-
- 3.1 概述
-
- 3.1.1 Open Book LLM Science Exam - Reduced RAM usage(方法5)
- 3.1.2 OpenBook DeBERTaV3-Large Baseline (Single Model)(方法7)
- 3.1.3 sentence-transformers
- 3.2 安装依赖,导入数据
- 3.3 数据预处理
- 3.4 检索出与prompt最关联的576篇wiki文档
- 3.5 检索出每个样本最相似的5个句子
- 3.6 推理
-
- 3.6.1 加载测试集
- 3.6.2 定义预处理函数和后处理函数
- 3.6.3 开始推理
- 3.6.3.1 使用trainer进行推理(方法7)
- 3.6.3.2 使用Pytorch进行推理(方法8)
前言:优秀notebook介绍
本文完整kaggle notebook见《Open Book QA&debertav3-large详解》,如果觉得有用,请投一票,谢谢
本系列第一篇文章《Kaggle - LLM Science Exam(一):赛事概述、数据收集、BERT Baseline》中详细介绍了赛事背景、数据集、评测指标等等,以及下面列举优秀notebook中的方法1、3、4,可供参考。
以下是收集的部分优秀notebook:
-
《Starter Notebook: Ranked Predictions with BERT》:Bert Baseline,使用
bert-base-cased和比赛提供的200个训练集样本进行训练,Public Score=0.545。 -
《[EDA, Data gathering] LLM-SE ~ Wiki STEM | 1k DS》(制作训练数据):比赛提供的200个样本太少了,作者
LEONID KULYK先分析了比赛数据集,然后同样使用gpt3.5制作了1000个Wikipedia样本,数据集上传在Wikipedia STEM 1k。 -
《LLM-SE ~ deberta-v3-large -i | 1k Wiki》:
LEONID KULYK将自己收集的1000个Wikipedia样本和比赛训练集合并,一起训练,模型是deberta-v3-large。notebook中有最终模型权重,可直接推理,LB= 0.709。 -
《New dataset + DEBERTA v3 large training!》:
0.723→0.759-
Radek基于方法3,使用自己生成的500个额外数据训练DEBERTA v3 large,Public Score=0.723。 -
Radek后来又生成了6000条数据,跟之前的500条融合为6.5K数据集,并在此基础上进行三次训练,得到了三个模型权重,上传在Science Exam Trained Model Weights中。然后通过下面两种方法,进行推理:-
《Inference using 3 trained Deberta v3 models》:三个模型分别预测之后概率取平均,
Public Score=0.737。 -
An introduction to Voting Ensemble:作者在这个notebook中详细介绍了Voting Ensemble以及使用方法,
Public Score=0.759。
-
-
作者最后上传了15k high-quality train examples。
-
-
《Open Book LLM Science Exam》:
jjinho首次提出了Open Book方法,演示了如何在训练集中,使用faiss 执行相似性搜索,找到与问答数据最相似的context(Wikipedia数据),以增强问答效果。 -
《Open Book LLM Science Exam - Reduced RAM usage》:
quangbk改进了方法5中的内存效率。 -
《OpenBook DeBERTaV3-Large Baseline (Single Model》):
Anil将方法4和方法6结合起来。他将先测试集数据按照方法6搜索出context,然后将其与prompt合并,得到新的测试集。然后加载方法4训练的模型进行推理,Public Score=0.771。test_df["prompt"] = test_df["context"] + " #### " + test_df["prompt"] -
《Sharing my trained-with-context model》:
Mgoksu同样使用了方法7,只是使用了自己制作的数据集进行离线训练,得到一个更好的模型llm-science-run-context-2,然后进行推理,top publicLB=0.807。 -
《How To Train Open Book Model - Part 1》、《How To Train Open Book Model - Part 2》:
CHRIS DEOTTE在part1中,参照方法8在自己制作的60k数据集进行训练,得到模型model_v2;然后在part2中使用方法8中的模型llm-science-run-context-2以及model_v2分别进行推理,得到的两个概率取平均,得到最终结果(Public Score=0.819)。- 在part1中,作者使用了竞赛指标MAP@3 来评估模型,并讨论了一些训练技巧,例如使用 PEFT或冻结model embeddings&model layers来减少训练参数、增加 LR 并减少 epochs来减少计算量、 使用gradient_checkpointing(这使用磁盘来节省RAM)、使用gradient_accumlation_steps模拟更大的批次等等。
-
《LLM Science Exam Optimise Ensemble Weights》:作者首先使用了方法9训练的模型权重;另外为了增加多样性,还融合了其它几个没有使用Open Book的deberta-v3-large模型,最终
Public Score=0.837。作者还写了以下notebook:- 《Incorporate MAP@k metrics into HF Trainer》:在Trainer中加入MAP@k指标
- 《Introducing Adversarial Weight Perturbation (AWP)》、《Adversarial Weight Perturbation (AWP) Inference》:介绍对抗性权重扰动AWP,以及推理方法。
- 《Using DeepSpeed with HF Trainer》,希望可以节约内存,以便训练更大的模型。
-
《LLM-SciEx Optimise Ensemble Weights(better models)》:类似方法10,通过模型融合,
Public Score=0.846。 -
《with only 270K articles》:作者自己制作了270K Wikipedia数据,使用
LongFormer模型而不是deberta-v3-large进行训练,Public Score=0.862。 -
《Platypus2-70B with Wikipedia RAG》:
SIMJEG结合了方法8和12,一共18个版本,Public Score从0.832到0.909。ALI在 《Explained Platypus2-70B + Wikipedia RAG》中对此notebook做了详细的说明。 -
《Fork of Fork of [86.2] with only 270K articles!》在方法12的基础上改进了预处理函数,并使用方法8 的模型,
Public Score=0.905 -
《RAPIDS TF-IDF - [LB 0.904] - Single Model》:在方法12的基础上,使用RAPIDS TF-IDF加速检索过程,使用双GPU(2xT4 GPU)和双线程来加速推理过程,并微调了部分参数(prepare_answering_input2),最终
LB=0.904。作者说自己参照方法11,融合了另外6个模型,最终得分0.916,代码未公开。
一、检索增强生成 (RAG) 概述
1.1 in-context learning
将 LLM 引入流程的最典型模式之一,是要求 LLM 根据专有的/特定领域的知识理解事物。目前,我们可以向 LLM 添加两种范式以获取这些知识:微调(fine-tune) 和 上下文学习(in-context learning)。前者是指对 LLM 模型进行附加训练,以增加额外的知识;而后者是在查询提示中添加一些额外的知识。
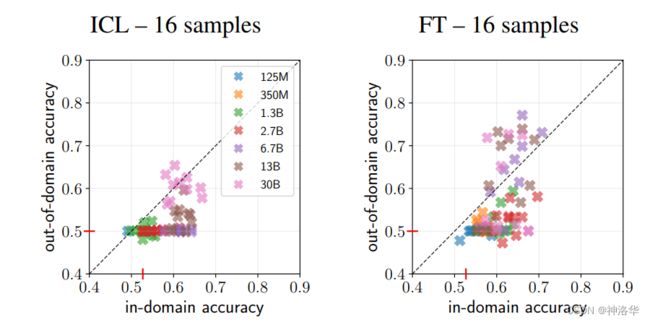
由于其简便性及在领域外泛化(out-of-domain generalization)方面的改进,以及大量证据表明微调模型会捕捉虚假相关性,因此上下文学习已经变得比微调更欢迎。在《Few-shot Fine-tuning vs. In-context Learning: A Fair Comparison and Evaluation》中,作者对比了few-shot fine-tuning(FT)和in-context learning(ICL)在不同规模的模型和数据集上的泛化能力。
上图中ICL使用的是 gpt-3 pattern,FT使用的是pattern-based fine-tuning(PBFT)后的checkpoint( in-domain performance)。我们报告了使用10个不同的数据种子进行的实验结果。当使用16个样本时,30B模型的ICL性能与较小模型(6.7B)的FT性能相媲美,对于大多数模型规模,FT的性能优于ICL,具体的显著性测试结果见如下:

最后,作者对这两种方法进行了总结:
-
FT需要模型训练的专业知识,而ICL只需要自然语言,因此ICL更易于非专家使用,且更具可重用性。然而,对于一些需要更复杂提示的任务,ICL可能不适用。
-
ICL需要大型模型,而FT可以使用小型模型。这使得ICL在为低资源语言开发的模型中的适用性受到限制,因为训练大型模型需要大量的训练数据,而这些数据对于许多语言来说不可用。
-
FT需要训练,而ICL不需要。但FT的推断时间要比ICL短,因为它只包括处理最小模式和测试实例所需的时间。使用ICL时,每个测试实例还必须包括所有的演示,这增加了推断时间。
-
模型的上下文大小对ICL有限制,而FT允许无限的训练示例。这两种方法都可以在领域内和领域外数据集上取得强大的性能,但随着模型规模的增大,FT对额外样本的受益更大。
-
FT和ICL都是相对较新的方法,因此仍需要更多的研究来深入了解它们的优势和劣势。
1.2 RAG简介
参考《How do domain-specific chatbots work? An Overview of Retrieval Augmented Generation (RAG)》
from langchain.document_loaders import WebBaseLoader
from langchain.indexes import VectorstoreIndexCreator
loader = WebBaseLoader("http://www.paulgraham.com/greatwork.html")
index = VectorstoreIndexCreator().from_loaders([loader])
index.query("What should I work on?")
The work you choose should ideally have three qualities: it should be something you have a natural aptitude for, something you have a deep interest in, and something that offers scope to do great work.
If you're unsure, you could start by working on your own projects that seem excitingly ambitious to you. It's also beneficial to be curious, try lots of things, meet lots of people, read lots of books, and ask lots of questions. When in doubt, optimize for interestingness.
It's okay to guess and be wrong sometimes, as this can lead to discovering what you're truly good at or interested in.
如果你感兴趣,可以尝试根据Paul Graham的文章构建的聊天机器人
在上面这段示例代码中,LangChain仅仅使用短短的3行代码就可以创建一个聊天机器人,并对任何网站或文档进行问答。第一次运行它时,感觉就像纯粹的魔术。这到底是怎么回事?
答案就是Retrieval Augmented Generation(RAG,检索增强生成)。
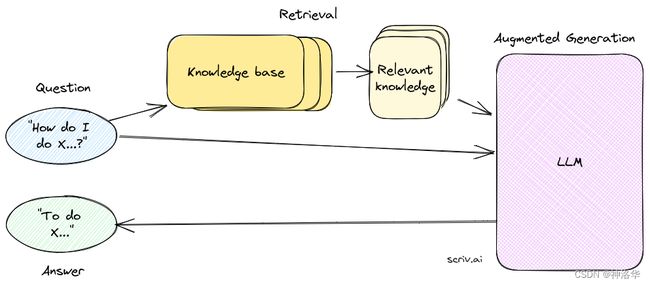
检索增强生成是一种大型语言模型技术,通过检索知识库来提取任务相关的上下文,以提高LLM生成的文本的质量和相关性,在对话系统、问答系统等领域有很大应用前景。RAG主要特点包括:
-
联合检索和生成:RAG将检索和生成两个关键任务结合在一起,使得生成的文本可以基于检索到的信息,从而提高生成的文本的相关性和信息价值。
-
上下文感知:RAG方法能够理解上下文,根据先前的对话或文本内容生成有连贯性的回应。这使得它在对话系统中特别有用,能够提供上下文感知的回答。
-
信息抽取:RAG允许从大规模的文本数据中抽取相关信息,而不是仅仅生成一些可能的答案。这有助于确保回答问题或生成文本的准确性和信息量。
-
适应性:RAG方法可以应用于各种不同的任务,包括问答、自动摘要、对话生成等,因此具有广泛的适应性。一些RAG方法还可以处理多种数据类型,包括文本、图像和音频等,从而能够应对多模态任务。
-
灵活性:RAG方法在生成文本时具有一定的灵活性,可以根据任务和需求生成不同类型的文本,从简单的答案到详细的解释。
-
支持开放域对话。RAG系统可以利用检索支持开放域的对话,不需要针对每一个可能的话题训练语言模型。
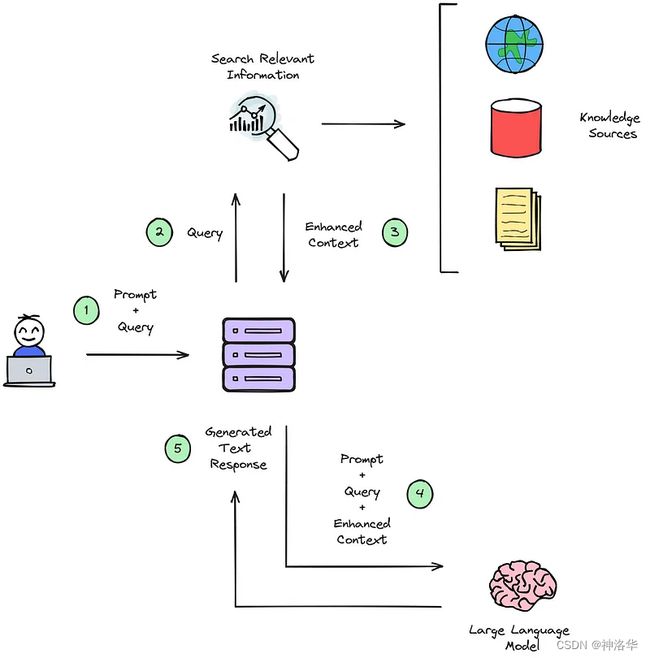
整个RAG的工作原理简要概括如下:
RAG有两个关键的步骤:
- 检索操作:根据用户的问题,从知识库中检索可能回答问题的最相关内容,这些信息可以是从知识库、文档集合或互联网上的文本中检索得到的。
- 生成操作:将相关信息与用户的问题一起发送给LLM,然后LLM 可以使用这些信息来增强其生成的回答或响应。
1.3 检索步骤:从知识库中获取正确的信息
检索的核心是一种搜索操作 ——我们希望根据用户的输入查找最相关的信息,就像搜索一样,有两个主要部分:
- 索引:将您的知识库变成可以搜索/查询的内容。
- 查询:从搜索词中提取最相关的知识。
理论上来说,任何搜索过程都可以用于检索,任何接受用户输入并返回结果的程序都可以使用,但是目前大多数RAG系统都依赖语义搜索技术。
1.3.1 embeddings
在LLMs的世界中,任何人类语言都可以表示为一组数字,这组数字被称为嵌入(embedding)。LLM 技术的一个关键部分是翻译器,它可以将人类语言文字翻译成 AI number-language,我们称这种翻译器为 "嵌入机(embedding machine):
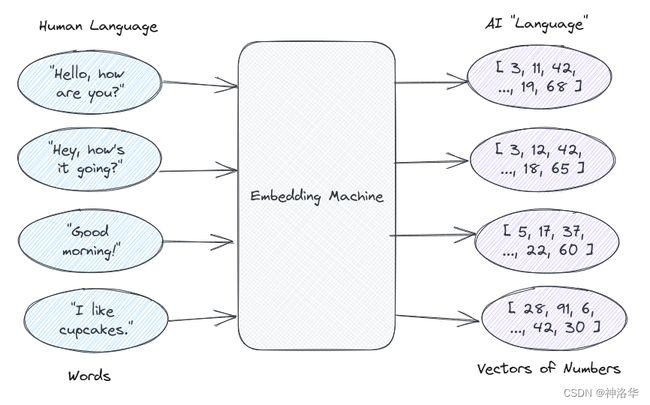
这些数字意味着什么?没有人知道!它们只对AI来说有“意义”。但是,相似的单词最终会有相似的一组数字,例如将上面这些词在embedding是空间中表示出来,会类似于:

当然,不可能在一张二维图上表示全部人类语言,但理论是一样的。实际上,嵌入具有更多维的坐标(OpenAI目前使用的模型的嵌入向量是由1,536个数字组成的),但是你仍然可以通过基本的数学运算来确定两个嵌入(两个文本片段)之间的相似度。
1.3.2 为知识库创建索引
为知识库创建索引通常是整个检索流程中最难也是最重要的部分,它更像是一门艺术,而不是科学,需要反复试验、不断试错。整体来看,索引过程可以分为两个步骤:
- 加载:从知识库的存储位置加载其内容。
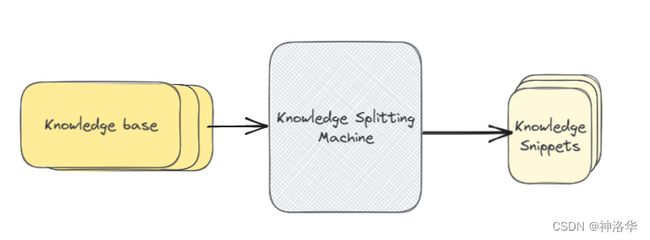
- 分割:将知识(knowledge)分割成适合嵌入搜索的片段大小
加载器(loaders)和分割器(splitters)这两个概念的区分有些简单粗暴,你也可以灵活组织,比如一个组件同时完成所有工作,或者把加载阶段拆分成多个子组件等。但是在LangChain中,它们被用来描述具体的操作方式,以便更好地理解底层概念。
下面以一个实际应用举例。我想建立一个聊天机器人来回答有关Saas产品SaaS Pegasus的问题。
首先需要为这个机器人的知识库添加documentation site,这一步可以通过 loader来完成。它可以找出可用的页面,爬取文档网站的内容。 loader加载完成后,将输出单个文档 -——站点上每个页面一个文档。
以LangChain为例,其内置的loaders提供了一系利内置加载器,可提取从Microsoft Word文档到整个Notion 站点的任何内容。LangChain loaders接口像上面讲的一样,输入一个"knowledge base",输出 a list of “documents”。

loader内部完成了很多工作,我们需要爬取所有页面的内容,然后将 HTML 格式内容转为可用的文本(usable text)。至于 PDF 或 Google 云端硬盘等其它loader,有不同的部分。另外还有并行化、错误处理等部分,非常复杂。
本文只是讲解工作原理,所以此处简化工作流,忽略内部的具体实现。现在假设loader输入知识库(knowledge base),输出了与documentation site中每个页面相对应的individual documents。理想情况下,此时已删除额外的标记,仅保留底层结构和文本。
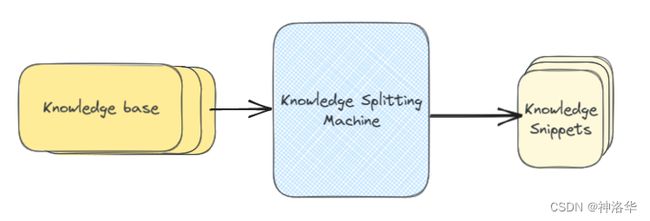
现在,我们可以将整个网页传递给我们的embedding machine,将其作为我们的知识片段(knowledge snippets)。但是每一页都可能涵盖很多内容,内容越多,这个页面的embedding就越“不具体”(unspecific),检索算法就越难检索到到最相似的结果。
通常情况下,用户提问的主题只是和页面中的某些文本相匹配,所以我们需要将文档拆分成embeddable chunks,便于搜索。另外文档拆分也是一门技术, snippets太大不能很好地匹配查询,太小会没有足够有用的上下文来生成答案。此外还涉及如何拆分(通常有标题时按标题进行拆分)等等问题。
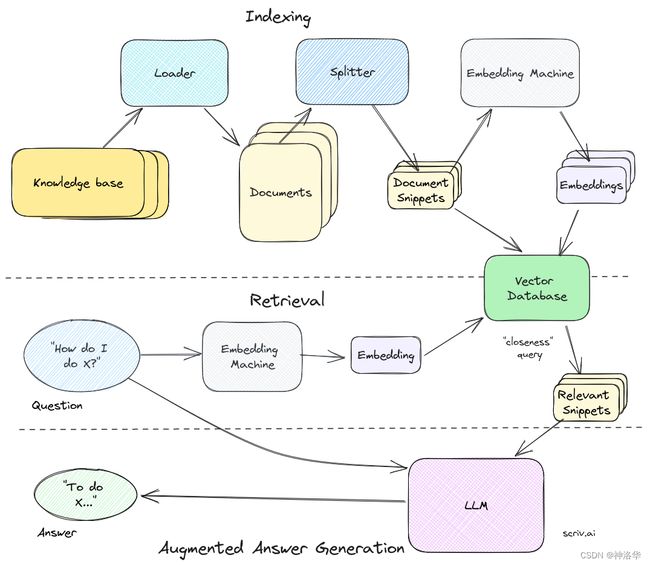
一旦我们有了文档片段,我们就将它们保存到我们的矢量数据库中,下面是为知识库编制索引的完整图片:
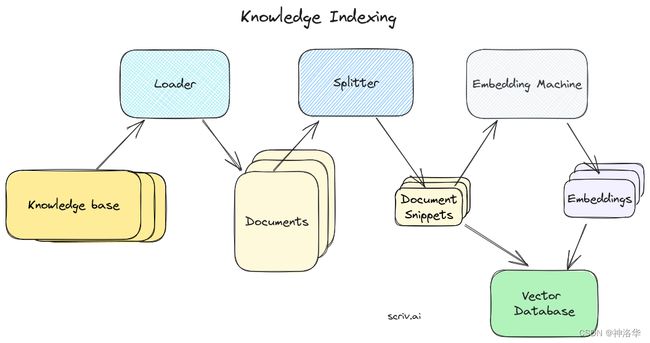
在LangChain中,splitters属于一个更大的类别,被称为document transformers。除了提供各种拆分文档的策略外,它们还具备去除冗余内容、翻译、添加元数据等功能。在这里,我们只关注splitters,因为它是文档变换的主要部分。
loader = WebBaseLoader("http://www.paulgraham.com/greatwork.html")
index = VectorstoreIndexCreator().from_loaders([loader])
在 LangChain 中,整个索引过程都封装在导航膜这两行代码中。首先,我们初始化我们的网站加载器并告诉它我们要使用的内容,然后我们从加载器构建整个索引并将其保存到我们的向量数据库中,整个加载、拆分、嵌入和保存都在后台进行。
1.3.3 通过embeddings技术检索最相关的知识
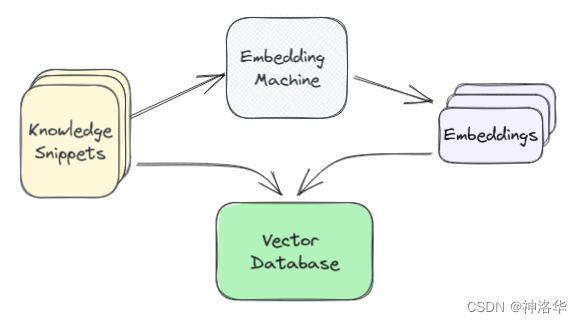
完成上一步构建索引之后,我们将每个知识片段传递给embedding machine(实际上是一个OpenAI API或类似的工具),并获得文本的嵌入式表示。然后,我们将该片段及其embeddings一起保存在一个矢量数据库中(vector database),一个专为处理数字向量优化的数据库。
 |
 |
现在数据库已经中包含所有内容的嵌入,理论上来说,可以将其视为我们的“语言”图上整个知识库的绘图。一旦我们有了这个图,就可以进行如下的查询操作:
- 在查询端,我们获取用户输入的嵌入

- 将输入embedding绘制在相同的向量空间中,并找到最接近的片段(本例中为 1 和 2),这些就是将要发送给LLM的问题相关片段
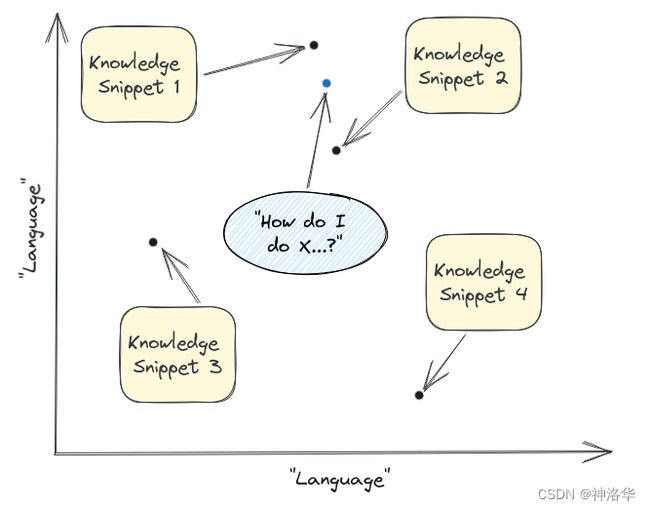
实际过程中,检索这个最相似的点是通过查询我们的向量数据库来完成的,所以实际过程类似于:
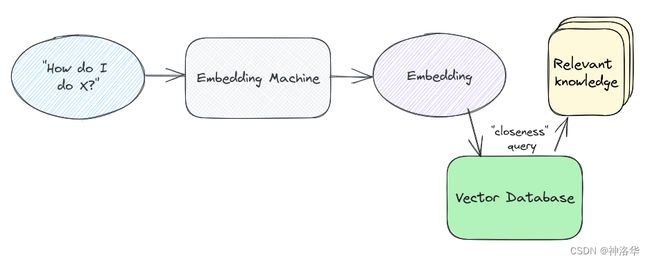
在LangChain中,这一步是通过以下代码完成的,其中隐藏了好很复杂的运算,比如使用余弦距离等来进行 query操作。
index.query("What should I work on?")
1.4 生成步骤:通过额外知识生成答案
现在我们已经从知识库中提取了我们认为能够回答问题的相关信息,那么我们如何使用这些信息来生成答案呢?
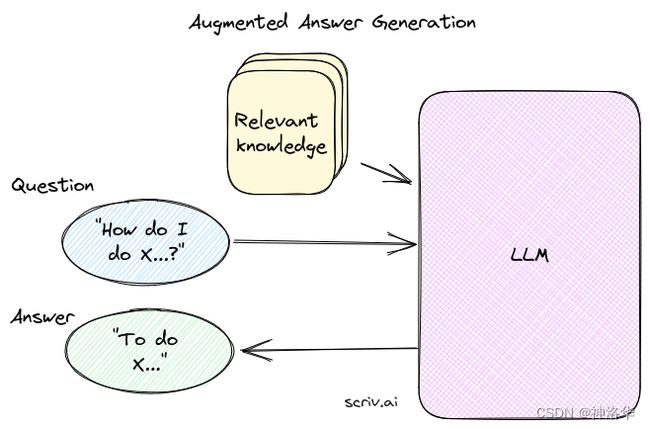
以 ChatGPT 为例,这一切都归结为 prompts和 messages。
1.4.1 使用系统提示向LLM提供自定义说明
第一个组件是system prompt,它向语言模型提供总体指导。对于 ChatGPT,系统提示类似于你是一个有用的助手”。更具体一点,我们可以告诉它我们想要它做什么,例如:
You are a Knowledge Bot. You will be given the extracted parts of a knowledge base (labeled with DOCUMENT) and a question. Answer the question using information from the knowledge base.
1.4.2 向LLM提供特定的知识来源
接下来,我们需要给AI提供阅读材料,为了得到更好的效果,我们可以通过一些结构和格式来帮助它。下面是一个将文档传递到 LLM 的示例格式,对每个文档进行一个说明或者提示是一个好事:
------------ DOCUMENT 1 -------------

This document describes the blah blah blah...

------------ DOCUMENT 2 -------------

This document is another example of using x, y and z...

------------ DOCUMENT 3 -------------

[more documents here...]
你还可以使用更便于机器理解的格式,例如JSON 或 YAML。在一些高级应用中(例如希望LLM引用其来源),保持数据格式的一致性非常重要。
1.4.3 合并外部知识和问题
格式化文档后,我们只需将其作为普通聊天消息发送到LLM。以下是使用 OpenAI ChatComplete API 进行RAG额示例代码:
openai_response = openai.ChatCompletion.create(
    model="gpt-3.5-turbo",
    messages=[
        {
            "role": "system",
            "content": get_system_prompt(),  # the system prompt as per above
        },
        {
            "role": "system",
            "content": get_sources_prompt(),  # the formatted documents as per above
        },
        {
            "role": "user",
            "content": user_question,  # the question we want to answer
        },
    ],
)
这样,我们使用一个自定义系统提示(a custom system prompt),两条消息(messages),就可以获得特定上下文(context-specific)的答案!
以上只是一个简单的示例。你还可以设置如果AI在知识源中找不到答案该怎么办。我们可以在系统提示符中进行设置,例如这种情况下拒绝回答,或者使用其一般知识。此外,你还可以让LLM引用其回答问题的特定来源。
1.5 总结
-
为知识库构建索引
- 获取知识源(
knowledge base),使用一个加载器(loader)将其转化为单独的文档(Document) - 使用分割器(
splitters)将其分成易于处理的小块或片段(document snippets)。 - 将这些片段传递给嵌入式机器(
embedding machine),将其转化为可用于语义搜索的向量。 - 将这些片段的embedding保存在我们的矢量数据库中(
vector database),同时保留它们的文本片段。
- 获取知识源(
-
检索
将 问题/任务 输入相同的嵌入式机器得到其嵌入表示,并传递到我们的矢量数据库。然后通过检索得到最匹配的片段,这些片段就是问题最相关的上下文(context),可用于增强LLM生成的回答或响应。 -
加强型的答案生成(augmented answer generation).。
将获取的相关知识片段,与自定义系统提示和问题进行合并,然后一起格式化,并最终得到基于相关上下文的问题答案。
二、Faiss
- Faiss开源地址、faiss文档
- 本章主要参考博客:《向量数据库入坑指南》
- 相关资源:斯坦福大学 - 信息检索导论:Information Retrieval and Web Search、Text Retrieval and Search Engines(coursera)
Faiss(Facebook AI Similarity Search)是一个开源的、高性能的相似性搜索库,由Facebook AI Research开发。Faiss主要用于处理大规模高维数据,如文本、图像和音频特征向量,以查找最相似的数据点或向量,所以在推荐系统、图像搜索、自然语言处理和其他需要高效相似性搜索的领域中得到广泛应用。
Faiss提供了各种用于相似性搜索的算法,包括经典的k最近邻搜索(k-nearest neighbors search)、向量聚类(vector clustering)和高维索引(high-dimensional indexing)等,其特点包括:
-
高性能:Faiss经过高度优化,能够在大型数据集上以非常快的速度执行相似性搜索操作。
-
多种索引结构:支持多种索引结构,如IndexFlatL2、IndexHNSW、IndexIVF等,这些索引类型可根据不同的数据规模和业务需求提供高性能的数据检索能力。
-
GPU支持:Faiss可以在CPU上执行相似性搜索,也支持在GPU上运行,这进一步提高了搜索速度。
-
易于使用:它提供了易于使用的API(可通过C++或Python进行调用,甚至有针对Golang开发的Go-Faiss),便于集成到各种应用程序和平台中。
如果你想写几行 CRUD 就能够完成高效的向量检索功能,可以试试启动一个 Milvus 实例,来完成高性能的向量检索(Milvus提供开箱即用的Docker镜像)。
2.1环境配置
为了尽可能减少不必要的问题,本文使用 Linux 操作系统作为 faiss 的基础环境,同时使用 Python 作为和 faiss 交互的方式。
Linux 环境 和 Python 环境配置可参考:《在笔记本上搭建高性价比的 Linux 学习环境:基础篇》、《用让新海诚本人惊讶的 AI 模型制作属于你的动漫视频》
在一切准备就绪之后,我们可以根据自己的设备状况,选择使用 CPU 版本的 faiss 还是 GPU 版本的 faiss,以及选择是否要指定搭配固定 CUDA 版本使用:
# 创建一个干净的环境
conda create -n faiss -y
# 激活这个环境
conda activate faiss
# 安装 CPU 版本
conda install -c pytorch python=3.8 faiss-cpu -y
# 或者,安装 GPU 版本
conda install -c pytorch python=3.8 faiss-gpu -y
# 或者,搭配指定 CUDA 版本使用
conda install -c pytorch python=3.8 faiss-gpu cudatoolkit=10.2 -y
2.2 构建向量数据
我们先从最简单的文本数据上手,实现一个“基于向量检索技术的文本搜索功能”。接下来,以小说 “哈利波特”为例进行演示,我们先从网络上下载好要处理为向量的文本数据(txt 文档)。
2.2.1 数据ETL
原始 TXT 文档大小是 3 MB ,为了减少不必要的向量转化计算量,我们先对内容进行必要的预处理(数据的 ETL 过程),去掉不必要的重复内容,空行等:
cat /Users/soulteary/《哈利波特》.txt | tr -d ' ' | sed '/^[[:space:]]*$/d' > data.txt
打开文本仔细观察,数据中有一些行中的文本数据格外长,是由好多个句子组成的,会对我们的向量特征计算、以及精准定位检索结果造成影响的。所以,我们还需要进行进一步的内容调整,将多个长句拆成每行一个的短句子。另外还需要避免将一段人物对话中的多个句子拆散到多行
为了解决这些问题,我们可以使用一段简单的 python代码来处理数据:
# 导入必要的库
import re

# 读取文件内容
with open("./hp.txt", "r", encoding="utf-8") as file:
    raw = file.read()

# 按换行符分割文本,然后合并为一个字符串
lines = raw.split("\n")
text = "\n".join(lines)

# 将句号后加换行,再按换行符分割文本
text = text.replace("。", "。\n")
lines = text.split("\n")

# 去除引号中的换行
lines = [re.sub(r'“(.*?)”', lambda match: match.group().replace("\n", ""), line) for line in lines]

# 去除多余的空格和's'
lines = [line.replace("s", "").strip().replace("s", "—") for line in lines]

# 过滤空行,然后合并为一个字符串
filtered_text = "\n".join([line for line in lines if line])

# 写入到文件
with open("./ready.txt", "w", encoding="utf-8") as output_file:
    output_file.write(filtered_text)
这段代码执行了以下操作:
-
合并文本:从"hp.txt"中读取文本内容,将其按换行符分割成多行,并将这些行合并为一个字符串。
-
多句行换成单句行:在句号后添加换行符,以便在每个句子之后都有一个换行符,并再次按换行符分割文本,将文本拆分为多个句子。
-
避免对话分割到多行:移除引号中的换行符,确保引号中的文本在同一行。
-
去除文本中的多余空格,并将’s’替换为"—",然后去除文本行两侧的空白字符。
-
过滤掉空行,只保留包含文本内容的行。
-
将处理后的文本写入到名为"ready.txt"的文件中,以供后续使用。
总的来说,这段代码的主要目的是对输入文本进行清理和格式化,以生成一个新的文本文件,其中每个句子在单独的行上,并且已去除了不必要的空格和字符。下面查看下整理好的文本文件占磁盘空间是多少:
du -hs ready.txt
5.5M	ready.txt
2.2.2 使用模型将文本转换为向量
为了将文本转换为向量数据,我们需要使用能够处理文本嵌入的模型。这里选择的模型是人大、腾讯 AI Lab、北大联合推出的《UER: An Open-Source Toolkit for Pre-training Models》预训练模型sbert-base-chinese-nli。此模型的训练数据来自ChineseTextualInference。
安装模型:
pip install sentence_transformers pandas
在安装完毕之后,我们可以在终端中输入 python 来进入 Python 交互式终端,首先将我们准备好的文本文件使用 pandas 解析为 DataFrames 。
import pandas as pd
df = pd.read_csv("ready.txt", sep="#",header=None, names=["sentence"])
print(df)
在执行之后,我们将看到类似下面的结果:
                                      sentence
0                                  《哈利波特》J.K罗琳
1                                第一部 第一章 幸存的男孩
2          住在四号普里怀特街的杜斯利先生及夫人非常骄傲地宣称自己是十分正常的人。
3      但是他们最不希望见到的就是任何奇怪或神秘故事中的人物因为他们对此总是嗤之以鼻。
4                      杜斯利先生是一家叫作格朗宁斯的钻机工厂的老板。
...                                        ...
60023                 哈利看着她茫然地低下头摸了摸额头上闪电形的伤疤。
60024                                “我知道他会的。”
60025                         十九年来哈利的伤疤再也没有疼过。
60026                                   一切都很好。
60027                                    (全书完)

[60028 rows x 1 columns]
接下来,我们对载入内存的文本进行向量计算,对每一行数据进行“特征向量抽取”:
from sentence_transformers import SentenceTransformer
model = SentenceTransformer('uer/sbert-base-chinese-nli')
sentences = df['sentence'].tolist()
sentence_embeddings = model.encode(sentences)
这个过程会比较久,如果是 Zen2 的普通笔记本,大概需要运行接近半个小时。当数据向量完毕之后,我们可以先执行 sentence_embeddings.shape,看看数据的状况(六万条文本被向量化为了 768 维的向量数据):
(60028, 768)
2.3 平面索引(FlatIndex)
2.3.1 平面索引实现
Faiss提供了多种索引类型,每种类型都有其特点和适用场景:
| 索引类型 | 说明 | 优缺点 |
|---|---|---|
FlatIndex |
平均哈希,最简单的索引类型,线性扫描。 | 仅适用于小型数据集。 |
IVFFlat |
倒排文件平均哈希,结合了倒排文件和平均哈希的概念。它将向量拆分到多个倒排文件(Inverted File)中,然后在每个倒排文件中使用FlatIndex | 适用于大规模数据和高维数据,但是存储开销较高。 |
IndexLSH |
局部敏感哈希,使用局部敏感哈希技术,通过哈希函数将相似的向量映射到相同的桶中,以便进行快速搜索。 | 适用于高维数据的相似性搜索,但是精度较低,不适用于所有数据类型。 |
IndexPQ |
指数PQ(产品量化)。使用Product Quantization技术,将高维向量分成多个子空间,并对每个子空间进行矢量量化。 | - 降低存储和搜索复杂性。 - 对数据分布要求较高,不适用于所有数据。 |
IndexIVFPQ |
乘积量化索引, 结合了倒排文件和Product Quantization,以加速高维向量的相似性搜索 | 在大规模高维数据集上表现出色 |
IndexHNSW |
基于Hierarchical Navigable Small World结构,允许在高维空间中快速搜索相似向量。 | - 适用于大规模数据集的高维搜索。 |
IndexIDMap |
最简单的索引,适用于小型数据集。 | - 适用于小规模测试和原型开发 |
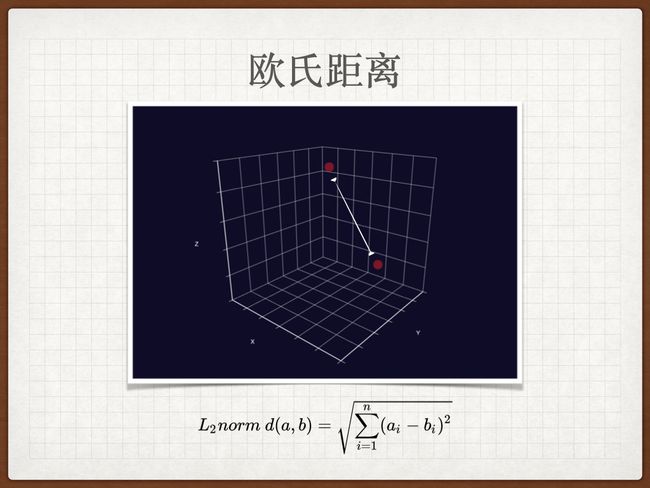
faiss 中最简单的索引,便是没有使用任何花哨技巧(压缩、分区等)的平面索引IndexFlatL2。当我们使用这种索引的时候,我们查询的数据会和索引中所有数据一一计算计算,获取它们之间的 L2 距离(欧几里得距离),因此它是所有索引类型中最慢的一种,但是也是最简单和最准确的索引类型,同时,因为类型简单,也是内存占用量最低的类型。而它采取的遍历式查找,也会被从业者打趣称之为“暴力搜索”。
之前我们已经准备好了 768 维度的高维向量数据,接下来,我们就用这些数据来构建其向量索引:
import faiss

dimension = sentence_embeddings.shape[1]
# 建立一个空的索引容器index,并使用了使用了L2(Euclidean)距离度量
index = faiss.IndexFlatL2(dimension)
# 向索引容器index添加文本向量
index.add(sentence_embeddings)
执行完毕上面的代码之后,我们执行 index.ntotal 来查看索引的数据是否正确:
# >>> index.ntotal
60028
确认所有数据都被索引之后,我们来写一段最简单的程序,来进行查询,为了演示“相似性检索”,而不是“关键词匹配”,我们来搜索一个离谱的原文肯定没有的内容“哈利波特猛然睡醒”:
topK = 5												# 查询 5 条最相似的数据
prompt_embeddings = model.encode(["哈利波特猛然睡醒"])		# 将搜索内容编码为embeddingd
# 使用faiss进行检索,返回5组最相似的结果,每组都包含相似度分数和文档索引
search_score, search_index = index.search(prompt_embeddings, topK)
df['sentence'].iloc[search_index[0]]                    # 根据索引获取检索文本
打印结果:
38216  “我很好先生”哈利结巴的说擦着脸上的汗“我刚才只是睡着了做了个恶梦。
37890  “我很好先生”哈利结巴的说擦着脸上的汗“我刚才只是睡着了做了个恶梦。
8009   那天晚上哈利失眠了。
13996  最後哈利精疲力尽的爬上床猛拉他的四柱大床的蚊帐堵住射进来的一道月光翻身躺了进去而且几乎立即觉...
45306  罗恩立刻就进入了梦乡但是哈利在上床之前从行李箱里翻出了他的那本《高级魔药制备》。
Name: sentence, dtype: object
虽然没有完全匹配关键词,但是我们想要的内容还是被程序找到了。我们每天都在使用的搜索引擎背后的众多技术之一,也包括类似的向量检索(未来有机会的话,我们聊聊语义搜索)。
如果我们将search_score,search_index打印出来,可以看到类似下面的输出:
# >>> print (search_score)
[[206.22675 206.22675 212.70087 219.73259 221.30847]]
# >>> print (search_index)
[[38216 37890  8009 13996 45306]]
所以如果我们使用上面的 “[38216 37890 8009 13996 45306]” 替换 iloc[search_index[0]] ,得到的结果也是一样的:
# >>> df['sentence'].iloc[[38216, 37890, 8009, 13996, 45306]]
38216  “我很好先生”哈利结巴的说擦着脸上的汗“我刚才只是睡着了做了个恶梦。
37890  “我很好先生”哈利结巴的说擦着脸上的汗“我刚才只是睡着了做了个恶梦。
8009   那天晚上哈利失眠了。
13996  最後哈利精疲力尽的爬上床猛拉他的四柱大床的蚊帐堵住射进来的一道月光翻身躺了进去而且几乎立即觉...
45306  罗恩立刻就进入了梦乡但是哈利在上床之前从行李箱里翻出了他的那本《高级魔药制备》。
Name: sentence, dtype: object
search_index是一个嵌套列表,每个元素是一个样本的索引结果,所以即使只有一个样本,其索引结果也要用search_index[0]表示。
如果我们想查看 38216 这条faiss索引存储的向量是什么,可以进行向量重建:
>>> index.reconstruct(38216)
array([ 5.07521369e-02, -3.93364072e-01, -1.19723105e+00, -3.36433440e-01,
        1.06395984e+00,  3.83257926e-01,  1.24985963e-01,  2.79548287e-01,
       -7.02445269e-01,  7.59876966e-01, -5.09731807e-02, -5.78854322e-01,
       -2.41243094e-01, -6.83130026e-01,  2.50904560e-01, -3.06654796e-02,
        1.09606862e+00,  1.76596511e-02,  4.99801673e-02, -1.00713462e-01,
...
...
        7.15905130e-01,  2.10034728e-01,  2.63317943e-01,  7.68652320e-01],
      dtype=float32)
>>> len(index.reconstruct(38216))
768
如果你想对 “FLAT” 索引有更多了解,可以移步官方开源项目中的facebookresearch/faiss/blob/main/benchs/bench\_index\_flat.py 文件。
2.4.2 平面索引性能
平面索引的工作方式是“暴力搜索”,所以它的计算成本是非常高的(每一次搜索行为,都将带来 60028 次数据查询及 L2 距离计算),同样的,因为使用这样的方式,这种类型的索引也不能进行很好的“水平扩展”。
为了避免这种因为数据量膨胀,而导致使用向量检索技术的搜索引擎、推荐系统、广告系统、风控系统等业务系统“停摆”,我们就需要引入一些工程上的小技巧啦,比如分区索引。
在聊分区索引之前,为了能够有一个清晰的效果对比,我们先对前文中的数据查询做一个基础的“benchmark”。
import faiss

dimension = sentence_embeddings.shape[1]
index = faiss.IndexFlatL2(dimension)
index.add(sentence_embeddings)

import time

topK = 5
prompt_embeddings = model.encode(["哈利波特猛然睡醒"])

costs = []
for x in range(10):
  t0 = time.time()
  search_score,search_index = index.search(prompt_embeddings, topK)
  t1 = time.time()
  costs.append(t1 - t0)

print("平均耗时 %7.3f ms" % ((sum(costs) / len(costs)) * 1000.0))
当执行代码之后,我们将得到类似下面的结果:
>>> print("平均耗时 %7.3f ms" % ((sum(costs) / len(costs)) * 1000.0))
平均耗时   9.185 ms
当然,除了计算方面的性能之外,存储方面的性能,我们也需要留意:
import os

dump_file = './dump'
faiss.write_index(index, dump_file)
file_size = os.path.getsize(dump_file)
os.remove(dump_file)
print ("%7.3f MB" % (file_size/1024/1024))
175.863 MB
2.4 分区索引(IVFFlat)
和传统数据库一样,我们能够使用不同的手段来优化我们的“查询性能”。在向量数据库中,对于“向量检索”最简单的性能优化方案,便是对索引数据进行分区优化,将数据通过“沃罗诺伊图单元”(也被叫做泰森多边形)来进行切割(类似传统数据库分库分表)。
假设我们已经完成了对数据的分区优化,当我们想要进行针对某个数据的向量相似度检索时,会先针对向量数据和“沃罗诺伊图”的质心进行计算,求出它们之间的距离。然后,将我们的搜索范围限定在它和这个质心距离覆盖的单元内。
因为我们缩小了搜索范围,并没有像平面索引一样,进行全量的“暴力搜索”,所以我们将得到一个近似精确的答案,以及相对于前文中的检索方式,更快的得到数据的查询结果。
2.4.1实战分区索引
在了解了索引分区优化的原理后,我们来进行简单的实战:
import faiss

dimension = sentence_embeddings.shape[1]
quantizer = faiss.IndexFlatL2(dimension)
nlist = 50
index = faiss.IndexIVFFlat(quantizer, dimension, nlist)

index.train(sentence_embeddings)
index.add(sentence_embeddings)
print (index.ntotal)
60028
index = faiss.IndexIVFFlat(quantizer, dimension, nlist)quantizer:创建的分区索引的质心位置dimension:索引数据维度nlist:数据分区数,即倒排文件(Inverted File)的数量。
index.train:根据IVF 索引官方文档,我们需要在添加数据之前,先针对数据进行“训练”(使用k-means对向量进行聚类),所以在index.add之前,我们需要调用index.train。
在完成了索引切换之后,我们对前文中的程序进行一些简单的调整,然后再跑个数据试试看:
import time

topK = 5
prompt_embeddings = model.encode(["哈利波特猛然睡醒"])

costs = []
for x in range(10):
  t0 = time.time()
  search_score,search_index = index.search(prompt_embeddings, topK)
  t1 = time.time()
  costs.append(t1 - t0)

print("平均耗时 %7.3f ms" % ((sum(costs) / len(costs)) * 1000.0))
# >>> print("平均耗时 %7.3f ms" % ((sum(costs) / len(costs)) * 1000.0))
平均耗时   0.167 ms
相比较平面索引,分区索引将查询延时从 9ms 降低到了 1ms 不到,节约了 98% 的时间,一定程度上解决了随着数据量膨胀,平面索引性能线行下降,最终可能无法满足业务诉求的问题。
当然,除了要看性能表现之外,也需要关注查询结果的准确性,以及是否有错误出现:
# >>> df['sentence'].iloc[I[0]]
13996  最後哈利精疲力尽的爬上床猛拉他的四柱大床的蚊帐堵住射进来的一道月光翻身躺了进去而且几乎立即觉...
52571  哈利现在已经睡到了小天狼星的房间里。
54641  赫敏睡熟了在她的毯子下攢作一团直到哈利呼唤她的名字很多此后她才醒了过来。
34396  突然之间哈利明白了在最后那两张床上躺的人是谁。
34122  他翻了个身不一会便再度睡去。
Name: sentence, dtype: object
可以看到和前文中的结果有了明显的不同,虽然内容还是和“哈利波特”、“猛然”、“睡”、“醒” 中的某些关键词有关,但是相比FLAT, IVF的精度有了明显的下降。所以通常情况,我们会通过增加 index.nprobe 数值,来告诉 faiss 搜索更多的“格子”,以便寻找到更合适的结果。
import time

index.nprobe = 10
topK = 5
prompt_embeddings = model.encode(["哈利波特猛然睡醒"])

costs = []
for x in range(10):
  t0 = time.time()
  search_score,search_index = index.search(prompt_embeddings, topK)
  t1 = time.time()
  costs.append(t1 - t0)

print("平均耗时 %7.3f ms" % ((sum(costs) / len(costs)) * 1000.0))

df['sentence'].iloc[I[0]]
平均耗时   1.910 ms

37890  “我很好先生”哈利结巴的说擦着脸上的汗“我刚才只是睡着了做了个恶梦。
38216  “我很好先生”哈利结巴的说擦着脸上的汗“我刚才只是睡着了做了个恶梦。
8009   那天晚上哈利失眠了。
13996  最後哈利精疲力尽的爬上床猛拉他的四柱大床的蚊帐堵住射进来的一道月光翻身躺了进去而且几乎立即觉...
45306  罗恩立刻就进入了梦乡但是哈利在上床之前从行李箱里翻出了他的那本《高级魔药制备》。
Name: sentence, dtype: object
可以看出,相似性检索的结果和我们使用平面索引完全一致了。此外,因为我们搜索的“单元格”更多了,所以搜索耗时也就从不到1ms增长到了接近2ms,但是即使如此,分区索引依旧比平面索引要快非常多。实际中, index.nprobe 是一个超参数,需要根据业务的实际情况来调整。
下面对比不同索引的内存消耗情况:
import os

dump_file = './dump'
faiss.write_index(index, dump_file)
file_size = os.path.getsize(dump_file)
os.remove(dump_file)
print ("%7.3f MB" % (file_size/1024/1024))
176.468 MB
相比较平面索引,分区索引的内存占用略微大了一些。
2.4.2 重建分区后的向量数据
之前我们曾使用过 index.reconstruct(38216) 来重建和查看某个索引对应的具体向量。但在分区索引(IVF)的场景中,如果还使用这个方法,将会报错:
# >>> index.reconstruct(38216)
Traceback (most recent call last):
File "" , line 1, in <module>
File "/home/soulteary/anaconda3/envs/faiss/lib/python/site-packages/faiss/__init__.py", line 427, in replacement_reconstruct
self.reconstruct_c(key, swig_ptr(x))
File "/home/soulteary/anaconda3/envs/faiss/lib/python/site-packages/faiss/swigfaiss_avx2.py", line 4717, in reconstruct
return _swigfaiss_avx2.IndexIVF_reconstruct(self, key, recons)
RuntimeError: Error in faiss::DirectMap::idx_t faiss::DirectMap::get(faiss::DirectMap::idx_t) const at /opt/conda/conda-bld/faiss-pkg_1639741038719/work/faiss/invlists/DirectMap.cpp:81: direct map not initialized
这一点官方文档中有所说明,为了追求更快的查询性能,IndexIVF 和向量 ID IndexBinaryIVF 都存储在倒排列表中。所以,我们无法通过向量 ID 来反查索引中的内容,如果我们想要得到某个数据的内容,需要手动重建索引。
我们需要先调用 index.make_direct_map() 来完成索引重建,接着就能像之前一样重新获取某个具体的向量数据了。
index.make_direct_map()
index.reconstruct(38216)
array([ 5.07521369e-02, -3.93364072e-01, -1.19723105e+00, -3.36433440e-01,
        1.06395984e+00,  3.83257926e-01,  1.24985963e-01,  2.79548287e-01,
       -7.02445269e-01,  7.59876966e-01, -5.09731807e-02, -5.78854322e-01,
       -2.41243094e-01, -6.83130026e-01,  2.50904560e-01, -3.06654796e-02,
        1.09606862e+00,  1.76596511e-02,  4.99801673e-02, -1.00713462e-01,
...
...
        7.15905130e-01,  2.10034728e-01,  2.63317943e-01,  7.68652320e-01],
      dtype=float32)
2.5 基于量化的索引(IndexIVFPQ)
在上文中,我们针对一个不到 6MB 的文本文件进行向量化,以及构建 faiss 向量索引,内存消耗达到了夸张的176 MB。如果是海量数据、或数据快速增长的场景中,服务器资源的内存可能完全装不下我们的向量数据,无法支撑我们采用分区索引或者平面索引这种相对精确的相似性检索,
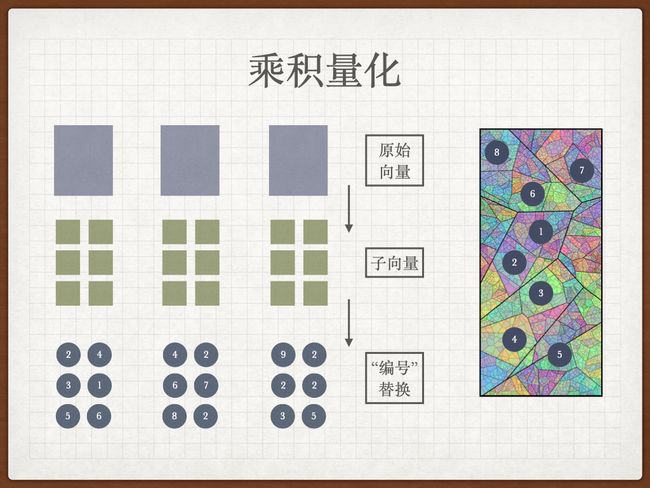
同时,因为数据量极大,即使采用能够性能提升非常明显的分区索引,也无法满足低延时的计算结果返回。所以我们需要想办法大幅降低内存占用。此时,我们可以采用“乘积量化(Product Quantization)”的方式,来建立 PQ 索引,帮助我们加速检索过程,同时减少内存空间占用。
简单理解,乘积量化索引具备一定的压缩向量数据的功能,某种程度上,它和分区索引所采取的“加速”思想是类似的,都是减少计算量:
- 分区索引采取的是划分大量“数据单元”,动态调整搜索范围;
- 乘积量化索引则更进一步,除了划分细粒度的“工作区域”外,还预先计算了不同向量数据之间的“距离”,让每一堆向量数据都是距离这堆向量数据的质心更近的数据。
要实现上面这段看起来十分复杂的工作,其实只需要三个步骤:
- 先将原始向量数据拆分为一些子向量。
- 对于每组子向量,分别进行聚类操作,获得每组向量的质心。
- 对向量中的子向量进行替换,使用距离它最近的向量集合的 ID。
import faiss

dimension = sentence_embeddings.shape[1]
quantizer = faiss.IndexFlatL2(dimension)
nlist = 50
m = 8					# 子向量数量
nbits_per_idx = 8		# 每个索引项的位数
index = faiss.IndexIVFPQ(quantizer, dimension, nlist, m, nbits_per_idx)

index.train(sentence_embeddings)
index.add(sentence_embeddings)
index.nprobe = 100    	# 要查询的倒排文件数量
import time

topK = 5
prompt_embeddings = model.encode(["哈利波特猛然睡醒"])

costs = []
for x in range(10):
  t0 = time.time()
  search_score,search_index = index.search(prompt_embeddings, topK)
  t1 = time.time()
  costs.append(t1 - t0)

print("平均耗时 %7.3f ms" % ((sum(costs) / len(costs)) * 1000.0))
平均耗时 0.116 ms
>>> print ("%7.3f MB" % (file_size/1024/1024))

  1.813 MB
当然,我在前文中也提到过,除了要关心性能之外,结果的质量也很重要:
>>> df['sentence'].iloc[I[0]]
>
37890  “我很好先生”哈利结巴的说擦着脸上的汗“我刚才只是睡着了做了个恶梦。
30619  罗恩昨天在哈利一回来后就睡着了。
38216  “我很好先生”哈利结巴的说擦着脸上的汗“我刚才只是睡着了做了个恶梦。
49276  “我要去睡觉了”金妮打了一个呵欠“自从……我就一直没能好好的睡个觉了我需要休息。”
33797  “他正在睡觉。待会儿我们一起去看他。比尔在陪着他他早上请了假。”
Name: sentence, dtype: object
可以看到相比较平面索引和分区索引,faiss.IndexIVFPQ 的索引的默认结果有一些乱来了,而且即使我们调整 nlist ,效果的改善也比较有限。但是,在一些对于“结果精确度”要求不高的业务场景中,还是最优的选择。
2.6 保存原始向量数据
对数据进行向量化的过程会消耗很多的资源,不管是时间还是内存。一般而言,编码的模型越复杂、机器性能越差、数据量越多,我们需要处理的时间就越长。
而我们在 faiss 中的数据都是储存在内存中的,这就不免存在我们辛辛苦苦计算好的向量数据,随着程序 crash 后,也随风而去了。想要解决这个问题,有一个比较笨的办法,就是将“embedding”后的数据进行本地保存,然后在程序出现问题之后,重新加载计算好的向量数据。
例如,可以使用numpy将我们的原始向量数据保存为npy格式,其大小尺寸和我们上文中计算平面索引得到的内存大小是完全一致的:
import os
import numpy as np

save_file = "data.npy"
np.save(save_file, sentence_embeddings)

file_size = os.path.getsize(save_file)
print ("%7.3f MB" % (file_size/1024/1024))
# 加载原始向量数据
sentence_embeddings = np.load("data.npy")
2.7 总结
总结三种常见的索引类型:
-
平面索引(FLAT): 一种朴实无华的索引,适用于小型数据集。它能提供高精度的相似性检索结果,可以在合适的情况下创建自己的“搜索引擎”,具有与谷歌等搜索引擎媲美的结果精度。
-
分区索引(IVF) : 牺牲一定准确度以换取更快的查询性能的策略。另外分区索引可以通过参数调整来提高准确度
-
量化索引(PQ):随着数据量的增大,量化索引 提供了巨大的收益,能够节省内存和服务器成本,同时显著提高查询性能。然而,由于其实现原理,不可能达到与分区索引和平面索引相媲美的准确度。
-
在某些情况下,可以考虑使用 复合性索引,以更好地适应特定业务场景,使向量数据库的检索更符合需求。
三、Open Book Q&A
3.1 概述
3.1.1 Open Book LLM Science Exam - Reduced RAM usage(方法5)
Open Book Q&A方法使用的Wikipedia Plaintext数据集,包含 2023 年 7 月 1 日维基百科转储中的 6,286,775 篇文章、标题、文本和类别。文章按字母数字顺序排序,并分成与文章标题的第一个字符对应parquet文件,即分区为 a - z 、 number (以数字开头的标题)和 other (以符号开头的标题)的 parquet 文件。

整个算法步骤如下:
- 读取Wikipedia文档数据集(使用WikiExtractor创建的)和测试集
- 检索出测试集prompt的相似文档
- 使用
sentence transformers(all-MiniLM-L6-v2 model)对训练集prompts(问题)和Wikipedia文档进行编码,并构建Wikipedia文档索引,存入文件wikipedia_202307.index。 - 读取索引文件
wikipedia_202307.index,使用 faiss 执行相似性搜索,检索出200条测试集prompt最相关的前 k 篇文章(本文取k=3,最终得到576篇文章而不是600篇,因为部分是重复的),最终返回这576篇文档的相似分数和文档索引search_index。 - 根据
search_index获取文档的全文(wiki_text_data)
- 使用
- 检索出prompt+answer的前n个相似句子(本文取n=5)
- 使用
blingfire库将wiki_text_data中的文档拆分成句子。做这一步是因为和问答数据最相似的部分一般只是文档中的某些段落或者句子。 - 对每条样本,合并其prompt和answer选项,编码结果为
question_embeddings。因为这样做检索的结果更准确。 - 对
question_embeddings执行相似性搜索,获得其最匹配的前n个匹配句子,记为context。context就是最终我们需要的额外上下文。
- 使用
- 将
prompt,answer,context结合起来,要么直接进行问题回答(方法6),要么输入LLM(方法7)
3.1.2 OpenBook DeBERTaV3-Large Baseline (Single Model)(方法7)
上一个notebook中,我们使用faiss 执行相似性搜索,得到了与prompt和answer最相似的context。将其与问答数据合并,增强上下文,得到新的测试集问答数据:
test_df["prompt"] = test_df["context"] + " #### " + test_df["prompt"]
然后对这个增强的测试集,执行常规的多选问答推理。
3.1.3 sentence-transformers
- sentence-transformers论文:《Sentence-BERT: Sentence Embeddings using Siamese BERT-Networks》、论文解读《Sentence-BERT(SBERT)模型介绍及Sentence Transformers库的使用》
- sentence-transformers官方文档、知乎《SentenceTransformers 库介绍》
BERT和RoBERTa在STS(语义文本相似性)等句子对回归任务上取得最先进的新性能,但是它要求将两个句子都馈送到网络中,这会导致大量的计算开销。例如用 BERT在10000个句子的集合中查找最相似的句子对,要进行大约 5000 万次推理计算(~65 小时)。所以BERT的构造使其不适合语义相似性搜索以及聚类等无监督任务。
另外,用BERT获取一个句子的向量表示,一般有两种方式:
- 用句子开头的
[CLS]经过BERT的向量作为句子的语义信息(更常用) - 用句子中的每个token经过BERT的向量,加和后取平均,作为句子的语义信息
然而,实验结果显示,在文本相似度任务上,使用上述两种方法得到的效果并不好,即使是Glove向量也明显优于原始BERT的句子embedding(见下图前三行)
论文中提出的Sentence-BERT(SBERT),通过对预训练的BERT进行修改,使用Siamese 和 Triplet Network(孪生网络和三胞胎网络)生成具有语义的句子的embedding(语义相近的句子的embedding距离就比较近),从而可以使用余弦相似度、曼哈顿距离、欧氏距离等找出语义相似的句子。计算耗时从BERT / RoBERTa 的 65 小时减少到 SBERT 的大约 5 秒,同时保持 相当的准确性。
更多细节请参考论文或者以上知乎贴。
3.2 安装依赖,导入数据
# 因为是notebook比赛模式,不能联网,所以从input中安装依赖库
!pip install -U /kaggle/input/faiss-gpu-173-python310/faiss_gpu-1.7.2-cp310-cp310-manylinux_2_17_x86_64.manylinux2014_x86_64.whl
!cp -rf /kaggle/input/sentence-transformers-222/sentence-transformers /kaggle/working/sentence-transformers
!pip install -U /kaggle/working/sentence-transformers
!pip install -U /kaggle/input/blingfire-018/blingfire-0.1.8-py3-none-any.whl

!pip install --no-index --no-deps /kaggle/input/llm-whls/transformers-4.31.0-py3-none-any.whl
#!pip install --no-index --no-deps /kaggle/input/llm-whls/peft-0.4.0-py3-none-any.whl
!pip install --no-index --no-deps /kaggle/input/llm-whls/datasets-2.14.3-py3-none-any.whl
#!pip install --no-index --no-deps /kaggle/input/llm-whls/trl-0.5.0-py3-none-any.whl
import os,gc,re,faiss
import pandas as pd
import numpy as np
import blingfire as bf

from tqdm.auto import tqdm
from collections.abc import Iterable
from faiss import write_index, read_index
from sentence_transformers import SentenceTransformer

import torch
import ctypes
libc = ctypes.CDLL("libc.so.6")
MODEL = '/kaggle/input/sentencetransformers-allminilml6v2/sentence-transformers_all-MiniLM-L6-v2'
DEVICE = 0
MAX_LENGTH = 384
BATCH_SIZE = 16

WIKI_PATH = "/kaggle/input/wikipedia-20230701"
wiki_files = os.listdir(WIKI_PATH) 					# ['x.parquet', 'h.parquet', 'w.parquet',...]
3.3 数据预处理
使用 sentence_transformers 对整个prompt进行编码,方便后续使用语义搜索来查找相关文章。
model = SentenceTransformer(MODEL, device='cuda')
model.max_seq_length = MAX_LENGTH
model = model.half()

trn = pd.read_csv("/kaggle/input/kaggle-llm-science-exam/test.csv").drop("id", 1)
trn.head()
prompt_embeddings = model.encode(trn.prompt.values, batch_size=BATCH_SIZE, device=DEVICE, show_progress_bar=True, convert_to_tensor=True, normalize_embeddings=True)
# 将查询向量从GPU上的张量转换为NumPy数组,以便后续在Faiss中使用
prompt_embeddings = prompt_embeddings.detach().cpu().numpy()
print(prompt_embeddings,prompt_embeddings.shape)
# 手动触发Python的垃圾回收,以释放之前的不再使用的内存
_ = gc.collect()
prompt_embeddings加.half(),后面sentence_index.search会报错
TypeError: in method 'IndexFlat_search', argument 3 of type 'float const *'
array([[-4.5478687e-02, -1.6479595e-02,  4.3971878e-02, ...,
        -5.1500157e-02, -9.1974944e-02,  7.7763526e-03],
       [-2.6538833e-03, -5.8031674e-02, -4.0828194e-02, ...,
         3.2339178e-02,  1.4145578e-02, -2.4660153e-02],
       [-6.8248026e-02,  9.7041421e-02, -7.8083292e-02, ...,
         4.0758580e-02,  4.6507336e-02,  2.7111586e-02],
       ...,
       [-7.3988572e-02, -1.4278200e-02, -4.0605428e-05, ...,
        -1.0465340e-02, -2.3960188e-02, -3.3164129e-02],
       [-2.5413906e-02,  3.4185217e-04, -4.3551046e-02, ...,
        -4.7686603e-02,  1.2639660e-01, -5.0002653e-02],
       [-5.9531994e-02, -7.2587818e-02, -2.9483654e-02, ...,
         2.7272794e-03, -2.6037039e-02,  2.4748029e-02]], dtype=float32)

(200, 384)
可见每个prompt被编码为384维的向量。
3.4 检索出与prompt最关联的576篇wiki文档
- 使用sentence-transformers对所有维基百科文章进行编码,然后使用faiss对编码后的向量构建索引并存储在wikipedia_202307.index文件中(这一步的代码此处未显示,应该是已经预处理好了)
- 使用read_index函数读取已处理好的Faiss索引文件
- 使用reconstruct索引重建函数,查看第一条faiss索引存储的向量长度为384,即sentence-transformers会将输入文本编码为384维的向量
# 读取预处理好的wiki索引文件
sentence_index = read_index("/kaggle/input/wikipedia-2023-07-faiss-index/wikipedia_202307.index")

# 使用reconstruct函数重构索引,查看索引中存储的向量
first_embedding = sentence_index.reconstruct(0)
print( first_embedding,first_embedding.shape)
sentence_index
[-1.56402588e-03  1.73797607e-02 -5.81665039e-02 -6.96182251e-03
 -6.85424805e-02  6.41479492e-02  1.04446411e-02  1.54647827e-02
 ...
 -1.45645142e-02 -4.87670898e-02  4.37545776e-03 -7.89184570e-02
  9.16137695e-02 -9.45434570e-02  2.29339600e-02  7.09838867e-02]
(384,)
<faiss.swigfaiss.IndexFlat; proxy of <Swig Object of type 'faiss::IndexFlat *' at 0x78f71c856c40> >
使用faiss检索出prompt_embeddings最相关的前三篇wiki文档
search_score, search_index = sentence_index.search(prompt_embeddings, 3)
search_score,search_index,search_index.shape
# search_score,shape为(200, 3)
array([[0.8242705 , 0.9412608 , 0.9816439 ],
        [0.3884983 , 0.79613495, 0.82003427],
        ...
        [0.6471102 , 0.6917976 , 0.73008466]], dtype=float32)

# search_index,shape为(200, 3)
array([[3573843, 4906500, 1830796],
        [1431454, 5135549, 5135229],
		...
		[1464446,  363737, 1464453]]
# 内存涨到12.3GB,删除不再需要变量,释放内存,降到3.3GB
del sentence_index
del prompt_embeddings
_ = gc.collect()
libc.malloc_trim(0)
_ = gc.collect():这行代码手动触发了 Python 的垃圾回收机制(Garbage Collection)。垃圾回收是一种用来识别和释放不再使用的内存的机制。虽然 Python 通常会自动执行垃圾回收,但在某些情况下,手动触发垃圾回收可以更快地释放内存。libc.malloc_trim(0):在特定情况下执行的系统级内存管理操作,用于释放更多内存。malloc_trim 是与 C 语言中的内存分配函数 malloc 相关的操作,它的目的是将未使用的内存返回给操作系统。
加载维基百科索引文件,仅包括’id’和’file’两列
df = pd.read_parquet("/kaggle/input/wikipedia-20230701/wiki_2023_index.parquet", columns=['id', 'file'])
df
				id			file
0			49495844	a.parquet
1			3579086		a.parquet

...	...	...

6286773		18920475	z.parquet
6286774		51132758	z.parquet
根据每个prompt检索的文档id,获取文档所在的wikipedia file:
wikipedia_file_data = []

# 遍历search_score和search_index,使用tqdm显示进度
for i, (scr, idx) in tqdm(enumerate(zip(search_score, search_index)), total=len(search_score)):
    # scr_idx = idx[np.where(scr <= 0.85)] # 作者准备设置分数阈值,最后取消了
    scr_idx = idx
    _df = df.loc[scr_idx].copy() 		   # 从df中选择与索引对应的行,并创建副本
    _df['prompt_id'] = i
    wikipedia_file_data.append(_df)

wikipedia_file_data 					   # 长为200的列表,每个都包含prompt的索引以及最相似的维基百科文章的索引及其位置
			id       file  		prompt_id
3573843  55518323  m.parquet          0
4906500  15739602  r.parquet          0
1830796     12571  g.parquet          0
		 id       file  		prompt_id
1431454  52303418  d.parquet          1
5135549  58495269  s.parquet          1
5135229   5782346  s.parquet          1,
...
根据每条数据的file和id,对wikipedia_file_data进行排序
wikipedia_file_data = pd.concat(wikipedia_file_data).reset_index(drop=True)
# drop_duplicates对数据去重,然后按file和id进行排序,最后重装索引
wikipedia_file_data = wikipedia_file_data[['id', 'prompt_id', 'file']].drop_duplicates().sort_values(['file', 'id']).reset_index(drop=True)
wikipedia_file_data
	id		prompt_id	  file
0	1141		151		a.parquet
1	11963992	185		a.parquet
2	1200		63		a.parquet
3	1234		130		a.parquet
4	1317		89		a.parquet
...	...	...	...
595	810077		27		x.parquet
596	1063160		46		y.parquet
597	31557501	49		y.parquet
598	47610211	49		y.parquet
599	34527		103		z.parquet
这样我们就得到了与200个prompt最相似的维基百科文章的全部索引(id),以及每个文章所在的parquet文件(file)。
# 删除不再需要的 df ,节省内存
del df
_ = gc.collect()
libc.malloc_trim(0)
下面我们遍历每个parquet文件名(file,需要去重),先获取所有当前parquet文件需要查找的文章索引(id),然后读取parquet文件的id和text两列;最后根据id筛选出其中的文档text,存储在wiki_text_data中。
wiki_text_data = []

# 遍历文件名列表[a.parquet,b.parquet...]
for file in tqdm(wikipedia_file_data.file.unique(), total=len(wikipedia_file_data.file.unique())):
	# 从文件名相匹配的行中提取 'id' 列的值,并将其转为一个字符串列表
    _id = [str(i) for i in wikipedia_file_data[wikipedia_file_data['file']==file]['id'].tolist()]
    # 读取parquet文件中'id'和'text'列
    _df = pd.read_parquet(f"{WIKI_PATH}/{file}", columns=['id', 'text'])
	# 创建一个副本,筛选出parquet文件中搜索出的id行
    _df_temp = _df[_df['id'].isin(_id)].copy()

    del _df
    _ = gc.collect()  	 # 手动触发垃圾回收,释放内存
    libc.malloc_trim(0)  # 释放更多内存(这部分可能是特定于系统的内存管理操作)
    wiki_text_data.append(_df_temp)

# 将结果列表中的数据合并成一个新的DataFrame,去除重复项,并重置索引
wiki_text_data = pd.concat(wiki_text_data).drop_duplicates().reset_index(drop=True)
wiki_text_data
		id						text
0	1550261	The American Petroleum Institute gravity, or A...
1	46674381	In mathematics and physics, acceleration is th...
2	424420	Accelerator physics is a branch of applied phy...
3	1234	Acoustic theory is a scientific field that rel...
4	68418053	Alan Louis Selman (April 2, 1941 – January 22,...
...	...	...
571	61265537	Xenambulacraria is a proposed clade of animals...
572	31557501	Year of No Light is a French post-metal band f...
573	47610211
574	1063160	was a Japanese-American physicist and professo...
575	34527	The zodiacal light (also called false dawn whe...
上述代码中,我们遍历唯一的文件名列表wikipedia_file_data.file.unique():
wikipedia_file_data[wikipedia_file_data['file']==file]:使用布尔索引来选择 wikipedia_file_data 中当前迭代的file(文件名 )的行。['id'].tolist():从过滤后的结果中选择 ‘id’ 列(Series格式),然后转为Python列表格式[str(i) for i in ...]:使用列表推导式,将这个列表中的每个值转换为字符串,并存储在 _id 列表中。
3.5 检索出每个样本最相似的5个句子
- 定义文档处理函数,以便将每篇文档都拆分为句子
# 主函数,将wiki文档拆分为句子并进行句子编码
def process_documents(documents: Iterable[str],
                      document_ids: Iterable,
                      split_sentences: bool = True,
                      filter_len: int = 3,
                      disable_progress_bar: bool = False) -> pd.DataFrame:
    """
    主要辅助函数,用于处理wiki文档。

    :param documents: wiki_text_data中的text
    :param document_ids:  wiki_text_data中的id
    :param split_sentences: 标志,确定是否进一步将文档分割为句子
    :param filter_len: 默认句子的最小字符长度为3,否则过滤掉。
    :param disable_progress_bar: 是否禁用 tqdm 进度条
    :return: DataFrame格式,包含列 `document_id`, `text`, `section`, `offset`
    """

    # 调用 sectionize_documents 函数来获取文档的索引、offset和text信息
    df = sectionize_documents(documents, document_ids, disable_progress_bar)

    # split_sentences默认为true,表示需要进一步分割句子
    if split_sentences:
        df = sentencize(df.text.values,
                        df.document_id.values,
                        df.offset.values,
                        filter_len,
                        disable_progress_bar)
    return df

# 处理documents,将文档按document_id和offset进行排序
def sectionize_documents(documents: Iterable[str],
                         document_ids: Iterable,
                         disable_progress_bar: bool = False) -> pd.DataFrame:
    """
    获取imaging reports并仅返回所选章节(默认为 FINDINGS、IMPRESSION 和 ADDENDUM)。

    :param documents: wiki_text_data中的text
    :param document_ids: wiki_text_data中的id
    :param disable_progress_bar: 是否 tqdm 进度条的标志
    :return: DataFrame格式,包含列 `document_id`, `text`, `offset`
    """
    processed_documents = []
    # 使用 tqdm 迭代处理文档,显示进度条
    for document_id, document in tqdm(zip(document_ids, documents), total=len(documents), disable=disable_progress_bar):
        row = {}
        text, start, end = (document, 0, len(document)) # end就是每篇文档的长度
        row['document_id'] = document_id
        row['text'] = text
        row['offset'] = (start, end)

        processed_documents.append(row)

    # 创建  DataFrame 并根据 'document_id' 和 'offset' 进行排序
    _df = pd.DataFrame(processed_documents)
    if _df.shape[0] > 0:
        return _df.sort_values(['document_id', 'offset']).reset_index(drop=True)
    else:
        return _df

# 将文档分割为句子,并同时返回document_id,text(句子信息和offset
def sentencize(documents: Iterable[str],
               document_ids: Iterable,
               offsets: Iterable[tuple[int, int]],
               filter_len: int = 3,
               disable_progress_bar: bool = False) -> pd.DataFrame:
    """
    将文档分割为句子。可以与 `sectionize_documents` 一起使用,进一步将文档分割为更易处理的部分。
    接受偏移量以确保分割后的句子可以与原始文档中的位置匹配。

    :param documents: wiki_text_data中的text
    :param document_ids: wiki_text_data中的id
    :param offsets: 可迭代的元组,表示开始和结束索引
    :param filter_len: 句子的最小字符长度(否则过滤掉)
    :return: 包含列 `document_id`, `text`, `offset` 的DataFrame
    """

    document_sentences = []
    # 使用 tqdm 迭代处理文档,显示进度条
    for document, document_id, offset in tqdm(zip(documents, document_ids, offsets), total=len(documents), disable=disable_progress_bar):
        try:
            # 使用 bf 库中的函数将文档分割为句子,并返回句子列表(-)和偏移量列表sentence_offsets
            _, sentence_offsets = bf.text_to_sentences_and_offsets(document)
            # 遍历当前文档的所有offset列表,o[0]和o[1]分别为句子起止位置
            for o in sentence_offsets:
                if o[1] - o[0] > filter_len:
                	# 如何句子长度大于filter_len,就通过切片得到句子信息
                    sentence = document[o[0]:o[1]]
                    # 将句子的offset+文档的offset,得到所有文档中的句子offset
                    abs_offsets = (o[0] + offset[0], o[1] + offset[0])
                    row = {}
                    row['document_id'] = document_id
                    row['text'] = sentence
                    row['offset'] = abs_offsets
                    document_sentences.append(row)
        except:
            continue
    return pd.DataFrame(document_sentences)
设有两个文档和它们的相关信息
documents = ["This is the first document.", "Here is the second one."]
document_ids = [1, 2]
通过调用 sectionize_documents 函数,返回结果应该是:
 	 document_id                    text       		offset
0       1  			This is the first document.  	(0, 29)
1       2  			Here is the second one.      	(30, 56)
- 将完整的维基百科文档拆分为句子
processed_wiki_text_data = process_documents(wiki_text_data.text.values, wiki_text_data.id.values)
processed_wiki_text_data  # 文档id,拆分后的句子和句子offset
		document_id							text						offset
0		10087606	In group theory, geometry, representation theo...	(0, 207)
1		10087606	For example, as transformations of an object i...	(208, 329)
2		10087606	Such symmetry operations are performed with re...	(330, 441)
3		10087606	In the context of molecular symmetry, a symmet...	(442, 631)
4		10087606	Two basic facts follow from this definition, w...	(632, 709)
...	...	...	...
32308	9962772		Mit Beitr.	(6031, 6041)
32309	9962772		Barth, 1957) == Selected publications == *Carl...	(6049, 6223)
32310	9962772		(Received 7 September 1920, published in issue...	(6224, 7033)
32311	9962772		Volume 1 Part 2 The Quantum Theory of Planck, ...	(7034, 7169)
32312	9962772		(Springer, 1982) *Walker, Mark German National...	(7170, 7553)
- 对句子进行编码,并卸载到CPU
wiki_data_embeddings = model.encode(processed_wiki_text_data.text, batch_size=BATCH_SIZE, device=DEVICE, show_progress_bar=True, convert_to_tensor=True, normalize_embeddings=True)
wiki_data_embeddings = wiki_data_embeddings.detach().cpu().numpy()  # (32313, 384)
_ = gc.collect()
- 合并测试集样本的prompt和answer
在很多情况下,GPT3.5 似乎直接从文本中获取答案。因此,我们希望检索最相似的句子来提供上下文。下面将测试集prompt和所有answer进行合并,然后进行编码,后面会根据其编码结果来进行搜索,也就是搜索与question_embeddings最相似的wiki_data_embeddings。
# 组合所有答案
trn['answer_all'] = trn.apply(lambda x: " ".join([x['A'], x['B'], x['C'], x['D'], x['E']]), axis=1)

# 合并prompt+answer,然后编码
trn['prompt_answer_stem'] = trn['prompt'] + " " + trn['answer_all']

question_embeddings = model.encode(trn.prompt_answer_stem.values, batch_size=BATCH_SIZE, device=DEVICE, show_progress_bar=True, convert_to_tensor=True, normalize_embeddings=True)
question_embeddings = question_embeddings.detach().cpu().numpy()
- 检索出最匹配的句子
NUM_SENTENCES_INCLUDE = 5		# 用于确定要包含多少个相关句子
#prompt_contexts = []			# 包含 Question, Choices, Context的列表
contexts = []					# 只包含 Context的列表

# 遍历测试集样本索引
for r in tqdm(trn.itertuples(), total=len(trn)):
    prompt_id = r.Index
    # 查找当前样本的相似文档wikipedia_file_data[wikipedia_file_data['prompt_id']==prompt_id]中的相似句子的索引(0-32312)
    prompt_indices = processed_wiki_text_data[processed_wiki_text_data['document_id'].isin(wikipedia_file_data[wikipedia_file_data['prompt_id']==prompt_id]['id'].values)].index.values
	# 如果找到了与当前问题相关的文档索引,即 prompt_indices 非空
    if prompt_indices.shape[0] > 0:
    	# 为相似句子构建faiss索引
        prompt_index = faiss.index_factory(wiki_data_embeddings.shape[1], "Flat")
        prompt_index.add(wiki_data_embeddings[prompt_indices])

        context = ""

        # 检索当前样本最相似的句子
        ss, ii = prompt_index.search(question_embeddings, NUM_SENTENCES_INCLUDE)
        for _s, _i in zip(ss[prompt_id], ii[prompt_id]):
            context += processed_wiki_text_data.loc[prompt_indices]['text'].iloc[_i] + " "

    contexts.append(context)
- 查看
context结果并保存
trn['context'] = contexts
trn[["prompt", "context", "A", "B", "C", "D", "E"]].to_csv("./test_context.csv", index=False)
model.cpu()
del model
del question_embeddings, wiki_data_embeddings
_ = gc.collect()
libc.malloc_trim(0)
torch.cuda.empty_cache()
下面我们打印10条训练数据,可以看到这些数据不仅提供了问题和选择,还提供了维基百科的上下文。这些上下文可能会提供关键的提示,甚至答案本身!
for i, p in enumerate(contexts[:2]):
    print(f"Question {i}")
    print(p)
    print()
Question 0
The presence of a clustered thick disk-like component of dark matter in the Galaxy has been suggested by Sanchez-Salcedo (1997, 1999) and Kerins (1997).Kerins, E. J. 1997, Astronomy and Astrophysics, 322, 709-718 (ADS entry )Sánchez-Salcedo, F. J. 1997, Astrophysical Journal, 487, L61-L64 (ADS entry )Sánchez-Salcedo, F. J. 1999, Monthly Notices of the Royal Astronomical Society, 303, 755-772 (ADS entry ) ==See also== * Dark matter * Brown dwarfs * White dwarfs * Microlensing * Hypercompact stellar system * Massive compact halo object (MACHOs) * Weakly interacting massive particles (WIMPs) ==References== Category:Star clusters Category:Open clusters Observations of the Bullet Cluster are the strongest evidence for the existence of dark matter; however, Brownstein and Moffat have shown that their modified gravity theory can also account for the properties of the cluster. == Observational methods == Clusters of galaxies have been found in surveys by a number of observational techniques and have been studied in detail using many methods: * Optical or infrared: The individual galaxies of clusters can be studied through optical or infrared imaging and spectroscopy. The observed distortions can be used to model the distribution of dark matter in the cluster. == Temperature and density == Clusters of galaxies are the most recent and most massive objects to have arisen in the hierarchical structure formation of the Universe and the study of clusters tells one about the way galaxies form and evolve. A 2021 article postulated that approximately 50% of all baryonic matter is outside dark matter haloes, filling the space between galaxies, and that this would explain the missing baryons not accounted for in the 2017 paper. == Current state == Currently, many groups have observed the intergalactic medium and circum-galactic medium to obtain more measurements and observations of baryons to support the leading observations. In cosmology, the missing baryon problem is an observed discrepancy between the amount of baryonic matter detected from shortly after the Big Bang and from more recent epochs.

Question 1
Many of these systems evolve in a self-similar fashion in the sense that data obtained from the snapshot at any fixed time is similar to the respective data taken from the snapshot of any earlier or later time. Many other seemingly disparate systems which are found to exhibit dynamic scaling. The form of their proposal for dynamic scaling was: :f(x,t)\sim t^{-w}x^{-\tau} \varphi \left( \frac x {t^z} \right), where the exponents satisfy the following relation: :w=(2-\tau)z. == Test for dynamic scaling == In such systems we can define a certain time-dependent stochastic variable x. Dynamic scaling (sometimes known as Family-Vicsek scaling) is a litmus test that shows whether an evolving system exhibits self-similarity. Essentially such systems can be termed as temporal self-similarity since the same system is similar at different times. == Examples == Many phenomena investigated by physicists are not static but evolve probabilistically with time (i.e. Stochastic process).
3.6 推理
3.6.1 加载测试集
import torch
import numpy as np
import pandas as pd
from datasets import Dataset
from transformers import AutoTokenizer
from transformers import AutoModelForMultipleChoice, TrainingArguments, Trainer

test_df = pd.read_csv("test_context.csv")
test_df["prompt"] = test_df["context"] + " #### " +  test_df["prompt"]
#test_df["prompt"] = test_df["context"].apply(lambda x: x[:1750]) + " #### " +  test_df["prompt"]
test_df=test_df.drop(columns=['context'])

# 添加答案列以保持和训练集格式一致,这样可以使用和训练集一样的预处理函数
test_df['answer'] = 'A'
test_df.head(3)
3.6.2 定义预处理函数和后处理函数
下面定义预处理函数,用于将待推理数据编码为多选问答需要的格式;定义后处理 函数,将推理结果转为提交的格式,这部分和方法1中完全一样。
- 将问题和5个答案选项组合,并进行解码
options = 'ABCDE'
indices = list(range(5))
option_to_index = {option: index for option, index in zip(options, indices)}
index_to_option = {index: option for option, index in zip(options, indices)}

def preprocess(example):
    # AutoModelForMultipleChoice 需要的是question/answer对,所以问题被复制5次
    first_sentence = [example['prompt']] * 5
    second_sentence = []
    # 遍历选项(A 到 E)并将它们添加到 second_sentence 列表中
    for option in options:
        second_sentence.append(example[option])

    tokenized_example = tokenizer(first_sentence, second_sentence, truncation=True)
    # 将答案映射为索引,并将其添加到 tokenized_example 中作为标签
    tokenized_example['label'] = option_to_index[example['answer']]
    return tokenized_example
可以看到,每个样本的问题被重复5次后和5个选项合并,解码后的结果input_ids、token_type_ids、attention_mask都是5个元素的嵌套列表,等于一个样本被拆成5个样本。
- 定义data_collator
#  datacollator 来自 https://huggingface.co/docs/transformers/tasks/multiple_choice
# 每个batch中对问答对进行动态填充(dynamically pad),所以不需要将每个问答对都填充到模型最大序列长度
from dataclasses import dataclass
from transformers.tokenization_utils_base import PreTrainedTokenizerBase, PaddingStrategy
from typing import Optional, Union

@dataclass
class DataCollatorForMultipleChoice:
    tokenizer: PreTrainedTokenizerBase
    padding: Union[bool, str, PaddingStrategy] = True
    max_length: Optional[int] = None
    pad_to_multiple_of: Optional[int] = None

    def __call__(self, features):
        # features就是4个样本(batch size=4)
        label_name = "label" if 'label' in features[0].keys() else 'labels'
        # 对每个样本(feature,字典格式)使用pop删除key为label的键值对,返回被删除的值
        # 所以feature被删除了label键值对,而labels的值是四个样本label列表[0, 0, 1, 0]
        labels = [feature.pop(label_name) for feature in features]
        batch_size = len(features)  						# 批次大小
        num_choices = len(features[0]['input_ids'])			# 选项数
        flattened_features = [
            [{k: v[i] for k, v in feature.items()} for i in range(num_choices)] for feature in features
        ]
        flattened_features = sum(flattened_features, [])

        batch = self.tokenizer.pad(
            flattened_features,
            padding=self.padding,
            max_length=self.max_length,
            pad_to_multiple_of=self.pad_to_multiple_of,
            return_tensors='pt',
        )
        batch = {k: v.view(batch_size, num_choices, -1) for k, v in batch.items()}
        batch['labels'] = torch.tensor(labels, dtype=torch.int64)
        return batch
最终返回的batch格式为:
{'input_ids': tensor([[[ 101, 2627...,    0]]]),
'token_type_ids': tensor([[[0, 0, 0,  ..., 0, 0]]]),
'attention_mask': tensor([[[1, 1, 1,  ..., 0, 0]]]),
'labels': tensor([0, 0, 1, 0])}
- 定义后处理函数,用于将预测结果(概率)转为比赛规定的提交格式
def predictions_to_map_output(predictions):
    sorted_answer_indices = np.argsort(-predictions)
    top_answer_indices = sorted_answer_indices[:,:3] # Get the first three answers in each row
    top_answers = np.vectorize(index_to_option.get)(top_answer_indices)
    return np.apply_along_axis(lambda row: ' '.join(row), 1, top_answers)
3.6.3 开始推理
3.6.3.1 使用trainer进行推理(方法7)
方法7加载llm-se-debertav3-large模型,方法8加载llm-science-run-context-2模型
- 加载模型和分词器
model_dir = "/kaggle/input/llm-se-debertav3-large"
tokenizer = AutoTokenizer.from_pretrained(model_dir)
model = AutoModelForMultipleChoice.from_pretrained(model_dir)
model.eval()
- 数据预处理
test_ds = Dataset.from_pandas(test_df)
# 使用数据集映射(map)预处理函数到训练数据集,同时删除不需要的列
tokenized_test_ds = test_ds.map(preprocess, batched=False, remove_columns=['prompt', 'A', 'B', 'C', 'D', 'E', 'answer'])
tokenized_test_ds
Dataset({
    features: ['input_ids', 'token_type_ids', 'attention_mask', 'label'],
    num_rows: 200
})
- 开启训练
trainer = Trainer(
    model=model,
    tokenizer=tokenizer,
    data_collator=DataCollatorForMultipleChoice(tokenizer=tokenizer)
)

test_predictions = trainer.predict(tokenized_test_ds)
- 提交结果
submission_df = pd.DataFrame({"id": np.arange(len(test_df))})
submission_df['prediction'] = predictions_to_map_output(test_predictions.predictions)
submission_df.to_csv('submission.csv', index=False)
submission_df.head()
  id	prediction
0	0	D B A
1	1	A B E
2	2	A C D
3	3	C E B
4	4	D A B
3.6.3.2 使用Pytorch进行推理(方法8)
model_dir = "/kaggle/input/llm-science-run-context-2"
tokenizer = AutoTokenizer.from_pretrained(model_dir)
model = AutoModelForMultipleChoice.from_pretrained(model_dir)
model.eval()
from torch.utils.data import DataLoader

tokenized_test_dataset = Dataset.from_pandas(test_df).map(preprocess, remove_columns=['prompt', 'A', 'B', 'C', 'D', 'E', 'answer'])
data_collator = DataCollatorForMultipleChoice(tokenizer=tokenizer)
test_dataloader = DataLoader(tokenized_test_dataset, batch_size=1, shuffle=False, collate_fn=data_collator)
test_predictions = []
for batch in test_dataloader:
    for k in batch.keys():
        batch[k] = batch[k].cuda()
    with torch.no_grad():
        outputs = model(**batch)
    test_predictions.append(outputs.logits.cpu().detach())

test_predictions = torch.cat(test_predictions)
submission_df = pd.DataFrame({"id": np.arange(len(test_df))})
submission_df['prediction'] = predictions_to_map_output(test_predictions)
submission_df.to_csv('submission.csv', index=False)
submission_df.head()
  id	prediction
0	0	D B E
1	1	A B D
2	2	A D B
3	3	C D E
4	4	D A B
方法7使用的是llm-se-debertav3-large模型,得分是0.771。如果改成llm-science-run-context-2(方法8的模型,经过额外数据集训练),得分会是0.807。不使用openbook方法,直接用llm-science-run-context-2模型进行推理,得分是0.746。
Tips:有一版我导出这篇博客的md格式,使用
jupytext --set-formats ipynb,md filename.md将其转为ipynb格式,上传到kaggle上跑第一遍没有问题,但是提交后显示Submission CSV Not Found,而我明明是有保存提交文件的,output中也看得到。
后面在本地jupyterlab中打开这份ipynb文件报错,估计是这个原因导致最后提交没有结果。后面将md文件在jupyterlab中以ipynb打开,再保存为ipynb格式,导入kaggle,提交比赛,就没问题了。

