Linux系统下文件的基本管理和 XFS 文件系统的备份恢复
文件的基本管理和 XFS 文件系统备份恢复
-
Linux系统目录结构和相对绝对路径
1.1## Linux系统目录结构
在WIN 系统中,查看文件先进入相应的盘符,然后进入文件目彔,比如 C:/ D:/ 等等
在Linux系统中,只有一个/(反斜杠这样的根目录)
使用tree命令可以查看Linux系统中的文件结构(如果没有需要手动安装)
[root@linux ~]# tree #查看指定目录下文件树形结构
.
├── anaconda-ks.cfg
├── Desktop
├── Documents
├── Downloads
├── initial-setup-ks.cfg
├── Music
├── Pictures
├── Public
├── Templates
└── Videos

8 directories, 2 files
安装tree命令(联网环境下)
[root@linux ~]# yum install tree #安装tree
Last metadata expiration check: 0:58:01 ago on Sun 06 Jun 2021 07:30:23 PM CST.
Package tree-1.7.0-15.el8.x86_64 is already installed.
Dependencies resolved.
Nothing to do.
Complete!
安装tree命令(非联网环境下,使用本地yum源)(首先是光盘镜像挂在,在Linux中所有的光盘镜像必须挂在才可正常使用)(/dev/cdrom 是 /dev/sr0 的软连接(软硬链接后期会在笔记中写到),两个都可以挂载)
[root@linux ~]# mount /dev/sr0 /mnt/ #将光盘镜像挂载到/mnt/目录下
mount: /mnt: WARNING: device write-protected, mounted read-only.
[root@linux ~]# mount /dev/cdrom /mnt/ #将光盘镜像挂载到/mnt/目录下
mount: /mnt: /dev/sr0 already mounted on /run/media/jz/CentOS-8-1-1911-x86_64-dvd.
[root@linux ~]# ll /dev/cdrom
lrwxrwxrwx. 1 root root 3 Jun  6 19:20 /dev/cdrom -> sr0
挂载完成之后安装tree命令(执行命令安装完成,相关命令可以按tab键补齐)
[root@linux ~]# rpm -ivh /mnt/BaseOS/Packages/tree-1.7.0-15.el8.x86_64.rpm
warning: /mnt/BaseOS/Packages/tree-1.7.0-15.el8.x86_64.rpm: Header V3 RSA/SHA256 Sign
ature, key ID 8483c65d: NOKEYVerifying...                          ################################# [100%]
Preparing...                          ################################# [100%]
	package tree-1.7.0-15.el8.x86_64 is already installed
centos8下的yum变化(在centos8中,yum命令已经变为dnf(不是地下城勇士),在centos8中,yum已经成为dnf-3的软连接,在centos8中用dnf命令安装软件会非常常用)
[root@linux ~]# ll /usr/bin/yum
lrwxrwxrwx. 1 root root 5 Nov 12  2019 /usr/bin/yum -> dnf-3
[root@linux ~]# dnf install
install        install-n      install-na     install-nevra
[root@linux ~]# dnf install tree
CentOS-8 - AppStream                                 1.9 kB/s | 4.3 kB     00:02
CentOS-8 - Base                                      1.6 kB/s | 3.9 kB     00:02
CentOS-8 - Extras                                    1.0 kB/s | 1.5 kB     00:01
Package tree-1.7.0-15.el8.x86_64 is already installed.
Dependencies resolved.
Nothing to do.
Complete!
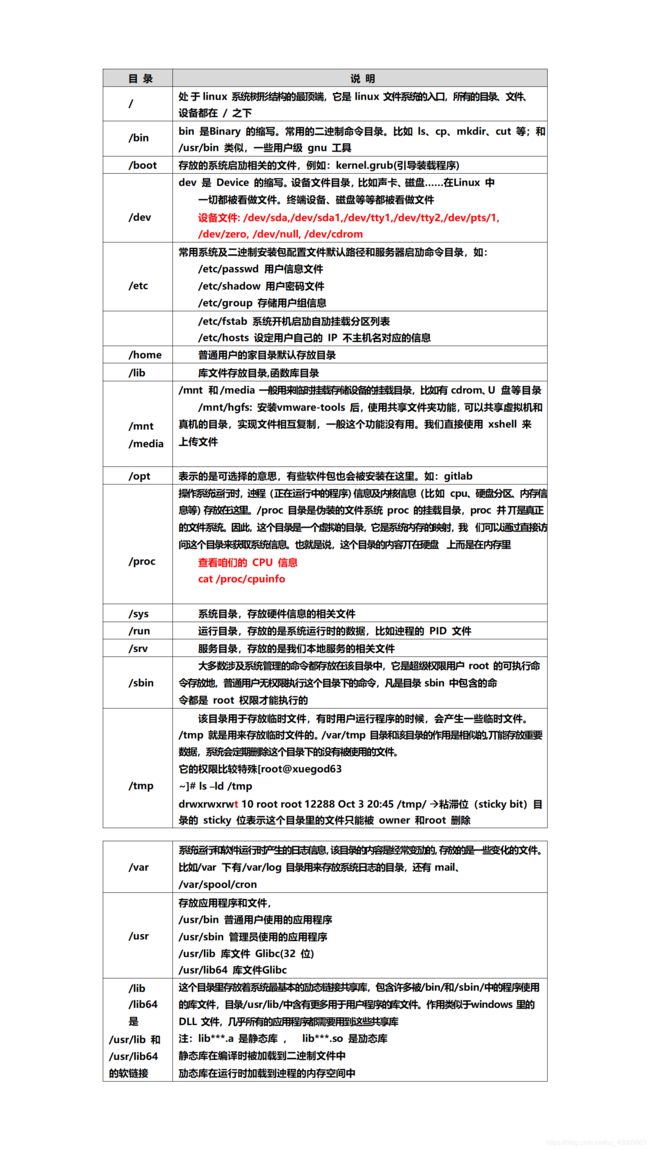
1.2## 认识Linux系统中根目录下的每个文件
/根目录下的文件(后面每个文件详细介绍)
[root@linux ~]# ls /
bin   dev  home  lib64  mnt  proc  run   srv  tmp  var
boot  etc  lib   media  opt  root  sbin  sys  usr
每个文件的介绍
1.3## 绝对路径和相对路径
路径:表示文件的位置的方式就是路径
绝对路径:在Linux 中,绝对路径是从"/(根目录)"开始的,比如/usr、/etc/passwd。如果一个路径是从根(/)开始的,它一定是绝对路径
相对路径:相对路径是以 . (当前目录)或 … (上级目录)开 始 的
我们切换到/etc/pam.d/目录下,使用pwd命令查看文件目录
[root@linux ~]# cd /etc/pam.d/ #切换到/etc/pam.d/目录下
[root@linux pam.d]# pwd #查看当前目录
/etc/pam.d
-
文件管理
2.1.1## 创建文件并编辑文件
命令:touch 作用:常用来创建空文件,如果文件存在,则修改这个文件的时间语
[root@linux ~]# cd /opt/
[root@linux opt]# touch a.txt
[root@linux opt]# ls
a.txt
[root@linux opt]# ll a.txt
-rw-r--r--. 1 root root 0 Jun  6 21:27 a.txt
[root@linux opt]# vim a.txt
[root@linux opt]# echo shutdown -10 >> a.txt
[root@linux opt]# cat a.txt
this is test file
shutdown -10
2.1.2## 创建文件夹
命令:mkdir 作用:创建目彔(加参数-p是递归创建)
[root@linux opt]# mkdir test
[root@linux opt]# ls
a.txt  test
[root@linux opt]# file test/
test/: directory
[root@linux opt]# mkdir test/a/b -p
[root@linux opt]# tree test/
test/
└── a
    └── b

2 directories, 0 files
2.2## 删除文件和目录
命令:rm 作用:可以删除一个目录中的一个或多个文件或目彔,对于链接文件,只是删除整个链接文件,而原 文件保持不变的
-f 强制删除,没有提示
-r 删除目录,递归删除,把目录下的文件和文件夹也删除
[root@linux opt]# ls
a.txt  test
[root@linux opt]# rm a.txt
rm: remove regular file 'a.txt'? y
[root@linux opt]# ls
test
[root@linux opt]# rm -r test/
rm: descend into directory 'test/'? y
rm: descend into directory 'test/a'? y
rm: remove directory 'test/a/b'? y
rm: remove directory 'test/a'? y
rm: remove directory 'test/'? y
[root@linux opt]# ls
下面的命令请谨慎使用!!!!!
[root@linux opt]# rm -rf /*
2.3## 复制和移动文件
命令:cp 源文件/目彔 目标文件/目录
选项:-R/r:递归处理,将指定目录下的所有文件包括子目录一并处理
[root@linux opt]# cp /etc/passwd ./copy
[root@linux opt]# ls
copy
[root@linux opt]# mv /etc/passwd ./copy1
[root@linux opt]# ls
copy  copy1
2.4## 查看文件
命令:cat 作用:查看文件内容,一次显示整个文件的内容
[root@linux opt]# cat copy
root:x:0:0:root:/root:/bin/bash
bin:x:1:1:bin:/bin:/sbin/nologin
...
命令:more 作用:以分页形式显示文件内容
[root@linux opt]# more copy
root:x:0:0:root:/root:/bin/bash
bin:x:1:1:bin:/bin:/sbin/nologin
...
命令:less 作用:和more 功能一样
说明:linux 中more 和 less 的区别
more:不支持后退,但几乎不需要加参数,空格键是向下翻页,Enter 键是向下翻一行,在不需要后退的情况下比较方便
less:支持前后翻滚,既可以向上翻页(pageup 键),也可以向下翻页(pagedown键),空栺键是向下翻页,Enter 键是向下翻一行
命令:head 作用: 用于显示文件的开头的内容。在默认情况下,head 命令显示文件的头10 行内容
语法:head(选顷)文件名
参数: -n 显示从文件头开始的行数
[root@linux opt]# head -3 copy
root:x:0:0:root:/root:/bin/bash
bin:x:1:1:bin:/bin:/sbin/nologin
daemon:x:2:2:daemon:/sbin:/sbin/nologin
命令:tail 作用: 用于显示文件中的尾部内容。默认在屏幕上显示指定文件的末尾 10 行
语法:tail (选顷)文件名
参数:
-n 显示文件尾部多少行的内容(n 为数字)
-f 动态显示数据(不关闭),常用来查看日志
[root@linux opt]# tail -f /var/log/secure
-
xfs文件系统的备份和恢复
XFS 提供了 xfsdump 和 xfsrestore 工具协助备份 XFS 文件系统中的数据。xfsdump 按inode 顺序备份一个XFS 文件系统。
centos7 开始选择 xfs 栺式作为默认文件系统,而丏丌再使用以前的 ext,仍然支持 ext4,xfs 与为大数据产生,每个单个文件系统最大可以支持 8eb,单个文件可以支持 16tb,不仅数据量大,而扩扩展性高。还可以通过 xfsdump,xfsrestore 来备份和恢复。
与传统的 UNIX 文件系统不同,XFS 不需要在备份前被卸载;对使用中的 XFS 文件系统做备份就可以保证镜像的一致性。XFS 的备份和恢复的过程是可以被中断然后继续的,无项冻结文件系统。xfsdump 甚至提供了高性能的多线程备份操作——它把一次 dump 拆分成多个数据流,每个数据流可以被发往不同的目的地
首先了解一下 xfsdump 的备份级别有以下两种,默认为 0(即完全备份)
0级别代表:完全备份
1到 9 级别代表:增量备份
扩展:
完全备份:每次都把指定的备份目录完整的复制一遍,不管目录下的文件有没有变化; 如:cp
增量备份:每次将之前(第一次、第二次、直到前一次)做过备份之后有变化的文件进行备份
差异备份:每次都将第一次完整备份以来有变化的文件进行备份。如: rsync 备份
首先是环境准备(关闭虚拟机,增加一块硬盘)


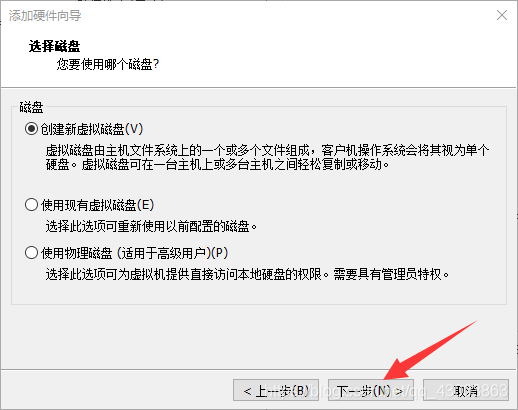


开机后对新添加的硬盘迚行栺式化
[root@linux ~]# fdisk /dev/sdb #格式化新添加的磁盘

Welcome to fdisk (util-linux 2.32.1).
Changes will remain in memory only, until you decide to write them.
Be careful before using the write command.

Device does not contain a recognized partition table.
Created a new DOS disklabel with disk identifier 0x4cda885d.

Command (m for help): n #创建新的分区
Partition type
   p   primary (0 primary, 0 extended, 4 free)
   e   extended (container for logical partitions)
Select (default p): p #选择主分区
Partition number (1-4, default 1):  #直接回车,默认为第一个分区号
First sector (2048-41943039, default 2048):  #起始扇区,直接回车,默认为2048
Last sector, +sectors or +size{K,M,G,T,P} (2048-41943039, default 41943039): +1G #指定分区大小,这里指定为1G,如果不指定回车,默认为20G

Created a new partition 1 of type 'Linux' and of size 1 GiB.

Command (m for help): w #保存并退出
The partition table has been altered.
Calling ioctl() to re-read partition table.
Syncing disks.

[root@linux ~]# ls /dev/sd* #查看分区是否成功
/dev/sda  /dev/sda1  /dev/sda2  /dev/sda3  /dev/sdb  /dev/sdb1

[root@linux ~]# mkfs.xfs /dev/sdb1 #格式化为xfs文件格式
meta-data=/dev/sdb1              isize=512    agcount=4, agsize=65536 blks
         =                       sectsz=512   attr=2, projid32bit=1
         =                       crc=1        finobt=1, sparse=1, rmapbt=0
         =                       reflink=1
data     =                       bsize=4096   blocks=262144, imaxpct=25
         =                       sunit=0      swidth=0 blks
naming   =version 2              bsize=4096   ascii-ci=0, ftype=1
log      =internal log           bsize=4096   blocks=2560, version=2
         =                       sectsz=512   sunit=0 blks, lazy-count=1
realtime =none                   extsz=4096   blocks=0, rtextents=0
创建挂载点并挂载,在挂载点目录下面准备备份文件
[root@linux ~]# mkdir /test
[root@linux ~]# mount /dev/sdb1 /test/
[root@linux ~]# cd /test/
[root@linux test]# ls -a
.  ..
[root@linux test]# cp /etc/passwd ./
[root@linux test]# ls
passwd
[root@linux test]# mkdir test
[root@linux test]# ls
passwd  test
[root@linux test]# touch ./test/a.txt
[root@linux test]# touch ./test/b.txt
[root@linux test]# ls
passwd  test
[root@linux test]# tree
.
├── passwd
└── test
    ├── a.txt
    └── b.txt

1 directory, 3 files
备份数据
备份整个分区。(这个功能就像是虚拟机的快照,服务器被黑后,进行快速恢复)
xfsdump -f 备份完后,数据存放的位置要备份路径或设备文件
注意:备份的路径这里不能写成/test/。 可以是/dev/sdb1 或/test 即目目录后不能有/
[root@linux test]# xfsdump -f /opt/dump_sdb1 /dev/sdb1 #备份到/opt/并命名为dump_sdb1  #被备份的文件为/dev/sdb1
xfsdump: using file dump (drive_simple) strategy
xfsdump: version 3.1.8 (dump format 3.0) - type ^C for status and control

 ============================= dump label dialog ==============================

please enter label for this dump session (timeout in 300 sec)
 -> dump_sdb1 #起一个备份名称,方便以后查询
session label entered: "dump_sdb1"

 --------------------------------- end dialog ---------------------------------

xfsdump: level 0 dump of linux:/test
xfsdump: dump date: Mon Jun  7 00:26:25 2021
xfsdump: session id: 20dbc356-4359-4890-9331-b796ae17037b
xfsdump: session label: "dump_sdb1"
xfsdump: ino map phase 1: constructing initial dump list
xfsdump: ino map phase 2: skipping (no pruning necessary)
xfsdump: ino map phase 3: skipping (only one dump stream)
xfsdump: ino map construction complete
xfsdump: estimated dump size: 26176 bytes

 ============================= media label dialog =============================

please enter label for media in drive 0 (timeout in 300 sec)
 -> sdb1 #被备份的媒介,一般写被备份的文件描述
media label entered: "sdb1"

 --------------------------------- end dialog ---------------------------------

xfsdump: creating dump session media file 0 (media 0, file 0)
xfsdump: dumping ino map
xfsdump: dumping directories
xfsdump: dumping non-directory files
xfsdump: ending media file
xfsdump: media file size 26200 bytes
xfsdump: dump size (non-dir files) : 2592 bytes
xfsdump: dump complete: 21 seconds elapsed
xfsdump: Dump Summary:
xfsdump:   stream 0 /opt/dump_sdb1 OK (success)
xfsdump: Dump Status: SUCCESS #备份成功
[root@linux test]# df -T #查看分区文件类型
Filesystem     Type     1K-blocks    Used Available Use% Mounted on
devtmpfs       devtmpfs    989504       0    989504   0% /dev
tmpfs          tmpfs      1006124       0   1006124   0% /dev/shm
tmpfs          tmpfs      1006124    9552    996572   1% /run
tmpfs          tmpfs      1006124       0   1006124   0% /sys/fs/cgroup
/dev/sda3      xfs       52403200 5175028  47228172  10% /
/dev/sda1      xfs        1038336  162504    875832  16% /boot
tmpfs          tmpfs       201224    1168    200056   1% /run/user/42
tmpfs          tmpfs       201224       4    201220   1% /run/user/0
/dev/sdb1      xfs        1038336   40372    997964   4% /test
指定备份时免交互操作,方便后期做定时备份
-L :xfsdump 记录每次备份的 session 会话的标头,这里写对此次备份的说明。如:
dump_sdb1_v2 ,可以随意写
-M :-M 储存设备的标签,这里写对 sdb1 用途的简易描述。如:
sdb1_sec ,可以随意写
[root@linux test]# xfsdump -f /opt/dump_sdb1_v2 /dev/sdb1 -L dump_sdb1_v2 -M sdb1_sec
ond_dumpxfsdump: using file dump (drive_simple) strategy
xfsdump: version 3.1.8 (dump format 3.0) - type ^C for status and control
xfsdump: level 0 dump of linux:/test
xfsdump: dump date: Mon Jun  7 00:40:13 2021
xfsdump: session id: 190c59ff-33b1-4be7-870e-5cd7cec6da18
xfsdump: session label: "dump_sdb1_v2"
xfsdump: ino map phase 1: constructing initial dump list
xfsdump: ino map phase 2: skipping (no pruning necessary)
xfsdump: ino map phase 3: skipping (only one dump stream)
xfsdump: ino map construction complete
xfsdump: estimated dump size: 26176 bytes
xfsdump: creating dump session media file 0 (media 0, file 0)
xfsdump: dumping ino map
xfsdump: dumping directories
xfsdump: dumping non-directory files
xfsdump: ending media file
xfsdump: media file size 26200 bytes
xfsdump: dump size (non-dir files) : 2592 bytes
xfsdump: dump complete: 2 seconds elapsed
xfsdump: Dump Summary:
xfsdump:   stream 0 /opt/dump_sdb1_v2 OK (success)
xfsdump: Dump Status: SUCCESS #备份成功
指定只备份分区中某个目彔
参数:-s 文件路径 只对指定的文件迚行备份,-s 指定时,路径写的是相对路径(-s 可以是文件或目录)
[root@linux test]# xfsdump -f /opt/test_dump -s test /dev/sdb1 -L test_dump -M sdb1 #/test/sdb1也可以写成/test
xfsdump: using file dump (drive_simple) strategy
xfsdump: version 3.1.8 (dump format 3.0) - type ^C for status and control
xfsdump: level 0 dump of linux:/test
xfsdump: dump date: Mon Jun  7 00:53:09 2021
xfsdump: session id: 6dc75fdf-4e24-458c-8f63-721dc8835968
xfsdump: session label: "test_dump"
xfsdump: ino map phase 1: constructing initial dump list
xfsdump: ino map phase 2: skipping (no pruning necessary)
xfsdump: ino map phase 3: skipping (only one dump stream)
xfsdump: ino map construction complete
xfsdump: estimated dump size: 21760 bytes
xfsdump: creating dump session media file 0 (media 0, file 0)
xfsdump: dumping ino map
xfsdump: dumping directories
xfsdump: dumping non-directory files
xfsdump: ending media file
xfsdump: media file size 22984 bytes
xfsdump: dump size (non-dir files) : 0 bytes
xfsdump: dump complete: 2 seconds elapsed
xfsdump: Dump Summary:
xfsdump:   stream 0 /opt/test_dump OK (success)
xfsdump: Dump Status: SUCCESS #备份成功
删除数据
[root@linux test]# ls
passwd  test
[root@linux test]# pwd
/test
[root@linux test]# rm -rf ./* #删除数据
[root@linux test]# ls
备份
[root@linux test]# xfsrestore -f /opt/dump_sdb1 /test/ #备份到根目录下的test目录下
xfsrestore: using file dump (drive_simple) strategy
xfsrestore: version 3.1.8 (dump format 3.0) - type ^C for status and control
xfsrestore: searching media for dump
xfsrestore: examining media file 0
xfsrestore: dump description:
xfsrestore: hostname: linux
xfsrestore: mount point: /test
xfsrestore: volume: /dev/sdb1
xfsrestore: session time: Mon Jun  7 00:26:25 2021
xfsrestore: level: 0
xfsrestore: session label: "dump_sdb1"
xfsrestore: media label: "sdb1"
xfsrestore: file system id: 95484287-9ae3-4778-87b8-b87727e7b541
xfsrestore: session id: 20dbc356-4359-4890-9331-b796ae17037b
xfsrestore: media id: aa922d6a-d98b-41d2-8dfb-73c9dd2e0a83
xfsrestore: using online session inventory
xfsrestore: searching media for directory dump
xfsrestore: reading directories
xfsrestore: 2 directories and 4 entries processed
xfsrestore: directory post-processing
xfsrestore: restoring non-directory files
xfsrestore: restore complete: 0 seconds elapsed
xfsrestore: Restore Summary:
xfsrestore:   stream 0 /opt/dump_sdb1 OK (success)
xfsrestore: Restore Status: SUCCESS #备份成功
[root@linux test]# ls
passwd  test
[root@linux test]# tree
.
├── passwd
└── test
    ├── a.txt
    └── b.txt

1 directory, 3 files
指定备份单个文件
[root@linux test]# xfsrestore -f /opt/dump_sdb1 -s test /test/11/ #将dump_sdb1备份数据中的test数据单个备份到/test/11目录下
xfsrestore: using file dump (drive_simple) strategy
xfsrestore: version 3.1.8 (dump format 3.0) - type ^C for status and control
xfsrestore: searching media for dump
xfsrestore: examining media file 0
xfsrestore: dump description:
xfsrestore: hostname: linux
xfsrestore: mount point: /test
xfsrestore: volume: /dev/sdb1
xfsrestore: session time: Mon Jun  7 00:26:25 2021
xfsrestore: level: 0
xfsrestore: session label: "dump_sdb1"
xfsrestore: media label: "sdb1"
xfsrestore: file system id: 95484287-9ae3-4778-87b8-b87727e7b541
xfsrestore: session id: 20dbc356-4359-4890-9331-b796ae17037b
xfsrestore: media id: aa922d6a-d98b-41d2-8dfb-73c9dd2e0a83
xfsrestore: using online session inventory
xfsrestore: searching media for directory dump
xfsrestore: reading directories
xfsrestore: 2 directories and 4 entries processed
xfsrestore: directory post-processing
xfsrestore: restoring non-directory files
xfsrestore: restore complete: 0 seconds elapsed
xfsrestore: Restore Summary:
xfsrestore:   stream 0 /opt/dump_sdb1 OK (success)
xfsrestore: Restore Status: SUCCESS
[root@linux test]# tree #查看是否备份成功
.
├── 11
│   └── test
│       ├── a.txt
│       └── b.txt
├── passwd
└── test
    ├── a.txt
    └── b.txt

3 directories, 5 files
使用 xfsdump 时,请注意下面下面的几个限制:
1、xfsdump 不支持没有挂载的文件系统备份!所以只能备份已挂载的
2、xfsdump 必项使用 root 的权限才能操作 (涉及文件系统的关系)
3、xfsdump 只能备份 XFS 文件系统
4、xfsdump 备份下来的数据 (档案或储存媒体) 只能让 xfsrestore 解析
5、xfsdump 是通过文件系统的 UUID 来分辨各个备份档的,因此不能备份两个具有相同UUID 的文件系统
增量备份
概念
增量备份是指在一次全备份或上一次增量备份后,以后每次的备份只需备份与前一次相比增加或者被修改的文件。这就意味着,第一次增量备份的对象是进行全备后所产生的增加和修改的文件;
第二次增量备份的对象是进行第一次增量备份后所产生的增加和修改的文件,以此类推。
优缺点
优点:没有重复的备份数据,因此备份的数据量不大,备份所需的时间很短。
缺点:增量备份的数据恢复比较麻烦,它必项具有上一次全量备份和所有增量备份的内容才能够完全恢复成功,并且他们必须沿着从全备份到依次增量备份的时间顺序反推恢复,可能会延长回复时间。
第一次完整备份
[root@linux test]# xfsdump -f /opt/test_full /test -L test_full -M sdb1
xfsdump: using file dump (drive_simple) strategy
xfsdump: version 3.1.8 (dump format 3.0) - type ^C for status and control
xfsdump: level 0 dump of linux:/test
xfsdump: dump date: Mon Jun  7 01:24:37 2021
xfsdump: session id: b9c5b5d7-3221-4ebb-9dc9-fbc9b45a120a
xfsdump: session label: "test_full"
xfsdump: ino map phase 1: constructing initial dump list
xfsdump: ino map phase 2: skipping (no pruning necessary)
xfsdump: ino map phase 3: skipping (only one dump stream)
xfsdump: ino map construction complete
xfsdump: estimated dump size: 27456 bytes
xfsdump: creating dump session media file 0 (media 0, file 0)
xfsdump: dumping ino map
xfsdump: dumping directories
xfsdump: dumping non-directory files
xfsdump: ending media file
xfsdump: media file size 28776 bytes
xfsdump: dump size (non-dir files) : 2592 bytes
xfsdump: dump complete: 2 seconds elapsed
xfsdump: Dump Summary:
xfsdump:   stream 0 /opt/test_full OK (success)
xfsdump: Dump Status: SUCCESS
增加内容
[root@linux test]# touch /test/1.txt 2.txt
[root@linux test]# tree
.
├── 11
│   └── test
│       ├── a.txt
│       └── b.txt
├── 1.txt
├── 2.txt
├── passwd
└── test
    ├── a.txt
    └── b.txt

3 directories, 7 files
第一次增量备份(指定备份等级为1)
[root@linux test]# xfsdump -l 1 -f /opt/test_back1 /test -L test_back1 -M sdb1
xfsdump: using file dump (drive_simple) strategy
xfsdump: version 3.1.8 (dump format 3.0) - type ^C for status and control
xfsdump: level 1 incremental dump of linux:/test based on level 0 dump begun Mon Jun
 7 01:24:37 2021xfsdump: dump date: Mon Jun  7 01:30:13 2021
xfsdump: session id: 2e8f82d3-2824-489a-908a-1d1ab2eb3b89
xfsdump: session label: "test_back1"
xfsdump: ino map phase 1: constructing initial dump list
xfsdump: ino map phase 2: pruning unneeded subtrees
xfsdump: ino map phase 3: skipping (only one dump stream)
xfsdump: ino map construction complete
xfsdump: estimated dump size: 21440 bytes
xfsdump: creating dump session media file 0 (media 0, file 0)
xfsdump: dumping ino map
xfsdump: dumping directories
xfsdump: dumping non-directory files
xfsdump: ending media file
xfsdump: media file size 22392 bytes
xfsdump: dump size (non-dir files) : 0 bytes
xfsdump: dump complete: 2 seconds elapsed
xfsdump: Dump Summary:
xfsdump:   stream 0 /opt/test_back1 OK (success)
xfsdump: Dump Status: SUCCESS
增加点数据,进行第二次增量备份(备份等级指定为2)
[root@linux test]# touch /test/test/1.txt 2.txt 3.txt #增加数据
[root@linux test]# tree
.
├── 11
│   └── test
│       ├── a.txt
│       └── b.txt
├── 1.txt
├── 2.txt
├── 3.txt
├── passwd
└── test
    ├── 1.txt
    ├── a.txt
    └── b.txt

3 directories, 9 files
[root@linux test]# xfsdump -l 2 -f /opt/test_back2 /test -L test_back2 -M sdb1
xfsdump: using file dump (drive_simple) strategy
xfsdump: version 3.1.8 (dump format 3.0) - type ^C for status and control
xfsdump: level 2 incremental dump of linux:/test based on level 1 dump begun Mon Jun
 7 01:30:13 2021xfsdump: dump date: Mon Jun  7 01:33:25 2021
xfsdump: session id: 4bc631a6-a3d0-43b5-a15b-0d8c9b0ae8fc
xfsdump: session label: "test_back2"
xfsdump: ino map phase 1: constructing initial dump list
xfsdump: ino map phase 2: pruning unneeded subtrees
xfsdump: ino map phase 3: skipping (only one dump stream)
xfsdump: ino map construction complete
xfsdump: estimated dump size: 22080 bytes
xfsdump: creating dump session media file 0 (media 0, file 0)
xfsdump: dumping ino map
xfsdump: dumping directories
xfsdump: dumping non-directory files
xfsdump: ending media file
xfsdump: media file size 23728 bytes
xfsdump: dump size (non-dir files) : 0 bytes
xfsdump: dump complete: 2 seconds elapsed
xfsdump: Dump Summary:
xfsdump:   stream 0 /opt/test_back2 OK (success)
xfsdump: Dump Status: SUCCESS
恢复数据
[root@linux test]# xfsrestore -f /opt/test_full /test/ #先恢复完全备份的数据
xfsrestore: using file dump (drive_simple) strategy
xfsrestore: version 3.1.8 (dump format 3.0) - type ^C for status and control
xfsrestore: searching media for dump
xfsrestore: examining media file 0
xfsrestore: dump description:
xfsrestore: hostname: linux
xfsrestore: mount point: /test
xfsrestore: volume: /dev/sdb1
xfsrestore: session time: Mon Jun  7 01:24:37 2021
xfsrestore: level: 0
xfsrestore: session label: "test_full"
xfsrestore: media label: "sdb1"
xfsrestore: file system id: 95484287-9ae3-4778-87b8-b87727e7b541
xfsrestore: session id: b9c5b5d7-3221-4ebb-9dc9-fbc9b45a120a
xfsrestore: media id: 16a0e013-6ba9-478a-8732-14109c4308d6
xfsrestore: using online session inventory
xfsrestore: searching media for directory dump
xfsrestore: reading directories
xfsrestore: 4 directories and 8 entries processed
xfsrestore: directory post-processing
xfsrestore: restoring non-directory files
xfsrestore: restore complete: 0 seconds elapsed
xfsrestore: Restore Summary:
xfsrestore:   stream 0 /opt/test_full OK (success)
xfsrestore: Restore Status: SUCCESS
[root@linux test]# ls
11  passwd  test
[root@linux test]# tree
.
├── 11
│   └── test
│       ├── a.txt
│       └── b.txt
├── passwd
└── test
    ├── a.txt
    └── b.txt

3 directories, 5 files
[root@linux test]# xfsrestore -f /opt/test_back1 /test/ #再恢复第一次增量备份的数据
xfsrestore: using file dump (drive_simple) strategy
xfsrestore: version 3.1.8 (dump format 3.0) - type ^C for status and control
xfsrestore: searching media for dump
xfsrestore: examining media file 0
xfsrestore: dump description:
xfsrestore: hostname: linux
xfsrestore: mount point: /test
xfsrestore: volume: /dev/sdb1
xfsrestore: session time: Mon Jun  7 01:30:13 2021
xfsrestore: level: 1
xfsrestore: session label: "test_back1"
xfsrestore: media label: "sdb1"
xfsrestore: file system id: 95484287-9ae3-4778-87b8-b87727e7b541
xfsrestore: session id: 2e8f82d3-2824-489a-908a-1d1ab2eb3b89
xfsrestore: media id: 918b3c1b-2e66-4a0d-9d86-7a3400dbb662
xfsrestore: using online session inventory
xfsrestore: searching media for directory dump
xfsrestore: reading directories
xfsrestore: 1 directories and 5 entries processed
xfsrestore: directory post-processing
xfsrestore: restoring non-directory files
xfsrestore: restore complete: 0 seconds elapsed
xfsrestore: Restore Summary:
xfsrestore:   stream 0 /opt/test_back1 OK (success)
xfsrestore: Restore Status: SUCCESS
[root@linux test]# tree
.
├── 11
│   └── test
│       ├── a.txt
│       └── b.txt
├── 1.txt
├── 2.txt
├── passwd
└── test
    ├── a.txt
    └── b.txt

3 directories, 7 files
[root@linux test]# xfsrestore -f /opt/test_back2 /test/ #再恢复第二次增量备份的数据
xfsrestore: using file dump (drive_simple) strategy
xfsrestore: version 3.1.8 (dump format 3.0) - type ^C for status and control
xfsrestore: searching media for dump
xfsrestore: examining media file 0
xfsrestore: dump description:
xfsrestore: hostname: linux
xfsrestore: mount point: /test
xfsrestore: volume: /dev/sdb1
xfsrestore: session time: Mon Jun  7 01:33:25 2021
xfsrestore: level: 2
xfsrestore: session label: "test_back2"
xfsrestore: media label: "sdb1"
xfsrestore: file system id: 95484287-9ae3-4778-87b8-b87727e7b541
xfsrestore: session id: 4bc631a6-a3d0-43b5-a15b-0d8c9b0ae8fc
xfsrestore: media id: 3ed8c6b8-9ad1-4084-843b-4c6c21eff6c8
xfsrestore: using online session inventory
xfsrestore: searching media for directory dump
xfsrestore: reading directories
xfsrestore: 2 directories and 9 entries processed
xfsrestore: directory post-processing
xfsrestore: restoring non-directory files
xfsrestore: restore complete: 0 seconds elapsed
xfsrestore: Restore Summary:
xfsrestore:   stream 0 /opt/test_back2 OK (success)
xfsrestore: Restore Status: SUCCESS
[root@linux test]# tree #至此,数据恢复成功
.
├── 11
│   └── test
│       ├── a.txt
│       └── b.txt
├── 1.txt
├── 2.txt
├── 3.txt
├── passwd
└── test
    ├── 1.txt
    ├── a.txt
    └── b.txt

3 directories, 9 files
我们下期接着分享。