java实现电子发票中的发票税号等信息识别的几种可用方案
先说一下背景:
今天领导突然说需要做一个电子发票中发票税号的识别,于是乎就开始去调研看有哪些方案,最先想到的就是OCR文字识别,自己去画框训练模型去识别税号等相关信息
话不多说开整思路:
思路一:百度AI平台去直接调用
思路二:自己基于模型训练
思路三:基于本地化代码识别票据中信息
这几种思路接下来我都会详细展开说,且每种方式的优缺点博主也会说清楚,仅供大家参考
思路一:百度AI平台去直接调用
-
百度OCR识别介绍
官网地址:OCR文字识别_免费试用_图片转文字-百度AI开放平台
你还别说,百度这几个模块想当成熟,模型训练的很好
-
使用方式
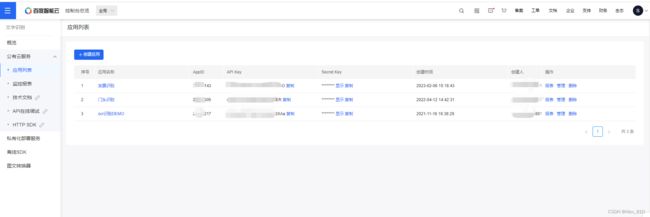
使用百度账号登录,创建应用,比较重要的是API KEY 和 SECRET KEY
服务与支持-自助服务-自助工具
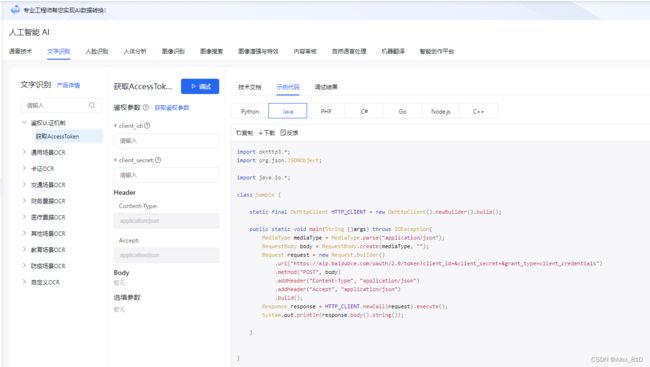
3.代码调用:(java)
-
加入依赖
    com.baidu.aip
    java-sdk
    4.16.5


    com.baidubce
    api-explorer-sdk
    1.0.3.1


    com.squareup.okhttp3
    okhttp
    3.10.0
-
创建工具类
FileUtil,Base64Util,HttpUtil,GsonUtils 工具类从下面链接下载
https://ai.baidu.com/file/658A35ABAB2D404FBF903F64D47C1F72
https://ai.baidu.com/file/C8D81F3301E24D2892968F09AE1AD6E2
https://ai.baidu.com/file/544D677F5D4E4F17B4122FBD60DB82B3
https://ai.baidu.com/file/470B3ACCA3FE43788B5A963BF0B625F3-
获取 Token 类
import org.json.JSONObject;

import java.io.BufferedReader;
import java.io.InputStreamReader;
import java.net.HttpURLConnection;
import java.net.URL;
import java.util.List;
import java.util.Map;

/**
 * 获取token类
 */
public class AuthService {

    /**
     * 获取权限token
     * @return 返回示例:
     * {
     * "access_token": "24.46ad247221975.2592000.1491995545.282335-1234567",
     * "expires_in": 2592000
     * }
     */
    public static String getAuth() {
        // 官网获取的 API Key 更新为你注册的
        String clientId = "74AHm9bwIfrVU16EDF9uxXbO";
        // 官网获取的 Secret Key 更新为你注册的
        String clientSecret = "c1fzjB8jy8GmLfe8rzMzvDZYheklTZNh";
        return getAuth(clientId, clientSecret);
    }

    public static void main(String[] args) {
        System.out.println(getAuth());
    }

    /**
     * 获取API访问token
     * 该token有一定的有效期,需要自行管理,当失效时需重新获取.
     * @param ak - 百度云官网获取的 API Key
     * @param sk - 百度云官网获取的 Secret Key
     * @return assess_token 示例:
     * "24.460da4889caad24cccdb1fea17221975.2592000.1491995545.282335-1234567"
     */
    public static String getAuth(String ak, String sk) {
        // 获取token地址
        String authHost = "https://aip.baidubce.com/oauth/2.0/token?";
        String getAccessTokenUrl = authHost
                // 1. grant_type为固定参数
                + "grant_type=client_credentials"
                // 2. 官网获取的 API Key
                + "&client_id=" + ak
                // 3. 官网获取的 Secret Key
                + "&client_secret=" + sk;
        try {
            URL realUrl = new URL(getAccessTokenUrl);
            // 打开和URL之间的连接
            HttpURLConnection connection = (HttpURLConnection) realUrl.openConnection();
            connection.setRequestMethod("GET");
            connection.connect();
            // 获取所有响应头字段
            Map> map = connection.getHeaderFields();
            // 遍历所有的响应头字段
            /*for (String key : map.keySet()) {
                System.err.println(key + "--->" + map.get(key));
            }*/
            // 定义 BufferedReader输入流来读取URL的响应
            BufferedReader in = new BufferedReader(new InputStreamReader(connection.getInputStream()));
            String result = "";
            String line;
            while ((line = in.readLine()) != null) {
                result += line;
            }
            /**
             * 返回结果示例
             */
            //System.err.println("result:" + result);
            JSONObject jsonObject = new JSONObject(result);
            String access_token = jsonObject.getString("access_token");
            return access_token;
        } catch (Exception e) {
            System.err.printf("获取token失败!");
            e.printStackTrace(System.err);
        }
        return null;
    }

} -
图片/PDF 发票识别测试类
import okhttp3.*;

import java.io.*;

import java.nio.file.Files;
import java.nio.file.Paths;
import java.util.Base64;

class Sample {

    static final OkHttpClient HTTP_CLIENT = new OkHttpClient().newBuilder().build();

    public static void main(String[] args) throws IOException {
        MediaType mediaType = MediaType.parse("application/x-www-form-urlencoded");
        // image 可以通过 getFileContentAsBase64("C:\fakepath\下载.png") 方法获取
        String path = "C:\\Users\\Desktop\\1.png";
        String image = getFileContentAsBase64(path);
        image = image.replaceAll("\\+","%2B");
        image = image.replaceAll("\\/","%2F");

        // 官网获取的 API Key 更新为你注册的
        String clientId = "74AHm9bwIfrVO";
        // 官网获取的 Secret Key 更新为你注册的
        String clientSecret = "c1fzjB8jy8GZNh";
        String access_token = AuthService.getAuth(clientId, clientSecret);
        //String access_token = "24.acd9426de6760aa.2592000.1678264-30210143";
        RequestBody body = RequestBody.create(mediaType, "image="+image);
        Request request = new Request.Builder()
                .url("https://aip.baidubce.com/rest/2.0/ocr/v1/vat_invoice?access_token="+access_token)
                .method("POST", body)
                .addHeader("Content-Type", "application/x-www-form-urlencoded")
                .addHeader("Accept", "application/json")
                .build();
        Response response = HTTP_CLIENT.newCall(request).execute();
        System.out.println(response.body().string());

    }

    /**
     * 获取文件base64编码
     *
     * @param path 文件路径
     * @return base64编码信息,不带文件头
     * @throws IOException IO异常
     */
    static String getFileContentAsBase64(String path) throws IOException {
        byte[] b = Files.readAllBytes(Paths.get(path));
        return Base64.getEncoder().encodeToString(b);
    }


}
输出结果
4.使用注意点
这种目前是每月免费调用1000次,但是这个需要把信息上传到百度云上,有信息安全方面考虑的同学需要思考一下,私有部署需要付费,大概是299买一个sdk
百度OCR识别发票 Java 代码实现 | 言曌博客
思路二:自己基于模型训练
这种提供思路,需要自己训练模型,基于百度OCR自训练平台训练模型,使用方式如下,这块做个简单介绍,仅供参考
1.使用步骤
百度智能云-登录
根据步骤操作几个,提供数据标注训练
2.使用注意点
这种方式好处是比较自定义化,这种本地部署比较麻烦,需要额外付费用,需多多斟酌
思路三:识别二维码
这个思路是跟财务同事再三确认后,目前只识别电子发票信息,且发票中都一定会有二维码信息,这就好办了,我们可以识别二维码中的信息,这不就问题解决了,且这种方式只要有二维码,准确率达到100%
重点说说第三种
1.代码实现:
干搂代码开始:
加入maven依赖包:
    org.apache.pdfbox
    pdfbox
    2.0.20

    com.google.zxing
    core
    3.1.0

    com.google.zxing
    javase
    3.1.0
上代码:
import ch.qos.logback.classic.Level;
import ch.qos.logback.classic.LoggerContext;
import com.google.zxing.BinaryBitmap;
import com.google.zxing.EncodeHintType;
import com.google.zxing.MultiFormatReader;
import com.google.zxing.Result;
import com.google.zxing.client.j2se.BufferedImageLuminanceSource;
import com.google.zxing.common.HybridBinarizer;
import com.huatek.base.utils.LoggerUtil;
import org.apache.commons.lang3.StringUtils;
import org.apache.pdfbox.cos.COSName;
import org.apache.pdfbox.pdmodel.PDDocument;
import org.apache.pdfbox.pdmodel.PDPage;
import org.apache.pdfbox.pdmodel.PDResources;
import org.apache.pdfbox.pdmodel.graphics.image.PDImageXObject;
import org.slf4j.Logger;
import org.slf4j.LoggerFactory;

import java.awt.image.BufferedImage;
import java.io.File;
import java.util.ArrayList;
import java.util.HashMap;
import java.util.List;
import java.util.Map;

public class InvoiceTest {

    //这块是为了避免log4j打印一些没必要的信息
    static {
        LoggerContext loggerContext = (LoggerContext) LoggerFactory.getILoggerFactory();
        List loggerList = loggerContext.getLoggerList();
        loggerList.forEach(logger -> {
            logger.setLevel(Level.INFO);
        });
    }

    private Logger logger = LoggerUtil.getLogger();

    public static void main(String[] args) {
        InvoiceTest fapiao1 = new InvoiceTest();
        //填写你自己的路径即可
        fapiao1.getInvoiceInfo("C:\\Users\\Desktop\\temp\\1.pdf");
    }

    /**
     * 获取电子发票pdf文件中的发票信息
     *
     * @param filePath 电子发票路径
     * @return 发票信息
     */
    public Object getInvoiceInfo(String filePath) {
        try {
            List imageList = extractImage(new File(filePath));
            if (imageList.isEmpty()) {
                logger.info("pdf中未解析出图片,返回空");
                return null;
            }

            MultiFormatReader formatReader = new MultiFormatReader();
            //正常解析出来有3张图片,第一张是二维码,其他两张图片是发票上盖的章
            BinaryBitmap binaryBitmap = new BinaryBitmap(new HybridBinarizer(new BufferedImageLuminanceSource(imageList.get(0))));
            Map hints = new HashMap<>();
            hints.put(EncodeHintType.CHARACTER_SET, "utf-8");
            Result result = formatReader.decode(binaryBitmap);
            if (result == null || StringUtils.isEmpty(result.getText())) {
                logger.info("pdf中的第一张图片没有解析了字符串信息,直接返回空");
                return null;
            }

            logger.info("从电子发票中识别出的信息为:{}", result.getText());

            // 读取到的信息为 : 01,发票类型,发票代码,发票号码,发票金额,开票日期,校验码,随机产生的摘要信息
            String[] infos = result.getText().split(",");
            if (infos.length != 8) {
                logger.info("pdf中的第一张图片解析出的字符串数组长度不为8,返回空。");
                return null;
            }

            //这里自己去定义对象,属性自己看着定义,仅供参考
            /*Invoice invoice = new Invoice();
            invoice.setInvoiceType(infos[1]); //发票类型
            invoice.setInvoiceCode(infos[2]); //发票代码
            invoice.setInvoiceNo(infos[3]); // 发票号码
            invoice.setAmount(new BigDecimal(infos[4])); // 发票金额
            invoice.setInvoiceDate(DateUtils.parseDate(infos[5], "yyyyMMdd")); //开票日期
            invoice.setCheckCode(infos[6]); // 校验码*/

            //return invoice;
            return null;
        } catch (Exception e) {
            logger.info("解析pdf中的二维码出现异常", e);
            return null;
        }
    }


    /**
     * 提取电子发票里面的图片
     *
     * @param pdfFile 电子发票文件对象
     * @return pdf中解析出的图片列表
     * @throws Exception
     */
    private List extractImage(File pdfFile) throws Exception {
        List imageList = new ArrayList();

        PDDocument document = PDDocument.load(pdfFile);
        PDPage page = document.getPage(0); //电子发票只有一页
        PDResources resources = page.getResources();

        for (COSName name : resources.getXObjectNames()) {
            if (resources.isImageXObject(name)) {
                PDImageXObject obj = (PDImageXObject) resources.getXObject(name);
                imageList.add(obj.getImage());
            }
        }
        document.close();
        return imageList;
    }
}
至此代码完成,有的同学可能会说那如果传的是图片怎么办,别慌那就继续实现就完事儿了
依赖还是那些依赖,根据你自己的需求封装工具类和上面代码相互配合判断调用
import com.google.zxing.*;
import com.google.zxing.client.j2se.BufferedImageLuminanceSource;
import com.google.zxing.common.HybridBinarizer;

import javax.imageio.ImageIO;
import java.awt.image.BufferedImage;
import java.io.File;
import java.io.IOException;
import java.util.HashMap;
import java.util.Map;
/**
 * 作用:二维码识别(图片)
 * 类名:QRCodeUtils
 **/
public class QRCodeUtils {
    /**
     * 解析二维码,此方法解析一个路径的二维码图片
     * path:图片路径
     */
    public static String deEncodeByPath(String path) {
        String content = null;
        BufferedImage image;
        try {
            image = ImageIO.read(new File(path));
            LuminanceSource source = new BufferedImageLuminanceSource(image);
            Binarizer binarizer = new HybridBinarizer(source);
            BinaryBitmap binaryBitmap = new BinaryBitmap(binarizer);
            Map hints = new HashMap();
            hints.put(DecodeHintType.CHARACTER_SET, "UTF-8");
            Result result = new MultiFormatReader().decode(binaryBitmap, hints);//解码
            System.out.println("图片中内容:  ");
            System.out.println("content: " + result.getText());
            content = result.getText();
        } catch (IOException e) {
            e.printStackTrace();
        } catch (NotFoundException e) {
            //这里判断如果识别不了带LOGO的图片,重新添加上一个属性
            try {
                image = ImageIO.read(new File(path));
                LuminanceSource source = new BufferedImageLuminanceSource(image);
                Binarizer binarizer = new HybridBinarizer(source);
                BinaryBitmap binaryBitmap = new BinaryBitmap(binarizer);
                Map hints = new HashMap();
                //设置编码格式
                hints.put(DecodeHintType.CHARACTER_SET, "UTF-8");
                //设置优化精度
                hints.put(DecodeHintType.TRY_HARDER, Boolean.TRUE);
                //设置复杂模式开启(我使用这种方式就可以识别微信的二维码了)
                hints.put(DecodeHintType.PURE_BARCODE,Boolean.TYPE);
                Result result = new MultiFormatReader().decode(binaryBitmap, hints);//解码
                System.out.println("图片中内容:  ");
                System.out.println("content: " + result.getText());
                content = result.getText();
            } catch (IOException e1) {
                e1.printStackTrace();
            } catch (NotFoundException e2) {
                e2.printStackTrace();
            }
        }
        return content;
    }

    public static void main(String [] args){
        System.out.println(deEncodeByPath("C:\\Users\\Desktop\\3-1.jpg"));//二维码图片路径
    }
}
如果上述不能识别的话,那么就需要对图片处理一次,然后再进行识别,这里是个调优图片的工具类。
package com.face.ele.common.utils;

import javax.imageio.ImageIO;
import java.awt.*;
import java.awt.image.BufferedImage;
import java.io.File;
import java.io.IOException;

/*
 * @description: 图片清晰处理
 */
public class ImageOptimizationUtil {

    // 阈值0-255
    public static int YZ = 150;

    /**
     * 图像二值化处理
     *
     * @param filePath 要处理的图片路径
     * @param fileOutputPath 处理后的图片输出路径
     */
    public static void binarization(String filePath, String fileOutputPath) throws IOException {
        File file = new File(filePath);
        BufferedImage bi = ImageIO.read(file);
        // 获取当前图片的高,宽,ARGB
        int h = bi.getHeight();
        int w = bi.getWidth();
        int arr[][] = new int[w][h];

        // 获取图片每一像素点的灰度值
        for (int i = 0; i < w; i++) {
            for (int j = 0; j < h; j++) {
                // getRGB()返回默认的RGB颜色模型(十进制)
                arr[i][j] = getImageGray(bi.getRGB(i, j));// 该点的灰度值
            }
        }

        // 构造一个类型为预定义图像类型,BufferedImage
        BufferedImage bufferedImage = new BufferedImage(w, h, BufferedImage.TYPE_BYTE_BINARY);

        // 和预先设置的阈值大小进行比较,大的就显示为255即白色,小的就显示为0即黑色
        for (int i = 0; i < w; i++) {
            for (int j = 0; j < h; j++) {
                if (getGray(arr, i, j, w, h) > YZ) {
                    int white = new Color(255, 255, 255).getRGB();
                    bufferedImage.setRGB(i, j, white);
                } else {
                    int black = new Color(0, 0, 0).getRGB();
                    bufferedImage.setRGB(i, j, black);
                }
            }

        }
        ImageIO.write(bufferedImage, "jpg", new File(fileOutputPath));
    }

    /**
     * 图像的灰度处理
     * 利用浮点算法:Gray = R*0.3 + G*0.59 + B*0.11;
     *
     * @param rgb 该点的RGB值
     * @return 返回处理后的灰度值
     */
    private static int getImageGray(int rgb) {
        String argb = Integer.toHexString(rgb);// 将十进制的颜色值转为十六进制
        // argb分别代表透明,红,绿,蓝 分别占16进制2位
        int r = Integer.parseInt(argb.substring(2, 4), 16);// 后面参数为使用进制
        int g = Integer.parseInt(argb.substring(4, 6), 16);
        int b = Integer.parseInt(argb.substring(6, 8), 16);
        int gray = (int) (r*0.28 + g*0.95 + b*0.11);
        return gray;
    }

    /**
     * 自己加周围8个灰度值再除以9,算出其相对灰度值
     *
     * @param gray
     * @param x 要计算灰度的点的横坐标
     * @param y 要计算灰度的点的纵坐标
     * @param w 图像的宽度
     * @param h 图像的高度
     * @return
     */
    public static int getGray(int gray[][], int x, int y, int w, int h) {
        int rs = gray[x][y] + (x == 0 ? 255 : gray[x - 1][y]) + (x == 0 || y == 0 ? 255 : gray[x - 1][y - 1])
                + (x == 0 || y == h - 1 ? 255 : gray[x - 1][y + 1]) + (y == 0 ? 255 : gray[x][y - 1])
                + (y == h - 1 ? 255 : gray[x][y + 1]) + (x == w - 1 ? 255 : gray[x + 1][y])
                + (x == w - 1 || y == 0 ? 255 : gray[x + 1][y - 1])
                + (x == w - 1 || y == h - 1 ? 255 : gray[x + 1][y + 1]);
        return rs / 9;
    }

    /**
     * 二值化后的图像的开运算:先腐蚀再膨胀(用于去除图像的小黑点)
     *
     * @param filePath 要处理的图片路径
     * @param fileOutputPath 处理后的图片输出路径
     * @throws IOException
     */
    public static void opening(String filePath, String fileOutputPath) throws IOException {
        File file = new File(filePath);
        BufferedImage bi = ImageIO.read(file);
        // 获取当前图片的高,宽,ARGB
        int h = bi.getHeight();
        int w = bi.getWidth();
        int arr[][] = new int[w][h];
        // 获取图片每一像素点的灰度值
        for (int i = 0; i < w; i++) {
            for (int j = 0; j < h; j++) {
                // getRGB()返回默认的RGB颜色模型(十进制)
                arr[i][j] = getImageGray(bi.getRGB(i, j));// 该点的灰度值
            }
        }

        int black = new Color(0, 0, 0).getRGB();
        int white = new Color(255, 255, 255).getRGB();
        BufferedImage bufferedImage = new BufferedImage(w, h, BufferedImage.TYPE_BYTE_BINARY);
        // 临时存储腐蚀后的各个点的亮度
        int temp[][] = new int[w][h];
        // 1.先进行腐蚀操作
        for (int i = 0; i < w; i++) {
            for (int j = 0; j < h; j++) {
                /*
                 * 为0表示改点和周围8个点都是黑,则该点腐蚀操作后为黑
                 * 由于公司图片态模糊,完全达到9个点全为黑的点太少,最后效果很差,故改为了小于30
                 * (写30的原因是,当只有一个点为白,即总共255,调用getGray方法后得到255/9 = 28)
                 */
                if (getGray(arr, i, j, w, h) < 30) {
                    temp[i][j] = 0;
                } else{
                    temp[i][j] = 255;
                }
            }
        }

        // 2.再进行膨胀操作
        for (int i = 0; i < w; i++) {
            for (int j = 0; j < h; j++) {
                bufferedImage.setRGB(i, j, white);
            }
        }
        for (int i = 0; i < w; i++) {
            for (int j = 0; j < h; j++) {
                // 为0表示改点和周围8个点都是黑,则该点腐蚀操作后为黑
                if (temp[i][j] == 0) {
                    bufferedImage.setRGB(i, j, black);
                    if(i > 0) {
                        bufferedImage.setRGB(i-1, j, black);
                    }
                    if (j > 0) {
                        bufferedImage.setRGB(i, j-1, black);
                    }
                    if (i > 0 && j > 0) {
                        bufferedImage.setRGB(i-1, j-1, black);
                    }
                    if (j < h-1) {
                        bufferedImage.setRGB(i, j+1, black);
                    }
                    if (i < w-1) {
                        bufferedImage.setRGB(i+1, j, black);
                    }
                    if (i < w-1 && j > 0) {
                        bufferedImage.setRGB(i+1, j-1, black);
                    }
                    if (i < w-1 && j < h-1) {
                        bufferedImage.setRGB(i+1, j+1, black);
                    }
                    if (i > 0 && j < h-1) {
                        bufferedImage.setRGB(i-1, j+1, black);
                    }
                }
            }
        }

        ImageIO.write(bufferedImage, "jpg", new File(fileOutputPath));
    }

    public static void main(String[] args) {
        String fullPath="E:\\test\\img\\1.jpg";
        String newPath="E:\\test\\img\\1new.jpg";
        try {
            ImageOptimizationUtil.binarization(fullPath,newPath);
        } catch (IOException e) {
            e.printStackTrace();
        }
    }
}
可以手动测试,然后对改代码的部分进行调正对应的参数-- gray变量里的计算进行灰度调整
private static int getImageGray(int rgb) {
    String argb = Integer.toHexString(rgb);// 将十进制的颜色值转为十六进制
    // argb分别代表透明,红,绿,蓝 分别占16进制2位
    int r = Integer.parseInt(argb.substring(2, 4), 16);// 后面参数为使用进制
    int g = Integer.parseInt(argb.substring(4, 6), 16);
    int b = Integer.parseInt(argb.substring(6, 8), 16);
    int gray = (int) (r*0.28 + g*0.95 + b*0.11);
    return gray;
}
对图片进行调整之后,再对图片进行识别即可。
2.优点
可以直接识别二维码读取部分票面信息,然后用这部分信息作为参数,通过调用税务的接口获取全票面信息。只要是正常的电子发票,识别率差不多是100%,效率极高,准确率也极高
3.缺点
只能获取部分信息,如果需要更多的信息,那就不能获取了,但是大部分场景还是可以覆盖的
如何识别电子发票中的二维码(java实现) - 简书
java实现识别二维码图片功能_java_脚本之家
至此三种思路都已经说完了,用哪个各位同学自己定夺,我目前采用的思路三,暂时没什么问题,基本满足业务需求,后续有问题就得去模型库中自己训练了


