【JAVA学习笔记】55 - 集合-Map接口、HashMap类、HashTable类、Properties类、TreeMap类(难点)
项目代码
https://github.com/yinhai1114/Java_Learning_Code/tree/main/IDEA_Chapter14/src/com/yinhai/map_
Map接口
一、Map接口的特点(难点)
难点在于对Node和Entry和EntrySet的关系
注意:这里讲的是JDK8的Map接口特点 Map java
1) Map与Collection并列存在。用于保存具有映射关系的数据:Key-Value(双列)
2) Map中的key和value 可以是任何引用类型的数据,会封装到HashMap$Node对象中
3) Map中的key不允许重复,原因和HashSet 一样,前面分析过源码.
4) Map中的value可以重复
5) Map的key可以为null, value也可以为null ,注意key为null,只能有一一个,value为null ,可以多个.
6)常用String类作为Map的key
7) key和value之间存在单向一对一关系,即通过指定的key总能找到对应的value
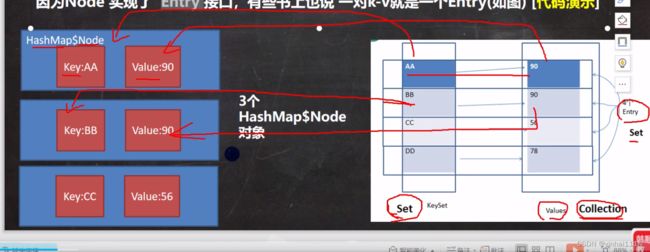
8) Map存放数据的key-value示意图,一对k-v是放在一个HashMap$Node中的, 又因为Node实现了Entry 接口,有些书上也说一对k-v就是一个Entry(如图) ,Entry只是指向Node,而不是创建了新的列表,同理KeySet和Collection也是。HashMap$Node -实现-> Map.Entry (getKey,getValue)接口
public class MapSource_ {
    public static void main(String[] args) {
        Map map = new HashMap();
        map.put("no1", "韩顺平");//k-v
        map.put("no2", "张无忌");//k-v
        map.put(new Car(), new Person());//k-v
        System.out.println(map.getClass());
        //1. k-v 最后是 HashMap$Node node = newNode(hash, key, value, null)
        //2. k-v 为了方便程序员的遍历,还会 创建 EntrySet 集合 ,该集合存放的元素的类型 Entry, 而一个Entry
        //即把Node转成Entry然后再放到EntrySet里 (引用),指向而不是创建!
        //   对象就有k,v EntrySet> 即: transient Set> entrySet;
        //3. 在entrySet中,定义的类型是 Map.Entry ,但是实际上存放的还是 HashMap$Node Node实现了Entry的接口
        //   这时因为 static class Node implements Map.Entry
        Set set = map.entrySet();
        System.out.println(set.getClass());// HashMap$EntrySet
        for (Object obj : set) {

            //System.out.println(obj.getClass()); //HashMap$Node
            //为了从 HashMap$Node 取出k-v
            //1. 先做一个向下转型
            Map.Entry entry = (Map.Entry) obj;
            System.out.println(entry.getKey() + "-" + entry.getValue() );
            //4. 当把 HashMap$Node 对象 存放到 entrySet 就方便我们的遍历, 因为 Map.Entry 提供了重要方法
            //   K getKey(); V getValue();
        }
        //可以把key值封装为KeySet,values封装成Values
        Set set1 = map.keySet();
        System.out.println(set1.getClass());
        Collection values = map.values();
        System.out.println(values.getClass());
    }
}

class Car {

}

class Person{

}
二、常用方法
public class MapMethod {
    public static void main(String[] args) {
        //演示map接口常用方法

        Map map = new HashMap();
        map.put("邓超", new Book("", 100));//OK
        map.put("邓超", "孙俪");//替换-> 一会分析源码
        map.put("王宝强", "马蓉");//OK
        map.put("宋喆", "马蓉");//OK
        map.put("刘令博", null);//OK
        map.put(null, "刘亦菲");//OK
        map.put("鹿晗", "关晓彤");//OK
        map.put("hsp", "hsp的老婆");

        System.out.println("map=" + map);

//        remove:根据键删除映射关系
        map.remove(null);
        System.out.println("map=" + map);
//        get:根据键获取值
        Object val = map.get("鹿晗");
        System.out.println("val=" + val);
//        size:获取元素个数
        System.out.println("k-v=" + map.size());
//        isEmpty:判断个数是否为0
        System.out.println(map.isEmpty());//F
//        clear:清除k-v
        //map.clear();
        System.out.println("map=" + map);
//        containsKey:查找键是否存在
        System.out.println("结果=" + map.containsKey("hsp"));//T


    }
}

class Book {
    private String name;
    private int num;

    public Book(String name, int num) {
        this.name = name;
        this.num = num;
    }
}
三、遍历方法
1) containsKey:查找键是否存在
2)keySet:获取所有的键
3)entrySet:获取所有关系
4)values:获取所有的值
public class MapFor {
    public static void main(String[] args) {

        Map map = new HashMap();
        map.put("邓超", "孙俪");
        map.put("王宝强", "马蓉");
        map.put("宋喆", "马蓉");
        map.put("刘令博", null);
        map.put(null, "刘亦菲");
        map.put("鹿晗", "关晓彤");

        //第一组: 先取出 所有的Key , 通过Key 取出对应的Value
        Set keyset = map.keySet();
        //(1) 增强for
        System.out.println("-----第一种方式-------");
        for (Object key : keyset) {
            System.out.println(key + "-" + map.get(key));
        }
        //(2) 迭代器
        System.out.println("----第二种方式--------");
        Iterator iterator = keyset.iterator();
        while (iterator.hasNext()) {
            Object key =  iterator.next();
            System.out.println(key + "-" + map.get(key));
        }

        //第二组: 把所有的values取出
        Collection values = map.values();
        //这里可以使用所有的Collections使用的遍历方法
        //(1) 增强for
        System.out.println("---取出所有的value 增强for----");
        for (Object value : values) {
            System.out.println(value);
        }
        //(2) 迭代器
        System.out.println("---取出所有的value 迭代器----");
        Iterator iterator2 = values.iterator();
        while (iterator2.hasNext()) {
            Object value =  iterator2.next();
            System.out.println(value);

        }

        //第三组: 通过EntrySet 来获取 k-v
        Set entrySet = map.entrySet();// EntrySet>
        //(1) 增强for
        System.out.println("----使用EntrySet 的 for增强(第3种)----");
        for (Object entry : entrySet) {
            //将entry 转成 Map.Entry
            Map.Entry m = (Map.Entry) entry;
            System.out.println(m.getKey() + "-" + m.getValue());
        }
        //(2) 迭代器
        System.out.println("----使用EntrySet 的 迭代器(第4种)----");
        Iterator iterator3 = entrySet.iterator();
        while (iterator3.hasNext()) {
            Object entry =  iterator3.next();
            //System.out.println(next.getClass());//HashMap$Node -实现-> Map.Entry (getKey,getValue)
            //向下转型 Map.Entry
            Map.Entry m = (Map.Entry) entry;
            System.out.println(m.getKey() + "-" + m.getValue());
        }


    }
}
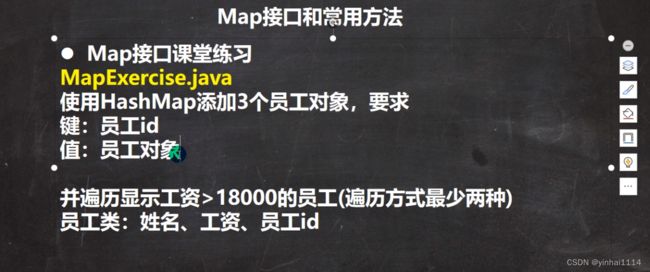
四、Map方法练习
public class MapExercise {
    public static void main(String[] args) {
        Map map = new HashMap();
        // System.out.println(map.getClass());
        Employee xiaohua = new Employee("xiaohua", 1444, "114514");
        Employee xiaowang = new Employee("xiaowang", 20000, "11451419");
        Employee xiaoming = new Employee("xiaoming", 190000, "1145141989");
        map.put(xiaohua.getId(),xiaohua);
        map.put(xiaowang.getId(),xiaowang);
        map.put(xiaoming.getId(),xiaoming);
        //两种方式遍历取出 通过key值取出KeySet
        Set keyset = map.keySet();
        for (Object o : keyset) {
            Employee employee = (Employee) map.get(o);
            if (employee.getSalary() > 18000){
                System.out.println(o + " - " +  map.get(o));
            }
        }
        //2通过Entry取出
        Set entrySet = map.entrySet();
        Iterator iterator = entrySet.iterator();
        while (iterator.hasNext()) {
            Map.Entry entry =  (Map.Entry)iterator.next();
            Employee employee = (Employee)entry.getValue();
            if(employee.getSalary() > 18000){
                System.out.println(employee);
            }

        }

    }
}

class Employee {
    private String name;
    private int salary;
    private String id;

    public String getId() {
        return id;
    }

    public Employee(String name, int salary, String id) {
        this.name = name;
        this.salary = salary;
        this.id = id;
    }

    public int getSalary() {
        return salary;
    }

    @Override
    public String toString() {
        return "\tname=" + name +
                "\tsalary=" + salary +
                "\tid=" + id +
                '\n';
    }
}
五、小结
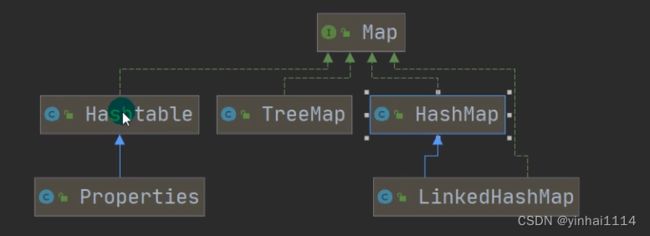
1) Map接口的常用实现类: HashMap、Hashtable和Properties.
2) HashMap是Map接口使用频率最高的实现类。
3) HashMap是以key - val一对的方式来存储数据
4) key不能重复,但是是值可以重复,允许使用null键和nul值。
5)如果添加相同的key,则会覆盖原来的key-val ,等同于修改.(key不会替换,val会替换)
6)与HashSet一样,不保证映射的顺序,因为底层是以hash表的方式来存储的.
7) HashMap没有实现同步,因此是线程不安全的
HashMap类
一、HashMap的底层机制
扩容机制(和HashSet相同,所以讲HashMap本质上是讲HashSet)
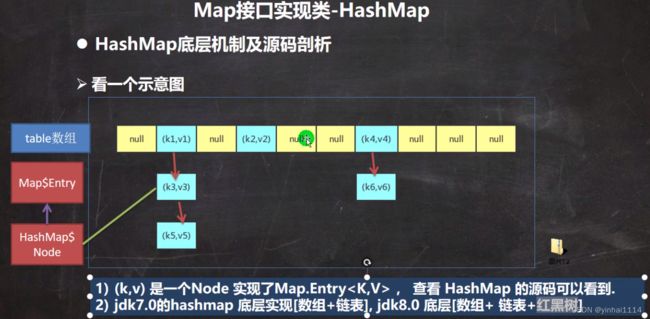
1) HashMap底层维护了Node类型的数组table,默认为null
2)当创建对象时,将加载因子(loadfactor)初始化为0.75.
3)当添加key-yal时,通过key的哈希值得到在table的索引。然后判断该索引处是否有元素,如果没有元素直接添加。如果该索引处有元素,继续判断该元素的key是否和准备加入的key相等,如果相等,则直接替换val;如果不相等需要判断是树结构还是链表结构,做出相应处理。如果添加时发现容量不够,则需要扩容。
4)第1次添加,则需要扩容table容量为16,临界值(threshold)为12.
5)以后再扩容,则需要扩容table容量为原来的2倍,临界值为原来的2倍,即24,依次类推.
6)在Java8中,如果一条链表的元素个数超过TREEIFY THRESHOLD(默认是8),并且
table的大小>= MIN TREEIFY CAPACITY(默认64),就会进行树化(红黑树)
二、HashMap的源码以及替换机制
public class HashMapSource1 {
    public static void main(String[] args) {
        HashMap map = new HashMap();
        map.put("java", 10);//ok
        map.put("php", 10);//ok
        map.put("java", 20);//替换value

        System.out.println("map=" + map);//

        /*
        1. 执行构造器 new HashMap()
           初始化加载因子 loadfactor = 0.75
           HashMap$Node[] table = null
        2. 执行put 调用 hash方法,计算 key的 hash值 (h = key.hashCode()) ^ (h >>> 16)
            public V put(K key, V value) {//K = "java" value = 10
                return putVal(hash(key), key, value, false, true);
            }
         3. 执行 putVal
         final V putVal(int hash, K key, V value, boolean onlyIfAbsent,
                   boolean evict) {
                Node[] tab; Node p; int n, i;//辅助变量
                //如果底层的table 数组为null, 或者 length =0 , 就扩容到16
                if ((tab = table) == null || (n = tab.length) == 0)
                    n = (tab = resize()).length;
                //取出hash值对应的table的索引位置的Node, 如果为null, 就直接把加入的k-v
                //, 创建成一个 Node ,加入该位置即可
                if ((p = tab[i = (n - 1) & hash]) == null)
                    tab[i] = newNode(hash, key, value, null);
                else {
                    Node e; K k;//辅助变量
                // 如果table的索引位置的key的hash相同和新的key的hash值相同,
                 // 并 满足(table现有的结点的key和准备添加的key是同一个对象  || equals返回真)
                 // 就认为不能加入新的k-v
                    if (p.hash == hash &&
                        ((k = p.key) == key || (key != null && key.equals(k))))
                        e = p;
                    else if (p instanceof TreeNode)//如果当前的table的已有的Node 是红黑树,就按照红黑树的方式处理
                        e = ((TreeNode)p).putTreeVal(this, tab, hash, key, value);
                    else {
                        //如果找到的结点,后面是链表,就循环比较
                        for (int binCount = 0; ; ++binCount) {//死循环
                            if ((e = p.next) == null) {//如果整个链表,没有和他相同,就加到该链表的最后
                                p.next = newNode(hash, key, value, null);
                                //加入后,判断当前链表的个数,是否已经到8个,到8个,后
                                //就调用 treeifyBin 方法进行红黑树的转换
                                if (binCount >= TREEIFY_THRESHOLD - 1) // -1 for 1st
                                    treeifyBin(tab, hash);
                                break;
                            }
                            if (e.hash == hash && //如果在循环比较过程中,发现有相同,就break,就只是替换value
                                ((k = e.key) == key || (key != null && key.equals(k))))
                                break;
                            p = e;
                        }
                    }
                    if (e != null) { // existing mapping for key
                        V oldValue = e.value;
                        if (!onlyIfAbsent || oldValue == null)
                            e.value = value; //替换,key对应value
                        afterNodeAccess(e);
                        return oldValue;
                    }
                }
                ++modCount;//每增加一个Node ,就size++
                if (++size > threshold[12-24-48])//如size > 临界值,就扩容
                    resize();
                afterNodeInsertion(evict);
                return null;
            }

              5. 关于树化(转成红黑树)
              //如果table 为null ,或者大小还没有到 64,暂时不树化,而是进行扩容.
              //否则才会真正的树化 -> 剪枝
              final void treeifyBin(Node[] tab, int hash) {
                int n, index; Node e;
                if (tab == null || (n = tab.length) < MIN_TREEIFY_CAPACITY)
                    resize();

            }
         */


    }
}
三、HashMap的扩容机制
public class HashMapSource2 {
    public static void main(String[] args) {


        HashMap hashMap = new HashMap();
        for (int i = 1; i <= 96; i++) {
            hashMap.put(i, "hello");
        }

        hashMap.put(new A(111), "hello");
        System.out.println("hashMap=" + hashMap);//12个 k-v

        //布置一个任务,自己设计代码去验证,table 的扩容
        //0 -> 16(12) -> 32(24) -> 64(64*0.75=48)-> 128 (96) ->
        //自己设计程序,验证-》 增强自己阅读源码能力. 看别人代码.
    }
}

class A {
    private int num;

    public A(int num) {
        this.num = num;
    }

    // 所有的A对象的hashCode都是100
   @Override
   public int hashCode() {
       return 100;
   }

    @Override
    public String toString() {
        return "\nA{" +
                "num=" + num +
                '}';
    }
}
HashTable类
一、HashTable的基本介绍
1)存放的元素是键值对即K-V
2) hashtable的键和值都不能为null,否则会抛出空指针异常
3) hashTable使用方法基本上和HashMap-样
4) hashTable是线程安全的,hashMap 是线程不安全的
5)简单看下底层结构
public class HashTableExercise {
    public static void main(String[] args) {
        Hashtable table = new Hashtable();//ok
        table.put("john", 100); //ok
        //table.put(null, 100); //异常 NullPointerException
        //table.put("john", null);//异常 NullPointerException
        table.put("lucy", 100);//ok
        table.put("lic", 100);//ok
        table.put("lic", 88);//替换
        table.put("hello1", 1);
        table.put("hello2", 1);
        table.put("hello3", 1);
        table.put("hello4", 1);
        table.put("hello5", 1);
        table.put("hello6", 1);
        System.out.println(table);

        //简单说明一下Hashtable的底层
        //1. 底层有数组 Hashtable$Entry[] 初始化大小为 11
        //2. 临界值 threshold 8 = 11 * 0.75
        //3. 扩容: 按照自己的扩容机制来进行即可.
        //4. 执行 方法 addEntry(hash, key, value, index); 添加K-V 封装到Entry
        //5. 当 if (count >= threshold) 满足时,就进行扩容
        //5. 按照 int newCapacity = (oldCapacity << 1) + 1; 的大小扩容.

    }
}
Properties类
一、基本介绍
1. Properties类继承自Hashtable类并且实现了 Map接口,也是使用一种键值对的形式来保存数据。
2.他的使用特点和Hashtable类似
3. Properties 还可以用于从xxx.properties文件中,加载数据到Properties类对象,并进行读取和修改
4.说明:工作后xxx.properties文件通常作为配置文件,这个知识点在I0流举例,有兴趣可先看文章
二、常用方法
public class Properties_ {
    public static void main(String[] args) {
        //1. Properties 继承  Hashtable
        //2. 可以通过 k-v 存放数据,当然key 和 value 不能为 null
        //增加
        Properties properties = new Properties();
        //properties.put(null, "abc");//抛出 空指针异常
        //properties.put("abc", null); //抛出 空指针异常
        properties.put("john", 100);//k-v
        properties.put("lucy", 100);
        properties.put("lic", 100);
        properties.put("lic", 88);//如果有相同的key , value被替换

        System.out.println("properties=" + properties);

        //通过k 获取对应值
        System.out.println(properties.get("lic"));//88

        //删除
        properties.remove("lic");
        System.out.println("properties=" + properties);

        //修改
        properties.put("john", "约翰");
        System.out.println("properties=" + properties);
    }
}
TreeMap类
public class TreeMap_ {
    public static void main(String[] args) {

        //使用默认的构造器,创建TreeMap, 是无序的(也没有排序)
        /*
            老韩要求:按照传入的 k(String) 的大小进行排序
         */
        //TreeMap treeMap = new TreeMap();
                TreeMap treeMap = new TreeMap(new Comparator() {
                    @Override
                    public int compare(Object o1, Object o2) {
                        //按照传入的 k(String) 的大小进行排序
                        //按照K(String) 的长度大小排序
                        //return ((String) o2).compareTo((String) o1);
                        return ((String) o2).length() - ((String) o1).length();
                    }
                });

        /*
            1. 构造器. 把传入的实现了 Comparator接口的匿名内部类(对象),传给给TreeMap的comparator
             public TreeMap(Comparator comparator) {
                this.comparator = comparator;
            }
            2. 调用put方法
            2.1 第一次添加, 把k-v 封装到 Entry对象,放入root
            Entry t = root;
            if (t == null) {
                compare(key, key); // type (and possibly null) check

                root = new Entry<>(key, value, null);
                size = 1;
                modCount++;
                return null;
            }
        */
        treeMap.put("jack", "杰克");
        treeMap.put("tom", "汤姆");
        treeMap.put("kristina", "克瑞斯提诺");
        treeMap.put("smith", "斯密斯");
        treeMap.put("hsp", "韩顺平");//加入不了
        /*
            2.2 以后添加
            Comparator cpr = comparator;
            if (cpr != null) {
                do { //遍历所有的key , 给当前key找到适当位置
                    parent = t;
                    cmp = cpr.compare(key, t.key);//动态绑定到我们的匿名内部类的compare
                    if (cmp < 0)
                        t = t.left;
                    else if (cmp > 0)
                        t = t.right;
                    else  //如果遍历过程中,发现准备添加Key 和当前已有的Key 相等,就不添加
                        return t.setValue(value);
                } while (t != null);
            }
         */
        System.out.println("treemap=" + treeMap);

    }
}
