01-Servlet 快速入门
花有重开日,人无再少年。
1、前言
- web:就是能够通过浏览器访问的网站。
- JavaWeb:是用Java技术解决相关web互联网领域的技术栈。
- C/S结构:全称Client/Server,指客户端/服务器模式。
- B/S结构:全称Browser/Server,指浏览器/服务器模式。
2、Tomcat 服务器

Tomcat 是 Apache 软件基金会(Apache Software Foundation)的Jakarta 项目中的一个核心项目,由Apache 、Sun 和其他一些公司及个人共同开发而成。因为 Tomcat 技术先进、性能稳定,而且免费,因而深受Java 爱好者的喜爱并得到了部分软件开发商的认可,成为目前比较流行的Web应用服务器。
Tomcat 服务器是一个免费开源的Web 应用服务器,属于轻量级应用服务器,是开发和调试 Servlet/JSP 程序的首选。
Tomcat 部分是Apache 服务器的扩展,但它是独立运行的,所以当你运行tomcat 时,它实际上作为一个与Apache 独立的进程单独运行的。
2.1、安装 Tomcat
下载地址:https://tomcat.apache.org/
这里我们以Tomcat 9为例,然后下载一个windows64位解压版。

2.2、Tomcat的启动和关闭
在浏览器中访问:http://localhost:8080
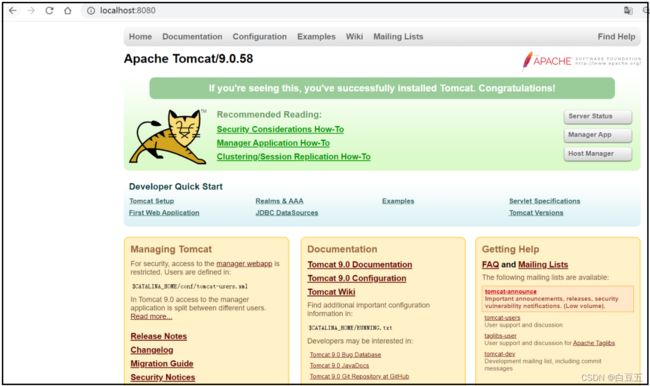
当出现这个页面的时候,我们的Tomcat服务器已经成功启动啦!
3、HTTP协议
-
协议:通信计算机双方必须共同遵从的一组约定,只有遵守这个约定,计算机之间才能相互通信。
-
HTTP协议:(全称:HyperText Transfer Protocol)即超文本传输协议,是一种详细规定了浏览器 和 服务器 之间互相通信的规则,它通常运行在TCP之上。

-
HTTPS:(全称:Hyper Text Transfer Protocol over SecureSocket Layer)可以理解为是HTTP的安全版,在HTTP 的基础下加入SSL层。
-
SSL:(全称:Secure Sockets Layer ),即安全套接字协议,主要用于web的安全传输协议,保证在 Internet 上数据传输安全。
-
HTTP 默认端口是80;
-
HTTPS 默认端口是433;
-
URL:统一资源定位符,是用于完整地描述Internet上网页和其他资源的地址的一种方法。
-
HTTP请求主要分为: Get 和 Post 方法,除此之外还有 Delete、Head、Options、Put、Trace,不过现在大部分的浏览器只支持Get 和 Post。
HTTP请求数据格式
GET / HTTP/1.1  # 请求行:GET表示请求方式, / 表示请求资源的路径, HHTP/1.1表示协议版本
Host: www.baidu.com
Connection: keep-alive
Cache-Control: max-age=0
Upgrade-Insecure-Requests: 1
User-Agent: Mozilla/5.0 (Windows NT 10.0; WOW64) AppleWebKit/537.36 (KHTML, like Gecko) Chrome/86.0.4240.198 Safari/537.36
Accept: text/html,application/xhtml+xml,application/xml;q=0.9,image/avif,image/webp,image/apng,*/*;q=0.8,application/signed-exchange;v=b3;q=0.9
...
请求数据分为3部分:
- 请求行,请求数据的第一行。
- 请求头,第二行开始,格式为key:value形式。
- 请求体,Post请求的最后一部分,存放请求参数。
常见的HTTP请求头:
Host:表示请求的主机名
User-Agent:浏览器版本
Accept: 表示浏览器能接收的资源类型
Accept-Language:表示浏览器偏好的语言,服务器可以根据此返回不同语言的网页
Accept-Encoding:表示浏览器可以支持的压缩类型
HTTP响应数据格式
它通常运行在TCP之上。
- 响应行,响应数据的第一行。
- 响应头,第二行开始,格式为key:value形式。
- 响应体,最后一部分,存放响应数据。
HTTP/1.1 200 OK  # HTTP/1.1表示协议版本, 200表示响应状态码, ok表示状态码描述
Bdpagetype: 2
Bdqid: 0xf380e018002cf5dc
Cache-Control: private
Connection: keep-alive
Content-Encoding: gzip
Content-Type: text/html;charset=utf-8
Date: Sun, 13 Feb 2022 10:41:10 GMT
...
常见的响应状态码:
- 200 ,请求响应成功 ;
- 3xx ,重定向,302 、 304(访问缓存);
- 4xx ,客户端错误, 404 (Not Found,请求路径没有对应资源)、405(请求方式没有对应的do*方法)
- 5xx ,服务器端错误,500服务器内部异常;
4、Maven
Maven 是一个比 Ant 更先进的项目管理工具,它采用"约定大于配置(CoC)"的策略来管理项目。它不仅用于把源代码构建成可发布的项目(包括编译、打包、测试和分发),还可以生成报告、生成Web站点等。
目前我们使用maven为项目自动导jar包。
新版Maven下载地址:https://maven.apache.org/download.cgi
Maven3.6.1下载地址:https://archive.apache.org/dist/maven/maven-3/3.6.1/binaries/
Maven中央仓库:https://mvnrepository.com/
这里我们以Maven3.6.1为例,然后点击 【apache-maven-3.6.1-bin.zip】进行下载!
![]()
配置环境变量
M2_HOME        maven目录下的bin目录
MAVEN_HOME     maven的目录
在系统的path中配置  %MAVEN_HOME%\bin
接下来测试Maven是否配置成功:

执行命名:mvn -v,出现以上结果时,说明我们Maven环境已经配置成功了!
配置阿里云镜像源
在 maven/conf/settings.xml 的< mirrors>标签中,添加如下配置,然后保存文件即可!
<mirror>
	<id>alimavenid>
	<mirrorOf>centralmirrorOf>
	<name>aliyun mavenname>
	<url>http://maven.aliyun.com/nexus/content/repositories/central/url>
mirror>
配置本地仓库
在maven的目录中创建一个名叫maven_repo的文件夹;
![]()
在 maven/conf/settings.xml 的< settings>标签中,添加如下配置,然后保存文件即可!
<localRepository>maven_repo文件夹的位置localRepository>
配置Maven全局jdk版本
在 maven/conf/settings.xml 的< proxies>标签中,添加如下配置,然后保存文件即可!
<profile>
  <id>jdk-1.8id>
  <activation>
	<activeByDefault>trueactiveByDefault>
	<jdk>1.8jdk>
  activation>

  <properties>
	<maven.compiler.source>1.8maven.compiler.source>
	<maven.compiler.target>1.8maven.compiler.target>
	<maven.compiler.compilerVersion>1.8maven.compiler.compilerVersion>
  properties>
profile>
在IDEA中配置Maven
首先来到IDEA的欢迎界面,然后点击【Configure】—【Settings】;


5、Servlet
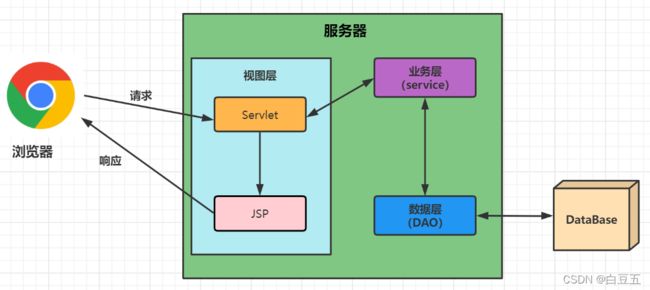
- Servlet 全称 Server Applet,是Java Web应用开发的基石,与平台无关性的组件。
- 它是运行在web服务器上的Java小程序,负责与客户端进行通信(接收请求、发出响应)。
- Servlet 可以响应任何类型的请求,但绝大多数情况下Servlet只用来扩展基于HTTP协议的Web服务器。
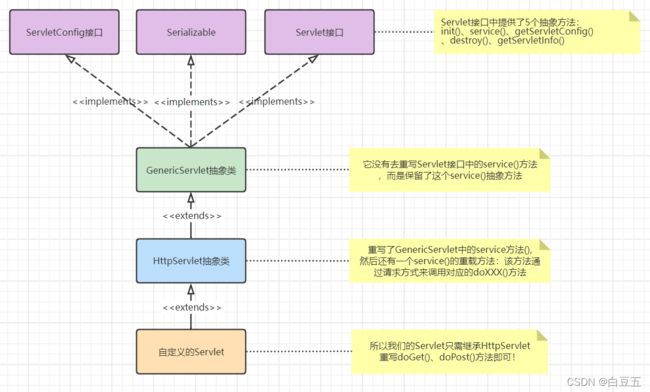
- 通常我们把实现了
javax.servlet.Servlet接口的Java程序,称之为Servlet 。 - Servlet API 是sun公司提供与web容器通信的一组接口和类。
Servlet 3.0 API 有以下4个包组成:
- javax.servlet包,定义了开发独立于协议的服务器小程序的接口和类。
- javax.servlet.http包,定义了开发采用HTTP协议通信的服务器小程序的接口和类。
- javax.servlet.annotation包,定义9个注解类型和2个枚举类型。
- javax.servlet.descriptor包,定义了访问Web应用程序配置信息的类型。
public interface Servlet {
    // 用来初始化Servlet资源,创建Servlet对象时调用该方法,只执行一次
    public void init(ServletConfig config) throws ServletException;

    // ServletConfig是容器向servlet传递参数的载体
    public ServletConfig getServletConfig();

    // 用来接收客户端请求对象,执行业务操作,然后利用响应对象响应客户端请求
    public void service(ServletRequest req, ServletResponse res) throws ServletException, IOException;

    //获取servlet相关信息
    public String getServletInfo();

    // 销毁Servlet,会自动调用该方法来回收资源
    public void destroy();
}
JSP/Servlet 生命周期
JSP 的本质就是 Servlet ,开发者编写的JSP页面将由web容器编译成对应的Servlet,当Servlet在容器中运行时,其实例的创建和销毁等都不是程序员决定的,而是web容器进行控制的。
创建Servlet实例的有两个时机:
- 客户端第一次请求某个Servlet时,系统会创建该Servlet实例;
- web应用启动时立即创建Servlet实例,即
load-on-startup Servlet。
Servlet 的生命周期:
- 创建Servlet实例;
- web容器调用 Servlet 的
init()方法,对Servlet进行初始化; - Servlet 初始化后,将一直存在容器中,用于响应客户端请求。如果客户端发送的是Post请求,容器会调用Servlet的doPost()方法处理并响应客户端请求。或者统一使用
service()方法来处理响应客户端的请求。 - 当web容器决定销毁Servlet时,会调用Servlet的
destroy()方法,通常在关闭web应用的时候销毁Servlet。
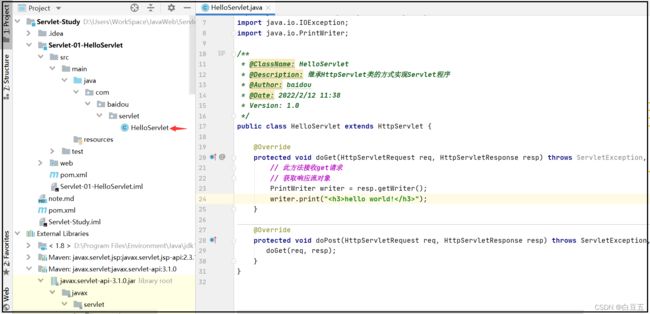
5.1、编写第一个Servlet程序
向pom.xml中导入依赖:
 <dependency>
     <groupId>javax.servletgroupId>
     <artifactId>javax.servlet-apiartifactId>
     <version>3.1.0version>


 dependency>

 <dependency>
     <groupId>javax.servlet.jspgroupId>
     <artifactId>javax.servlet.jsp-apiartifactId>
     <version>2.3.1version>

 dependency>
编写一个Servlet程序:
package com.baidou.servlet;

import javax.servlet.ServletException;
import javax.servlet.http.HttpServlet;
import javax.servlet.http.HttpServletRequest;
import javax.servlet.http.HttpServletResponse;
import java.io.IOException;
import java.io.PrintWriter;

/**
 * @ClassName: HelloServlet
 * @Description: 继承HttpServlet类的方式实现Servlet程序
 * @Author: baidou
 * @Date: 2022/2/12 11:38
 * Version: 1.0
 */
public class HelloServlet extends HttpServlet {

    @Override
    protected void doGet(HttpServletRequest req, HttpServletResponse resp) throws ServletException, IOException {
        // 此方法接收get请求
        // 获取响应流对象
        PrintWriter writer = resp.getWriter();
        writer.print("hello world!");
    }

    @Override
    protected void doPost(HttpServletRequest req, HttpServletResponse resp) throws ServletException, IOException {
       doGet(req, resp);
    }
}
在web.xml中注册这个Servlet:
<servlet>
    <servlet-name>helloServletservlet-name>
    <servlet-class>com.baidou.servlet.HelloServletservlet-class>
servlet>

<servlet-mapping>
    <servlet-name>helloServletservlet-name>
    <url-pattern>/hellourl-pattern>
servlet-mapping>
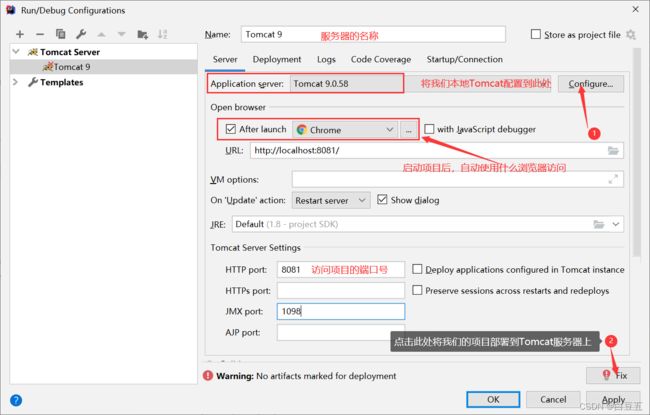
启动Tomcat服务器:

有时候启动项目的时候会报 Error:(3, 21) java:程序包javax.servlet不存在 ,说明我们Maven项目导入的依赖它没有识别到,需要我们手动将jar包导入。
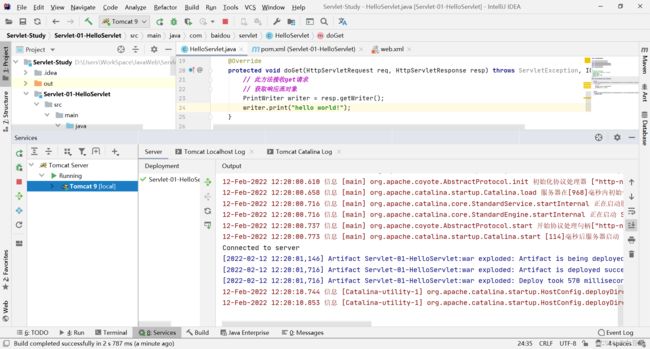
在浏览器中访问:http://localhost:8081/helloservlet/hello

5.2、ServletContext
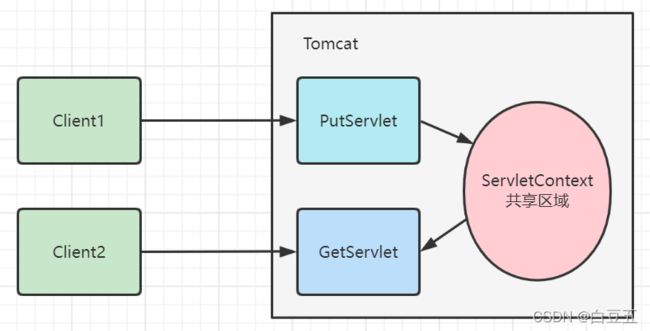
- ServletContext 是一个接口,它表示Servlet上下文对象;
- 当web容器启动时,它会为每一个web应用创建一个对应的ServletContext对象(共享区域),他可以被web应用中所有JSP/Servlet共享。
ServletContext的作用:
- 获取web.xml中配置的初始参数,
context-param; - 获取当前的工程路径;
- 获取工程部署后在服务器硬盘上的绝对路径;
- 共享数据;
- 读取资源文件;
- 请求转发getRequestDispatcher();
获取web.xml中配置的初始参数参数,context-param
在web.xml中配置context-param参数:
 <context-param>
     <param-name>nameparam-name>
     <param-value>白豆五param-value>
 context-param>
 <context-param>
     <param-name>pwdparam-name>
     <param-value>123456param-value>
 context-param>
创建一个Servlet来读取这些参数:
// 使用注解的方式注册这个Servlet
@WebServlet(name = "contextServlet", urlPatterns = "/contextServlet")
public class ContextServlet extends HttpServlet {

    @Override
    protected void doGet(HttpServletRequest req, HttpServletResponse resp) throws ServletException, IOException {
        // 获取ServletContext对象
        //ServletContext context = getServletConfig().getServletContext();
        ServletContext context = this.getServletContext();
        // 获取初始化参数
        String name = context.getInitParameter("name");
        String pwd = context.getInitParameter("pwd");
        System.out.println("name==="+name);
        System.out.println("pwd==="+pwd);
    }

    @Override
    protected void doPost(HttpServletRequest req, HttpServletResponse resp) throws ServletException, IOException {
        doGet(req, resp);
    }
}
获取当前的工程路径
// 使用注解的方式注册这个Servlet
@WebServlet(name = "contextServlet", urlPatterns = "/contextServlet")
public class ContextServlet extends HttpServlet {

    @Override
    protected void doGet(HttpServletRequest req, HttpServletResponse resp) throws ServletException, IOException {
        // 获取ServletContext对象
        //ServletContext context = getServletConfig().getServletContext();
        ServletContext context = this.getServletContext();

        // 获取当前工程的路径
        System.out.println(context.getContextPath());// helloservlet
    }

    @Override
    protected void doPost(HttpServletRequest req, HttpServletResponse resp) throws ServletException, IOException {
        doGet(req, resp);
    }
}
获取工程部署后在服务器硬盘上的绝对路径
// 使用注解的方式注册这个Servlet
@WebServlet(name = "contextServlet", urlPatterns = "/contextServlet")
public class ContextServlet extends HttpServlet {

    @Override
    protected void doGet(HttpServletRequest req, HttpServletResponse resp) throws ServletException, IOException {
        // 获取ServletContext对象
        //ServletContext context = getServletConfig().getServletContext();
        ServletContext context = this.getServletContext();

        // 获取工程部署后在服务器硬盘上的绝对路径
        System.out.println("工程部署的路径:"+context.getRealPath("/"));
        System.out.println("Java面试宝典在工程部署的路径:" + context.getRealPath("/doc/Java面试宝典.pdf"));
    }

    @Override
    protected void doPost(HttpServletRequest req, HttpServletResponse resp) throws ServletException, IOException {
        doGet(req, resp);
    }
}
共享数据
创建两个servlet,一个用来存储数据,一个用来读取数据;
/**
 * @ClassName: PutServlet
 * @Description: 向ServletContext中存取数据
 * @Author: baidou
 * @Date: 2022/2/13 17:33
 * Version: 1.0
 */

// 使用注解的方式注册这个Servlet
@WebServlet(name = "PutServlet", urlPatterns = "/put")
public class PutServlet extends HttpServlet {
    @Override
    protected void doGet(HttpServletRequest req, HttpServletResponse resp) throws ServletException, IOException {
        ServletContext context = this.getServletContext();
        context.setAttribute("name","白豆五");
    }

    @Override
    protected void doPost(HttpServletRequest req, HttpServletResponse resp) throws ServletException, IOException {
        doGet(req, resp);
    }
}
/**
 * @ClassName: GetServlet
 * @Description: 获取ServletContext中的数据
 * @Author: baidou
 * @Date: 2022/2/13 17:33
 * Version: 1.0
 */
// 使用注解的方式注册这个Servlet
@WebServlet(name = "GetServlet", urlPatterns = "/get")
public class GetServlet extends HttpServlet {
    @Override
    protected void doGet(HttpServletRequest req, HttpServletResponse resp) throws ServletException, IOException {
        ServletContext context = this.getServletContext();
        String name = (String) context.getAttribute("name");

        resp.setContentType("text/html");
        resp.setCharacterEncoding("UTF-8");
        resp.getWriter().print("name===" + name);
    }

    @Override
    protected void doPost(HttpServletRequest req, HttpServletResponse resp) throws ServletException, IOException {
        doGet(req, resp);
    }
}
5.3、HttpServletResponse
Web服务器收到客户端的http请求,会针对每一次请求,分别创建一个用于代表请求的HttpServletRequest对象、和代表响应的HttpServletResponse对象。
负责向浏览器发送数据的方法
ServletOutputStream getOutputStream() throws IOException;

PrintWriter getWriter() throws IOException;
负责向浏览器发送响应头的方法
void addDateHeader(String var1, long var2);

void addHeader(String var1, String var2);

void addIntHeader(String var1, int var2);

void setHeader(String var1, String var2);

void setDateHeader(String var1, long var2);

void setIntHeader(String var1, int var2);
负责向客户端(浏览器)发送响应状态码的
void setStatus(int var1);
响应状态码的常量:
int SC_CONTINUE = 100;
int SC_SWITCHING_PROTOCOLS = 101;
int SC_OK = 200;
int SC_CREATED = 201;
int SC_ACCEPTED = 202;
int SC_NON_AUTHORITATIVE_INFORMATION = 203;
int SC_NO_CONTENT = 204;
int SC_RESET_CONTENT = 205;
int SC_PARTIAL_CONTENT = 206;
int SC_MULTIPLE_CHOICES = 300;
int SC_MOVED_PERMANENTLY = 301;
int SC_MOVED_TEMPORARILY = 302;
int SC_FOUND = 302;
int SC_SEE_OTHER = 303;
int SC_NOT_MODIFIED = 304;
int SC_USE_PROXY = 305;
int SC_TEMPORARY_REDIRECT = 307;
int SC_BAD_REQUEST = 400;
int SC_UNAUTHORIZED = 401;
int SC_PAYMENT_REQUIRED = 402;
int SC_FORBIDDEN = 403;
int SC_NOT_FOUND = 404;
int SC_METHOD_NOT_ALLOWED = 405;
int SC_NOT_ACCEPTABLE = 406;
int SC_PROXY_AUTHENTICATION_REQUIRED = 407;
int SC_REQUEST_TIMEOUT = 408;
int SC_CONFLICT = 409;
int SC_GONE = 410;
int SC_LENGTH_REQUIRED = 411;
int SC_PRECONDITION_FAILED = 412;
int SC_REQUEST_ENTITY_TOO_LARGE = 413;
int SC_REQUEST_URI_TOO_LONG = 414;
int SC_UNSUPPORTED_MEDIA_TYPE = 415;
int SC_REQUESTED_RANGE_NOT_SATISFIABLE = 416;
int SC_EXPECTATION_FAILED = 417;
int SC_INTERNAL_SERVER_ERROR = 500;
int SC_NOT_IMPLEMENTED = 501;
int SC_BAD_GATEWAY = 502;
int SC_SERVICE_UNAVAILABLE = 503;
int SC_GATEWAY_TIMEOUT = 504;
int SC_HTTP_VERSION_NOT_SUPPORTED = 505;
重定向的方法
void sendRedirect(String var1) throws IOException;
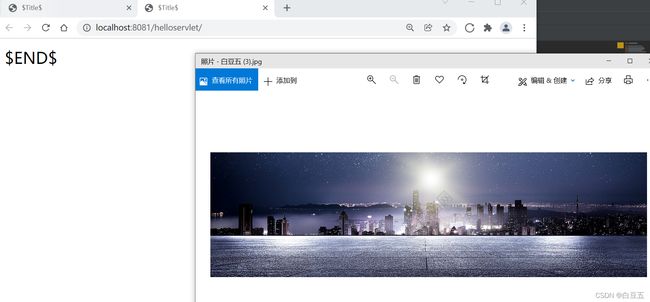
【示例】:文件下载
/**
 * @ClassName: DownloadServlet
 * @Description: 实现文件下载
 * @Author: baidou
 * @Date: 2022/2/13 19:23
 * Version: 1.0
 */
@WebServlet(name = "downloadServlet", urlPatterns = "/down")
public class DownloadServlet extends HttpServlet {
    @Override
    protected void doGet(HttpServletRequest req, HttpServletResponse resp) throws ServletException, IOException {
        // 获取文件的输入流
        InputStream in = this.getServletContext().getResourceAsStream("/WEB-INF/image/白豆五.jpg");
        String fileName = "白豆五.jpg";

        // 告诉浏览器以附件的形式下载, URLEncoder.encode(fileName,"UTF-8")处理中文乱码问题
        //resp.setContentType("application/x-msdownload;");
        resp.setHeader("Content-Disposition", "attachment;filename=" + URLEncoder.encode(fileName, "UTF-8"));

        // 获取输出流
        OutputStream out = resp.getOutputStream();

        // 设置缓冲区
        int len = 0;
        byte[] buffer = new byte[1024];

        // 将输入流中的数据写到buffer缓冲区中
        while ((len = in.read(buffer)) > 0) {
            //将缓冲区中的数据输出到客户端
            out.write(buffer, 0, len);
        }
        out.close();
        in.close();
    }

    @Override
    protected void doPost(HttpServletRequest req, HttpServletResponse resp) throws ServletException, IOException {
        super.doGet(req, resp);
    }
}
/**
 * @ClassName: ImageServlet
 * @Description: 实现验证码功能
 * @Author: baidou
 * @Date: 2022/2/14 10:13
 * Version: 1.0
 */
@WebServlet(name = "imageServler", urlPatterns = "/image")
public class ImageServlet extends HttpServlet {
    @Override
    protected void doGet(HttpServletRequest req, HttpServletResponse resp) throws ServletException, IOException {

        // 让浏览器3秒自动刷新一次
        //resp.setHeader("refresh","3");

        //在内存中创建一张图片,宽度:80px 高度:20px  图片类型:BufferedImage.TYPE_INT_BGR不透明的图片
        BufferedImage image = new BufferedImage(162, 40, BufferedImage.TYPE_INT_BGR);

        // 得到这张图片
        Graphics2D g = (Graphics2D) image.getGraphics();
        // 设置图片的背景颜色
        g.setColor(Color.pink);
        // 以矩形的方式填充
        g.fillRect(0, 0, 162, 40);

        //给图片写数据
        g.setColor(Color.BLUE);
        g.setFont(new Font("黑体", Font.ITALIC, 20));
        //g.drawString(randomNum(), 0, 20);
        g.drawString("程序猿不过情人节", 0, 30);

        // 画干扰线
        g.setColor(Color.RED);
        g.drawLine(0, 30, 40, 0);
        g.setColor(Color.GREEN);
        g.drawLine(0, 0, 160, 30);

        //告诉浏览器,这个请求用图片的方式打开
        resp.setContentType("image/jpeg");

        //网站存在缓存,不让浏览器缓存
        resp.setDateHeader("expires", -1);
        resp.setHeader("Cache-Control", "no-cache");
        resp.setHeader("Pragma", "no-cache");

        //把图片写给浏览器
        ImageIO.write(image, "jpg", resp.getOutputStream());

    }

    /**
     * 生成7位随机数
     *
     * @return num
     */
    private String randomNum() {
        Random random = new Random();
        String num = random.nextInt(9999999) + "";
        StringBuffer buffer = new StringBuffer();
        // 不够7位用0填充
        for (int i = 0; i < 7 - num.length(); i++) {
            buffer.append("0");
        }
        return num + buffer.toString();
    }

    @Override
    protected void doPost(HttpServletRequest req, HttpServletResponse resp) throws ServletException, IOException {
        doGet(req, resp);
    }
}
【示例】:实现重定向
<%@ page contentType="text/html;charset=UTF-8" language="java" %>
<html>
<head>
    <title>logintitle>
head>
<body>
<form action="${pageContext.request.contextPath}/login" method="post">
    <p>账号:<input type="text" name="name" required="required">p>
    <p>密码:<input type="password" name="pwd" required="required">p>
    <p>
        <input type="submit" value="登录">
        <input type="reset" value="重置">
    p>
form>
body>
html>
<%@ page contentType="text/html;charset=UTF-8" language="java" %>
<html>
  <head>
    <title>welcometitle>
  head>
  <body>
      <h3>登录成功!h3>
  body>
html>
@WebServlet("/login")
public class LoginServlet extends HttpServlet {
    @Override
    protected void doGet(HttpServletRequest req, HttpServletResponse resp) throws ServletException, IOException {
        //处理乱码问题
        req.setCharacterEncoding("UTF-8");
        resp.setCharacterEncoding("UTF-8");
        // 获取表单的数据
        String name = req.getParameter("name");
        String pwd = req.getParameter("pwd");
        if ("白豆五".equals(name)&&"123456".equals(pwd)){
             // 转发
             req.getRequestDispatcher("welcome.jsp").forward(req,resp);
        }else{
           // 重定向
           resp.sendRedirect(getServletContext().getContextPath()+"/index.jsp");
        }
    }

    @Override
    protected void doPost(HttpServletRequest req, HttpServletResponse resp) throws ServletException, IOException {
        doGet(req, resp);
    }
}
- 重定向,地址栏会发生变化,可以访问其他站点(服务器)的资源,重定向是两次请求,不能使用request对象来共享数据。
- 转发,地址栏路径不变,能访问当前服务器下的资源,转发是一次请求,意味着可以使用request对象来共享数据。
5.4、HttpServletRequest
HttpServletRequest对象代表客户端的请求,当客户端通过HTTP协议访问服务器时,HTTP请求头中的所有信息都封装在这个对象中,通过这个对象提供的方法,可以获得客户端请求的所有信息。
获取客户端信息
//获取客户端发出请求时的完整URL。
StringBuffer getRequestURL();

//获取请求行中的资源名部分。
String getRequestURI();

//获取请求行中的参数部分
String getQueryString();

//获取请求URL中的额外路径信息。额外路径信息是请求URL中的位于Servlet的路径之后和查询参数之前的内容,它以“/”开头
String getPathInfo();

// 获取发出请求的客户端的IP地址
 String getRemoteAddr();

//获取发出请求的客户端的完整主机名
String getRemoteHost();

//获取客户端所使用的网络端口号
int getRemotePort();

//获取WEB服务器的IP地址
String getLocalAddr();

//获取WEB服务器的主机名
String getLocalName();
示例:
@WebServlet("/getContent")
public class GetContentServlet extends HttpServlet {
@Override
protected void doGet(HttpServletRequest req, HttpServletResponse resp) throws ServletException, IOException {
req.setCharacterEncoding("UTF-8");
resp.setCharacterEncoding("UTF-8");
resp.setContentType("text/html;charset=UTF-8");
// 获取请求的URL
String requestURI = req.getRequestURI();
// 获取客户端的IP地址
String remoteAddr = req.getRemoteAddr();
// 获取客户端主机名
String remoteHost = req.getRemoteHost();
// 获取客户端所使用的网络端口号
int remotePort = req.getRemotePort();
// 获取WEB服务器的主机名
String localName = req.getLocalName();
//获取WEB服务器的IP地址
String localAddr = req.getLocalAddr();
// 响应流对象
PrintWriter out = resp.getWriter();
out.write("获取客户端信息如下:");
out.write("
");
out.write("获取请求的URL:" + requestURI);
out.write("
");
out.write("获取客户端的IP地址:" + remoteAddr);
out.write("
");
out.write("获取客户端主机名:" + remoteHost);
out.write("
");
out.write("获取客户端所使用的网络端口号:" + remotePort);
out.write("
");
out.write("获取WEB服务器的主机名:" + localName);
out.write("
");
out.write("获取WEB服务器的IP地址:" + localAddr);
// 释放资源
out.close();
}
@Override
protected void doPost(HttpServletRequest req, HttpServletResponse resp) throws ServletException, IOException {
doGet(req, resp);
}
}
获取客户端请求头
String getHeader(String var1);

Enumeration<String> getHeaders(String var1);

Enumeration<String> getHeaderNames();
获得客户端提交的数据
String getParameter(String var1);

String[] getParameterValues(String var1);

Enumeration<String> getParameterNames();

Map<String, String[]> getParameterMap();
请求转发
指一个web资源收到客户端请求后,通知服务器去调用另外一个web资源进行处理。
实现请求转发的方式:
-
通过ServletContext的getRequestDispatcher(String path)方法,该方法返回一个RequestDispatcher对象,调用这个对象的forward方法可以实现请求转发。
-
通过request对象提供的getRequestDispatche(String path)方法,该方法返回一个RequestDispatcher对象,调用这个对象的forward方法可以实现请求转发。
request对象作为一个域对象(Map容器)使用时,主要是有以下四个操作:
- setAttribute(String name,Object o)方法,将数据作为request对象的属性存放到request对象中;
- getAttribute(String name)方法,获取request对象的name属性的属性值;
- removeAttribute(String name)方法,移除request对象的name属性;
- getAttributeNames()方法,获取request对象的所有属性名;
6、Cookie、Session
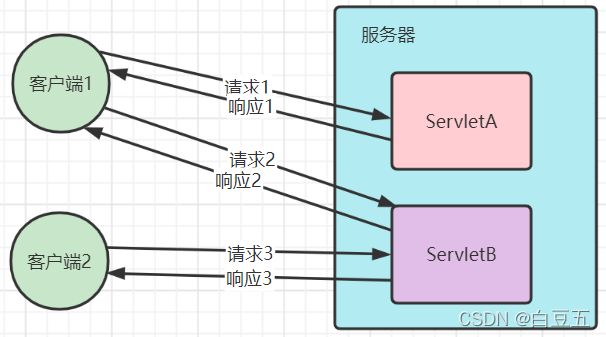
会话:指用户打开浏览器,访问web服务器的资源时,会话建立,直到有一方断开连接,则会话结束。在一次会话中可以包含多个请求和响应。
会话跟踪:是一种维护浏览器状态的方法,服务器需要识别多次请求是否来自于同一个浏览器,以便于在同一次会话的多次请求间共享数据。
HTTP协议是无状态的,每次浏览器向服务器请求时,服务器都会将该请求视为新请求,因此我们需要会话跟踪技术来实现会话内数据共享。
实现方式:
- 客户端会话跟踪技术:Cookie
- 服务端会话跟踪技术:Session
6.1、Cookie
Cookie:客户端会话技术,将数据保存到客户端,以后每次请求都携带Cookie数据进行访问,例如:在浏览器中记住账号。
Cookie的使用
发送Cookie:
// 1、创建Cookie对象,设置数据
Cookie cookie = new Cookie("name","白豆五");
// 2、发送Cookie到客户端,使用response对象
response.addCookie(cookie);
获取Cookie:
// 1、获取客户端携带的所有Cookie,使用request对象
Cookie[] cookies = req.getCookies();

// 2、遍历数组,获取每一个Cookie对象:for
for (Cookie cookie : cookies) {
    // 3、使用Cookie对象方法获取数据
    String name = cookie.getName();
    if ("name".equals(name)) {
    String value = cookie.getValue();
    System.out.println("cookie名称===" + name);
    System.out.println("cookie内容===" + value);
    }
}
Cookie的原理
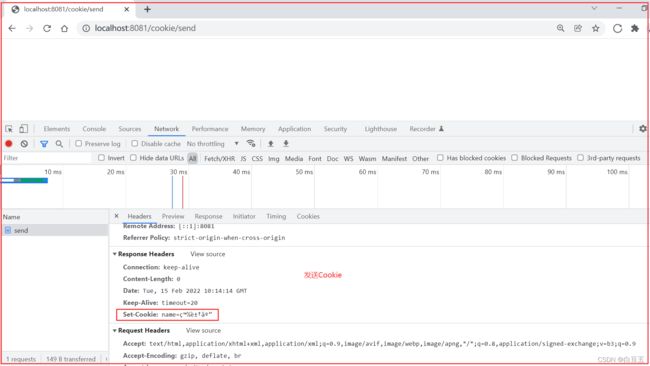
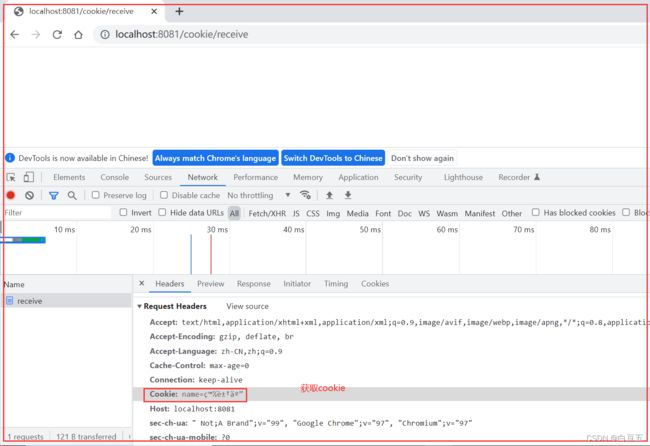
Cookie的实现是基于HTTP协议的,响应头:set-cookie,请求头:cookie;

Cookie 存活时间
默认情况下,Cookie存储在浏览器内存中,当浏览器关闭时,内存释放,则Cookie被销毁。
设置Cookie的存活时间,setMaxAge(int seconds) ;
- seconds为正数:会将Cookie写入浏览器所在电脑的硬盘上,做持久化存储,到时间自动删除。
- seconds为负数:默认值,Cookie在当前浏览器内存中,当浏览器关闭时,则Cookie被销毁。
- seconds为零:删除对应的Cookie。
示例代码如下:
@WebServlet("/send")
public class SendCookieServlet extends HttpServlet {
    @Override
    protected void doGet(HttpServletRequest req, HttpServletResponse resp) throws ServletException, IOException {
        // 创建Cookie对象
        Cookie cookie = new Cookie("name", "白豆五");

        // 设置存活时间 1周 7天
        cookie.setMaxAge(7*24*60*60);
        // 发送Cookie
        resp.addCookie(cookie);
    }

    @Override
    protected void doPost(HttpServletRequest req, HttpServletResponse resp) throws ServletException, IOException {
        doGet(req, resp);
    }
}
Cookie 存储中文
- Cookie 不能直接存储中文;
- 如果要存储中文,则需要进行转码,URL编码
示例代码如下:
@WebServlet("/send")
public class SendCookieServlet extends HttpServlet {
    @Override
    protected void doGet(HttpServletRequest req, HttpServletResponse resp) throws ServletException, IOException {

        String value = "白豆五";
        //URL编码
        value = URLEncoder.encode(value, "UTF-8");
        System.out.println("存储数据===" + value);

        // 创建Cookie对象
        Cookie cookie = new Cookie("name", value);

        // 设置存活时间 1周 7天
        cookie.setMaxAge(7 * 24 * 60 * 60);
        // 发送Cookie
        resp.addCookie(cookie);
    }

    @Override
    protected void doPost(HttpServletRequest req, HttpServletResponse resp) throws ServletException, IOException {
        doGet(req, resp);
    }
}
@WebServlet("/receive")
public class ReceiveCookieServlet extends HttpServlet {
    @Override
    protected void doGet(HttpServletRequest req, HttpServletResponse resp) throws ServletException, IOException {
        // 获取客户端携带的所有Cookie,使用request对象
        Cookie[] cookies = req.getCookies();

        // 遍历数组,获取每一个Cookie对象
        for (Cookie cookie : cookies) {
            // 使用Cookie对象方法获取数据
            String name = cookie.getName();
            if ("name".equals(name)) {
                String value = cookie.getValue();
                //URL解码
                value = URLDecoder.decode(value,"UTF-8");
                System.out.println("cookie名称===" + name);
                System.out.println("cookie内容===" + value);
            }
        }
    }

    @Override
    protected void doPost(HttpServletRequest req, HttpServletResponse resp) throws ServletException, IOException {
        doGet(req, resp);
    }
}
6.2、Session
Session:服务端会话技术,将数据保存到服务端。
就好比,我们在淘宝登录账号后,跳转别的页面时都不用重新登录。
JavaEE 提供 HttpSession 接口,来实现一次会话的多次请求之间的数据共享。
Session的使用
获取Session对象:
HttpSession session = request.getSession();
Session对象的功能:
// 存储数据到Session域中
void setAttribute(String name, Object value);

// 根据 Key,获取对应的值
Object getAttribute(String name);

// 根据 key,删除对应的键值对
void removeAttribute(String name);
示例代码如下:
@WebServlet("/a")
public class ServletA extends HttpServlet {

    @Override
    protected void doGet(HttpServletRequest req, HttpServletResponse resp) throws ServletException, IOException {
        // 获取Session对象
        HttpSession session = req.getSession();
        // 存储数据
        session.setAttribute("name","白豆五");
        session.setAttribute("age",18);
    }

    @Override
    protected void doPost(HttpServletRequest req, HttpServletResponse resp) throws ServletException, IOException {
        doGet(req, resp);
    }
}
@WebServlet("/b")
public class ServletB extends HttpServlet {

    @Override
    protected void doGet(HttpServletRequest req, HttpServletResponse resp) throws ServletException, IOException {
        // 获取session对象
        HttpSession session = req.getSession();
        // 获取数据
        String name = (String) session.getAttribute("name");
        String age = (String) session.getAttribute("age");
        System.out.println("name====" + name);
        System.out.println("age====" + age);
    }

    @Override
    protected void doPost(HttpServletRequest req, HttpServletResponse resp) throws ServletException, IOException {
        doGet(req, resp);
    }
}
Session原理
Session是基于Cookie实现的。
Session钝化、活化
服务器重启后,Session中的数据是否还在?
- 钝化:在服务器正常关闭后,Tomcat会自动将Session数据写入硬盘的文件中。
- 活化:再次启动服务器后,从文件中加载数据到Session中。
Session销毁
- 默认情况下,无操作,30分钟自动销毁;
<session-config>
	<session-timeout>30session-timeout>
session-config>
- 调用Session对象的invalidate()方法。
总结
Session和Cookie都是来完成一次会话内多次请求间数据共享的。
两者的区别:
- 存储位置:cookie是将数据存储在客户端,session将数据存储在服务端;
- 安全性:cookie不安全,session安全;
- 数据大小:cookie最大3kb,session无大小限制;
- 存储时间:cookie可以长期存储,session默认30分钟;
- 服务器性能:cookie不占服务器资源,session占用服务器资源;
7、Thymeleaf
官网:https://www.thymeleaf.org/

Thymeleaf(直译:百里香) 是一个跟 Velocity、FreeMarker 类似的模板引擎,它可以完全替代JSP使用。(这样前端就不用把文件转jsp了,也可以实现前后端分离)
Thymeleaf 能创建原始的模板,这些模板是纯HTML的,能够像静态的HTML那样以原始的方式编写和预览,并且能够在运行时渲染动态模型数据。除此之外,Thymeleaf是与Servlet 没有耦合关系的,这样它就能够用在JSP不能使用的领域上。

7.1、快速入门
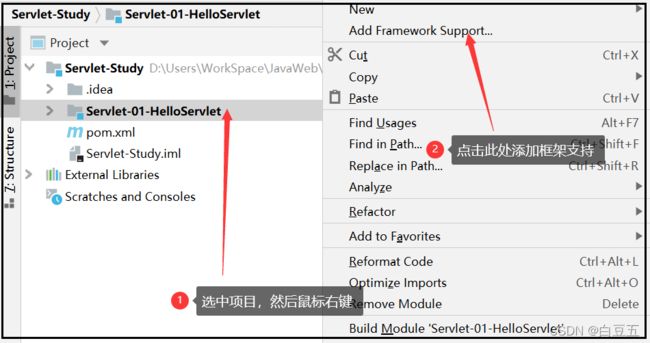
1、创建一个普通的Maven工程,并添加web支持;
2、引入Thymeleaf 和 其他的依赖(大概9个):
<dependency>
     <groupId>javax.servletgroupId>
     <artifactId>javax.servlet-apiartifactId>
     <version>3.1.0version>


dependency>


<dependency>
    <groupId>org.thymeleafgroupId>
    <artifactId>thymeleafartifactId>
    <version>3.0.12.RELEASEversion>
dependency>


<dependency>
    <groupId>org.slf4jgroupId>
    <artifactId>slf4j-apiartifactId>
    <version>1.7.25version>
dependency>


<dependency>
    <groupId>org.slf4jgroupId>
    <artifactId>slf4j-log4j12artifactId>
    <version>1.7.25version>
    <scope>testscope>
dependency>


<dependency>
    <groupId>org.attoparsergroupId>
    <artifactId>attoparserartifactId>
    <version>2.0.5.RELEASEversion>
dependency>


<dependency>
    <groupId>org.javassistgroupId>
    <artifactId>javassistartifactId>
    <version>3.20.0-GAversion>
dependency>


<dependency>
    <groupId>ognlgroupId>
    <artifactId>ognlartifactId>
    <version>3.1.26version>
dependency>


<dependency>
    <groupId>org.unbescapegroupId>
    <artifactId>unbescapeartifactId>
    <version>1.1.6.RELEASEversion>
dependency>


<dependency>
    <groupId>log4jgroupId>
    <artifactId>log4jartifactId>
    <version>1.2.15version>
dependency>
3、创建并配置官网提供的模板:
/**
 * @ClassName: GTVGApplication
 * @Description: 创建并配置模板引擎
 * @Author: baidou
 * @Date: 2022/2/16 19:26
 * Version: 1.0
 */
public class GTVGApplication {

    private final TemplateEngine templateEngine;
	// 有参构造器,servletContext用于存储资源
    public GTVGApplication(final ServletContext servletContext) {
        // 1、模板解析器
        ServletContextTemplateResolver templateResolver = new ServletContextTemplateResolver(servletContext);

		// 2、对模板解析器进行配置
        // HTML是默认模板模式,但我们还是将它设置,是为了更好地理解代码
        templateResolver.setTemplateMode(TemplateMode.HTML);
        // 模板引擎存放位置
        templateResolver.setPrefix("/WEB-INF/templates/"); //前缀
        // 模板页面文件后缀
        templateResolver.setSuffix(".html");//后缀
        // 模板的缓存的生存时间默认为1小时,如果没有设置,将被缓存到LRU(缓存淘汰算法)中
        templateResolver.setCacheTTLMs(Long.valueOf(3600000L));

        // 缓存默认设置为 true
        // 缓存默认为true,若希望修改模板后自动更改(如调试时),可设置为false
        templateResolver.setCacheable(false);

        // 设置字符集
        templateResolver.setCharacterEncoding("UTF-8");

        // 3、创建模板引擎实例
        this.templateEngine = new TemplateEngine();
        // 4、设置模板解析器
        this.templateEngine.setTemplateResolver(templateResolver);
    }

    /**
     * 获取模板引擎
     * @return templateEngine
     */
    public TemplateEngine getTemplateEngine() {
        return templateEngine;
    }

}
4、编写路由并测试引擎;
/**
 * @ClassName: TestServlet
 * @Description: 测试类
 * @Author: baidou
 * @Date: 2022/2/16 20:16
 * Version: 1.0
 */
@WebServlet(name = "TestServlet",urlPatterns = "/test")
public class TestServlet extends HttpServlet {
    @Override
    protected void doGet(HttpServletRequest req, HttpServletResponse resp) throws ServletException, IOException {
        req.setAttribute("title", "桃李不言下自成蹊");
        req.setAttribute("username","白豆五" );
        resp.setCharacterEncoding("UTF-8");
        // 对配置类进行初始化
        GTVGApplication application = new GTVGApplication(req.getServletContext());
        // 模板引擎对象
        TemplateEngine engine = application.getTemplateEngine();
        // 获取上下文对象(装数据的)
        WebContext context = new WebContext(req, resp, req.getServletContext());
        // 渲染页面,渲染到/WEB-INF/templates/index.html
        engine.process("index", context, resp.getWriter());

    }

    @Override
    protected void doPost(HttpServletRequest req, HttpServletResponse resp) throws ServletException, IOException {
        doGet(req, resp);
    }
}
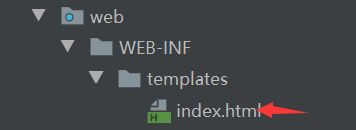
然后在web目录下的/WEB-INF/templates/中创建一个index.html文件,并使用thymeleaf语法获取后台发送的数据:
<html xmlns:th="http://www.thymeleaf.org">
<head>
    <meta charset="UTF-8">
    <title th:text="${title}">testtitle>
head>
<body>
<h1 th:text="${username}">桃李不言下自成蹊h1>
body>
html>
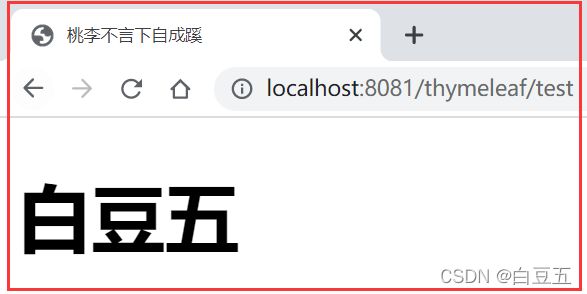
然后在浏览器中访问:http://localhost:8081/thymeleaf/test
7.2、优化模板引擎引入
我们知道每次向后台发送请求都会对GTVGApplication创建实例有点浪费资源,我们能不能把它变成像Servlet、Filter、Listener那样的单例;
Thymeleaf 配置类如下:
/**
 * @ClassName: ThymeleafConfig
 * @Description: Thymeleaf配置类
 * @Author: baidou
 * @Date: 2022/2/17 10:38
 * Version: 1.0
 */
 @WebListener // 通过注解的方式注册监听器
public class ThymeleafConfig implements ServletContextListener {

    private static final String TEMPLATE_ENGINE_ATTR = "com.e-learn.thymeleaf3.TemplateEngineInstance";

	public ThymeleafConfig() {
    }

    // 初始化
    @Override
    public void contextInitialized(ServletContextEvent sce) {
        // 获取servletContext实例
        ServletContext servletContext = sce.getServletContext();
        // 获取TemplateEngine实例
        TemplateEngine engine = new GTVGApplication(servletContext).getTemplateEngine();
        // 将引擎添加到servletContext中
        servletContext.setAttribute(TEMPLATE_ENGINE_ATTR, engine);
    }

    // 销毁
    @Override
    public void contextDestroyed(ServletContextEvent sce) {

    }
}
模板引擎工具类:
@WebListener
public class TemplateEngineUtils {

    private static final String TEMPLATE_ENGINE_ATTR = "com.e-learn.thymeleaf3.TemplateEngineInstance";

    /**
     * 获取模板引擎
     *
     * @param context
     * @return TemplateEngine
     */
    public static TemplateEngine getTemplateEngine(ServletContext context) {
        return (TemplateEngine) context.getAttribute(TEMPLATE_ENGINE_ATTR);
    }
}
测试类:
@WebServlet("/a")
public class TestServlet02 extends HttpServlet {
    @Override
    protected void doGet(HttpServletRequest req, HttpServletResponse resp) throws ServletException, IOException {
        req.setAttribute("title", "傻妞为您服务");
        req.setAttribute("slogan", "请输入开机密码");
        resp.setCharacterEncoding("UTF-8");
        TemplateEngine engine = TemplateEngineUtils.getTemplateEngine(req.getServletContext());
        // 获取上下文对象
        WebContext context = new WebContext(req, resp, req.getServletContext());
        // 渲染页面
        engine.process("welcome", context, resp.getWriter());
    }

    @Override
    protected void doPost(HttpServletRequest req, HttpServletResponse resp) throws ServletException, IOException {
        doGet(req, resp);
    }
}
页面:
<html xmlns:th="http://www.thymeleaf.org">
<head>
    <meta charset="UTF-8">
    <title>欢迎页title>
head>
<body>
<h1 th:text="${title}">桃李不言下自成蹊h1>
<h1 th:text="${slogan}">Hello World!h1>
body>
html>
在浏览器中访问:http://localhost:8081/thymeleaf/a

7.3、Servlet 工具类
引入jackson依赖:
<dependency>
    <groupId>com.fasterxml.jackson.coregroupId>
    <artifactId>jackson-databindartifactId>
    <version>2.9.5version>
dependency>

<dependency>
    <groupId>com.fasterxml.jackson.coregroupId>
    <artifactId>jackson-coreartifactId>
    <version>2.9.5version>
dependency>

<dependency>
    <groupId>com.fasterxml.jackson.coregroupId>
    <artifactId>jackson-annotationsartifactId>
    <version>2.9.5version>
dependency>
Servlet工具类:
/**
 * @ClassName: ThymeleafServlet
 * @Description: Servlet工具类
 * @Author: baidou
 * @Date: 2022/2/17 14:41
 * Version: 1.0
 */
public class ThymeleafServlet extends HttpServlet {
    // 序列化唯一标识
    private static final long serialVersionUID = 8428724747085777119L;
    private static final ObjectMapper objectMapper = new ObjectMapper();

    @Override
    protected void doGet(HttpServletRequest req, HttpServletResponse resp) throws ServletException, IOException {
        excute(req, resp);
    }

    @Override
    protected void doHead(HttpServletRequest req, HttpServletResponse resp) throws ServletException, IOException {
        excute(req, resp);
    }

    @Override
    protected void doPost(HttpServletRequest req, HttpServletResponse resp) throws ServletException, IOException {
        excute(req, resp);
    }

    @Override
    protected void doPut(HttpServletRequest req, HttpServletResponse resp) throws ServletException, IOException {
    }

    @Override
    protected void doDelete(HttpServletRequest req, HttpServletResponse resp) throws ServletException, IOException {
        excute(req, resp);
    }

    @Override
    protected void doOptions(HttpServletRequest req, HttpServletResponse resp) throws ServletException, IOException {
    }

    @Override
    protected void doTrace(HttpServletRequest req, HttpServletResponse resp) throws ServletException, IOException {
        excute(req, resp);
    }

    @Override
    protected void service(HttpServletRequest req, HttpServletResponse resp) throws ServletException, IOException {
        excute(req, resp);
    }

    /**
     * 执行真实的方法
     *
     * @param request
     * @param response
     * @throws IOException
     */
    public void excute(HttpServletRequest request, HttpServletResponse response) throws IOException {

        // 处理中文乱码
        request.setCharacterEncoding("UTF-8");
        response.setCharacterEncoding("UTF-8");

        // 设置MIME类型
        //response.setContentType("text/html;charset=utf-8");

        System.out.println("请求方式===" + request.getMethod());

        // 获取方法名,  参数: ?methodeName=后台方法()
        String methodName = request.getParameter("methodName");

        Class<? extends ThymeleafServlet> clazz = this.getClass();
        try {
            if (StringUtils.isBlank(methodName)) {
                response.setContentType("application/json;charset=utf-8");
                PrintWriter writer = response.getWriter();
                writer.print(objectMapper.writeValueAsString(new ResponseResult<>(ResultCode.PARAM_ERROR.getCode(), ResultCode.PARAM_ERROR.getMsg())));
                writer.flush();
                writer.close();
                return;
            } else {
                // 获取方法
                Method method = clazz.getDeclaredMethod(methodName, HttpServletRequest.class, HttpServletResponse.class);
                // 设置访问
                method.setAccessible(true);
                // 执行方法
                TemplateEngine engine = TemplateEngineUtils.getTemplateEngine(request.getServletContext());
                WebContext context = new WebContext(request, response, request.getServletContext());
                engine.process(url, context, response.getWriter());
            }
        } catch (NoSuchMethodException | IllegalAccessException | InvocationTargetException e) {
            e.printStackTrace();
        }
    }
}
字符串工具类:
/**
 * @ClassName: StringUtils
 * @Description: 字符串工具类
 * @Author: baidou
 * @Date: 2022/2/17 15:20
 * Version: 1.0
 */
public abstract class StringUtils {
    public static boolean isEmpty(String text) {
        if (text == null || "".equals(text)) {
            return true;
        } else {
            return false;
        }
    }

    public static boolean isBlank(String text) {
        if (text == null || "".equals(text.trim())) {
            return true;
        } else {
            return false;
        }
    }
}
结果码的枚举类:
/**
 * @ClassName: ResultCode
 * @Description: 结果码
 * @Author: baidou
 * @Date: 2022/2/17 15:34
 * Version: 1.0
 */
public enum ResultCode {
    /**
     * 操作成功 请求成功
     */
    SUCCESS("200", "操作成功", "请求成功"),
    /**
     * 操作失败 执行失败
     */
    FAILED("10086", "执行失败", "执行失败"),

    /**
     * 参数错误 参数为空或格式不正确
     */
    PARAM_ERROR("10001", "参数错误", "参数为空或格式不正确"),

    /**
     * 登录失败
     */
    LOGIN_FAILED("10002", "登录失败", "登录失败"),

    /**
     * 账号锁定
     */
    LOGIN_LOCKED("10003", "账号锁定", "账号锁定"),


    /**
     * appKey异常 appKey被冻结
     */
    APPKEY_ERROR("10005", "appKey异常", "appKey被冻结"),

    /**
     * 验证码失效 redis中key失效
     */
    TIMEOUT("10006", "验证码失效,请重新发送", "redis中key失效"),

    /**
     * 短信一发送,单位时间内,不会重新发送
     */
    NO_TIMEOUT("10007", "短信已发送,请等待", "短信已发送,单位时间内,不会重新发送"),

    /**
     * 短信一发送,单位时间内,不会重新发送
     */
    CODE_ERROR("10008", "验证码错误,请重新输入", "客户端获取的验证码与redis中存储的验证码不一致"),

    /**
     * 短信一发送,单位时间内,不会重新发送
     */
    NO_LOGIN("10009", "未登录状态", "未登录状态"),

    /**
     * 未知系统异常
     */
    EXCEPTION("10010", "未知系统异常", "未知系统异常"),

    /**
     * 这是在主机名解析时通常出现的暂时错误,它意味着本地服务器没有从权威服务器上收到响应。
     */
    UNKNOWN_HOST("10011", " 这是在主机名解析时通常出现的暂时错误,它意味着本地服务器没有从权威服务器上收到响应。", "这是在主机名解析时通常出现的暂时错误,它意味着本地服务器没有从权威服务器上收到响应。"),

    /**
     * 签名不一致
     */
    INCONSISTENT_SIGNATURE("10012", "签名不一致", "签名不一致"),

    /**
     * 算法不匹配
     */
    ALGORITHM_MISMATCH("10013", "算法不匹配", "算法不匹配"),

    /**
     * token过期失效
     */
    TOKEN_EXPIRATION("10014", "token过期失效", "token过期失效"),

    /**
     * payload失效
     */
    PALLOAD_INVALID("10015", "payload失效", "payload失效"),

    /**
     * 上传失败
     */
    UPLOAD_FAILED("10016", "上传失败", "上传失败"),

    /**
     * appKey不存在 确认appKey是否正确
     */
    APPKEY_NOTHINGNESS("10017", "appKey不存在", "确认appKey是否正确"),


    /**
     * appkey和appSecret不匹配
     */
    APPKEY_MISMATCHING("10030", "appkey和appSecret不匹配", "appkey和appSecret不匹配"),

    /**
     * 数据异常 接口调用异常
     */
    DATA_ERROR("49999", "数据异常", "接口调用异常"),

    /**
     * 数据异常 接口调用异常
     */
    DATA_EMPTY("50000", "未查询到数据", "未查询到数据"),

    /**
     * 手机号已经存在
     */
    MOBILE_EXISTS("50001", "手机号已经存在", "手机号已经存在"),

    /**
     * 手机号不存在
     */
    MOBILE_NOT_EXISTS("50002", "手机号不存在", "手机号不存在"),

    /**
     * 手机号格式错误
     */
    MOBILE_INCORRECT("50003", "请输入正确手机号", "手机号格式不正确");

    /**
     * 状态码
     */
    private String code;
    /**
     * 状态码含义
     */
    private String msg;
    /**
     * 状态码含义描述
     */
    private String desc;

    ResultCode(String code, String msg, String desc) {
        this.code = code;
        this.msg = msg;
        this.desc = desc;
    }

    public String getCode() {
        return code;
    }

    public String getMsg() {
        return msg;
    }

    public String getDesc() {
        return desc;
    }
}
封装跳转的视图和数据:
/**
 * @ClassName: ModelAndView
 * @Description: 封装跳转视图和数据
 * @Author: baidou
 * @Date: 2022/2/17 17:04
 * Version: 1.0
 */
public class ModelAndView {
    private String viewName;
    private ConcurrentHashMap<String, Object> map = new ConcurrentHashMap<>();
    public ModelAndView() {
    }

    public String getViewName() {
        return viewName;
    }

    public void setViewName(String viewName) {
        this.viewName = viewName;
    }

    public ConcurrentHashMap<String, Object> getMap() {
        return map;
    }

    public void addObject(String name, Object value) {
        map.put(name,value);
    }
    public void getObject(String name) {
        map.get(name);
    }

}
测试类:
@WebServlet(urlPatterns = "/h")
public class HelloController extends ThymeleafServlet {
    public String hello(HttpServletRequest request, HttpServletResponse response) {
       model = new ModelAndView();
        model.setViewName("welcome");
        model.addObject("title", "大西瓜不要");
        model.addObject("slogan", "我要小西瓜");
        response.setCharacterEncoding("UTF-8");
        request.setAttribute("map", model.getMap());
        return model.getViewName();
    }
}
页面:
<html xmlns:th="http://www.thymeleaf.org">
<head>
    <meta charset="UTF-8">
    <title>欢迎页title>
head>
<body>

<h1 th:text="${map['title']}">桃李不言下自成蹊h1>
<h1 th:text="${map['slogan']}">Hello World!h1>
body>
html>
在浏览器中访问:http://localhost:8081/thymeleaf/h?methodName=hello

7.4、自定义主页
创建一个Servlet,将注解@WebServlet中value的值设置为空串 "",然后对模板引擎设置跳转的页面和响应的数据。
@WebServlet(name = "IndexController", value = "")
public class IndexController extends HttpServlet {

    public void doGet(HttpServletRequest request, HttpServletResponse response) throws IOException {
        request.setAttribute("title", "欢迎页");
        request.setAttribute("username", "白豆五");
        response.setCharacterEncoding("utf-8");
        TemplateEngine engine = TemplateEngineUtils.getTemplateEngine(request.getServletContext());
        WebContext context = new WebContext(request, response, request.getServletContext());
        engine.process("index", context, response.getWriter());
    }
}
页面:
<html xmlns:th="http://www.thymeleaf.org">
<head>
    <meta charset="UTF-8">
    <title th:text="${title}">testtitle>
head>
<body>
thymeleaf测试页面
<h1 th:text="${username}">桃李不言下自成蹊h1>
body>
html>
在浏览器中访问:http://localhost:8081/thymeleaf/

7.5、引入CSS和JS文件
编写一个路由:
@WebServlet("/t")
public class TestController extends HttpServlet {

    @Override
    protected void doGet(HttpServletRequest req, HttpServletResponse resp) throws ServletException, IOException {
        resp.setCharacterEncoding("utf-8");
        TemplateEngine engine = TemplateEngineUtils.getTemplateEngine(req.getServletContext());
        WebContext context = new WebContext(req, resp, req.getServletContext());
        engine.process("test", context, resp.getWriter());
    }
}
test.html
<html xmlns:th="http://www.thymeleaf.org">
<head>
    <meta charset="utf-8">
    <title>测试页面title>

    <link th:href="@{/script/test.css}" rel="stylesheet" type="text/css">

    <script type="text/javascript" th:src="@{/script/test.js}">script>
head>
<body>

<img th:src="@{/image/R-C.jpg}" alt="图片">

<h1>Hello World!h1>

<p id="app">这是一个段落p>

<button type="button" onclick="displayDate()">显示日期button>
body>
html>
test.css
p {
    color: red;
}
test.js
alert("hello world")
在浏览器中访问:http://localhost:8081/thymeleaf/t
7.6、常用表达式
地址:https://www.cnblogs.com/tuanz/p/8709709.html
示例:
@WebServlet("/www")
public class MsgController extends HttpServlet {
@Override
protected void doGet(HttpServletRequest req, HttpServletResponse resp) throws ServletException, IOException {
resp.setCharacterEncoding("UTF-8");
req.setAttribute("title", "测试页面");
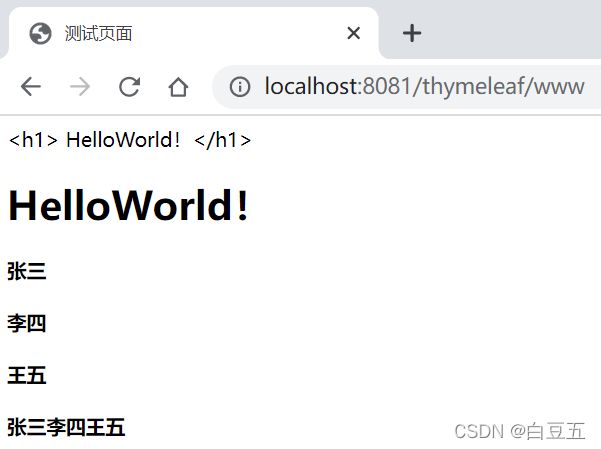
req.setAttribute("tag", " HelloWorld!
");
req.setAttribute("users", Arrays.asList("张三", "李四", "王五"));
TemplateEngine engine = TemplateEngineUtils.getTemplateEngine(req.getServletContext());
WebContext context = new WebContext(req, resp, req.getServletContext());
engine.process("hello",context,resp.getWriter());
}
}
<html xmlns:th="http://www.thymeleaf.org">
<head>
    <meta charset="UTF-8">
    <title th:text="${title}">111title>
head>
<body>
<div th:text="${tag}">div>

<div th:utext="${tag}">div>


<h4 th:each="user:${users}" th:text="${user}">h4>

<h4>

    <span th:each="user:${users}">[[${user}]]span>
h4>
body>
html>
8、Filter
-
Filter :表示过滤器,是 JavaWeb 三大组件之一。
-
过滤器可以把对资源的请求拦截下来,从而实现一些特殊的功能。
-
过滤器一般完成一些通用的操作,比如:权限控制、统一编码处理、敏感字符处理等。
Filter的使用
1、创建一个类,实现Filter接口,并重写其所有方法;
2、使用注解 @WebFilter 来配置Filter拦截资源的路径;
3、在doFilter()方法中编写代码并放行;
【示例】:统一编码配置
@WebFilter("/filter/*")
public class CharacterEncodingFilter implements Filter {

    //初始化:web服务器关闭的时候,过滤器进行初始化
    @Override
    public void init(FilterConfig filterConfig) throws ServletException {


	// 执行顺序:执行放行前逻辑->放行->访问资源->执行放行后逻辑
    @Override
    public void doFilter(ServletRequest request, ServletResponse response, FilterChain chain) throws IOException, ServletException {
        request.setCharacterEncoding("UTF-8");
        response.setCharacterEncoding("UTF-8");
        response.setContentType("text/html;charset=UTF-8");
        // 放行前对request数据进行处理
        System.out.println("CharacterEncodingFilter_放行前");
        // 放行
        chain.doFilter(request, response);
        // 放行后对response数据进行处理
        System.out.println("CharacterEncodingFilter_放行后");
    }

    //销毁:web服务器关闭的时候,过滤器会销毁
    @Override
    public void destroy() {

    }
}
Filter拦截路径配置:
- 拦截具体的资源:
/index.html,只有访问index.html时才会被拦截; - 目录拦截:
/user/*,访问/user/下的所有资源,都会被拦截; - 后缀名拦截:
*.jsp,访问后缀名为jsp的资源,都会被拦截; - 拦截所有:
/*,访问所有资源,都会被拦截;
9、Listener
- Listener:表示监听器,是JavaWeb三大组件之一。
- 作用:监听某个事件的发生,状态的改变。(比如:比如监听application、request、session这三个作用域)
监听器的使用:定义一个类,实现XxxListener接口,重写其所有方法,最后将这个监听器注册。

