【Pytorch(四)】学习如何使用 PyTorch 读取并处理数据集
文章目录
- 学习如何使用 PyTorch 读取并处理数据集
-
- 1. 准备数据集
- 2. 读取并处理数据集 MNIST
学习如何使用 PyTorch 读取并处理数据集
在处理任何机器学习问题之前都需要读取数据,并对数据进行预处理。处理数据样本的代码可能会变得混乱且难以维护,因此 PyTorch 将数据集代码与模型训练代码相分离,从而获得更好的可读性和模块化。
下面我们将以手写数字0~9的数据集 MNIST 为例,学习如何在 PyTorch 中读取和处理数据。
1. 准备数据集
MNIST数据集
2. 读取并处理数据集 MNIST
下面我们来通过 PyTorch 读取和处理 MNIST 数据集。在这一节中我们将把数据集读取到 train_loader(训练数据集)和 test_loader (测试数据集)中。
PyTorch 中与数据读取和预处理相关的模块包括 torchvision 和 torch.utils.data。我们首先导入相关包(torch & torchvision),并查看版本。其中,torch 是顶层的 PyTorch 包和张量库;torchvision 是一个单独的包,通过它可以便捷的访问一些常用的数据集(如 MNIST、Fashion-MNIST、 Cifar 和 ImageNet 等),以及模型架构(如 VGG)和图像转换方法。
import torch  # top-level pytorch package and tensor library
import torchvision

print(torch.__version__)

print(torch.cuda.is_available())
print(torch.version.cuda)
1.7.1+cu110
True
11.0
数据读取和预处理总结起来包括如下几个步骤:
1) 提取原始数据 (extract data from the dataset)
2) 将提取出来的原始数据转换为合适的格式 (transform it into the desirable format (Dataset object))
3) 将数据加载到合适的数据结构中 (load the data into a suitable data structure (DataLoader object))
batch_size_train = 128  # 设置训练集的 batch size,即每批次将参与运算的样本数
batch_size_test = 128  # 设置测试集 batch size
# 我们首先提取原始数据,即使用 PyTorch 的内置函数从网络上获得 MNIST 数据集。
# 数据集下载网址:http://yann.lecun.com/exdb/mnist/
# (大家可在上述网址阅读 MNIST 的详细信息。)

# 此处由于下载数据集可能会卡死,我们为大家准备好了提前下载好的数据集,即本篇
# 开头让大家下载并上传到特定路径的四个压缩包。上传到特定路径是为了让 PyTorch
# 能够找到。


######################### Please explain the following code #########################

# 下述代码除了提取原始数据,还会对原始数据进行预处理 (transform)。经过转换
# 后的数据被保存为一个 Dataset object,其中包含样本及其对应的标签。

# 请同学们查阅资料,在实验报告中对以下代码进行解释,说明其每个参数对应的意义,
# 和代码进行的具体操作。

train_set = torchvision.datasets.MNIST('./dataset_mnist', train=True, download=True,
                                       transform=torchvision.transforms.Compose([
                                           torchvision.transforms.ToTensor(),
                                           torchvision.transforms.Normalize(
                                               (0.1307,), (0.3081,)
                                           )
                                       ])
)

##################################### end ##########################################
# 接下来,请同学们仿照上述训练集,对测试集进行相似处理,并将转换后的测试集数据保存在 test_set 中。

############################ Please finish the code ################################

# test_set = XXX

test_set = torchvision.datasets.MNIST('./dataset_mnist', train=False, download=True,
                                       transform=torchvision.transforms.Compose([
                                           torchvision.transforms.ToTensor(),
                                           torchvision.transforms.Normalize(
                                               (0.1307,), (0.3081,)
                                           )
                                       ])
)


##################################### end ##########################################
# 完成数据转换后,最后一步即将数据 (Dataset) 加载到合适的数据结构中,即 DataLoader。
# DataLoader 可以帮助我们便捷的对数据进行操作,例如我们可以方便的设置 batch_size
# (每一批的样本个数), shuffle(是否随机打乱样本顺序), num_workers(加载数据的时候
# 使用几个子进程)等。
train_loader = torch.utils.data.DataLoader(train_set, batch_size=batch_size_train, shuffle=True)
test_loader = torch.utils.data.DataLoader(test_set, batch_size=batch_size_test, shuffle=True)
我们的数据集已经准备好了,在开始使用 PyTorch 搭建神经网络前,让我们先来查看一下读取到的数据集。
- 查看数据集整体情况
print(len(train_set))  # train_set 中的样本总数
print(train_set.train_labels)  # train_set中的样本标签
print(train_set.train_labels.bincount())  # 查看每一个标签有多少样本
60000
tensor([5, 0, 4,  ..., 5, 6, 8])
tensor([5923, 6742, 5958, 6131, 5842, 5421, 5918, 6265, 5851, 5949])
print(train_set.classes)  # 查看 train_set 的样本类别
print(len(train_set.classes))  # 查看train_set中有所少种类别
print(train_set.class_to_idx)  # 查看样本类别和样本标签的对应关系
['0 - zero', '1 - one', '2 - two', '3 - three', '4 - four', '5 - five', '6 - six', '7 - seven', '8 - eight', '9 - nine']
10
{'0 - zero': 0, '1 - one': 1, '2 - two': 2, '3 - three': 3, '4 - four': 4, '5 - five': 5, '6 - six': 6, '7 - seven': 7, '8 - eight': 8, '9 - nine': 9}
- 查看 Dataset object 中的单个样本
sample = next(iter(train_set))  # get an item from train_set

print("For each item in train_set: \n\n \t type: ", type(sample))  # tuple (image, label)
print("\t Length: ", len(sample), '\n')  # 2
For each item in train_set:

 	 type:
	 Length:  2
image, label = sample # unpack the sample

print("For each image: \n\n \t type: ", type(image)) # rank-3 tensor
print("\t shape: ", image.shape, '\n') # [channel, height, width] = [1, 28, 28]  Note: 仅有3维!
print("For each label: \n\n \t type: ", type(label), '\n')
For each image:

 	 type:
	 shape:  torch.Size([1, 28, 28])

For each label:

 	 type:
import matplotlib.pyplot as plt
import numpy as np
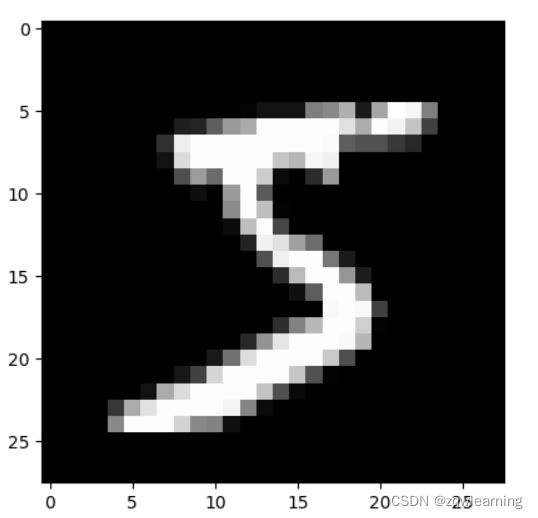
print("Let's check an image: \n ")
plt.imshow(image.squeeze(), cmap='gray')
print(f'label: {label}')
Let's check an image:

label: 5
- 查看 DataLoader object 中一个批次的样本
train_loader_plot = torch.utils.data.DataLoader(
    train_set, batch_size=40
)  # 假设一个批次有40个样本

batch = next(iter(train_loader_plot))
print("type(batch): \t", type(batch))  # list [images, labels]
print("len(batch): \t", len(batch), "\n") # 2

images, labels = batch

print("type(images): \t", type(images))  # rank-4 tensor
print("images.shape: \t", images.shape)  # [batch_size, channel, height, width] = [10, 1, 28, 28]

print("type(labels): \t", type(labels))  # rank-1 tensor
print("labels.shape: \t", labels.shape)  # size=batch size
type(batch):
len(batch): 	 2

type(images):
images.shape: 	 torch.Size([40, 1, 28, 28])
type(labels):
labels.shape: 	 torch.Size([40])
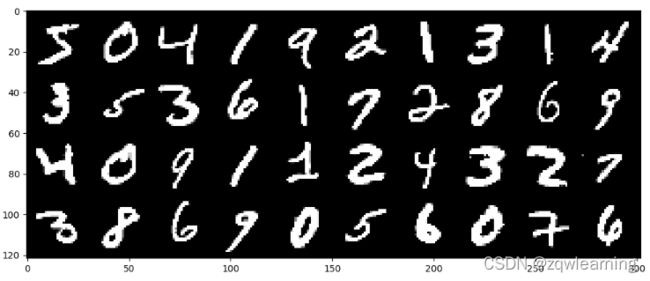
# 画出第一个批次的样本

grid = torchvision.utils.make_grid(images, nrow=10)  # make a grid of images (grid is a tensor)
plt.figure(figsize=(12,12))
plt.imshow(np.transpose(grid, (1,2,0))) # np.transpose permutes the dimensions
print(f'labels: {labels}')
labels: tensor([5, 0, 4, 1, 9, 2, 1, 3, 1, 4, 3, 5, 3, 6, 1, 7, 2, 8, 6, 9, 4, 0, 9, 1,
        1, 2, 4, 3, 2, 7, 3, 8, 6, 9, 0, 5, 6, 0, 7, 6])