前端切图仔跑路真经
一、闭包
谈到闭包,我们首先要讨论的就是作用域。
1、作用域: 是指程序源代码中代码定义的范围。规定了如何设置变量,也就是确定了当前执行代码对变量的访问权限。
JavaScript采用词法作用域,也就是静态作用域,就是在函数定义的时候,就已经确定了。
2、变量对象:
变量对象就是当前代码段中,所有的变量(包括变量、函数、形参argument)组成的一个对象。
变量对象是在执行上下文中被激活的,只有变量对象被激活了,在这段代码中才能使用所有的变量。
变量对象分为全局变量对象、局部变量对象。全局也叫VO,函数由于执行才被激活为AO。
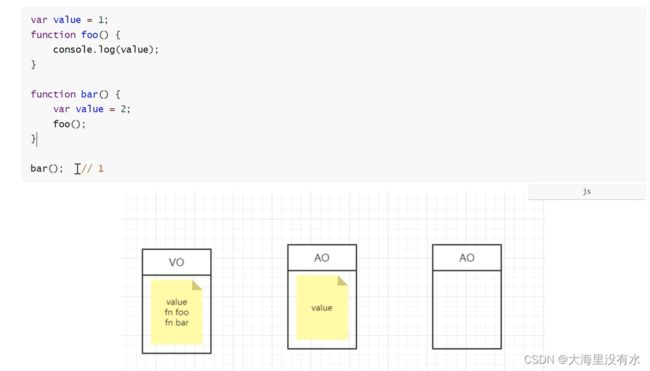
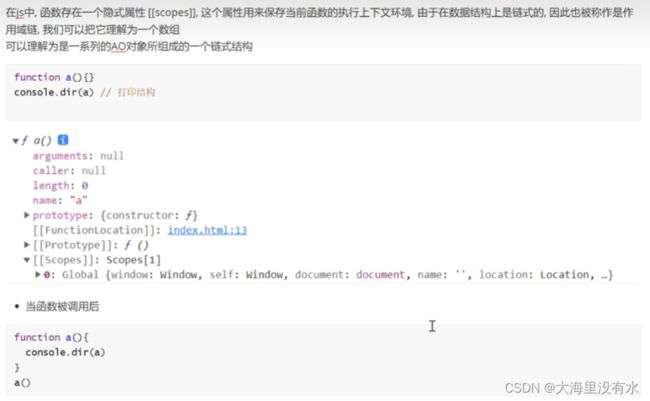
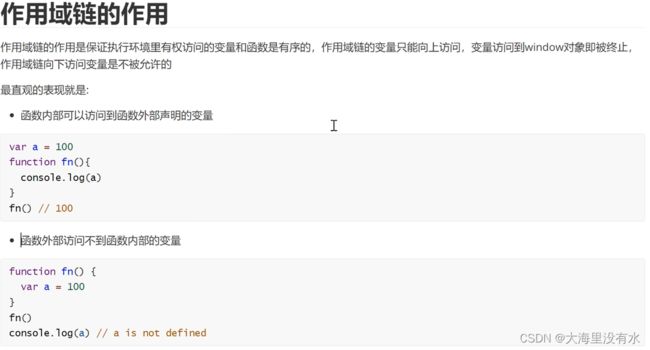
3、作用域链:

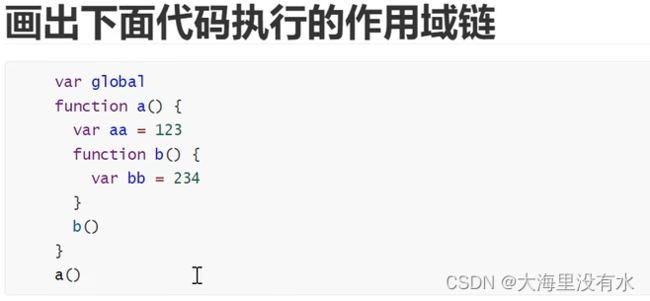


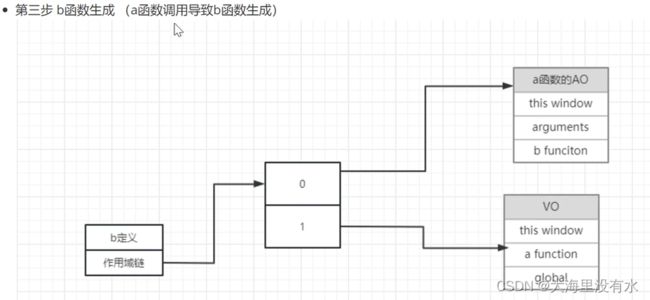

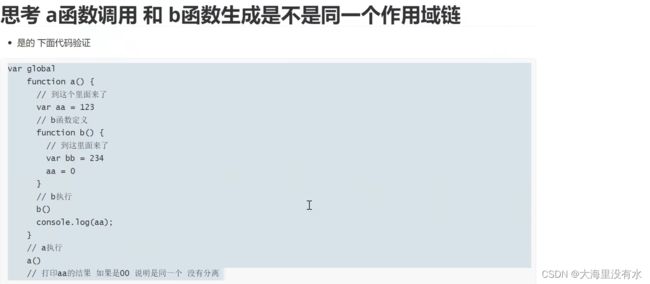

4、闭包的使用:
下面代码是闭包的定义:

a函数执行完之后,a函数作用域断裂销毁,b函数被return,b函数还能访问到a函数,是因为b函数在生成的时候时候也保存了一份a函数变量的引用。

小结:闭包产生的原因必须结合作用域链进行讲解。
5、闭包的实战应用:


防抖、节流、定时器传参

// 1、递归的方式实现
// 考察三个知识点:闭包、递归、全局变量
function add(n) {
  // 递归的出口
  if (!n) return res;
  res = n
  return function (n) {
    return add(res + n);
  };
}

add(1)(2)(); // 3
console.log('add(1)(2)(): ',add(1)(2)())
add(); // 函数的调用
二、深浅拷贝深层次理解
1、下面是复制举例,并不是浅拷贝(浅拷贝也是会创建一个新的对象的):
let obj = {
    name: '荒天帝'
}
let obj2 = obj
obj2.name = '石昊'
console.log('obj.name',obj.name) // 石昊
console.log('obj2.name',obj2.name)// 石昊
console.log(obj === obj2) // true
console.log( {} == {}) //false
注:浅拷贝拷贝基本数据类型,是将值复制一份;如果是引用类型,那就是拷贝的地址。
2、深拷贝实现
function deepClone(source) {
  if (source === null) return source;
  if (source instanceof Date) return new Date(source);
  if (source instanceof RegExp) return new RegExp(source);
  // 递归出口
  if (typeof source !== "object") return source;
  let obj = Array.isArray(source) ? [] : {};
  for (let i in source) {
    if (source.hasOwnProperty(i)) {
      obj[i] = deepClone(source[i]);
    }
  }
  return obj;
}

let person = {
    name: 'John',
    hobby: ['zhangsang', 'lisi'],
    date: new Date()
}
let deepPerson = deepClone(person);
deepPerson.name = '狠人大帝'
console.log('deepPerson',deepPerson)
console.log('person',person)
三、防抖节流
我是这么理解的:防抖就是回城,打断重来;节流就是技能cd
DOCTYPE html>
<html lang="en">
  <head>
    <meta charset="UTF-8" />
    <meta http-equiv="X-UA-Compatible" content="IE=edge" />
    <meta name="viewport" content="width=device-width, initial-scale=1.0" />
    <title>Documenttitle>
  head>
  <body>
    <input type="text" id="input" />
  body>
  <script>
    // 防抖函数
    function debounce(callback, delay) {
      let timer;
      return function (arg) {
        clearTimeout(timer);
        // 我们想清除的是setTimeout,我们应该存储这个timer的变量
        // timer变量需要一直保存在内存当中, 内存的泄露,这就要使用闭包了
        timer = setTimeout(function () {
            callback(arg);
        }, delay);
      };
    }
    function func(value) {
      console.log("value", value);
    }

    const input = document.getElementById("input");
    const debounceFn = debounce(func, 1000);
    input.addEventListener("keyup", function (e) {
        debounceFn(e.target.value);
    });
  script>
html>
DOCTYPE html>
<html lang="en">
  <head>
    <meta charset="UTF-8" />
    <meta http-equiv="X-UA-Compatible" content="IE=edge" />
    <meta name="viewport" content="width=device-width, initial-scale=1.0" />
    <title>Documenttitle>
  head>
  <body>
    <button id="button">点击button>
    <script>
      function throttle(func, wait) {
        let timerout;
        return function () {
          if (!timerout) {
            timerout = setTimeout(function () {
              func();
              timerout = null
            }, wait);
          }
        };
      }
      document.querySelector("#button").onclick = throttle(function () {
        console.log("节流 ", Math.random());
      }, 1000);
    script>
  body>
html>
四、登录验证
1、传统sessionId登录验证弊端, 解决:基于token身份认证方案


五、面试真题
1、this指向
function fn(a, c) {
  console.log("a", a); // a [Function: a]
  var a = 123;
  console.log("a", a); // a 123
  console.log("c", c); // c [Function: c]
  function a() {}
  if (false) {
    var d = 678;
  }
  console.log("d", d); // d undefined
  console.log("b ", b); // b  undefined
  var b = function () {};
  console.log("b ", b); // b  [Function: b]
  function c() {}
  console.log("c ", c); // c  [Function: c]
}

fn(1, 2);

// 分析:
/**
 * 1、创建了AO对象
 * 2、找形参和变量的声明,作为AO对象的属性名,值是undefined,实参和形参相统一
 * 3、找函数声明,会覆盖变量的声明
 */
AO: {
    a: undefined 1 function a() {}
    c: undefined 2 function c() {}
    d: undefined
    b: undefined
}
<!DOCTYPE html>
<html lang="en">
  <head>
    <meta charset="UTF-8" />
    <meta http-equiv="X-UA-Compatible" content="IE=edge" />
    <meta name="viewport" content="width=device-width, initial-scale=1.0" />
    <title>Document</title>
  </head>
  <body>
    <script>
      // 阿里真题
      var name = 222;
      var a = {
        name: 111,
        say: function () {
          console.log(this.name);
        },
      };

      var fun = a.say;
      fun(); // 222
      a.say(); // 111

      var b = {
        name: 333,
        say: function (fun) {
          fun();
        },
      };
      b.say(a.say); // 222
      b.say = a.say;
      b.say(); // 333
    </script>
  </body>
</html>

2、BFC

3、BFC解决margin塌陷问题
DOCTYPE html>
<html lang="en">
<head>
  <meta charset="UTF-8">
  <meta http-equiv="X-UA-Compatible" content="IE=edge">
  <meta name="viewport" content="width=device-width, initial-scale=1.0">
  <title>Documenttitle>
  <style>
    .father {
      width: 200px;
      height: 300px;
      background-color: blueviolet;
      overflow: hidden;
    }

    .son {
      width: 100px;
      height: 100px;
      background-color: red;
      margin-top: 50px;
    }
  style>
head>
<body>
  <div class="father">
    <div class="son">div>
  div>
body>
html>

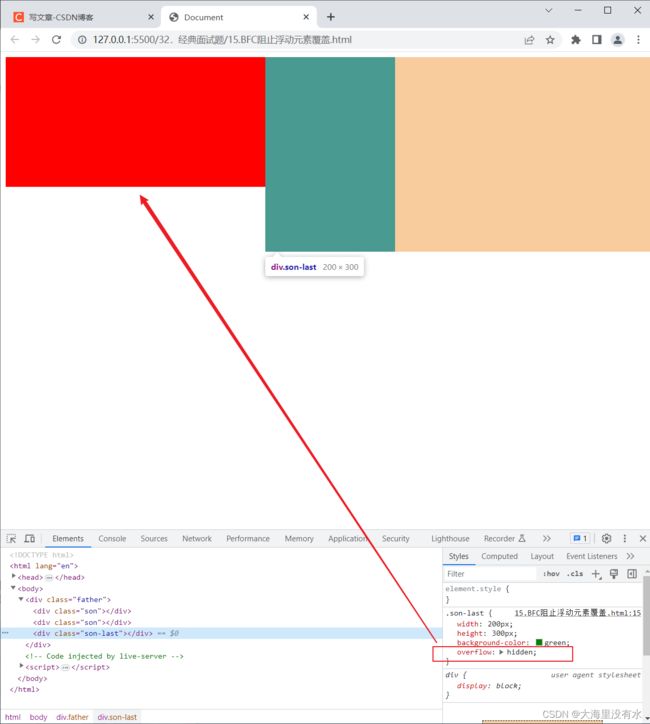
2、BFC阻止浮动元素覆盖
DOCTYPE html>
<html lang="en">
  <head>
    <meta charset="UTF-8" />
    <meta http-equiv="X-UA-Compatible" content="IE=edge" />
    <meta name="viewport" content="width=device-width, initial-scale=1.0" />
    <title>Documenttitle>
    <style>
      .son {
        width: 200px;
        height: 200px;
        background-color: red;
        float: left;
      }
      .son-last {
        width: 200px;
        height: 300px;
        background-color: green;
        overflow: hidden;
      }
    style>
  head>
  <body>
    <div class="father">
      <div class="son">div>
      <div class="son">div>
      <div class="son-last">div>
    div>
  body>
html>

4、数组去重:
const arr = [1, 2, 3, 4, 5, 6, 7, 8, 2, 3, 4, 5, 6, 7];
// 去重方式1:
function unique(arr) {
  // return Array.from(new Set(arr))
  return [...new Set(arr)];
}
console.log(unique(arr));

// 去重方式2:两次循环
function unique2(arr) {
  for (var i = 0, len = arr.length; i < len; i++) {
    for (var j = i + 1, len = arr.length; j < len; j++) {
      if (arr[i] === arr[j]) {
        arr.splice(j--, 1);
        len--;
      }
    }
  }
  return arr;
}
console.log(unique2(arr));

// 去重方式3:indexOf
function unique3(arr) {
  var array = [];
  for (var i = 0; i < arr.length; i++) {
    if (array.indexOf(arr[i]) === -1) {
      array.push(arr[i]);
    }
  }
  return array;
}
console.log(unique3(arr));

// 去重方式4: includes,去上面差不多
function unique4(arr) {
  var array = [];
  for (var i = 0; i < arr.length; i++) {
    if (!array.includes(arr[i])) {
      array.push(arr[i]);
    }
  }
  return array;
}
console.log(unique4(arr));

// 去重方式5: filter
function unique4(arr) {
  return arr.filter(function (item, index) {
    // indexOf(item, 0):表示在元素中第一次出现的索引值
    // indexOf查找值,只会找到第一次查到的索引值,后续有相同的值不会找出来
    return arr.indexOf(item, 0) === index;
  });
}
console.log(unique4(arr));
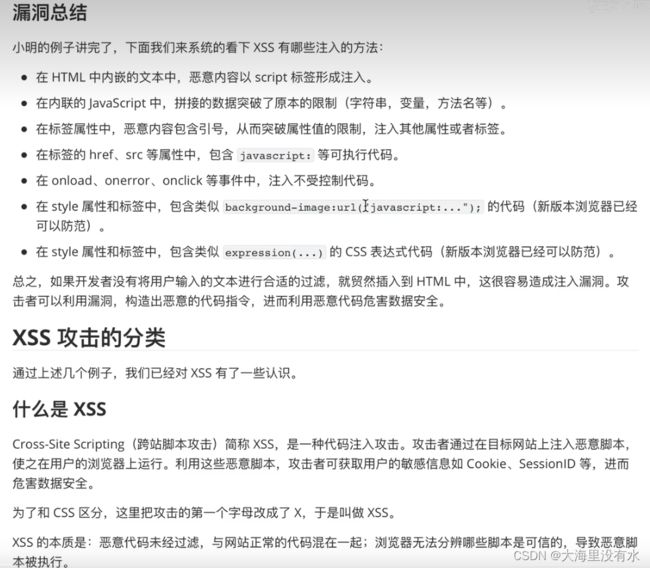
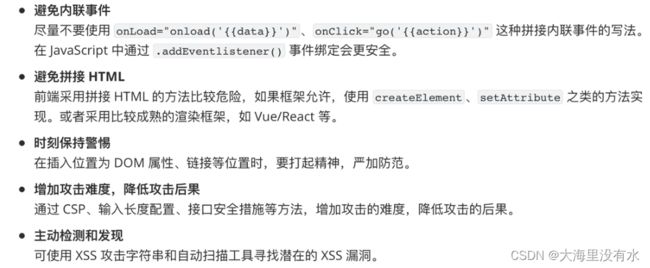
六、xss攻击
1. 什么情况下会产生xss攻击?
	a. 就是渲染html的时候,如果不做转义,会产生xss攻击。
	b. 在做a链接跳转的时候,即使做了转义,也会产生。


七、继承
1、原型链继承:
// 原型链继承
function Parent() {
  this.name = ["荒天帝"];
}

Parent.prototype.getName = function () {
  return this.name;
};

function Child() {}

// 子类的原型链指向父类的实例
Child.prototype = new Parent();
const child = new Child();

console.log(child.name); // [ '荒天帝' ]
console.log(child.getName()); // [ '荒天帝' ]

// 弊端:对某一个子类实例引用变量的修改,会影响到所有的实例
const child2 = new Child();
child2.name[0] = "独断万古";
console.log(child2.name); // 独断万古

const child3 = new Child();
console.log(child.name); //  [ '独断万古' ]
console.log(child3.getName()); // [ '独断万古' ]
2、构造函数继承:
// 构造函数继承:
//    在子类的构造函数中,需要执行父类的构造函数,并且为其绑定子类的this(其实就是改变this指向)

function Animals(name) {
  this.name = [name];
}
Animals.prototype.getName = function () {
  return this.name;
};
function Dog() {
  // 子类中调用父类的构造函数,直接使用Animals()调用就行
  Animals.call(this, "大黄");
}
const dog1 = new Dog();
const dog2 = new Dog();

dog1.name[0] = "小黄";
console.log(dog1.name); // [ '小黄' ]
console.log(dog2.name); // [ '大黄' ]

// 构造函数继承缺点: 继承不到父类原型上的方法和属性
dog1.getName(); // 报错
3、组合式继承:
// 组合式继承:解决原型链继承 和 构造函数继承缺点
function Car(name) {
  this.name = [name];
}
Car.prototype.getName = function () {
  return this.name;
};

// 构造函数继承
function BMW(name) {
  Car.call(this, name);
}

// 原型链继承
// BMW.prototype = new Car(); // 上面这样的写法,每次都创建一下,影响性能。直接指向父类的原型即可
// BMW.prototype = Car.prototype // 这么写,加在子类上的方法,父类也可以调用,我们需要使用一下浅拷贝、
BMW.prototype = Object.create(Car.prototype);
// 原型链的一个规则
BMW.prototype.constructor = BMW

const bmw1 = new BMW("宝马三系");
const bmw2 = new BMW("宝马五系");

bmw1.name[0] = '宝马7系'

console.log(bmw1.name); // [ '宝马7系' ]
console.log(bmw2.name); // [ '宝马五系' ]
console.log(bmw1.getName()); // [ '宝马7系' ]
八、发布订阅模式
$emit $on底层其实就是,还有pubsub.js。
1.可以实现组件之间的通信
2.可以实现跨组件传值
3.可以实现解耦
      // 定义发布者
      var showObj = {};
      // 有一个列表用来存放订阅者需要执行的回调函数
      showObj.list = [];

      // 增加订阅者
      showObj.listen = function (key, fn) {
        if (!this.list[key]) {
          this.list[key] = [];
        }
        this.list[key].push(fn);
      };

      // 发布消息
      showObj.trigger = function () {
        // 去除key
        var key = Array.prototype.shift.call(arguments);
        var fns = this.list[key];
        if (!fns || fns.length === 0) {
          return;
        }
        // 遍历这个数组,然后执行这个函数
        for (var i = 0, fn; (fn = fns[i++]); ) {
          fn.apply(this, arguments);
        }
      };

      // 1、进行订阅
      showObj.listen("red", function (color, size) {
        console.log(`颜色是${color}, 尺码是${size}`);
      });
      showObj.listen("black", function (color, size) {
        console.log(`再次打印颜色是${color}, 尺码是${size}`);
      });
      // 2、进行发布
      showObj.trigger("red", "红色", 38);
      showObj.trigger("black", "黑色", 41);
九、Proxy
1、使用Object.defineProperty实现简易双向绑定:
DOCTYPE html>
<html lang="en">
  <head>
    <meta charset="UTF-8" />
    <meta http-equiv="X-UA-Compatible" content="IE=edge" />
    <meta name="viewport" content="width=device-width, initial-scale=1.0" />
    <title>Documenttitle>
  head>
  <body>
    <input type="text" id="input" />
    <p id="p">p>
    <script>
      const input = document.querySelector("#input");
      const p = document.querySelector("#p");
      var obj = {};
      Object.defineProperty(obj, "name", {
        set: function (val) {
          input.value = val;
          p.innerHTML = val;
        },
        get: function () {
          return val;
        },
      });

      input.addEventListener("input", function (e) {
        obj.name = e.target.value;
      });
    script>
  body>
html>
2、使用Proxy实现双向绑定:
DOCTYPE html>
<html lang="en">
  <head>
    <meta charset="UTF-8" />
    <meta http-equiv="X-UA-Compatible" content="IE=edge" />
    <meta name="viewport" content="width=device-width, initial-scale=1.0" />
    <title>Documenttitle>
  head>
  <body>
    <input type="text" id="input" />
    <p id="p">p>
    <script>
      const input = document.querySelector("#input");
      const p = document.querySelector("#p");
      var obj = {};
      let newProxy = new Proxy(obj, {
        get: (target, key, recevier) => {
          return Reflect.get(target, key, recevier);
        },
        set: (target, key, value, recevier) => {
          // 监听newProxy是否有新的变化
          if (key === "text") {
            p.innerHTML = value;
          }
          return Reflect.set(target, key, value, recevier);
        },
      });

      input.addEventListener("keyup", (e) => {
        newProxy.text = e.target.value;
      });
    script>
  body>
html>
3.proxy表单验证
// proxy set get 的应用: proxy实现表单验证
// 验证规则
const validators = {
  name: {
    validate(value) {
      return value.length > 6;
    },
    message: "用户名长度不能小于6",
  },
  password: {
    validate(value) {
      return value.length > 10;
    },
    message: "密码长度不能小于10位",
  },
  mobile: {
    validate(value) {
      return /^1(3|5|7|8|9)[0-9]{9}$/.test(value);
    },
    message: "手机号码格式错误",
  },
};

// 验证方法
function validator(obj, validators) {
  return new Proxy(obj, {
    set(target, key, value) {
      const validator = validators[key];
      if (!validator) {
        target[key] = value;
      } else if (validator.validate(value)) {
        target[key] = value;
      } else {
        console.log(validator.message || "");
      }
    },
  });
}

let form = {};
form = validator(form, validators);
form.name = "1111111";
form.password = "password";